
This guide provides a general overview of the components needed to run EMERSE, how to install them, and how to verify that they are running. The guide covers step-by-step directions on how to install everything on a Linux server.
For this guide we provide three already created Solr indexes to use as well as SQL scripts to create the database schema and populate it with sample data. An actual production instance would require the creation of the Solr indexes, populating the patient table, and additional localized configurations dependent on document sources and metadata. Nevertheless, this guide should provide enough detail to understand how everything is installed and provides the ability to test the final installation to ensure that it is functional.
If you run into trouble, we recommend that issues get posted to our Discourse Message Forum so that they can be available to all of our developers as well as the larger EMERSE community. The forum is also a good place to search for issues that may have already been addressed.
We’ll start with a general discussion of the components of EMERSE, the sizing of things for a production environment, then move onto more specific requirements, and the steps to set up the demo system, which is the main thing this guide covers. Once the demo system is set up, you can then alter the configuration to match what you want in production.
Introduction
There are different ways to set up EMERSE, but at UM, we have two physical servers: a database server, and an application server. The database server just runs the database service, while the application server runs Apache httpd, Solr and Tomcat. Apache httpd acts as a reverse proxy to Tomcat. Tomcat is the web application container, which is loaded with our software, EMERSE. Solr is the search engine underlying EMERSE, and as such, Solr it’s loaded with medical documents which it stores as a search index on disk on the application server.
The search index is very large. It has two main parts: a collection of index structures to make search fast, plus a document store which stores the document exactly as-is so it can be viewed in EMERSE. We have 440 million documents (of around 5 million patients) in our search index, which takes of 5.5 TB of disk space. That’s 12.5 KB of disk space per document. However, that’s just an average, as some documents are only a few sentences long, while others have embedded images in them that make them very large. So, to estimate the size for your installation, it’s probably better to use the size of the text (ignoring images). I would plan for the index to be 5 times the size of the text. We see an increase of around 4 times, but it’s good to have a little extra room. If you embed images into the documents, you can add that onto the index size. They aren’t stored in the index structures but are stored in the document store.
The EMERSE database stores user’s data related to using EMERSE itself, such as searches, patient lists, an audit-trail of users activities in EMERSE. The audit-trail can become quite large in disk usage, but most other data is relatively small. Thus, database size is determined more by users and usage. It should be safe to start with a 10 GB or 50 GB database, and then expand as needed. Our database at UM is currently about 70 GB, which is from around 6,000 over 12 years of usage. (Not all users were using EMERSE over that entire time.)
The physical database server itself does not need to be very large, as we don’t hit the database very heavily, but there can be issues with its performance. Those problems are usually peculiarities to a particular vendor of database rather than truly heavy usage. For instance, we’ve seen MS SQL Server perform very slowly on large numbers of parameters in insert statements, but other vendors have no problems.
For the application server, we have 32 CPUs, and 64 GiB of memory. The machine is so large because our search index is so large. Solr’s performance is mostly bound by IO performance, we have a directly attached disk to the server, not network SAN or anything like that. This is important pretty much no matter the index size unless much of the index can fit into memory. However, you can still do network attached storage or other slower options; it won’t affect performance so much that direct attached storage is a necessity.
Besides the hardward and software that is needed to run EMERSE itself, you also need some ETL software to load data into the EMERSE database and medical records into Solr. We generally call this the data pipeline. We don’t provide software for this, as it’s the piece that connects your institutions sources of data with the EMERSE installation, and so would vary significantly from institution to institution. There are main two things you need to load:
-
patients into the EMERSE database, and
-
medical records into Solr.
We don’t cover the data pipeline in this guide, so for more information on it and how to build one for your institution, look at the integration guide.
Supported Operating Systems
EMERSE is mainly tested on enterprise Linux systems (RHEL and SUSE), so we recommend these or their open source equivalents. Windows based platforms should work as well, provided they are recent enough to have quality Java releases, as EMERSE and most of the components run within a Java Virtual Machine.
Planning
Personnel
To install EMERSE, someone with sys admin skills is desirable. This person should be able to install and configure software, edit database tables, etc. No actual programmer experience is needed for a default installation and configuration of EMERSE. Knowledge of servers, Java, Linux, and Apache software will be useful skills for this installation.
Timelines
The initial setup described in this guide can probably be done in a day or less. More time will be required for additional customizations and planning related to localized needs, document extraction and indexing, regulatory approval, etc.
Server and Storage
A Linux/Unix based server is suggested for installing the application server and for hosting the indexing services. No specific type of storage is required, but in general the server should be connected to the highest speed storage available. EMERSE performs a lot of disk reads to retrieve the documents, so read performance is important. We have conducted some experiments using SSD storage and have found it to provide nearly a two-fold increase in system performance for EMERSE, most noticeably in the area where all documents are retrieved and highlighted for a pre-defined set of patients.
Database Sizing
EMERSE doesn’t place great demand on the Oracle database, so a relatively small server can be used with 10-50 GB of storage allocated for user tablespaces. While no longer up-to-date, at one point at Michigan Medicine we were using 70 GB of database space for production EMERSE with 6,000+ users and 12 years of data (audit logs, user settings, etc).
Server setup
For a production install of EMERSE you will probably want to set up a Linux server based on whatever local options are available. For the purposes of this install guide, a desktop Fedora Linux machine was used to carry out the steps.
Component Installation
The remainder of this guide covers the process of installing and configuring the application server where the EMERSE application will be deployed. Specifics for installing each of these components follows.
| For some of the commands shown in this guide, specific version numbers will be shown as examples. Depending on the software component, the version number you download and install may differ from these examples. Make note of these potential differences when executing the instructions on the command line to ensure that they work successfully. |
Also note that most of these directions are directed at a Linux installation, but we have provided some details for Windows for those interested in trying to install EMERSE on a Windows server.
For the purposes of this installation guide, all components will be stored in a directory called /app. In reality it can be any directory, but for consistency they will go here in this guide.
| Name | Version | Description | Download URL |
|---|---|---|---|
Java JDK |
21 |
Java Development Kit/SDK (JDK) |
|
Apache Tomcat |
10.1.42+ |
Java Servlet Engine |
|
Apache Solr |
9.7.0 (or higher, but not a major version higher) |
Indexing/Information Retrieval System |
|
Relational Database |
10.3 or higher |
Many databases work with EMERSE; we will use this MariaDB since it’s easy to install on linux. |
|
EMERSE WAR file |
latest version |
EMERSE Web Archive File (WAR file) deployment and configuration |
https://github.com/project-emerse/emerse/releases/ You must log in to GitHub.com and be grated access to EMERSE, otherwise this page will appear as a 404. Contact the EMERSE team for access to the GitHub repository. |
Java
The first step in installing EMERSE is to download and install a Java Development Kit (JDK) on the server. Java 21 or higher is required because it was compiled under that version.
Operating Systems often include a Java runtime, and is available on the PATH variable. We will use the java available from the linux distribution’s package manager, and install it like so:
sudo dnf install java-21-openjdk
# Confirming installation:
java --version
The latter command should print out the java version installed, and confirms that Java is on the path.
Apache Tomcat
EMERSE is packaged as a Java based WAR file that will be deployed to the Tomcat Servlet engine. Tomcat depends on a Java JDK. Tomcat version 10 is required. The Tomcat download page lists a number of components available for download. Only the "Core" software is required. See Required Software section.
We’ll navigate to the apache website and click on the "tar.gz" link under the "Core" bullet point. This should download apache from a mirror near you. Then unzip the in the /app directory:
cd /app
tar zxf ~/Downloads/apache-tomcat*.tar.gz
# Let's rename the directory to just "tomcat" for simplicity
mv apache-tomcat* tomcat
Let’s start tomcat to confirm it works:
/app/tomcat/bin/catalina.sh startOpen a browser and navigate to http://localhost:8080/. A Tomcat welcome screen should appear.
To stop Tomcat, you just need to do:
/app/tomcat/bin/catalina.sh stop(Though you don’t need to stop Tomcat now.)
Apache Solr
EMERSE leverages Apache Solr for searching documents. See Required Software section for the specific version to use. The Solr version should have the same major version as specified in our documentation, and a minimum of the minor version. Otherwise, the sample indexes provided may not be usable, and EMERSE may not function.
Navigate your browser to https://solr.apache.org/downloads.html and download the latest .tgz BINARY release of Solr. You can use the "slim" binary release, as we don’t use any of the additional modules packaged in the non-slim version. We’ll expand it under /app and rename it, just like tomcat:
cd /app
tar zxf ~/Downloads/solr*.tgz
mv solr* solr
Let’s start solr to confirm it’s installed correctly:
/app/solr/bin/solr startand then navigate your browser to http://localhost:8983/solr/. You should see the Solr admin tool dashboard.
Maria Database
A database is needed for EMERSE. For the purposes of getting started, we’ll use the MariaDB database, since it’s often installable using Linux package managers.
sudo dnf install mariadb-serverDatabase servers are often configured to be automatically started up as a "service" when the computer is booted. Different Linux systems do this different ways, but the most common, especially for Red Hat systems, is systemd. For Fedora, this looks like:
# Enable the service so it starts at boot:
sudo systemctl enable mariadb
# Start it right now:
sudo systemctl start mariadb
If you don’t want it started at boot, don’t "enable" the service. It can be started while "disabled."
To confirm it’s running, run the mariadb command, which attempts to connect to the database:
mariadbYou should either get a command prompt for the database, or a permission error, such as "Access denied for user…" You should not get an error saying it cannot get to the server, or cannot find a file named mysql.sock or a similar name.
EMERSE Install and Initial Configuration
From here on out, you’ll start installing software developed here at Michigan Medicine. Our software, along with SQL install scripts, and related files are all stored in our private EMERSE project page on GitHub. To access this repository and hence the rest of the installation materials, please contact the EMERSE team and provide us with your GitHub ID.
All installation files are "assets" on release pages of the EMERSE project. All the files necessary to install EMERSE (or upgrade it from the previous version) are provided for each release starting with 6.5.0, with the exception of the sample Solr indexes, which will be referenced here.
Solr indexes
Download a zip of the solr indexes from this link. These indexes are populated with sample data to help with testing the initial setup and configuration.
The documents index stores all the documents that EMERSE can search. A document is comprised of fields, each field holding a numeric, date, or textual value. In particular, one field, usually named RPT_TEXT stores the text of the document, while other fields store "metadata" about the document, such as the MRN of the patient, a unique identifier for the document, the encounter date, etc.
The sample indexes we provide contains PubMed abstracts and open access case reports (containing no protected health information).
The patient index stores a copy of the PATIENT table in the EMERSE database, which is a list of all patients with basic demographic data, such as birth date, race, marital status, etc. EMERSE will copy the PATIENT table to the patient index once a night.
We’ll create a solr home directory under /app/indexes:
cd /app
mkdir indexes
cd indexes
unzip ~/Downloads/solr-indexes-7.1.0.zip
Once this is done, your directory structure should look like:
/app/indexes/solr.xml
/app/indexes/lib
/app/indexes/documents
/app/indexes/patient
Next, we’ll stop Solr, and start it back up, specifying the Solr home directory as /app/indexes so it reads these indexes:
/app/solr/bin/solr stop
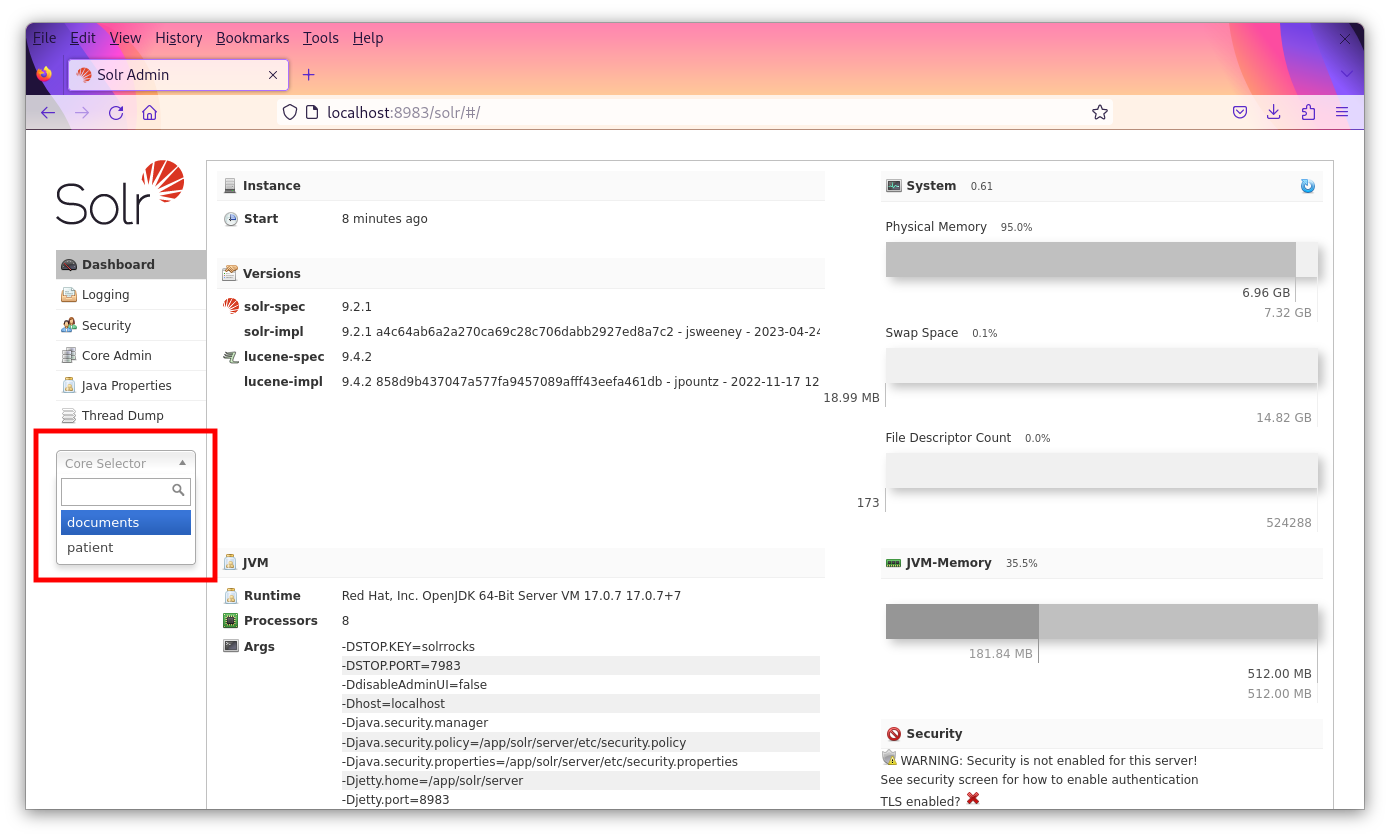
/app/solr/bin/solr start -s /app/indexesYou should be able to navigate to http://localhost:8983/solr/ again and see two cores in the "Core Selector" dropdown on the left side of the screen. There should be no red banner at the top describing an error.
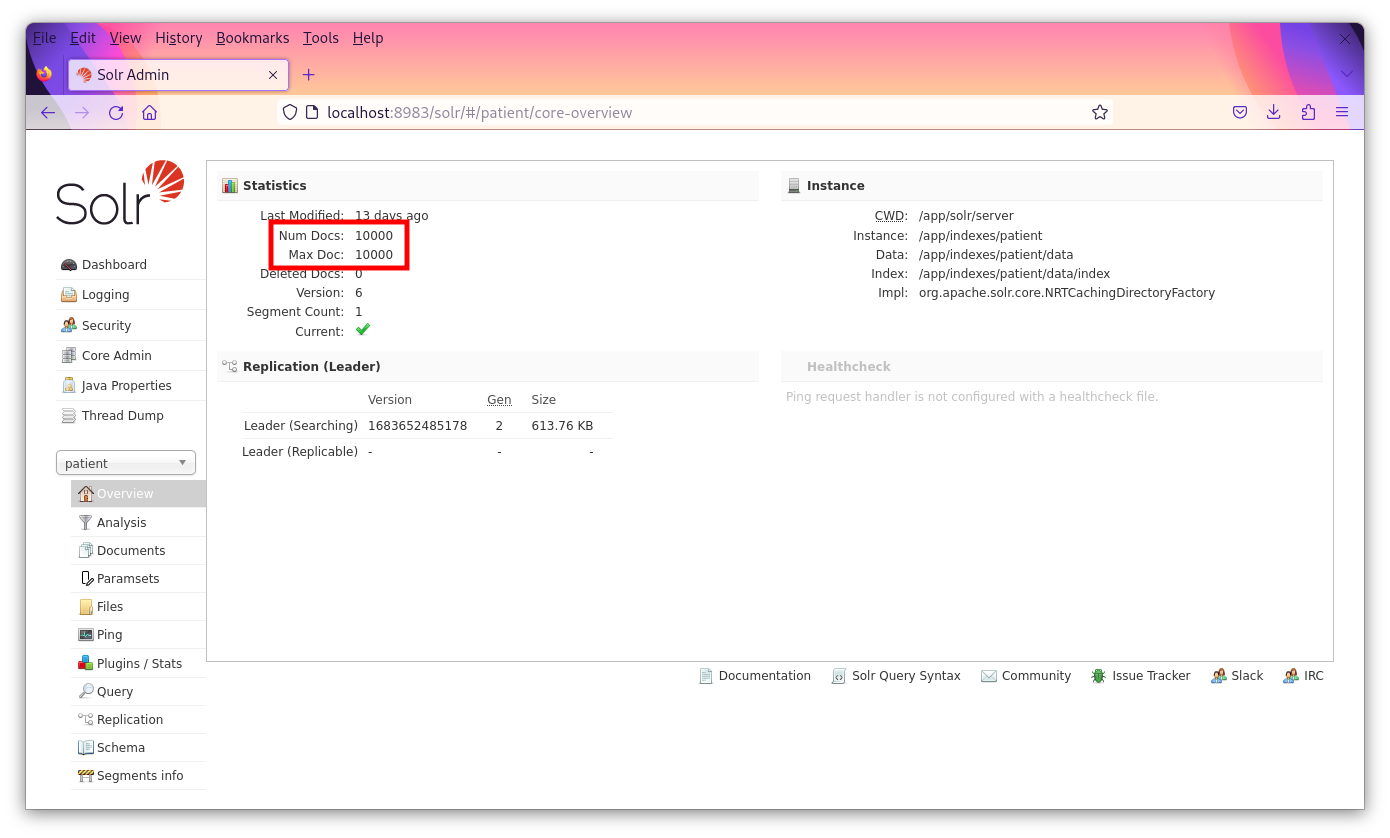
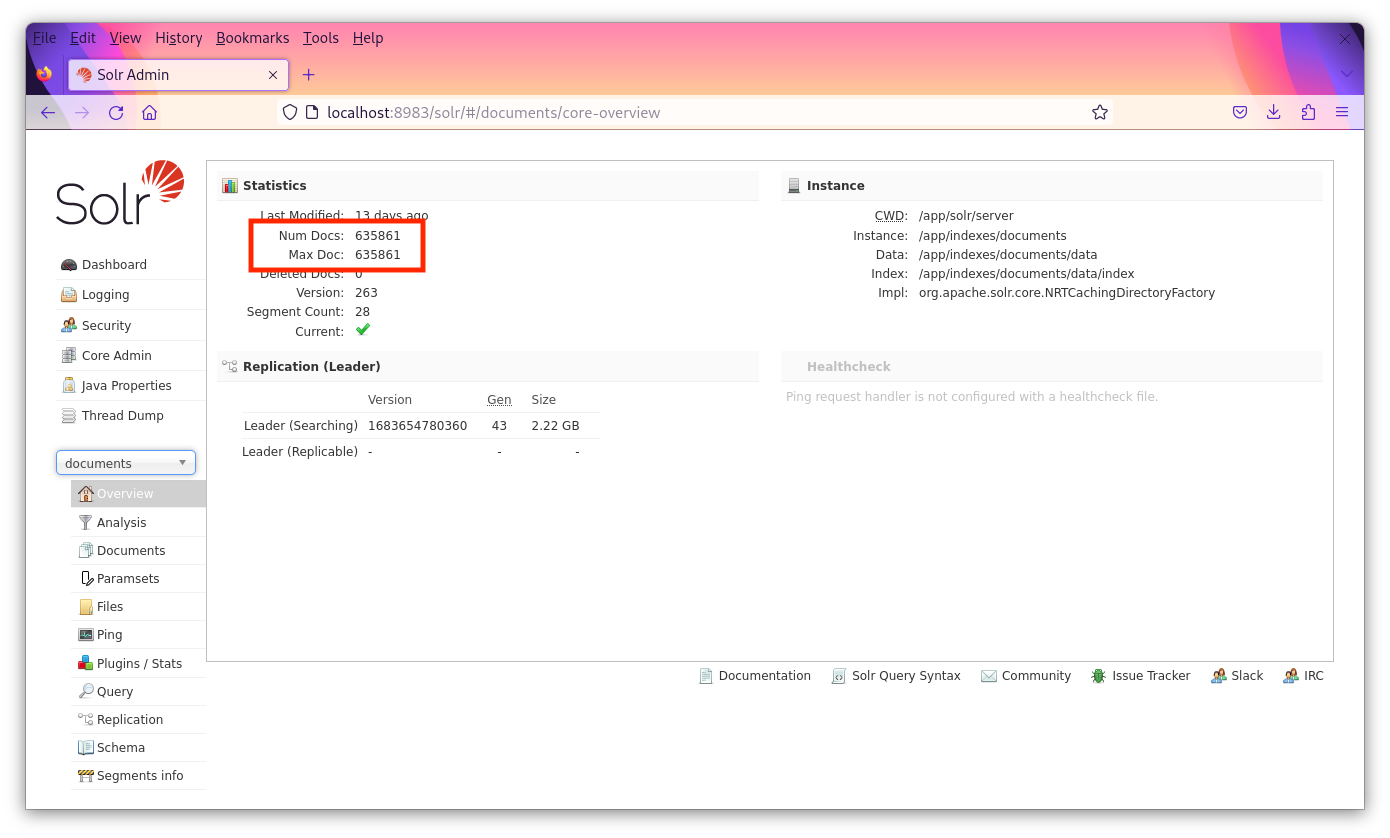
Select each core to verify that the proper counts are there. For the documents core there should be 635,861 documents. For the patient cores, there should be 10,000 "documents" (each representing a patient). It’s okay if the "Max Doc" field is not the same as the "Num Docs" field in the admin panel.
We can put settings to configure Solr (such as the -s /app/indexes) in a script, so it’s easy to remember. In our case setting the environment variable SOLR_HOME is equivalent to passing -s. Let’s create a directory /app/bin and put a file solr in there:
mkdir /app/bin
# create the file
touch /app/bin/solr
# make the file executable
chmod +x /app/bin/solr
The contents of the file should be:
#!/usr/bin/env bash

export SOLR_HOME=/app/indexes
export SOLR_HEAP=2g

/app/solr/bin/solr "$@"
Database initialization
Provided with the EMERSE distribution are a set of files, each containing SQL statements, that create all needed database objects and sample data that will allow the EMERSE application to startup with a default set of database objects, and sample data in the patients, research studies, synonyms and tables. *These scripts should be run as the user and schema setup for the EMERSE application (this will be set by each implementing site) We recommend a schema named emerse. The account doesn’t require a DBA role but needs to be able to create database objects such as tables, indexes, sequences and views.
To run these scripts, we need to create a user and schema for EMERSE. To do that, we need to login to the database as a privileged user. That depends on how the database is set up during installation, which if you installed MariaDB from the Linux distribution package manager, that depends on how they chose to set it up. Thus, you will have to consult the documentation from the Linux distribution on how to login to MariaDB. For Fedora Linux, we merely need to become root user, and issue the mariadb command. Usually either the mariadb or mysql command is used to connect to the database.
sudo su -
mariadb
Once we are connected as a privileged user, we should create the emerse user with password "demouser" and emerse schema (called a "database" in MariaDB parlance) by giving the following commands to the database in the mariadb / mysql commandline:
create user emerse identified by 'demouser';
create database emerse character set = 'utf8mb4' collate = 'utf8mb4_bin';
grant all privileges on emerse.* to emerse;| It’s important to make sure the collation is case-sensitive. Default collation in MariaDB is case-insensitive, which is why we set it explicitly. |
To check that this has been done correctly, login to the bash shell as yourself again (not root), and try:
mariadb emerse -u emerse -pand type the password "demouser". (You may need to use mysql as the command; it’s usage is exactly the same.) This should grant you access to the MariaDB sql commandline. Whenever we need to run sql, you should login to the database using this command, or a similar one.
Go back to the EMERSE GitHub 7.1.0 release page, and download the following files:
-
fresh-install-7.1.0.mariadb.sql
Different databases need different sql scripts. Other database should work, but we will need to generate scripts for you. If you are installing on such a database, please email us and we can upload a script for you.
To run this file against our emerse database, connect to the database with the --abort-source-on-error flag, then source the downloaded script using the source command, plus the filename, like so:
mariadb emerse -u emerse -p --abort-source-on-error
# inside the mariadb connection:
source ~/Downloads/fresh-install-7.1.0.mariadb.sql
You’ll have to type the password "demouser" before you can issue the source command.
To confirm everything was installed correctly, then run the show tables command, which should list all 111 tables.
show tables;EMERSE Configuration
EMERSE is configured by primarily one file, emerse.properties. This file tells EMERSE how to connect to Oracle, Solr, and LDAP (if using). It also has additional internal configuration or presentation information such as your local contact email for your users.
Go back to the GitHub release page for version 7.1.0 and download the following files:
-
emerse.properties
After downloading, move the properties to /app/etc/.
mkdir /app/etc
mv ~/Downloads/emerse.properties /app/etc/
Next, we need to tell Tomcat to tell EMERSE where this file is. We can do that by setting some environment variables, much like for our Solr start script:
#!/usr/bin/env bash

export CATALINA_OPTS="$CATALINA_OPTS -Demerse.properties.filepath=/app/etc/emerse.properties"

/app/tomcat/bin/catalina.sh "$@"
You will need to make some changes to the emerse.properties file to reflect your installation properties such as the URL of the database. Information on configuring EMERSE application properties is located in the Configuration Guide.
For our installation, we need to replace the following lines in emerse.properties
ds.url=jdbc:oracle:thin:@localhost:1521/orclwith:
ds.url=jdbc:mariadb://localhost:3306/emerseFor different databases, you will need to look up the JDBC url and provide it for the value of ds.url.
WAR file installation
The next step in getting EMERSE up and running after initial installation of the application server and configuration of the database with default settings is to deploy the EMERSE WAR file.
Go to the latest EMERSE release page (currently here) and download the emerse.war file.
Install that into Tomcat by moving it into the webapps directory:
mv ~/Downloads/emerse.war /app/tomcat/webappsWe also need to download the JDBC database driver. For MariaDB, download the latest stable version here. (For MariaDB, they named the driver "Connector/J".) Their website has a lot of steps; you want to look for the "jar" packaging without sources. The file name should look like mariadb-java-client-VERSION.jar.
We’ll move the driver into the tomcat lib directory so it’s available to EMERSE:
mv ~/Downloads/mariadb-java-client-*.jar /app/tomcat/lib/Once both emerse.war and the correct database driver are installed into Tomcat, you should be able to restart tomcat and navigate to http://localhost:8080/emerse/ and see the login screen.
/app/bin/tomcat stop
/app/bin/tomcat start
You can login as the user emerse with the password demouser. (This account is completely different than the database account, but we use the same username and password so there’s less to remember.)
If the EMERSE application does not come up, check the tomcat logs at /app/tomcat/logs/catalina.out or at /app/tomcat/logs/localhost.*.log.
If you see in the log file it complaining that it can’t find the driver, you can try to force it by adding the following line in /app/bin/tomcat below the other export line:
export CATALINA_OPTS="$CATALINA_OPTS -Djdbc.drivers=fully.qualified.driver.ClassName"You can find the fully qualified driver classname with the following command:
unzip -c /app/tomcat/lib/your-db-driver.jar META-INF/services/java.sql.DriverIt should look like this for instance:
mcclaink@mac-f99y7w4k5f ~/l/a/lib> unzip -c mssql-jdbc-12.6.3.jre11.jar META-INF/services/java.sql.Driver
Archive:  mssql-jdbc-12.6.3.jre11.jar
  inflating: META-INF/services/java.sql.Driver
com.microsoft.sqlserver.jdbc.SQLServerDriver
It’s the com.microsoft.sqlserver.jdbc.SQLServerDriver line that is the fully qualified class name of the driver. This should force Java to load that driver.
Further testing
To test the installation a bit futher, login and try a search:
-
Choose any button or type something in to get past the Attestation page.
-
Enter "chest pain" in the Add Terms Box and press Find Patients.
-
Click on the button Move patients to Temporary Patient List
-
Click the Highlight Documents button
-
Click on a cell on the Overview page to see a document with the term "chest pain" highlighted on the following Summaries page.
-
Click on a Summary to open up an actual document with the term "chest pain" highlighted.
At this point, if everything worked, it’s is a very good indication that EMERSE is running well.
Setting startup scripts
While not necessary, it can be helpful to have the system startup every time the server is started or rebooted, rather than entering the startup commands for each component every time.
First, make sure the database starts up on boot:
sudo systemctl enable mariadbThis command depends on your distribution and how you installed the database.
Now add that startup script to a crontab. To create the file, type:
crontab -eIf you have followed the directions outlined in this document and installed Redhat Linux, it may open up the file using the vi editor. If so, type i for insert, then type one line as follows:
@reboot /app/bin/tomcat start
@reboot /app/bin/solr start
Then, to save the file, type esc [escape] and then :wq and enter to close and save the file. To verify that the crontab is there, type
crontab -lIt should show those two lines. At this point, restarting the server should allow all of the required components to startup automatically.
Adjustments for Production
You may need to increase the memory used by Tomcat and Solr for production. In the /app/bin/tomcat script, add the line:
export CATALINA_OPTS="$CATALINA_OPTS -Xmx2g"This will set the maximum heap size to 2 GB. You may need more or less, but 2 GB is generally the minimum. The JVM will automatically setup the maximum based on total memory on the system, but sometimes this is too much, or too little.
Add the below line to /app/bin/solr:
export SOLR_HEAP="4g"This will set solr’s heap size to 4 GB, which is a good initial size.
Generally, if you have x GB of memory on the system, 2 GB should be for Tomcat, x/2-2 GB should be for Solr, and the rest should be "free" so that the operating system can use it as a file cache. Solr uses memory-mapped files which don’t count towards Solr’s memory footprint (at least as the JVM heap). Instead, the OS uses free memory in the system to cache the files. The memory used for caching files is "free" in the sense that the OS could repurpose it at any time since the contents of the that memory is just the contents of a file on disk, but there’s a big performance difference between reading from memory and reading from disk, which is why we want a lot of "free" memory to be available for caching disk files.
Obviously the formula x/2-2 could produce a very small (or negative number) if total system memory is low. You probably need at least 4 GB for Solr, and 2 GB for Tomcat, but you may need more for both. Look at the JVM check on the diagnostics page (http://localhost:8080/emerse/diagnostics.html) for a better clue as to how much more memory you might need for Tomcat. Look at the Solr admin’s Dashboard page to get a sense of how much Solr is using. You generally want 1 GB of free memory in both, especially after using the system extensively.
Customizing EMERSE
Once an initial implementation is complete, local customization work will need to be done including identifying document sources, proper indexing with metadata in Solr, and other configurations related to document display in EMERSE.
At a high level, you’ll have to:
-
Gain access to patient demographic data such as name, date of birth, sex, race, etc. We’ll use these data to fill the PATIENT database table.
-
Build a process to pull in patient data into EMERSE’s PATIENT table as patient data is added or changed.
-
(Optional) Since users may use EMERSE as part of a research study, it would make sense that they could attest to using EMERSE for their research study on EMERSE’s attestation page. To enable this, you will need to gain access to the research studies at your institution, and build a process to load them into the RESEARCH_STUDY table and related tables in the database. This is an optional step, as users can record a more generic reason, or free-write a reason on the attestation page.
-
Gain access to the free text patient notes. There may be multiple systems storing patient notes. EMERSE can be loaded with all of them.
-
Decide on the schema of Solr documents used to store patient notes. This means what field names are you going to use, and are these fields going to store dates, text, or some other metadata (such as note type, clinical department, etc).
-
Update the schema in your Solr index to reflect your decisions.
-
Use the Admin UI to update fields defined in EMERSE. These fields match the Solr fields, but they have additional information such as a display name, and where to display them in EMERSE. Filters can also be defined here, but it’s better to do that after loading documents into Solr. (See below.)
-
Build a process to push (or pull) patient notes into Solr, as new notes are created, and old notes are amended or corrected.
-
Load documents into Solr.
-
Use the Admin UI to define filters on your fields. This usually involves querying the actual documents loaded into Solr to see what values they have for each field.
You’ll probably have your patient demographic data and patient notes in a database, but you could also have a "feed" of notes or other events, such as HL7 messages, sent to you over a message queue or pubsub system. If your best access is the feed, we recommend you store the messages into a database for EMERSE, since EMERSE will require you to re-index all documents on certain major upgrades. In those cases, pulling from a database is often easier or faster than getting the HL7 feed to be replayed, or extracting the stored documents out of the old instance of Solr to be indexed into the new instance.
EMERSE has a concept of a source. A source isn’t defined by where documents come from, per se, though often it has some connection to that (for example, sources can be the primary EHR system, the pathology system, a radiology system, other legacy systems, etc). Instead, each source defines the set of fields for its documents, so if you have two documents with different sets of fields, they should be labeled with different sources. Of course, it is also possible for some documents labeled with one source to not use certain fields, or use certain fields differently, however sources are meant to mitigate this usage, since it can be misleading, or lead to very generic labels for fields which may be unhelpful. It’s up to you to decide how to organize documents into EMERSE’s sources.
For the purpose of this guide, let’s suppose we have our documents and patients stored in a database, and there are three sources of documents:
-
Encounter Notes
-
Radiology Reports
-
Pathology Reports
And suppose we have this hypothetical warehouse in which these documents are stored:
create table PROVIDER (
  ID     bigint primary key,
  NAME   varchar(128)
);

create table PROCEDURE (
  ID       bigint primary key,
  NAME     varchar(128),
  CATEGORY bigint,
);

create table ORDERED_PROCEDURE (
  ID          bigint primary key,
  PROC_ID     bigint foreign key PROCEDURE (ID),
  PAT_MRN_ID  varchar(20),
  AUTHORIZING_PROV_ID  bigint foreign key PROVIDER (ID),
  CSN                  bigint,
  RESULT_STATUS        varchar(24),
  RESULT_DATE          datetime,
  REPORT_DATE          datetime,
  UPDATE_DATE          datetime
);

create table IMPRESSION (
  ORDERED_PROC_ID bigint not null foreign key ORDERED_PROCEDURE (ID),
  LINE_NUM smallint not null,
  LINE varchar(1024),
  primary key (ORDERED_PROC_ID, LINE_NUM)
);

create table NARRATIVE (
  ORDERED_PROC_ID bigint not null foreign key ORDERED_PROCEDURE (ID),
  LINE_NUM smallint not null,
  LINE varchar(1024),
  primary key (ORDERED_PROC_ID, LINE_NUM)
);

create table ENCOUNTER (
  ID bigint primary key,
  PAT_MRN_ID  varchar(20),
  AUTHORIZING_PROV_ID  bigint foreign key PROVIDER (ID),
  CSN                  bigint,
  ENCOUNTER_DATE       datetime,
  UPDATE_DATE          datetime,
  ENCOUNTER_TYPE       varchar(128),
  TEXT                 mediumtext
);
Encounters are stored entirely in the ENCOUNTER table, containing a clob of the entire report. Both ordered procedures and encounters reference providers by a foreign key. We have a set of procedures grouped into categories, which is how we’ll distinguish between radiology and pathology reports. If a procedure is ordered, it can have an impression or narrative or both. Those tables split the text for a single ordered procedure across many rows, ordered by the LINE_NUM column.
Obviously, real systems would hopefully have a more rational organization of data.
Clearing out Demo Data
You can clear out the demo data before configuring and loading the system for your site. We have a feature in the Admin App that allows you to quickly clear out a lot of data in the database and in Solr. To use this, you have to do to things:
-
You must create a non-demo user which is an admin, and log in as them
-
You must set the
admin.clearDemoDataSecretproperty in theemerse.propertiesfile with a secret (ie, password) needed to run the code that clears out the data
Once you’ve done these things, you can go to the System tab, then Clear Demo Data section, enter the password you configured, and clear out all the demo-related data. If you’ve already loaded some data into, say, the documents index in Solr, you can skip that step by unselecting that checkbox.
| Clearing out the demo data this way is optional. A fresh install of the demo system will really only have data in the patients table and the demo user accounts. You can clear out the patients with a simple SQL command, and disable the user accounts once you’ve created others. This admin feature is more for if you’ve used the demo system a lot, and want to start fresh without having to re-install. |
Fields in EMERSE
The "Fields" tab in the admin interface tells EMERSE how to interpret and use the fileds in Solr. Fields declare four important things to EMERSE:
-
the display name of the field,
-
whether the field stores a date or just text,
-
where to show the field in EMERSE (it does need to be shown anywhere),
-
the filter to show for the field (not filterable is an option),
-
and finally whether to use "values" or "groups of values" for the filter options, if a filter is used.
A field can be shown in the summaries table, which is the table reached after clicking on a cell in the overview table (after highlighting documents). The other place a field can be shown is in the document page, which is when you are viewing the full text of the document. (You reach this page after clicking a row in the summaries table.) The field doesn’t have to be shown at all. If a field is shown, its display name will be used, not its Solr field name.
See the administrator guide for more information on the "Fields" tab.
Filters
A field can also have a filter. There are three types of filters:
- CHECKBOXES
-
This will show each value of the field as a checkbox. This is intended for short lists of values, usually less than 50.
- AUTOCOMP
-
This will show an input box which users can type out a value of the field, and the input box will autocomplete it. Users can also see a list of all values. This is intended for when there are thousands of values for a field.
- TEXTAREA
-
This will show a textarea where users can type in a newline-separated list of values. These values are not autocompleted or validated currently. However, this allows you to paste a list from excel or elsewhere to set a long list of values at once. This is intended for identifier-like values, such as encounter IDs, document IDs, etc. The number of possible values of the field can be in the millions.
CHECKBOXES and AUTOCOMP both require the admin to load the values of the field into the EMERSE database for autocomplete / display purposes. The TEXTAREA filter does not use values loaded into the database.
Values in the database can be grouped. These groups will appear as a single filter option to the user, and are also shown as the value of the field when the field is shown in the summaries table or document page. This allows Solr to be loaded with codes that wouldn’t be recognizable to the average user, or to smooth out changes in codes, names, organization, etc, over different data sources or over time. For instance, as the set of deparments change, you may want to group old departments under the same group as new ones that they are equivalent to. The mapping of values into groups is many-to-many. Thus, if an old department was split into two, you can group it with both of its new versions.
You can also create multiple fields in EMERSE on the same field in Solr. This allows you to group the values of that field in different ways. For instance, suppose you have a single field in Solr that is the "exam description". It’s values contain information about the body part examined and the type of imaging done. You can make one field in EMERSE pointing to this field in Solr whose groups are body parts, and each group contains all values that have imaging on that body part. A second field in EMERSE on this Solr field can have groups for imaging types, grouping values together that mention the same type of imaging.
Though using groups is flexible, it is more performant to not use groups, or only use very small groups, such as groups of one in size (effectively just providing a human-readable label on the value stored in Solr). This is because mapping a list of 4 groups to a list of say, 70 values, results in a search of 70 terms. The more terms in a search, the slower it goes.
Special Roles for Fields
Finally, certain fields play special roles in EMERSE. The names of these roles are given below. Note that these are the names of the roles, but the names of the fields in Solr can be anything, though we typically name them the same.
RPT_TEXT-
This field should store the text of the document, and indexed case-sensitive.
RPT_ID-
This is the unique identifier of the document in the index.
MRN-
This field should hold the MRN of the patient the document belongs to. It should match the values of the
MRNin the patient index. If you are using de-identified data, you can use a number that is not actually the MRN, but it must be unique for each person in the index. SOURCE-
This field should store the name of the "source" the document is from.
DOC_CONTEXT-
This field stores some value that provides context to the document in the results page of all-patient search. All patient search results show only snippets of matched text in the document, hopefully not exposing a lot of PHI, and this field should similarly not show a lot of PHI but help users understand the context around the shown snippets. Often it’s the note type.
CLINICAL_DATE-
This field should store a relevant clinical date of the document, such as the encounter date, exam date, etc. This is used to determine the date range of the index.
PATIENT_ENCOUNTER_ID-
This field should contain an identifier that links a collection of documents together into an "encounter" or some other greater grouping. An encounter is often something like an entire inpatient stay.
A field should be assigned to each of these special roles (the same field can play many roles if needed).
Fields for our Example
There are cross-source fields, and source-specific fields. Let’s start with defining our cross-source fields for our three sources. These will also play the special roles in EMERSE given above.
For both cross-source and source-specific fields, we need to decide
-
what from the data warehouse we will store in Solr, and
-
where we will show that data in EMERSE.
There are two places we can show a field:
-
when viewing the document, or
-
when viewing a table of summaries of documents for a specific source and patient
If the field is visible, we can also give it a label, which will appear as the column header if its shown in the list of documents, or a row header if shown in the whole-document view.
To show a field in the document page, check the box labeled "Show in Document Page" for the field. To show it in the summaries table, check thee box labeled "Show in Summaries Table".
For our cross-source fields, let’s define:
| Solr Field | Purpose | Special Role(s) | Visible in Views | Label |
|---|---|---|---|---|
|
Cross-source unique id |
|
nowhere |
ID |
|
MRN |
|
document |
MRN |
|
Patient encounter identifier |
|
summaries, document |
CSN |
|
Encounter date |
|
list, document |
Encounter Date |
|
Date document updated |
none |
document |
Updated Date |
|
Document source |
|
nowhere |
Source |
|
Document Text |
|
nowhere [2] |
TEXT |
|
Source-specific id |
none |
document |
Document ID |
|
Name of the clinician |
none |
summaries, document |
Provider |
|
ID of the clinician |
noe |
nowhere |
Provider ID |
Notice that not every cross-source field plays must play some special role. For instance, the SSID field will be used the same across all sources so we can configure it in the cross-source section.
For fields specific to the encounter source we have:
| Solr Field | Purpose | Visible in Views | Label |
|---|---|---|---|
|
Type of encounter |
summaries, document |
Encounter Type |
We’ll put both radiology and pathology reports in the same source which we’ll name the reports source since they have some different fields than encounters, but similar fields to each other; after all, they are described using the same tables in the warehouse, the only difference is the procedure category.
| Solr Field | Purpose | Visible in Views | Label |
|---|---|---|---|
|
Status of the result |
summaries, document |
Encounter Type |
|
Date the report was made |
document |
Report Date |
Configuring Solr
Once we have declared the fields we will use in Solr to EMERSE, we should setup Solr to actually use those fields. You can delete the data directories inside each core:
/app/solr/bin/solr stop   # don't run solr while reconfiguring it
rm -Rf /app/indexes/*/data
Then edit the /app/indexes/documents/conf/managed-schema to remove all fields, but keep all the data types, then add our fields:
<?xml version="1.0" encoding="UTF-8"?>
<schema name="example" version="1.5">
  <!-- must name the field that stores the unique key of the document across all sources -->
  <uniqueKey>ID</uniqueKey>
  <!-- required for internal Solr reasons -->
  <field name="_version_" type="long" docValues="true"/>

  <!-- fields playing a special role -->
  <field name="ID" type="string" required="true"/>
  <field name="SOURCE" type="string" required="true"/>
  <field name="MRN" type="string" required="true"/>
  <field name="CSN" type="string"/>
  <field name="DATE" type="date" required="true"/>
  <field name="TEXT" type="text_with_header_post_analysis" required="true"/>


  <!-- shared fields -->
  <field name="SSID" type="string"/>
  <field name="PROVIDER" type="string"/>
  <field name="PROVIDER_ID" type="numeric"/>
  <field name="UPDATED" type="date"/>


  <!-- encounter specific fields -->
  <field name="TYPE" type="string"/>


  <!-- reports specific fields -->
  <field name="STATUS" type="string"/>
  <field name="REPORT_DATE" type="date"/>


  <!-- leave the field types here (omitted for brevity) -->

</schema>
Once we have rewritten our index schema, we can start Solr again and start indexing.
Indexing into Solr
You will need to develop an ETL process to load documents into EMERSE from your document sources. The EMERSE team has an application called "EMERSE Indexing" that indexes documents formed from queries to databases into Solr which we will use to show how this could be done. You can contact the EMERSE team to get the application. Looking at the code should give you an example of how you can do this yourself, or if your data source are all in databases, you may be able to use the application yourself.
Our example "EMERSE Indexing" application requires three things:
-
Apache Tomcat
-
Apache ActiveMQ
-
A database
At the University of Michigan, we use a Tomcat instance just for indexing, but for this guide, we’ll use the same one as EMERSE. Put the indexing.war in /app/tomcat/webapps/indexing.war and add some lines to /app/tomcat/bin/setenv.sh to tell it where its configuration files are:
export CATALINA_OPTS="$CATALINA_OPTS -Demerse-indexing.properties.filepath=/app/etc/emerse-indexing.properties"
export CATALINA_OPTS="$CATALINA_OPTS -Ddocuent-sources.xbl.filepath=/app/etc/document-sources.xml"
Now let’s define the properties:
broker.url=tcp://localhost:61616

solr.url=http://localhost:8983/solr/documents
solr.fields=ID,SOURCE,MRN,DATE,UPDATED,TEXT,SSID,PROVIDER,PROVIDER_ID,CSN,TYPE,STATUS,REPORT_DATE

ds.dw.url=jdbc:...
ds.dw.username=...
ds.dw.password=...
ds.dw.driver=...

ds.emerse-indexing.url=jdbc:mariadb:localhost:3306/indexing
ds.emerse-indexing.username=emerse
ds.emerse-indexing.password=demouser
The field solr.fields should list out all our solr fields. The properties starting like ds.<name> give connection details for a database called <name>. We’ll use two database, one called "dw" which would be your data warehouse, and "emerse-indexing" which is a required database that stores the tables EMERSE Indexing itself uses. We’ll create a database in MariaDB for this.
Create a database and run the install sql script for the indexing project, much like for EMERSE:
create database indexing character set = 'utf8';
grant all privileges on indexing.* to emerse;
mariadb indexing -u emerse -p < indexing.mariadb.sqlFinally, the indexing application requires a durable message broker called ActiveMQ "classic" edition. We can download and install it much like tomcat, from apache’s website. Expand the zip in /app/, renaming it to activemq, then starting it:
cd /app
unzip ~/Downloads/apache-activemq-*.zip
mv apache-activemq* activemq
# and start it
activemq/bin/activemq start
We can use the default configuration for activemq. You should see the admin interface at http://localhost:8161/admin/. The username and password are both admin.
Next, we will write the document-sources.xml. A quick overview of the project is needed, but not everything will be covered here. You can see the documentation for the project on GitHub for more details.
The indexing application has a notion of a "source", and is defined by a <source> element in the XML. It has a name attribute, used within the application to load documents from the source, plus a source attribute which is assigned to the SOURCE field of the documents produced from it. (That is, it’s the EMERSE source.) Thus, multiple indexing sources can go into the same source bucket in EMERSE.
There are two kinds of queries in the indexing application. A document metadata query, which produces the metadata for documents, one document per row produced by the query, and a text query, which produces the text of the document. The text query is run once for each document, and the first column of all rows of produced by the query are appended together to produce the text of the document.
There are three variations on the metadata query, which differ only by which documents they pick out, but always return the same set of columns. They are:
-
<range>query, returning documents in a date range, -
<incremental>query, returning documents modified since the last run of the incremental query, -
<by-keys>query which return documents enumerated by unique keys identifying the documents stored in a table.
Each of these queries are defined under a common element <documentQueries> under the <source>. However, since the queries return the same data, but only for different subsets of all documents, they differ only slightly in the where clause. For that reason, instead of writing out the whole query under each element, they are defined as a substitution of "fragment references" on a single <baseDocumentQuery> (under the <source> element). The fragment references are written like ##fragment-name##. The replacement for the fragment references are defined by a like-named element under the variation’s element under <documentQueries>. Some example XML is helpful here:
<source name="pathology" source="reports">
  <documentBaseQuery>
    select a.columnA as SOLR_FIELD_A
         , b.columnB as NON_SOLR_COLUMN
      from tableA a
      join tableB b on a.ID = b.A_ID
     where ##selection-criteria##
  </documentBaseQuery>
  <documentQueries>
    <range>
      <selection-criteria>a.DATE between :from and :to</selection-criteria>
    </range>
    <incremental>
      <selection-criteria>a.UPDATE_DATE > :lastUpdated</selection-criteria>
    </incremental>
    <by-keys>
      <selection-criteria>a.ID = :key1</selection-criteria>
    </by-keys>
  </documentQueries>
  <textQuery>
    select line
      from table
     where abc = :SOLR_FIELD_A
       and def = :NON_SOLR_COLUMN
</source>
Note that if multiple fragment references are present in the base query, then you’d define each as additional elements under the variation’s element (as a sibling to <selection-criteria> in the example above). Also note that the different variations have different query parameters, written in the form of :parameterName. These are fixed for each of the variations, and are as shown in the example.
Finally, in the text query, you reference the column aliases of the metadata query as query parameters. Thus, you can return some columns only needed in the text query (to make it run faster by doing fewer joins). The column aliases of the metadata query do double-duty by naming the field that column should be placed in. If the column alias isn’t in the solr.fields property in emerse-indexing.properties it won’t be added to the Solr document.
We will define two indexing sources, matching our EMERSE sources. We will only work with the range metadata query, since it’s the most straightforward.
<sources>
  <source name="reports" source="reports">
    <baseDocumentQuery>
      select proc.ID                   as PROC_ID
           , 'r' || oproc.ID           as ID
           , oproc.ID                  as SSID
	   , oproc.PAT_MRN_ID          as MRN
	   , oproc.RESULT_DATE         as DATE
	   , oproc.UPDATE_DATE         as UPDATED
	   , oproc.AUTHORIZING_PROV_ID as PROVIDER_ID
	   , prov.NAME                 as PROVIDER
	   , oproc.CSN                 as CSN
	   , oproc.REPORT_DATE         as REPORT_DATE
	   , oproc.RESULT_STATUS       as STATUS
        from ORDERED_PROCEDURE oproc
	join PROVIDER prov
	  on prov.ID = oproc.AUTHORIZING_PROV_ID
	join PROCEDURE proc
	  on proc.ID = oproc.PROC_ID
       where proc.CATEGORY in (1, 2)
         and ##condition##
    </baseDocumentQuery>
    <documentQueries>
      <by-keys/>
      <incremental/>
      <range>
        <condition>oproc.RESULT_DATE between :from and :to</condition>
      </range>
    </documentQueries>
    <textQuery>
      select *
        from (
      select NAME, 1 as section, 0 as line
        from PROCEDURE
       where ID = :PROC_ID
       union all
      select 'IMPRESSION\n\n', 2 as section, 0 as line
       union all
      select LINE, 3 as section, LINE_NUM as line
        from IMPRESSION
       where ORDERED_PROC_ID = :SSID
       union all
      select '\n\nNARRATIVE\n\n', 4 as section, 0 as line
       union all
      select LINE, 5 as section, LINE_NUM as line
        from NARRATIVE
       where ORDERED_PROC_ID = :SSID
           ) t
       order by t.section, t.line
    </textQuery>
  </source>

  <source name="encounters" source="encounters">
    <baseDocumentQuery>
      select 'e' || ID             as ID
           , e.ID                  as SSID
	   , e.PAT_MRN_ID          as MRN
	   , e.ENCOUNTERDATE       as DATE
	   , e.UPDATE_DATE         as UPDATED
	   , e.AUTHORIZING_PROV_ID as PROVIDER_ID
	   , prov.NAME             as PROVIDER
	   , e.CSN                 as CSN
	   , e.ENCOUNTER_TYPE      as TYPE
        from ENCOUNTER e
	join PROVIDER prov
	  on prov.ID = e.AUTHORIZING_PROV_ID
       where ##condition##
    </baseDocumentQuery>
    <documentQueries>
      <by-keys/>
      <incremental/>
      <range>
        <condition>e.ENCOUNTER_DATE between :from and :to</condition>
      </range>
    </documentQueries>
    <textQuery>
      select e.TEXT
        from ENCOUNTER e
       where e.ID = :SSID
    </textQuery>
  </source>
</sources>
Notice in particular, that in the "Reports" source, we produced the PROC_ID column in the metadata query, but it isn’t listed in the solr.fields property. We did this so we can use it in the text query, where we include the name of the procedure at the top of the document’s text, without having to do any joins to find it. Also notice that we construct the text of the document as a series of unions of queries, part of them are fixed text that can be used as section titles. The first column of the rows are joined together to make the text. Other columns are ignored, and only used to order the rows correctly.
Now you should be able to start Tomcat and navigate to http://localhost:8080/indexing/. There you will see a very simple interface, where you can tell it to do one of the three variations on the metadata query. Run the range query for a date range that makes sense, and the application should index into Solr.
Useful Post-Implementation Details
-
The
solrconfig.xmlfile should be located on the server. It is located inside/app/indexes/documents/conf/(where "documents" is the name of the Solr core/collection). -
For changes made to the Solr
schema.xmlyou will need to make corresponding changes in the EMERSE database, described in the Data Guide. -
When interacting with the Solr API you may need to use a URL that points to the specific index/collection, such as https://localhost:8983/solr/documents/. However, to get anything back you will need to specify an action such as
https://localhost:8983/solr/documents/select?q=RPT_TEXT:asthma
-
As you are updating the underlying data, note that the patient counts shown in the user interface do not come from the patient database table, but rather is derived from a unique count of the medical record numbers (MRNs) in the indexed documents. This was intentional because it might be the case that a patient in the database has no documents, and thus would return no results within EMERSE. The actual source of the patient count that the GUI uses is in the
SOLR_INDEXdatabase table (thepatient_countcolumn). This column is updated by the app in the background using an async batch process that runs occasionally to update the patient count by retrieving unique MRN’s from the Solr index calleddocuments. An update of the counts for the UI can be forced by the "System Synchronization" feature found within the EMERSE admin application (http://localhost:8080/emerse/admin/).