
Overview
This guide describes topics related to the networking of EMERSE instances across sites, including basic operation and configuration. In general, there will be no need to set up a hub; only local configuration of an existing EMERSE instance is required to join the network. A new hub instance is only needed for a group of EMERSE sites that want to run their own network.
Importantly, to join the network, nothing else needs to be installed. Everything required is already built-into the baseline EMERSE system. Further, joining the network is completely optional. If a site chooses not to join the network that site can still use the basic functionality of EMERSE. The network capability is turned off by default, and can only be turned on by a local system administrator (with some additional configuration required, and described in this guide).
Background
EMERSE was initially designed to be a standalone system at a single site. With the introduction of networking, it is now possible to connect these sites to form an EMERSE network. However, for reasons of trust, most functions of EMERESE cannot be used cross-site. Currently, the most a user can do is run an search against all patients of another site and get an obfuscated count. However, even this small degree of functionality can be helpful.
A site does not have to join any EMERSE network, and it could join many or host its own network (by setting up a hub). In addition, each site has control over how its information is obfuscated.
Network Architecture
Rather than being a completely de-centralized network, EMERSE networks operate using a hub-and-spoke model. This makes it easier to operate and reduces the number of connections required as more sites are added to the network. Each site can connect to multiple hubs, and all sites connected to a hub are connected to one another through the hub (although any site can still limit access to another site, or even specific users, with the Firewall, described below.) Connecting to a hub requires only an outgoing connection, so no special firewall rules need to be added to join a network, assuming the server can reach the Internet. However, to setup a network hub, incoming connections must be allowed, which might require changes to firewall rules and NAT rules. A typical site participating in the network would not need to operate a network hub.
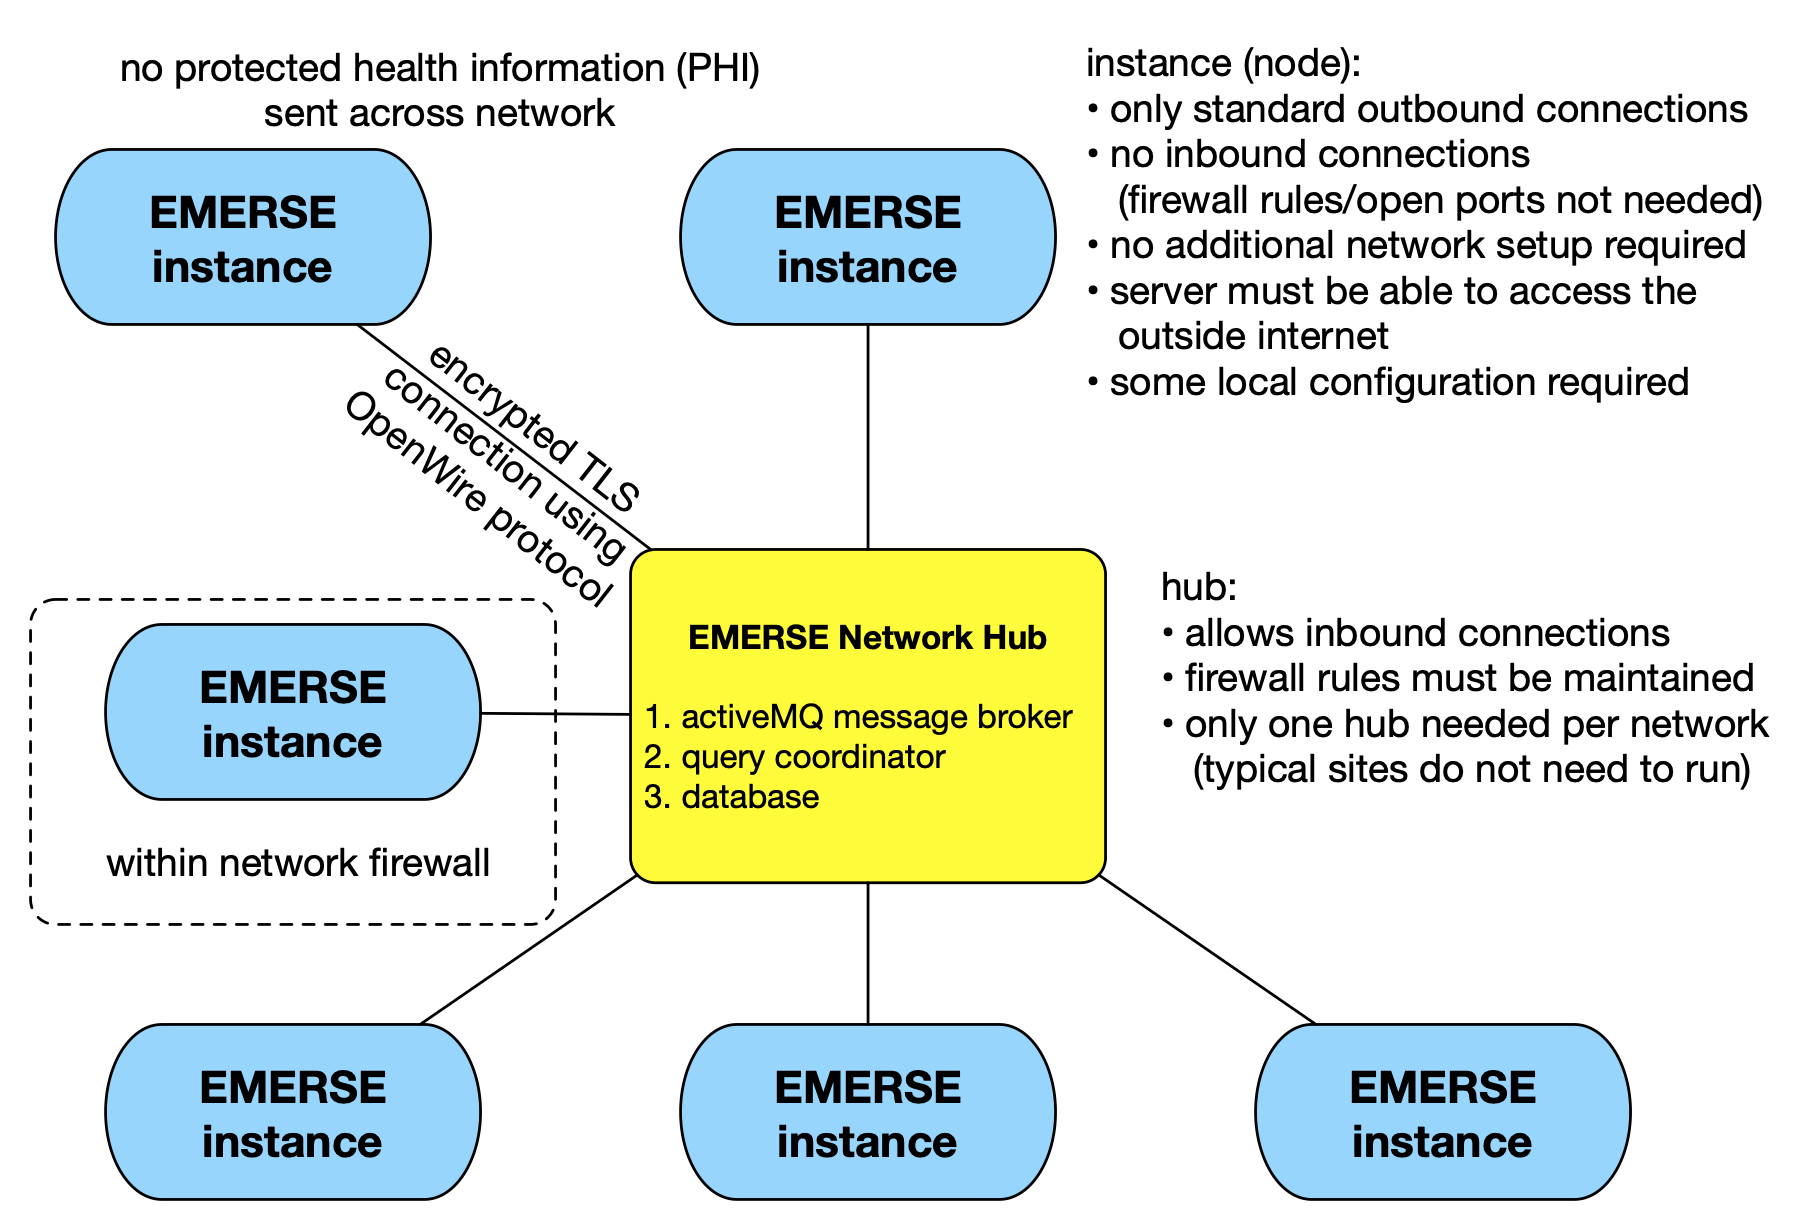
The hub consists of three parts: a message broker called Apache ActiveMQ, a piece of custom software called the Query Coordinator, and a database. EMERSE at each site connects to ActiveMQ, as does the Query Coordinator, and they communicate with one another through messages sent to the broker. The Query Coordinator stores in the database some centralized auditing of messages, and some caches of information from the sites, such as total patient count, or whether the site appears to be "online."
Communication between EMERSE instances and the Network Hub is done over a secure, encrypted TLS connection (even though no PHI travels across the network), using the OpenWire Protocol. A connection can only be made from an EMERSE instance outbound to the Network Hub, and not the other way around. Not requiring inbound connections helps ensure security since the EMERSE instance does not accept connections from the outside world. The connection between the EMERSE instance and the Network Hub can persist indefinitely because the OpenWire protocol supports a lightweight 'Keep-Alive Mechanism' wherein the client and server regularly send small 'keep-alive' messages or 'heartbeats' back and forth to each other. These signals check whether the connection is still alive and functioning. If a connection is lost, the EMERSE instance can detect the loss of a connection and attempt to re-connect to the Hub.
Examples
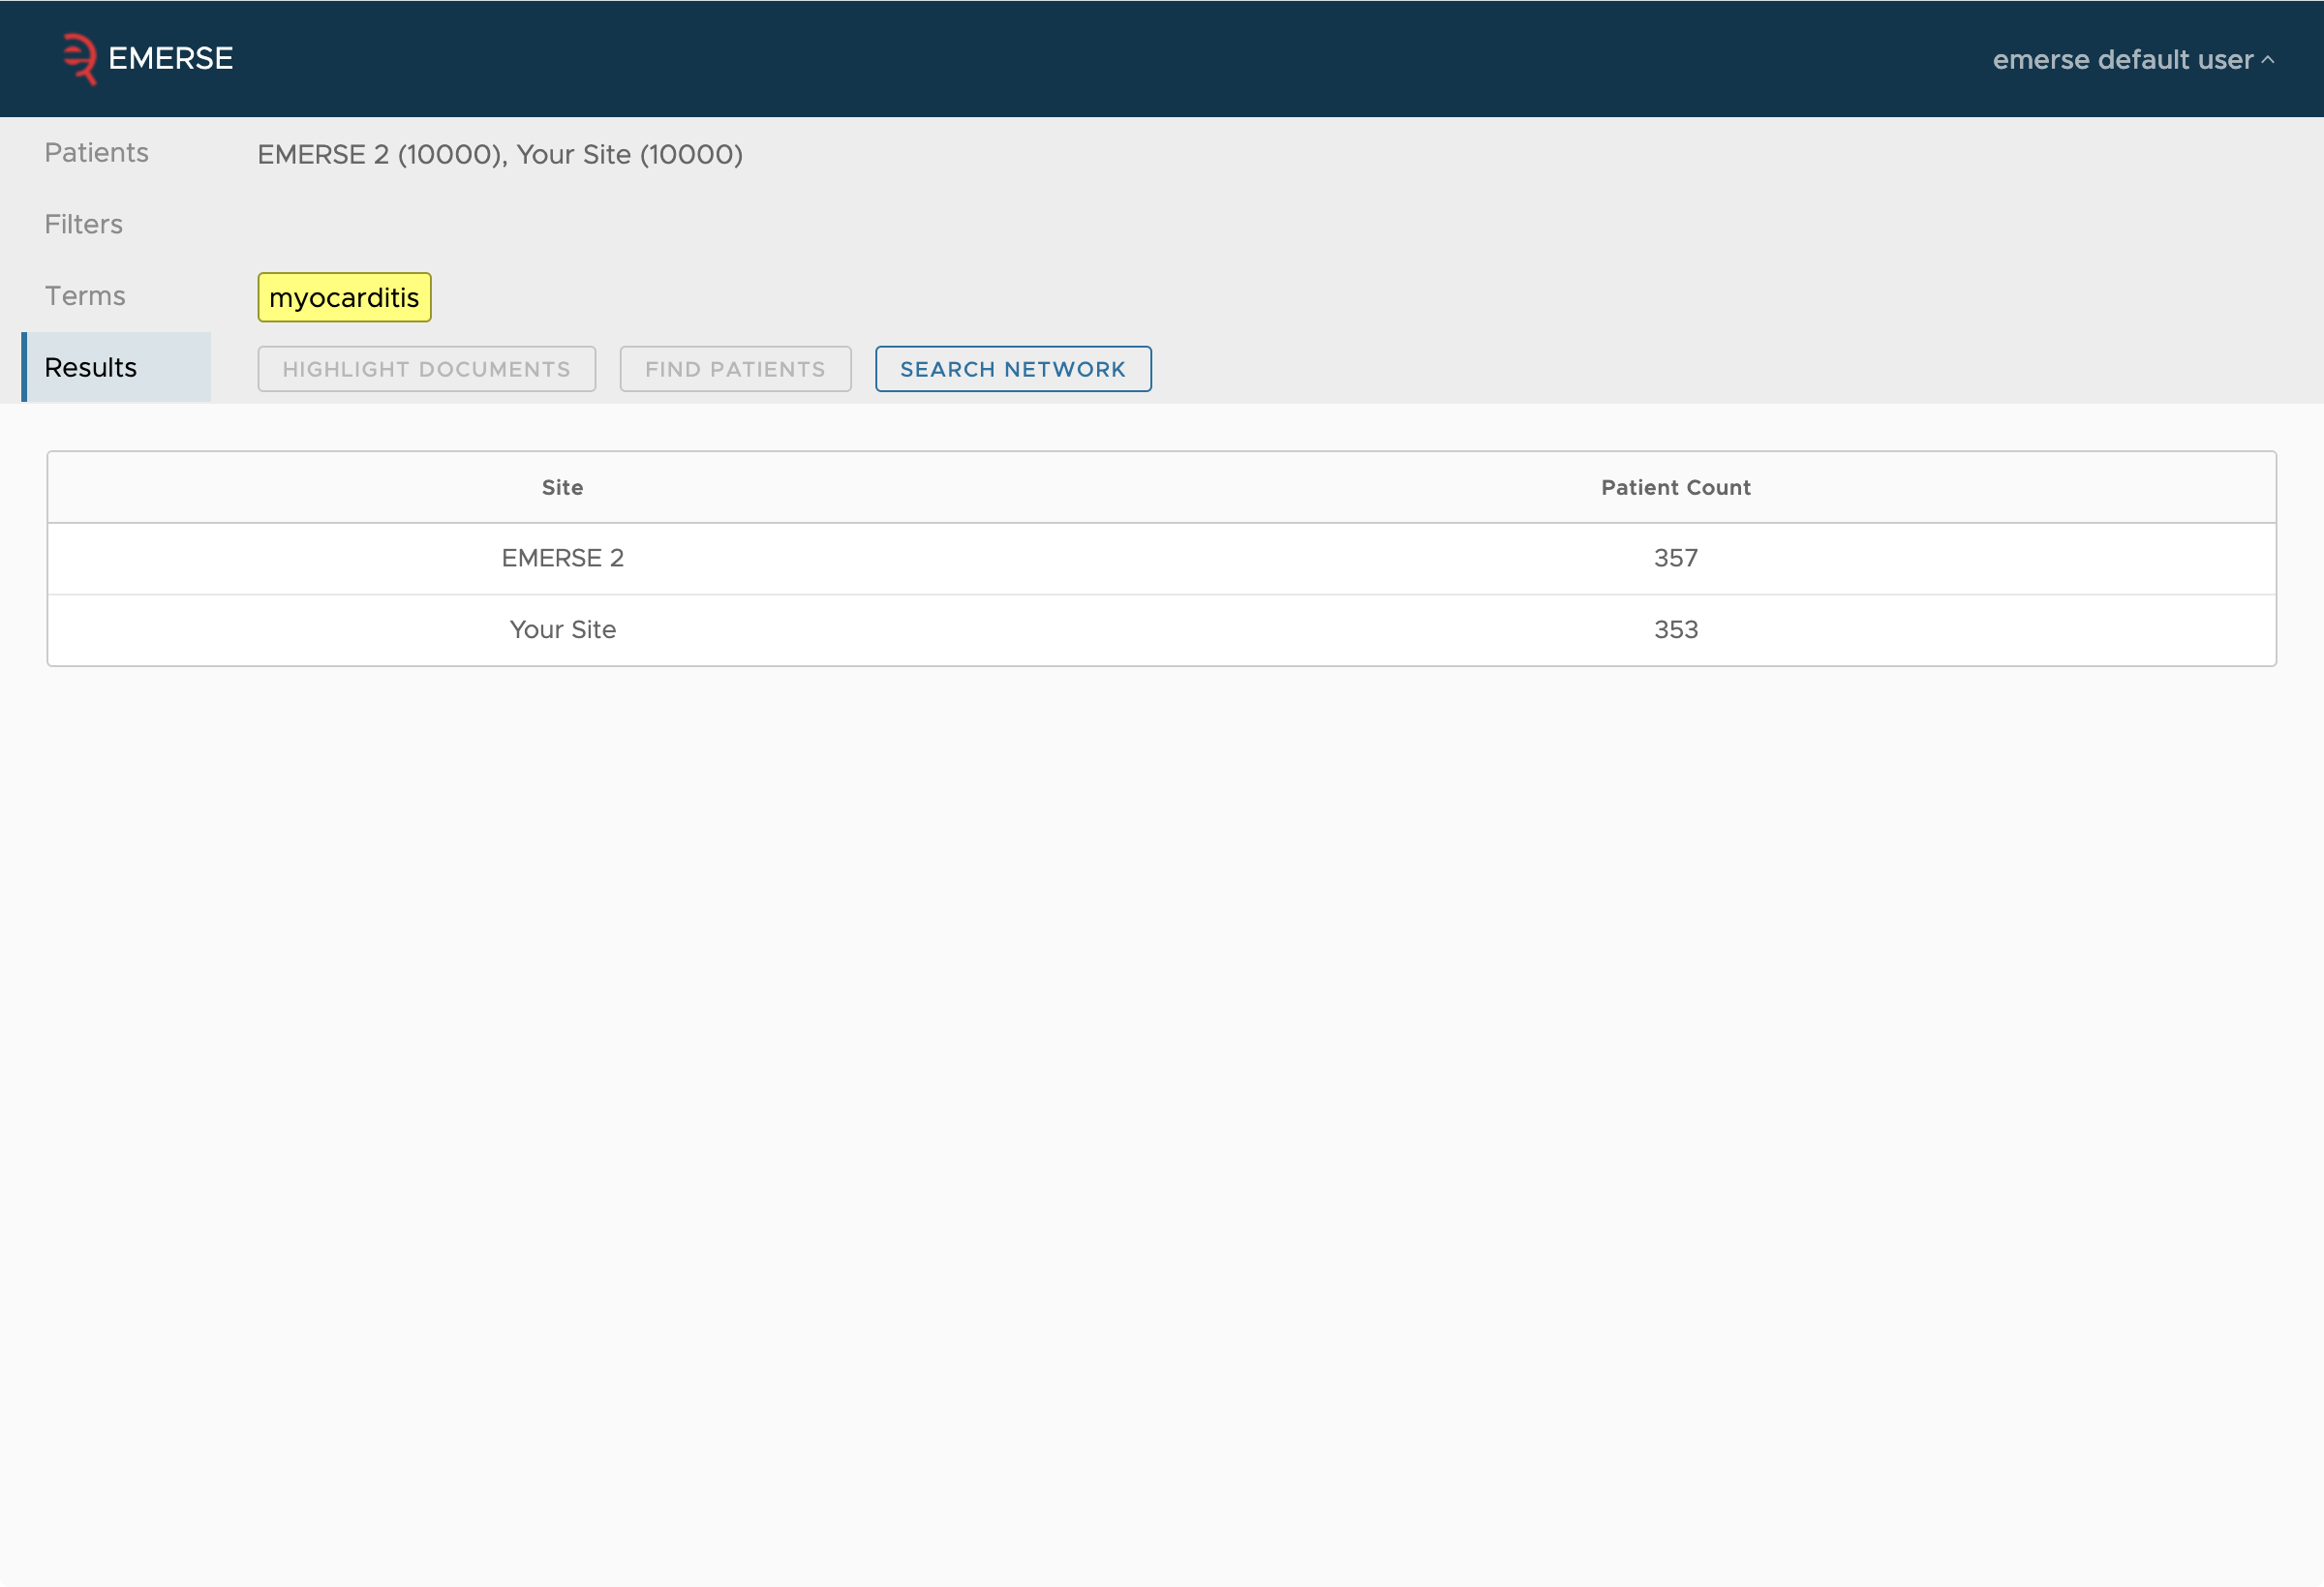
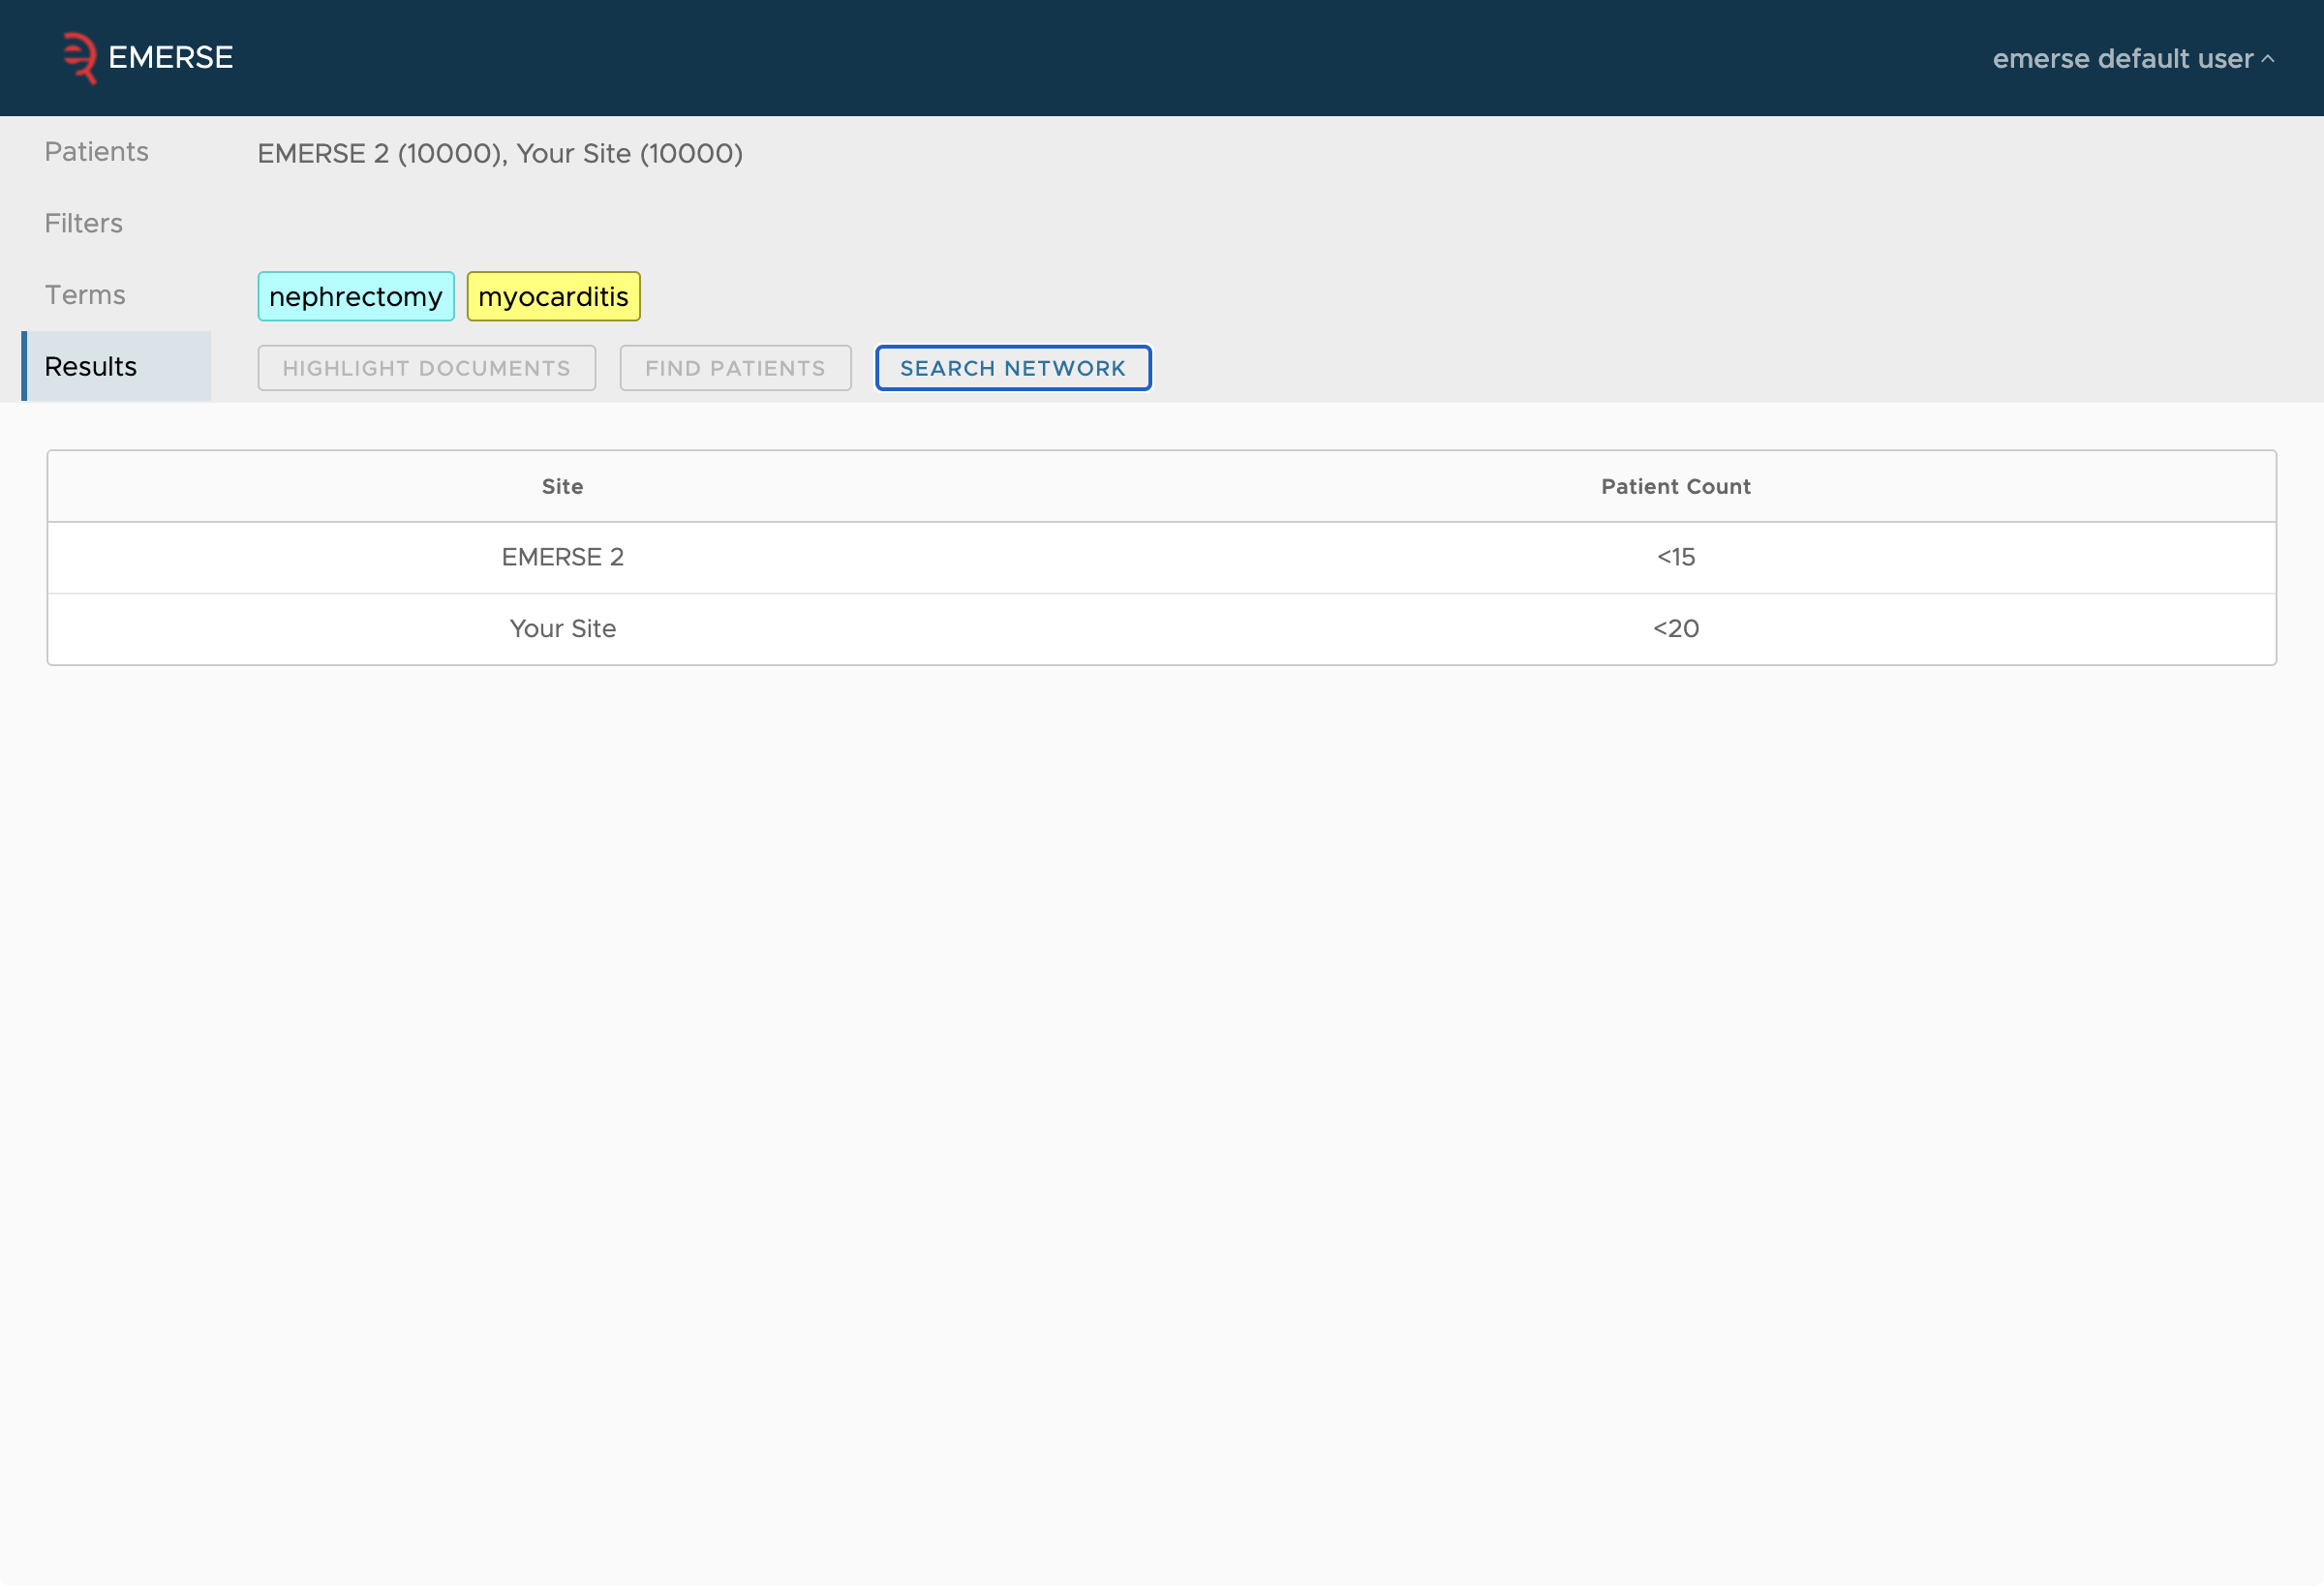
The following are screen shots of the networking functionality from the perspective of a user to show the type of results that would be seen.
Security Considerations
Only counts are reported across the network to other sites.
| No documents, free text, patient identifiers, or any other protected health information (PHI) is ever transmitted across the network. |
The network has multiple safeguards, both technical and administrative, that are described here at a high-level. Additional details, including configuration of some of these features, are described later in this guide.
High level overview of security features:
-
No PHI is ever sent across the network
-
Only obfuscated counts are sent across the network
-
Even though no PHI is sent across the network, all traffic between sites is encrypted
-
To ensure attackers don’t try to directly connect to the message broker, or that one site doesn’t attempt to impersonate another, each site authenticates to the broker by a username and password, over a secure TLS connection
-
Each site has local control over the type and degree of obfuscation using configuration settings
-
Each site controls the threshold under which small counts from their site are not reported (e.g., small counts might be reported as "less than 10")
-
The hub limits the number of queries a single user can make in a defined time window
-
All queries are audited and stored locally with each participating site; these audit logs can be viewed within the Admin application
-
Query response times are randomized to prevent estimating count sizes based on response times
-
Each site has access their own Firewall within the admin app that enables blocking a single user from another site or even another site overall from querying the local system
-
The network architecture, the query coordinator, and EMERSE itself have undergone multiple rounds of security assessments including code reviews, penetration testing, vulnerability scans, and more
-
All users must agree to the Terms of Use for each user session in which the Network is used; this is built into the user-interface and cannot be bypassed. These terms of use include:
1. Conduct searches only for valid purposes which at this time includes estimating cohort sizes and demonstrating the network capabilities to others
2. Never attempt to identify individuals
3. Never use the counts to gain a "market" advantage over other Participating
sites
4. Never share your login credentials with others
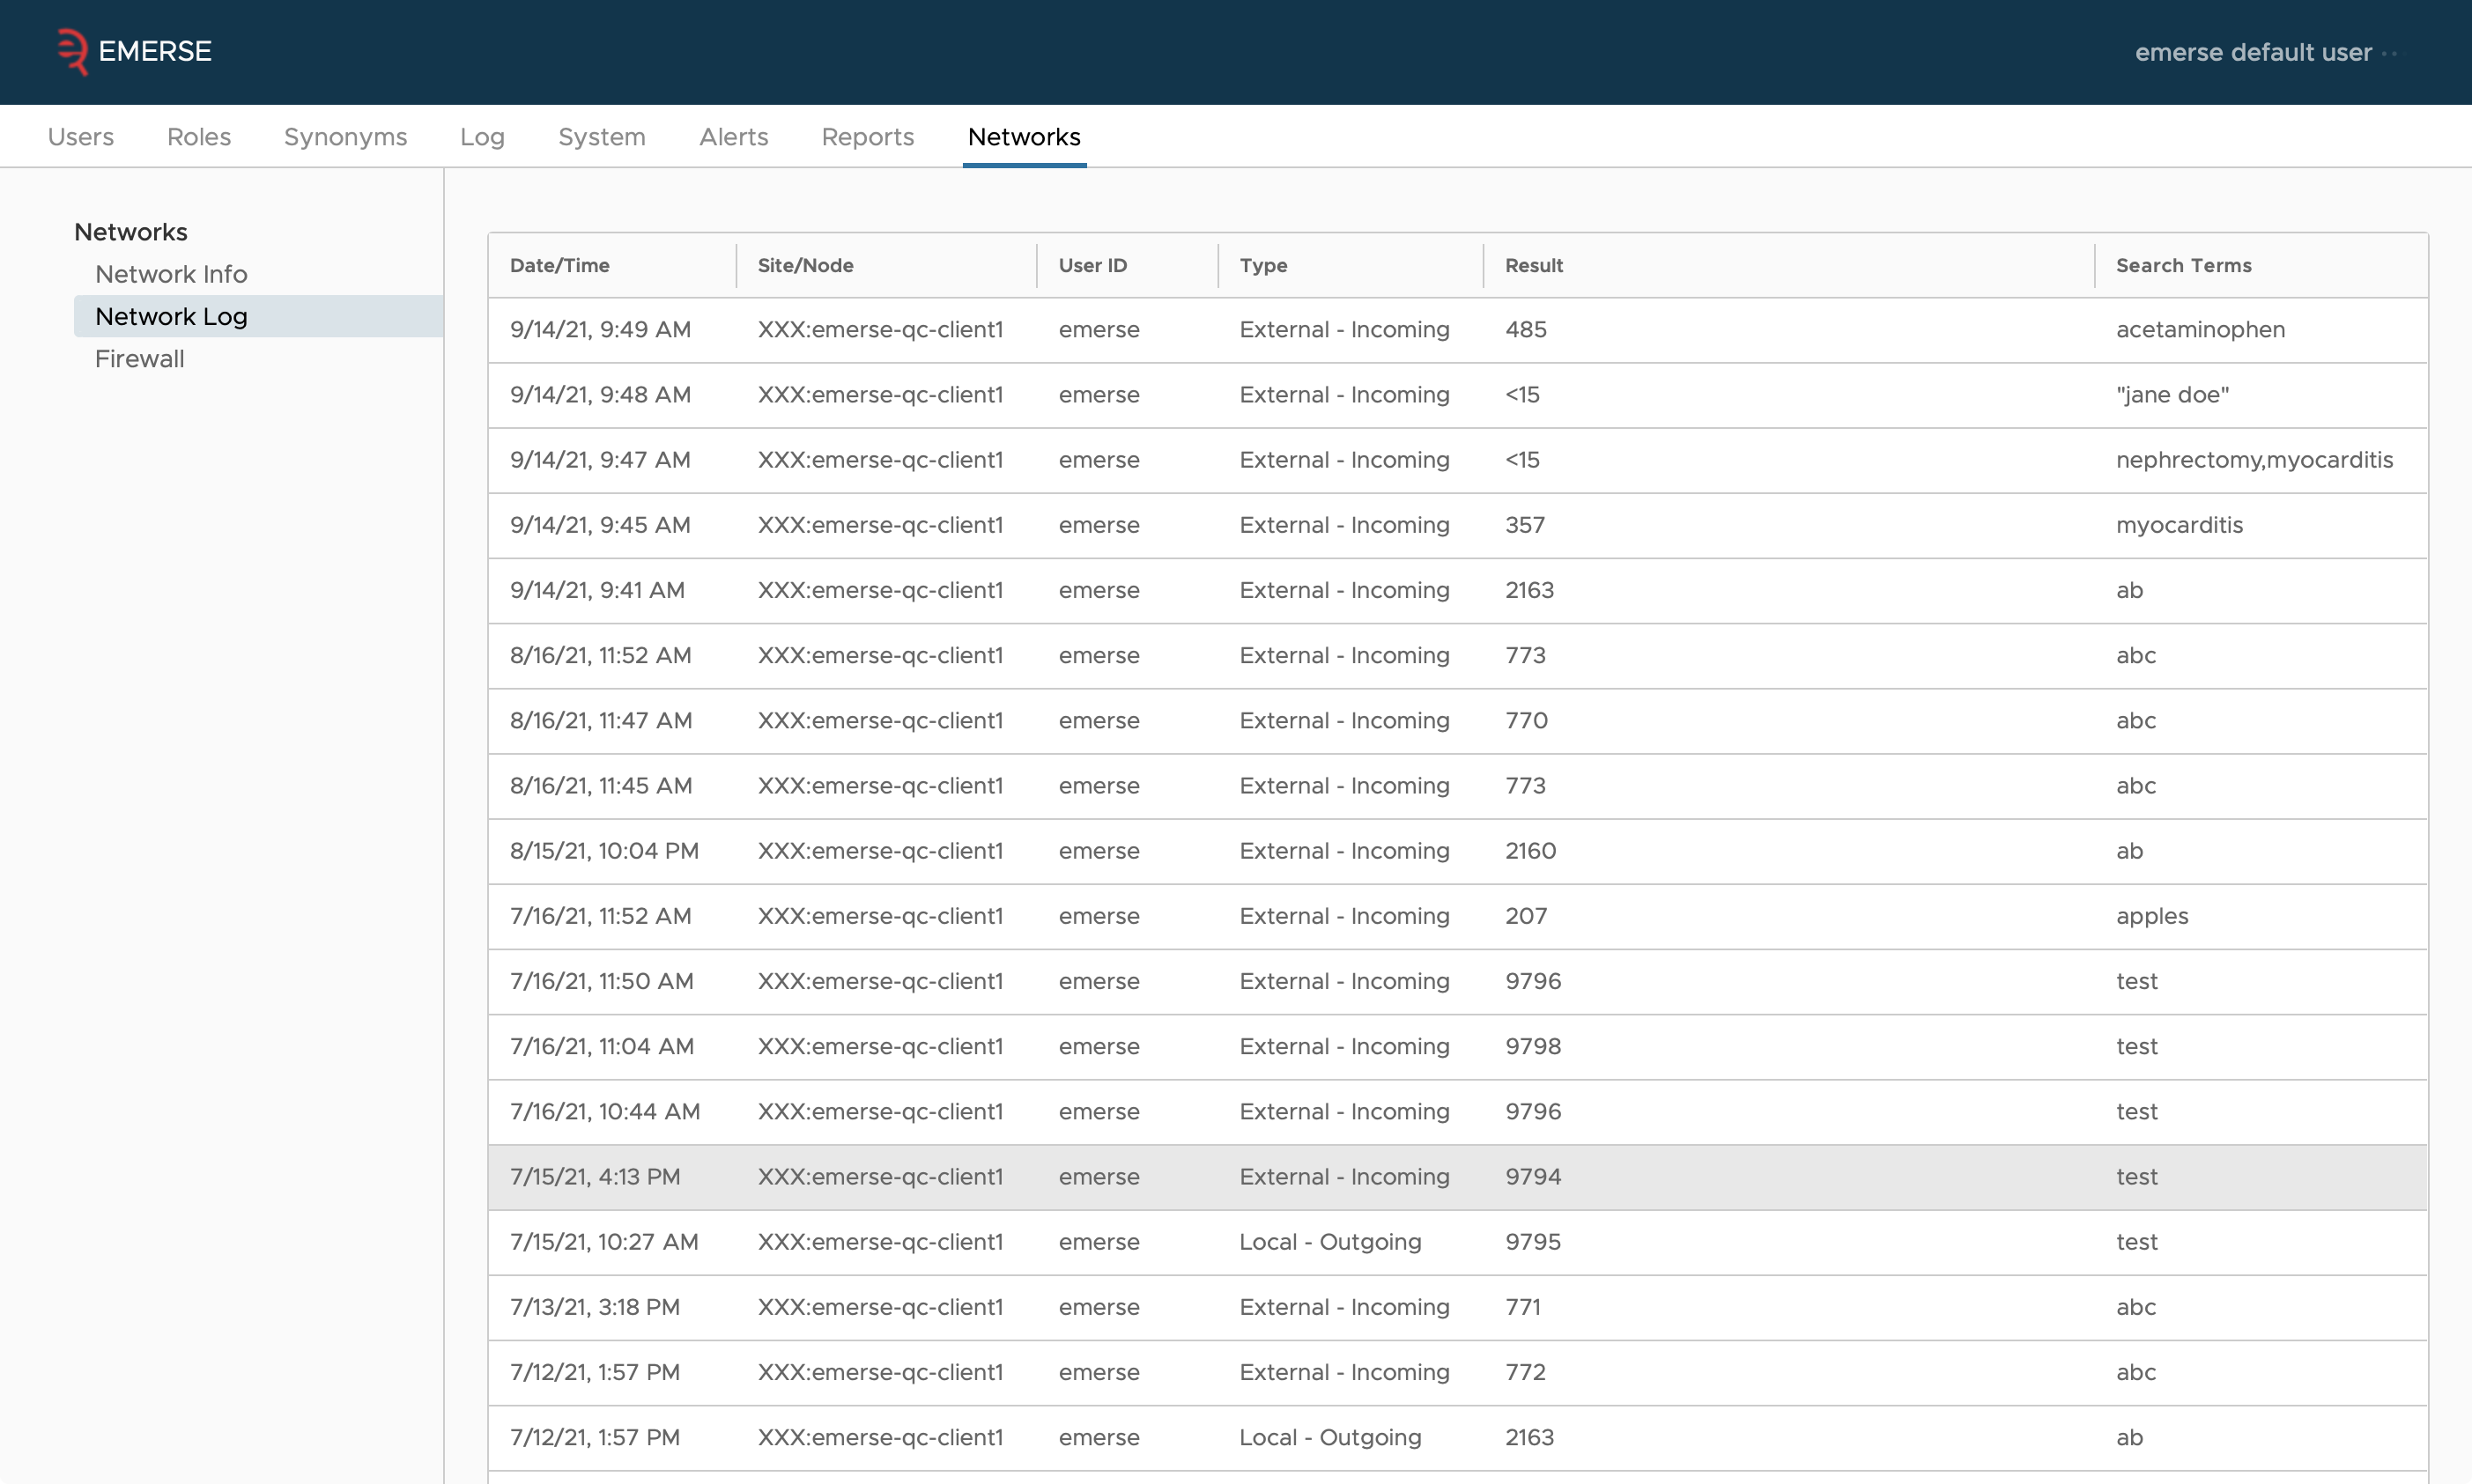
Audit Logs
Each site’s EMERSE instance tracks what queries are run by which network users (both the user name and the site that user is from), plus the count reported back to them. This is kept in the table SEARCH_AUDIT, with the REMOTE_USER and NODE_INDICATOR columns filled out.
Audit logs can also be viewed from within the Admin application.
Firewall
The EMERSE Admin application also includes a firewall feature to give absolute and granular control to each site (node) regarding who has access to the network feature. The firewall allows an administrator to block incoming traffic from a specific user at a specific site, or even an entire site. It also permits the administrator to block a local user from querying a specific node in the network, or from using the network at all. Note that blocking local users from the network functionality can also be done at a higher level using the Privileges feature that is connected to Roles. Changes to the firewall rules take effect immediately, since there is no need for this information to be transmitted to other sites on the network.
While we do not anticipate the firewall from ever being needed, it does empower a site to feel comfortable that they are in full control over access and can turn aspects of the network off immediately if, for example, the logs reveal suspicious activity from a specific user.
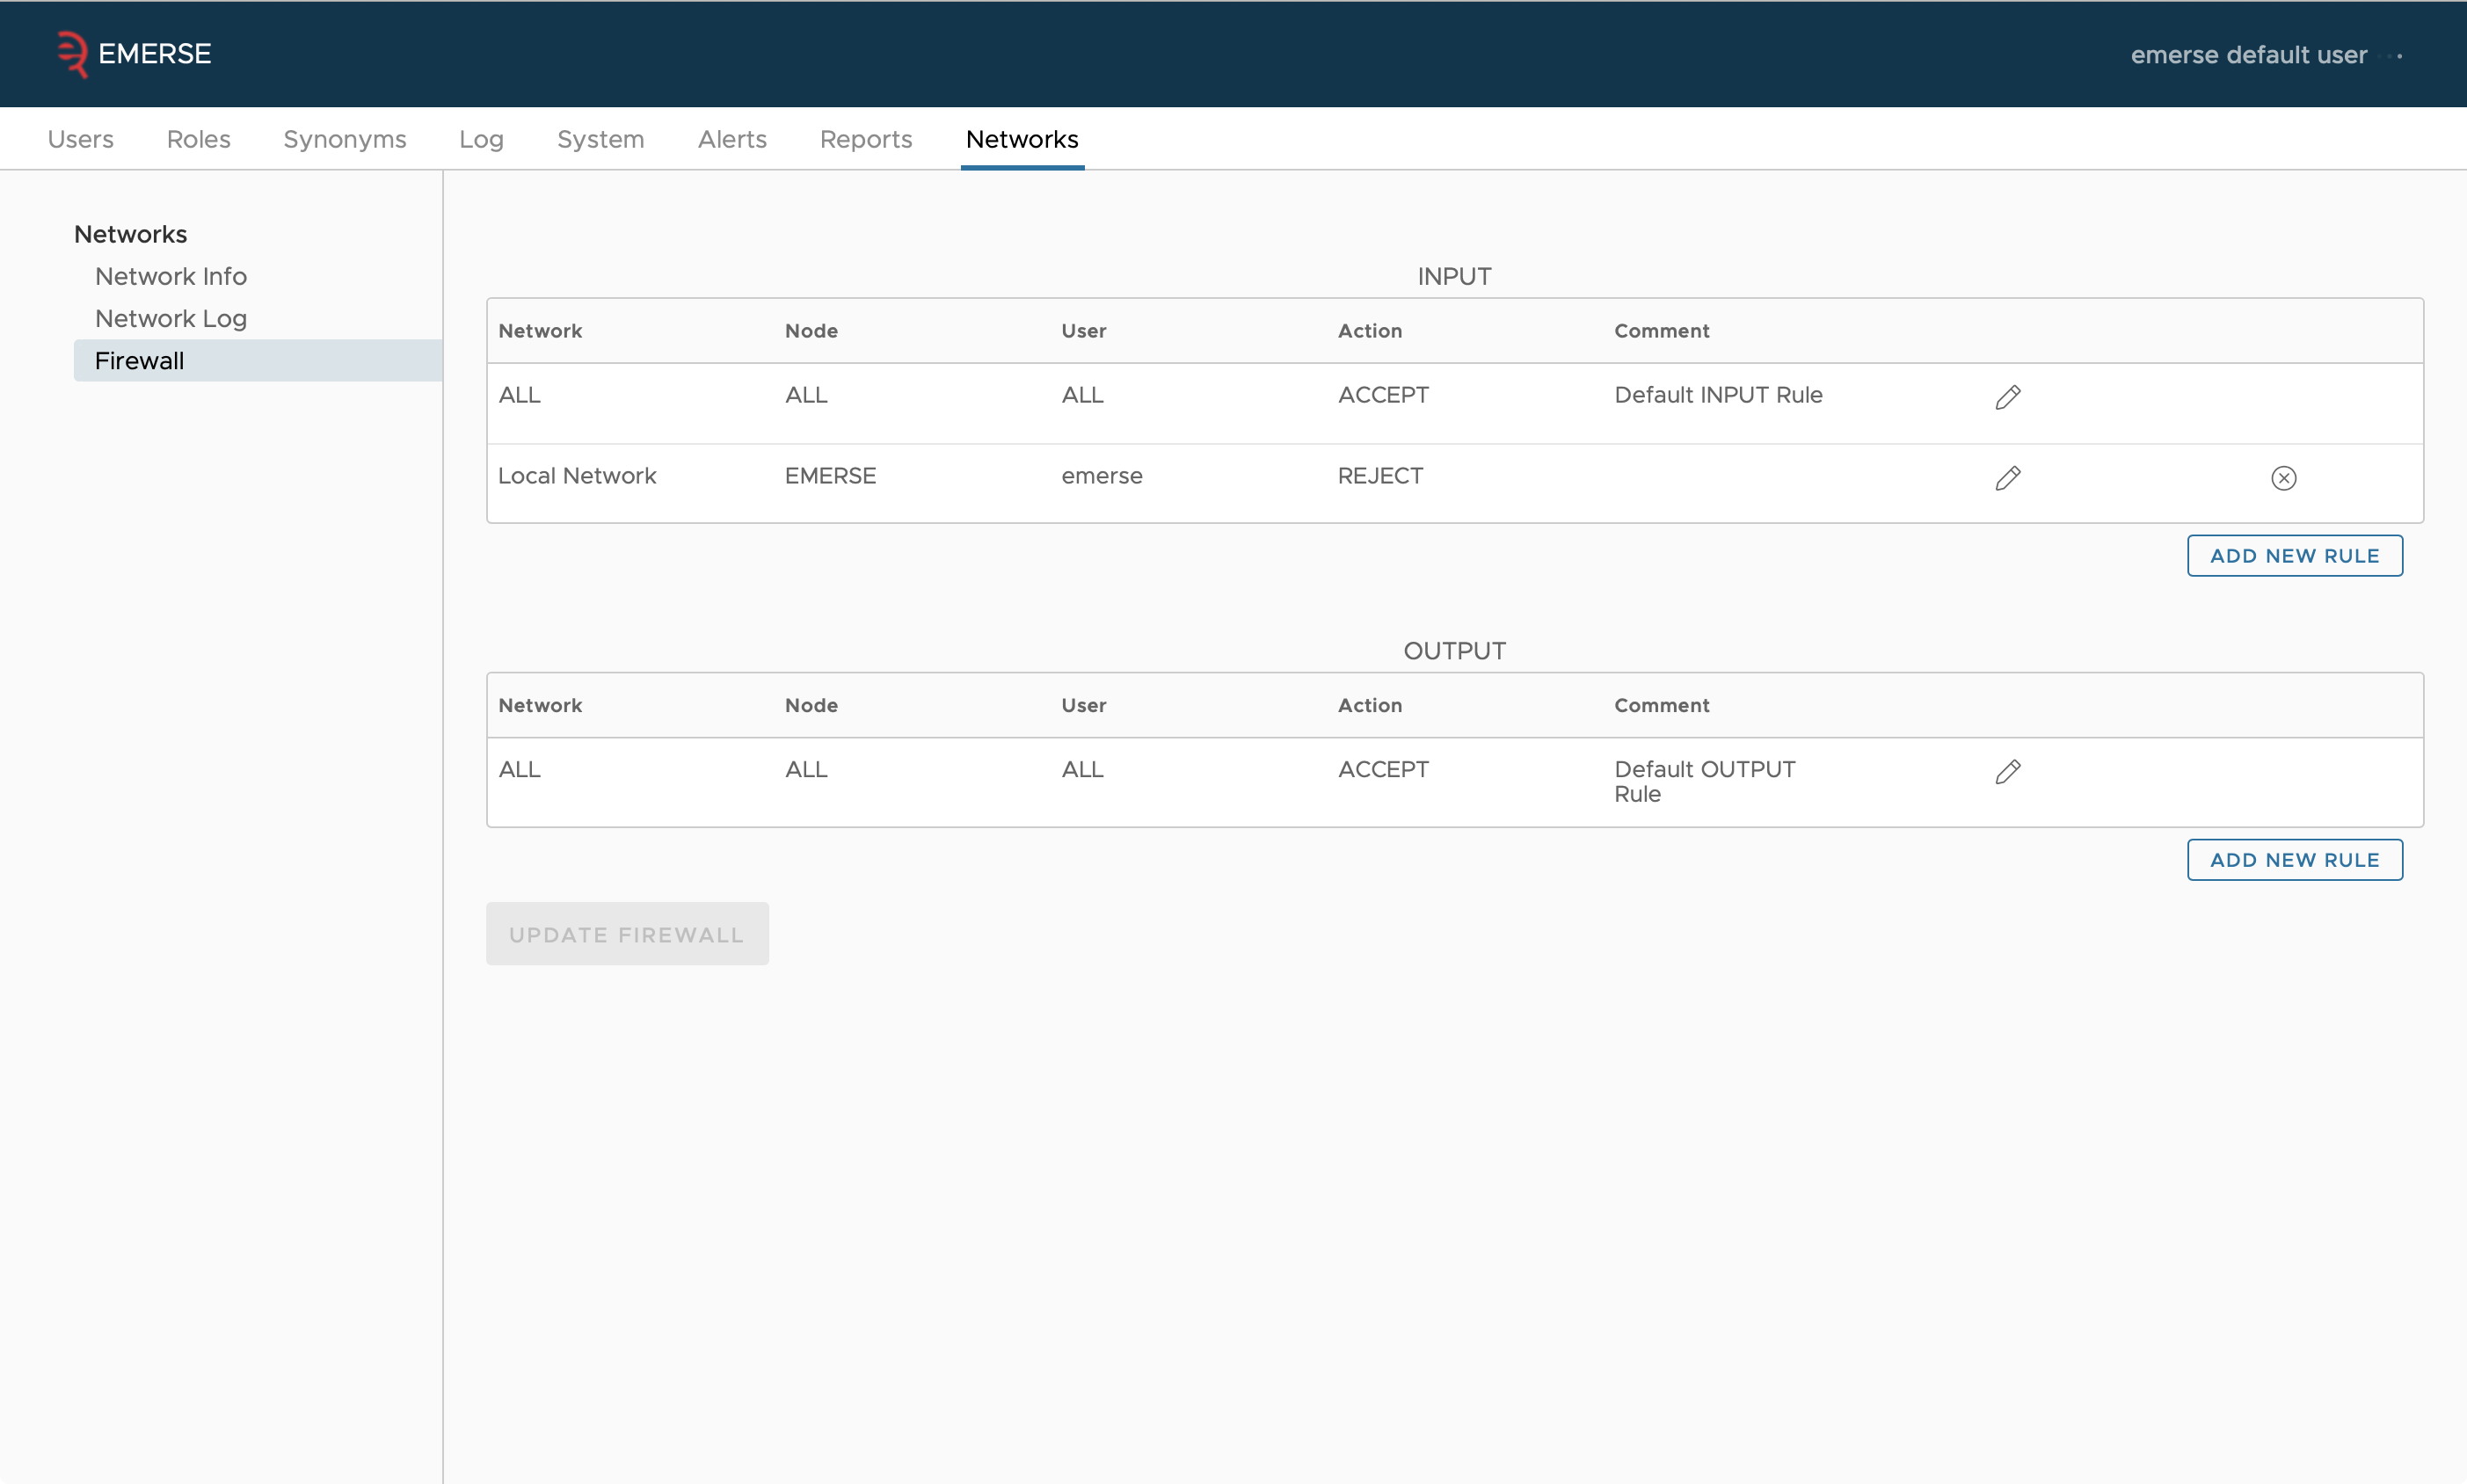
When blocking a specific user, that user’s ID must be entered by the administrator. For external users (users at another site), the user ID is validated against the user IDs in the audit logs. For local users, the user ID is validated against the local user table in the database. Note that each instance of EMERSE only has access to its own local user information—the only way to know about a user from another site is to look through the audit logs for those who have already queried the network.
Configuration
Starting with version 6.0, all EMERSE instances are capable of connecting to networks. To configure a network, create a file named emerse-network.properties in the home directory of the user running the EMERSE application, or set the system property emerse.network.properties.filepath to the location of the properties file. See the installation guide for how to set system properties.
This properties file configures all networks the EMERSE instance connects to. For each network, choose a short identifier for the network, such as UM if you are connecting to the network hosted by University of Michigan. This will be a prefix of the property names that configure the network in the emerse-network.properties file. (XXX is a placeholder in this documentation for the network identifier you chose.) This prefix has no meaning other than to group the properties.
- XXX.name
-
This is the name of the network as it will appear in the UI. Currently, there is no place in the UI where network names appear, but that may change in the future.
To configure the name of your site, as it appears in the list of networked sites, you can set a property in emerse.properties:
- node.name
-
The name of your node in the network in the network page. By default, this is
Your Site.
Configuring the Connection
The central hub runs an instance of a message broker called ActiveMQ. It is this broker that EMERSE actually connects to to communicate with the other instances on the network. All of this information should be given to you by the hub owner.
- XXX.node.id
-
This is the name of this EMERSE instance on this network. This should be the same as the username below, though this restriction may change in the future.
- XXX.url
-
This is the URL of the ActiveMQ instance that the hub is running. It should be typcially of the form
ssl://hostname:port. - XXX.username
-
This is the username your EMERSE instances uses to authenticate to the network.
- XXX.password
-
The password used to authenticate this EMERSE instance to the network.
Configuring the Sharing of Term Bundles
Term bundles can be shared across the network. When network bundle sharing is enabled on at least one network, it will alter the bundle sharing screen to add an option to share the bundle with all sites on all networks where network bundle sharing is enabled, and also allow you to share the bundle with individual people from the sites of that network which have bundle sharing enabled to. If you disable bundle sharing on a network, other sites on that network cannot share bundles with you, nor can you share them with them.
- XXX.bundles.enabled
-
true(the default) to enable bundles for the network, orfalseto disabled it for the network.
Configuring Queues
The following properties configure what queues this EMERSE instance should listen to and send requests to so it can communicate with the query coordinator.
- XXX.emerse.in
-
This is the name of the queue that all EMERSE instances on the network listen on to receive requests. In other words, it’s EMERSE’s "inbox." Which EMERSE instance a message is "to" is determined by the
nodeIdheader on the message. - XXX.emerse.out
-
This is the name of the queue that all EMERSE instances use to send responses to requests. In other words, it’s EMERESE’s "outbox." Only the query coordinator dequeues messages from this queue. Which EMERES instance a message is "from" is determined by the
JMSXUserIDheader on the message.
In all cases, a node in the network is identified by it’s XXX.node.id which should be the same as the username of its account in ActiveMQ.
Count Obfuscation
Your EMERSE instance by default is configured to report an obfuscated count of the patients that match queries originating from the network, meaning a random number chosen around the exact number. This prevents a user from tweaking a query to positively identify a patient based on an exact result returned.
There are a number of ways to customize or disable this obfuscation. The first is that counts below a certain threshold can be merely reported as "less than N" for a number N that you configure. Second, you can choose the type and parameters of the random distribution used to draw a number around the exact count. This means you can have very wide spread of numbers reported for a single query, or a very narrow spread. Finally, you can round the reported number to the nearest multiple of M, for a number M you configure.
Much of the approach for obfuscation was modeled after other systems such as the i2b2 Workbench.
The general code for obfuscation looks like the following:
	public int obfuscate(int count)
	{
		double sample = sample() - mean();

		double obfuscatedValue = count + sample;
		if (obfuscatedValue <= zeroThreshold)
		{
			return 0;
		}
		long roundedValue = Math.round(obfuscatedValue / roundToNearest) * roundToNearest;
		if (roundedValue <= 0)
		{
			return 0;
		}
		return (int) roundedValue;
	}
For the code above, sample() generates a random number from the configured distribution, and mean() returns the mean of that distribution. Details about the options for selection a distribution are below.
For the properties defined below, the XXX represents the name of an individual site in the network, and each site will have its own set of obfuscations that can be configured, in case that differs between sites.
| XXX.obfuscate.count.zeroThreshold |
This is the lower limit for which no count will be returned. If this parameter is not defined, it will default to 10. Example:
XXX.obfuscate.count.zeroThreshold=10 |
| XXX.obfuscate.count.roundToNearest |
Round counts to the nearest multiple of this number. By default this is one (so effectively no rounding is performed). Example:
XXX.obfuscate.count.roundToNearest=1 |
| XXX.obfuscate.count.distribution |
This is the statistical distribution for how the obfuscation will be made. The default if no parameter is defined is Example:
XXX.obfuscate.count.distribution=normal |
Additional obfuscation options related to the distribution are defined in the table below.
| Distribution value | Description | Additional Parameters | Parameter description |
|---|---|---|---|
normal |
The normal distribution |
XXX.obfuscate.count.distribution.normal.s=2 |
The standard deviation |
binomial |
The binomial distribution |
XXX.obfuscate.count.distribution.binomial.n=6 |
Number of "trials", a choice between 0 or 1. |
uniform |
The uniform distribution |
XXX.obfuscate.count.distribution.uniform.scale=6 |
This is the uniform distribution on [0, S], where S is this parameter. |
disabled |
A uniform distribution on [0,0] |
(none) |
This distribution effectively disables the random variation of results. |
| The distributions are the standard statistical distributions. We "sample" from the distribution, meaning we generate a random number with the probability described by the distribution, and we modify the actual count based on that random number. |
Response Time Obfuscation
It may be possible to glean some information from the amount of time it takes for a query to respond. For instance, if a query cannot possibly match because a term queried for doesn’t appear in the index, then the response to the query my be received very quickly, but if the term does appear, it may take much longer. This may then be used to infer that the count is zero versus non-zero, even though the count is itself reported the same after obfuscation (as less than ten say).
To prevent this, a response is delivered at least after some small random amount of time. This is less configurable than the count obfuscation; it simply waits a random amount of time uniformly randomly picked between a configurable min and max delay.
| XXX.obfuscate.time.minDelayMillis |
The minimum number of milliseconds to wait before responding. Default is zero. |
| XXX.obfuscate.time.maxDelayMillis |
The maximum number of milliseconds to wait before responding. Default is 1000 (a single second). |
Query Limits
EMERSE throttles requests from users on the network to prevent them from executing a large number of queries to try to deduce the exact count for a query result. This can be specified using two parameters which should be configured in the usual emerse.properties file, not the network properties file.
Namely, when a request from a user comes in, it will be rejected if in the last X minutes, the number of queries run by that user (from that remote site) is at or exceeding the threshold configured.
Queries that are rejected are not logged in the audit system at this point.
| remoteUserQueryThreshold |
This defines the total number of queries a user can execute at the local site within a certain time frame, which is defined using Example:
remoteUserQueryThreshold=10 |
| remoteUserQueryIntervalInMins |
This defines the time span in which the Example:
remoteUserQueryIntervalInMins=30 |
The two parameters, as shown above, would allow for no more than 10 queries within a 30 minute time period from a single user.
Configuring Filter Mapping for Demographic Search Fields
Overview
Network search allows a query submitted from one node to be sent to other nodes through the Query Coordinator. Because different nodes may store demographic filter values differently, the Query Coordinator includes a filter mapping layer.
This mapping layer translates search filter values in two steps:
Sender node local value
        ↓
Canonical value
        ↓
Receiver node local value
For example, one node may store female patients as:
SEX_CD = F
while another node may store the same concept as:
SEX_CD = 0
Using the mapping layer, the Query Coordinator can translate:
Sender node: SEX_CD = F
        ↓
Canonical value: FEMALE
        ↓
Receiver node: SEX_CD = 0
This allows network searches to behave consistently even when each node uses different local codes for the same demographic concepts.
The mapping configuration is stored in the following tables:
-
NETWORK_SEARCH_FIELD
-
CANONICAL_VALUE
-
NODE_FIELD_VALUE_MAPPING
Mapping Tables
NETWORK_SEARCH_FIELD
The NETWORK_SEARCH_FIELD table stores the list of fields that are supported in network search.
It also identifies whether a field requires value mapping.
For example:
-
BIRTHDATE does not require mapping because date values can be passed directly between nodes.
-
SEX_CD, RACE_CD, ETHNICITY_CD, and DECEASED_FLAG require mapping because different nodes may store different local values for the same concept.
CANONICAL_VALUE
The CANONICAL_VALUE table stores the shared canonical values for each mapped network search field.
For example, the field SEX_CD may have the following canonical values:
FEMALE
MALE
UNKNOWN
These canonical values are not necessarily stored in any node’s local database. They are used by the Query Coordinator as an intermediate translation layer.
NODE_FIELD_VALUE_MAPPING
The NODE_FIELD_VALUE_MAPPING table stores the mapping between a node’s local values and the canonical values.
For example:
| Node | Local Field | Local Value | Canonical Value |
|---|---|---|---|
e1 |
SEX_CD |
0 |
FEMALE |
e2 |
SEX_CD |
F |
FEMALE |
This tells the Query Coordinator that e1 value 0 and e2 value F represent the same concept.
Creating the Mapping Tables in Query Coordinator Database
The tables can be created using the following SQL:
CREATE TABLE "NETWORK_SEARCH_FIELD" (
    "ID" BIGINT GENERATED ALWAYS AS IDENTITY PRIMARY KEY,
    "FIELD_KEY" VARCHAR(100) NOT NULL UNIQUE,
    "LABEL" VARCHAR(255) NOT NULL,
    "HAS_MAPPING" BOOLEAN NOT NULL DEFAULT FALSE
);

CREATE TABLE "CANONICAL_VALUE" (
    "ID" BIGINT GENERATED ALWAYS AS IDENTITY PRIMARY KEY,
    "NETWORK_SEARCH_FIELD_ID" BIGINT NOT NULL,
    "CODE" VARCHAR(100) NOT NULL,
    "LABEL" VARCHAR(255) NOT NULL,

    UNIQUE ("NETWORK_SEARCH_FIELD_ID", "CODE"),

    FOREIGN KEY ("NETWORK_SEARCH_FIELD_ID")
        REFERENCES "NETWORK_SEARCH_FIELD"("ID")
);

CREATE TABLE "NODE_FIELD_VALUE_MAPPING" (
    "ID" BIGSERIAL PRIMARY KEY,

    "NODE_ID" VARCHAR(100) NOT NULL,
    "LOCAL_FIELD_KEY" VARCHAR(100) NOT NULL,
    "LOCAL_VALUE" VARCHAR(255) NOT NULL,

    "CANONICAL_VALUE_ID" BIGINT NOT NULL,

    "ACTIVE" BOOLEAN NOT NULL DEFAULT TRUE,

    UNIQUE ("NODE_ID", "LOCAL_FIELD_KEY", "LOCAL_VALUE", "CANONICAL_VALUE_ID"),

    FOREIGN KEY ("CANONICAL_VALUE_ID")
        REFERENCES "CANONICAL_VALUE"("ID"),

    FOREIGN KEY ("NODE_ID")
        REFERENCES "NODE"("ID")
);
Adding Default Network Search Fields
For the default configuration, the following patient demographic fields can be added as network search fields:
-
Birth Date
-
Sex
-
Race
-
Ethnicity
-
Deceased
Use the following query:
insert data:
INSERT INTO "NETWORK_SEARCH_FIELD" ("FIELD_KEY", "LABEL", "HAS_MAPPING")
VALUES
    ('BIRTHDATE', 'Birth Date', FALSE),
    ('SEX_CD', 'Sex', TRUE),
    ('RACE_CD', 'Race', TRUE),
    ('ETHNICITY_CD', 'Ethnicity', TRUE),
    ('DECEASED_FLAG', 'Deceased', TRUE);
BIRTHDATE has "HAS_MAPPING" = FALSE because date values are not translated through canonical values. The other demographic fields have "HAS_MAPPING" = TRUE because their local values may differ between nodes.
Adding Canonical Values
Canonical values for the default mapped network search fields can be inserted using the following query:
INSERT INTO "CANONICAL_VALUE" (
    "NETWORK_SEARCH_FIELD_ID",
    "CODE",
    "LABEL"
)
SELECT
    cf."ID",
    v."CODE",
    v."LABEL"
FROM (
    VALUES
        -- SEX_CD
        ('SEX_CD', 'FEMALE', 'Female'),
        ('SEX_CD', 'MALE', 'Male'),
        ('SEX_CD', 'UNKNOWN', 'Unknown'),

        -- ETHNICITY_CD
        ('ETHNICITY_CD', 'HISPANIC', 'Hispanic'),
        ('ETHNICITY_CD', 'NON_HISPANIC', 'Non-Hispanic'),
        ('ETHNICITY_CD', 'PATIENT_REFUSED', 'Patient Refused'),
        ('ETHNICITY_CD', 'UNKNOWN', 'Unknown'),

        -- RACE_CD
        ('RACE_CD', 'AMERICAN_INDIAN_ALASKA_NATIVE', 'American Indian and Alaska Native'),
        ('RACE_CD', 'ASIAN', 'Asian'),
        ('RACE_CD', 'BI_MULTI_RACIAL', 'Bi/Multi Racial'),
        ('RACE_CD', 'BLACK_AFRICAN_AMERICAN', 'Black or African American'),
        ('RACE_CD', 'MIDDLE_EASTERN', 'Middle Eastern'),
        ('RACE_CD', 'NATIVE_HAWAIIAN_PACIFIC_ISLANDER', 'Native Hawaiian and Other Pacific Islander'),
        ('RACE_CD', 'OTHER', 'Other'),
        ('RACE_CD', 'PATIENT_REFUSED', 'Patient Refused'),
        ('RACE_CD', 'UNKNOWN', 'Unknown'),
        ('RACE_CD', 'WHITE', 'White or Caucasian'),

        -- DECEASED_FLAG
        ('DECEASED_FLAG', 'ALIVE_UNKNOWN', 'Alive/Unknown'),
        ('DECEASED_FLAG', 'DECEASED', 'Deceased')
) AS v("FIELD_KEY", "CODE", "LABEL")
JOIN "NETWORK_SEARCH_FIELD" cf
    ON cf."FIELD_KEY" = v."FIELD_KEY"
ON CONFLICT ("NETWORK_SEARCH_FIELD_ID", "CODE") DO UPDATE
SET "LABEL" = EXCLUDED."LABEL";
Adding Node-Specific Value Mappings
To enable mapped demographic network search for a node, each node’s local field values must be mapped to the appropriate canonical values.
For example, suppose node e1 stores sex values as:
| Local Field | Local Value | Meaning |
|---|---|---|
SEX_CD |
F |
Female |
SEX_CD |
M |
Male |
SEX_CD |
U |
Unknown |
The mapping can be inserted as follows:
WITH mapping("LOCAL_FIELD_KEY", "LOCAL_VALUE", "CANONICAL_CODE") AS (
    VALUES
        ('SEX_CD', 'F', 'FEMALE'),
        ('SEX_CD', 'M', 'MALE'),
        ('SEX_CD', 'U', 'UNKNOWN'),
)
INSERT INTO "NODE_FIELD_VALUE_MAPPING" (
    "NODE_ID",
    "LOCAL_FIELD_KEY",
    "LOCAL_VALUE",
    "CANONICAL_VALUE_ID",
    "ACTIVE"
)
SELECT
    'e1' AS "NODE_ID",
    m."LOCAL_FIELD_KEY",
    m."LOCAL_VALUE",
    cv."ID" AS "CANONICAL_VALUE_ID",
    TRUE AS "ACTIVE"
FROM mapping m
JOIN "NETWORK_SEARCH_FIELD" cf
    ON cf."FIELD_KEY" = m."LOCAL_FIELD_KEY"
JOIN "CANONICAL_VALUE" cv
    ON cv."NETWORK_SEARCH_FIELD_ID" = cf."ID"
   AND cv."CODE" = m."CANONICAL_CODE"
ON CONFLICT ("NODE_ID", "LOCAL_FIELD_KEY", "LOCAL_VALUE", "CANONICAL_VALUE_ID") DO UPDATE
SET "ACTIVE" = EXCLUDED."ACTIVE";
In this example, node e1 maps:
SEX_CD = F → FEMALE
SEX_CD = M → MALE
SEX_CD = U → UNKNOWN
Supporting Multiple Local Values for One Canonical Value
A node may have more than one local value mapped to the same canonical value.
For example, one node may store female patients using two different values:
SEX_CD = 1 → FEMALE
SEX_CD = 2 → FEMALE
Another node may store female patients using one value:
SEX_CD = F → FEMALE
The Query Coordinator handles this by translating through the canonical value.
For example, if a user searches from node e1:
SEX_CD IN (1, 2)
the Query Coordinator translates the values as:
e1 SEX_CD 1 → FEMALE
e1 SEX_CD 2 → FEMALE
After deduplication, the canonical filter is:
SEX_CD = FEMALE
If the search is sent to node e2, and node e2 maps:
SEX_CD F → FEMALE
then the Query Coordinator sends the following filter to e2:
SEX_CD IN (F)
This also works in the reverse direction.
If a user searches from e2:
SEX_CD IN (F)
and the search is sent to e1, the Query Coordinator translates it to:
SEX_CD IN (1, 2)
Example: Adding Full Mappings for a Node
The following example inserts mappings for sex, ethnicity, race, and deceased values for node e1.
Update the local values as needed for each node.
WITH mapping("LOCAL_FIELD_KEY", "LOCAL_VALUE", "CANONICAL_CODE") AS (
    VALUES
        -- SEX_CD
        ('SEX_CD', 'F', 'FEMALE'),
        ('SEX_CD', 'M', 'MALE'),
        ('SEX_CD', 'U', 'UNKNOWN'),

        -- ETHNICITY_CD
        ('ETHNICITY_CD', 'Hispanic', 'HISPANIC'),
        ('ETHNICITY_CD', 'Non-Hispanic', 'NON_HISPANIC'),
        ('ETHNICITY_CD', 'Pt Refused', 'PATIENT_REFUSED'),
        ('ETHNICITY_CD', 'Unknown', 'UNKNOWN'),

        -- RACE_CD
        ('RACE_CD', 'A', 'AMERICAN_INDIAN_ALASKA_NATIVE'),
        ('RACE_CD', 'B', 'BLACK_AFRICAN_AMERICAN'),
        ('RACE_CD', 'D', 'PATIENT_REFUSED'),
        ('RACE_CD', 'E', 'MIDDLE_EASTERN'),
        ('RACE_CD', 'H', 'OTHER'),
        ('RACE_CD', 'M', 'BI_MULTI_RACIAL'),
        ('RACE_CD', 'O', 'ASIAN'),
        ('RACE_CD', 'P', 'NATIVE_HAWAIIAN_PACIFIC_ISLANDER'),
        ('RACE_CD', 'U', 'UNKNOWN'),
        ('RACE_CD', 'W', 'WHITE'),

        -- DECEASED_FLAG
        ('DECEASED_FLAG', 'false', 'ALIVE_UNKNOWN'),
        ('DECEASED_FLAG', 'true', 'DECEASED')
)
INSERT INTO qc."NODE_FIELD_VALUE_MAPPING" (
    "NODE_ID",
    "LOCAL_FIELD_KEY",
    "LOCAL_VALUE",
    "CANONICAL_VALUE_ID",
    "ACTIVE"
)
SELECT
    'e1' AS "NODE_ID",
    m."LOCAL_FIELD_KEY",
    m."LOCAL_VALUE",
    cv."ID" AS "CANONICAL_VALUE_ID",
    TRUE AS "ACTIVE"
FROM mapping m
JOIN qc."NETWORK_SEARCH_FIELD" cf
    ON cf."FIELD_KEY" = m."LOCAL_FIELD_KEY"
JOIN qc."CANONICAL_VALUE" cv
    ON cv."NETWORK_SEARCH_FIELD_ID" = cf."ID"
   AND cv."CODE" = m."CANONICAL_CODE"
ON CONFLICT ("NODE_ID", "LOCAL_FIELD_KEY", "LOCAL_VALUE", "CANONICAL_VALUE_ID") DO UPDATE
SET "ACTIVE" = EXCLUDED."ACTIVE";