Overview
This guide provides a general overall of the components needed to run EMERSE, how to install them, and verify that they are running.
Supported Operating Systems
EMERSE is mainly tested on enterprise linux systems (RHEL and SUSE), so we recommend these or their open source equivalents. Windows based platforms should work as well, provided they are recent enough to have quality Java releases, as EMERSE and most of the components run within a Java Virtual Machine.
Pre-Requisites
Oracle
An Oracle database server is needed for EMERSE. For the purposes of getting started, Oracle makes available a free “Express Edition” that is fully functional. This free edition of Oracle supports 1 core and up to 10 GB of disk space, which should be enough to support a few users in a demonstration version, or even light use in a production setting. Oracle express can be downloaded here: Oracle Express-Edition
Any of the available Oracle Database Editions should work with EMERSE. Michigan Medicne uses the Enterprise version in the production environment, but EMERSE does not depend on any Oracle components that would require additional licensing (e.g., replication, Oracle RAC, advanced compression, etc.)
| EMERSE was initially developed at Michigan Medicine for internal use, and Oracle was chosen because it was already licensed by the University. It is the only non-open source component used by EMERSE. It should theoretically be possible to change the database to an open source one, or to another database such as SQL Server, but we do not recommend it at this time due to the effort it would take. Further, this approach is currently untested and unsupported by the EMERSE team. |
Server and Storage
A Linux/Unix based server is suggested for installing the application server and host the indexing services. No specific type of storage is required, but in general the server should be connected to the highest speed storage available. EMERSE performs a lot of disk reads to retrieve the documents, so read performance is important. We have conducted some experiments using SSD storage and have found it to provide nearly a two-fold increase in system performance for EMERSE, most noticeably in the area where all documents are retrieved and highlighted for a pre-defined set of patients.
Storage capacity is dependent on number of documents to be indexed. At Michigan Medicine 1.5TB is in use to host approximately 100 million documents in both TXT and HTML format on the production server. An additional 3 TB is available for index optimization, as optimization requires about 2x the size of the index. If your documents are heavily formatted (e.g., RTF instead of TXT), storage requirements may be higher.
Installation components
The remainder of this document covers the process of installing and configuring the application server where the EMERSE application will be deployed. The following items are required:
-
Java Development Kit/SDK (JDK)
-
Apache Tomcat (Java Servlet Engine)
-
Apache ActiveMQ (A message broker)
-
Solr 6 web application
-
EMERSE Web Archive File (WAR file) deployment and configuration
Specifics for installing each of these follows.
Installation
| Name | Version | Download URL |
|---|---|---|
Java JDK |
1.8.x |
http://www.oracle.com/technetwork/java/javase/downloads/jdk8-downloads-2133151.html |
Apache Tomcat |
8.0.45+ |
|
Apache Active MQ |
5.15 |
|
Apache Solr |
6.0.0 (only, not higher) |
|
EMERSE WAR file |
latest version |
Java
The first step in installing EMERSE is to download and install a Java Development Kit (JDK) on the server. Java 8 or higher is required. All of the remaining components that will be installed are dependent on a path to the location of the installation of this java JDK installation.
| Note the location of the path to the JDK installation. It will be needed in subsequent installation steps |
Linux: After downloading the java appropriate for the linux server, unpack the file:
tar -xvf jdk-xxversion-linux-xnn.tar.gz
or
rpm -ivh jdk-xxversion-linux-xnn.rpm
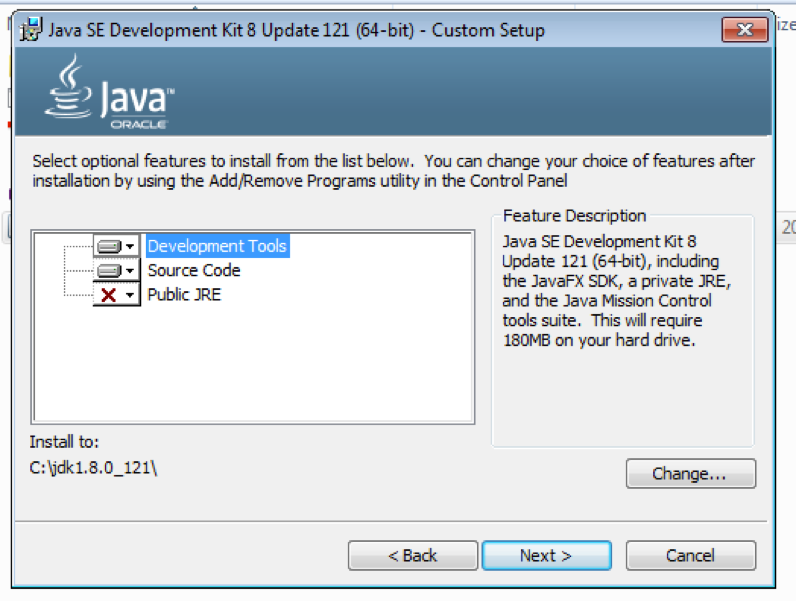
Windows: After downloading, run the executable. If the target workstation has an existing Java installation that you wish to maintain, unselect the “public JRE” option in the installer as shown below.

Apache Tomcat
EMERSE is packaged as a Java based WAR file that will is deployed to the Tomcat Servlet engine. Tomcat depends on a Java JDK. Version 8.0.45+ is required. The tomcat download page lists a number of components available for download. Only the "Core" software is required. The main steps to setup Tomcat are:
-
Download the "Core" zip or tar file. See Required Software section.
-
Unzip to desired directory
-
Ensure Tomcat uses the desired Java runtime
| Operating Systems often include a Java runtime, and is available on the "Path" variable. We recommend explicitly using the JDK downloaded previously. |
Linux:
From the binary distributions listed on the page, choose the "Core" tar file. Move the tar file to a desired directory for installation. Extract the tar file using
tar -zxvf apache-tomcat-8.0.nn.tar.gz
Edit the startup script (startup.sh) found at /path/to/tomcat/bin to point to Java installation directory by adding
export JAVA_HOME=/path/to/jdk_install
It has also been observed that EMERSE requires a higher limit on the number of open files than what is typically the default on some Linux systems. This can be set using the ulimit command as below prior to starting Tomcat, or added directly to the startup script startup.sh.
ulimit -v unlimited
When the open file limit is set too low, an exception like the following will be thrown when Solr or EMERSE are started.
...
Caused by: java.io.IOException: Map failed
        at sun.nio.ch.FileChannelImpl.map(FileChannelImpl.java:849)
        at org.apache.lucene.store.MMapDirectory.map(MMapDirectory.java:283)
        at org.apache.lucene.store.MMapDirectory$MMapIndexInput.<init>(MMapDirectory.java:228)
        at org.apache.lucene.store.MMapDirectory.openInput(MMapDirectory.java:195)
        at org.apache.lucene.codecs.compressing.CompressingTermVectorsReader.<init>(CompressingTermVectorsReader.java:118)
        at org.apache.lucene.codecs.compressing.CompressingTermVectorsFormat.vectorsReader(CompressingTermVectorsFormat.java:85)
        at org.apache.lucene.index.SegmentCoreReaders.<init>(SegmentCoreReaders.java:132)
        at org.apache.lucene.index.SegmentReader.<init>(SegmentReader.java:96)
        at org.apache.lucene.index.StandardDirectoryReader$1.doBody(StandardDirectoryReader.java:63)
        at org.apache.lucene.index.SegmentInfos$FindSegmentsFile.run(SegmentInfos.java:843)
        at org.apache.lucene.index.StandardDirectoryReader.open(StandardDirectoryReader.java:53)
        at org.apache.lucene.index.DirectoryReader.open(DirectoryReader.java:66)
...
Windows:
Download the zip file from binary distributions under the “Core” section. Unzip this file in a desired directory. This will become the Tomcat installed directory. Edit the startup.bat file found under bin to point to the directory where the JDK was installed.
set JAVA_HOME=c:\path_to\jdk_install
Starting and Stopping the Tomcat Server
To start the server use:
/path/to/tomcat/bin/startup.sh
To stop the server use:
/path/to/tomcat/bin/shutdown.sh
Confirm Tomcat installation
Point a browser to http://hostname:8080/. A tomcat welcome screen should come up.
Apache Solr
EMERSE leverages Apache Solr for searching documents.
-
Download recommended file. See Required Software section.
-
Unzip to desired directory
-
Ensure Solr uses the desired Java runtime
| The Solr version should be the exact version specified. Otherwise, the sample indexes provided may not be usable, and EMERSE may not function. |
Start and Stop Solr
To start the server use:
/path/to/solr/bin/solr start
To stop the server use:
/path/to/solr/bin/solr stop
Validate installation
Using a browser, navigate to http://hostname:8983/solr to confirm Solr installation.
Solr Data directory
At this point Solr should be running, but it has no "cores" or data. Create a new directory, preferrably outside the Solr installation directory, that will have configuration and data for each index that is being hosted. The remainder of this document will refer to SOLR_DATA_DIR as this directory.
Initial index configuration
The EMERSE distribution includes a set of sample Solr index files that include a set of PubMed articles, not containing protected health information (PHI). They provide a way to verify the EMERSE install is successful, but the contents of which should be deleted and replaced with your organization’s real patient documents after additional localized configuration is done. These sample documents are linked to the patients loaded by the SQL file in database setup by their MRN. Additional Solr index files include indexes specific to the patients, which are used to rapidly summarize details used for graphing demographics.
The sample index folders pubmed, patient, and patient-slave should be downloaded and then placed in the Solr’s data directory on the server where EMERSE and Solr are running. Other aspects of the configuration will have to be changed from the included example files to match your local institutional needs (e.g., the metadata types included for each document).
Apache ActiveMQ
EMERSE requires ActiveMQ to enable background processing of a number of internal tasks. Installation steps are very similar to Apache Tomcat.
-
Download recommended file. See Required Software section.
-
Unzip to desired directory
-
Ensure ActiveMQ uses the desired Java runtime
Unpack the ActiveMQ distribution.
EMERSE Install and Configuration
Database initialization
Provided with the EMERSE distribution are a set of files, each containing SQL statements that create all needed database objects and sample data that will allow the EMERSE application to startup with a default set of database objects, and sample data in the patients, research studies, synonyms and tables. These scripts should be run as the user and schema setup for the EMERSE application (this will be set by each implementing site), and not a system or sysdba user. These files need to be executed in a SQL query tool in the following order:
-
sequences.sql -
tables.sql -
indexes.sql -
constraints.sql -
lookupdata.sql -
indexdata.sql -
patientdata.sql -
synonyms_index_subset.sql -
synonyms_subset_50k.sql -
3_5_releasechanges.sql
| These files are for release version 3.5 |
WAR file installation
The next step in getting EMERSE up and running after initial installation of the application server and configuration
of the database with default settings is to deploy the EMERSE WAR file.
To deploy the file, first rename the supplied war file to emerse.war, then copy the war file to the
webapps directory of the Tomcat server. If Tomcat is using default settings, the WAR file will be exploded into a
number of files in a directory called emerse. This directory includes all the files needed to run the application.
You will need to make a change to the settings file to reflect the database that will be used.
Inside the WEB-INF/classes directory of the exploded war file, you will find a file called project.properties.
This file contains the settings to connect to the database.
Configuration
At this point the software part of the installation is complete, but some additional configuration may be required. Minimally, this would include the URL of the Oracle database. Information on configuring EMERSE to locate the Oracle Server is located in the configuration guide.
Confirm installation
At this point EMERSE should come up, using the URL:
http://hostname:8080/emerse
If it does not, the best place to troubleshoot any issues are in log files inside the Tomcat installation:
$TOMCAT_INSTALL_PATH/logs
Checklist
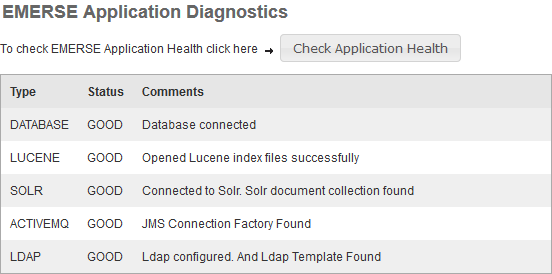
After all the required software is installed, one can verify the component wiring by running a diagnosis checklist through the EMERSE app. The check list page can be viewed using the URL:
http(s)://hostname<:port if applicable>/emerse/diagnostics.html
The following components are verified on a high level:
-
Database: Connection to the database is established and a query on sysdate is run.
-
Lucene: Checks the Lucene path in the configuration file and establishes a connection.
-
SOLR: Establishes a connection to SOLR and run a simple query.
-
Active MQ: Establishes a connection to Active MQ configured in the property files.
-
LDAP: Checks if the LDAP profile is provided and if true, establishes a connection to the LDAP tree.

