
Overview
This guide provides a general overview of the components needed to run EMERSE, how to install them, and how to verify that they are running. The guide covers step-by-step directions on how to install everything on a linux server.
For this guide we provide three already created Solr indexes to use as well as SQL scripts to create the database schema and populate it with sample data. An actual production instance would require the creation of the Solr indexes, populating the patient table, and additional localized configurations dependent on document sources and metadata. Nevertheless, this guide should provide enough detail to understand how everything is installed and provides the ability to test the final installation to ensure that it is functional.
If you run into trouble, we recommend that issues get posted to our Discourse Message Forum so that they can be available to all of our developers as well as the larger EMERSE community. The forum is also a good place to search for issues that may have already been addressed.
Supported Operating Systems
EMERSE is mainly tested on enterprise Linux systems (RHEL and SUSE), so we recommend these or their open source equivalents. Windows based platforms should work as well, provided they are recent enough to have quality Java releases, as EMERSE and most of the components run within a Java Virtual Machine.
Planning
Personnel
To install EMERSE, someone with sys admin skills is desirable. This person should be able to install and configure software, edit database tables, etc. No actual programmer experience is needed for a default installation and configuration of EMERSE. Knowledge of servers, Java, Linux, and Apache software will be useful skills for this installation.
Timelines
The initial setup described in this guide can probably be done in a day or less. More time will be required for additional customizations and planning related to localized needs, document extraction and indexing, regulatory approval, etc.
Server and Storage
A Linux/Unix based server is suggested for installing the application server and for hosting the indexing services. No specific type of storage is required, but in general the server should be connected to the highest speed storage available. EMERSE performs a lot of disk reads to retrieve the documents, so read performance is important. We have conducted some experiments using SSD storage and have found it to provide nearly a two-fold increase in system performance for EMERSE, most noticeably in the area where all documents are retrieved and highlighted for a pre-defined set of patients.
Storage capacity is dependent on number of documents to be indexed. While no longer our latest statistics, at one point at Michigan Medicine 2.2TB was used to host approximately 166 million documents in both TXT and HTML format on the production server. An additional 4 TB was available for index optimization, as optimization requires about 2x the size of the index. If your documents are heavily formatted (e.g., HTML instead of TXT), storage requirements may be higher.
Database Sizing
EMERSE doesn’t place great demand on the Oracle database, so a relatively small server can be used with 10-50 GB of storage allocated for user tablespaces. While no longer up-to-date, at one point at Michigan Medicine we were using 8 GB of database space for production EMERSE with 600+ users and 5 years of data (audit logs, user settings, etc).
Server setup
For a production install of EMERSE you will probably want to set up a Linux server based on whatever local options are available. For the purposes of this install guide, a desktop Fedora Linux machine was used to carry out the steps.
Component Installation
The remainder of this guide covers the process of installing and configuring the application server where the EMERSE application will be deployed. Specifics for installing each of these components follows.
| For some of the commands shown in this guide, specific version numbers will be shown as examples. Depending on the software component, the version number you download and install may differ from these examples. Make note of these potential differences when executing the instructions on the command line to ensure that they work successfully. |
Also note that most of these directions are directed at a Linux installation, but we have provided some details for Windows for those interested in trying to install EMERSE on a Windows server.
For the purposes of this installation guide, all components will be stored in a directory called /app. In reality it can be any directory, but for consistency they will go here in this guide.
| Name | Version | Description | Download URL |
|---|---|---|---|
Java JDK |
11 |
Java Development Kit/SDK (JDK) |
|
Apache Tomcat |
9.0.43+ |
Java Servlet Engine |
|
Apache Solr |
8.9.0 (or higher, but not a major version higher) |
Indexing/Information Retrieval System |
|
Relational Database |
10.3 or higher |
Many databases work with EMERSE; we will use this MariaDB since it’s easy to install on linux. |
|
EMERSE WAR file |
latest version |
EMERSE Web Archive File (WAR file) deployment and configuration |
https://github.com/project-emerse/emerse/releases/ You must log in to GitHub.com and be grated access to EMERSE, otherwise this page will appear as a 404. |
| Earlier versions of Tomcat may have a bug in it causing the admin2 app not to load. |
| Name | Version | Description |
|---|---|---|
Hibernate |
5.4.25 |
Provides database-agonstic data persistence |
Spring Security |
5.5.0 |
Provides security services |
Java
The first step in installing EMERSE is to download and install a Java Development Kit (JDK) on the server. Java 11 or higher is required because it was compiled under that version.
Operating Systems often include a Java runtime, and is available on the PATH variable. We will use the java available from the linux distribution’s package manager, and install it like so:
sudo dnf install java-11-openjdk
# Confirming installation:
java --version
The latter command should print out the java version installed, and confirms that Java is on the path.
Apache Tomcat
EMERSE is packaged as a Java based WAR file that will be deployed to the Tomcat Servlet engine. Tomcat depends on a Java JDK. Tomcat version 9.0.7+ is required. The Tomcat download page lists a number of components available for download. Only the "Core" software is required. See Required Software section.
We’ll navigate to the apache website and click on the "tar.gz" link under the "Core" bullet point. This should download apache from a mirror near you. Then unzip the in the /app directory:
cd /app
tar zxf ~/Downloads/apache-tomcat*.tar.gz
# Let's rename the directory to just "tomcat" for simplicity
mv apache-tomcat* tomcat
Let’s start tomcat to confirm it’s running:
/app/tomcat/bin/catalina.sh startOpen a browser and navigate to http://localhost:8080/. A Tomcat welcome screen should appear.
To stop tomcat, you just need to do:
/app/tomcat/bin/catalina.sh stop(Though you don’t need to do that now.)
Apache Solr
EMERSE leverages Apache Solr for searching documents. See Required Software section for the specific version to use. The Solr version should have the same major version as specified, and a minimum of the minor version. Otherwise, the sample indexes provided may not be usable, and EMERSE may not function.
Navigate your browser to https://solr.apache.org/downloads.html and download the latest .tgz BINARY release of Solr. We’ll expand it under /app and rename it, just like tomcat:
cd /app
tar zxf ~/Downloads/solr*.tgz
mv solr* solr
Let’s start solr to confirm it’s installed correctly:
/app/solr/bin/solr startand then navigate your browser to http://localhost:8983/solr/. You should the solr admin tool dashboard.
Maria Database
A database is needed for EMERSE. For the purposes of getting started, we’ll use the MariaDB database, since it’s often installable using linux package manages.
sudo dnf install mariadb-serverDatabase servers are often configured to be automatically started up as a "service" when the computer is booted. Different linux systems do this different ways, but the most common, especially for RedHat systems, is systemd. For Fedora, this looks like:
# Enable the service so it starts at boot:
sudo systemctl enable mariadb
# Start it right now:
sudo systemctl start mariadb
If you don’t want it started at boot, don’t "enable" the service. It can be started while "disabled."
To confirm it’s running, run the mariadb command, which attempts to connect to the database:
mariadbYou should either get a command prompt for the database, or a permission error, such as "Access denied for user…" You should not get an error saying it cannot get to the server, or cannot find a file named mysql.sock or a similar name.
Microsoft SQL Server Database
If you are using Microsoft SQL Server as the backend database, we recommend two additional steps to ensure adequate performance.
-
Enable
READ_COMMIT_SNAPSHOTon the database; -
Adding
sendStringParametersAsUnicode=false;on the JDBC connection.
EMERSE Install and Initial Configuration
From here on out, you’ll start installing software developed here at Michigan Medicine. Our software, along with SQL install scripts, and related files are all stored in our private EMERSE project page on GitHub. To access this repository and hence the rest of the installation materials, please contact the EMERSE team and provide us with your GitHub ID.
All installation files are "assets" on release pages of the EMERSE project. Generally, we don’t duplicate all the files needed to install EMERSE on each release, because many files don’t change, and many files that don’t change are extremely large (such as the example index files). For this reason, we only attach the changed files for each release. Thus, if you need a file named, say, emerse.properties you should search from the most recent release to the least recent release for the file with that name, or a very similar name. For instance, if you see emerse.properties on releases 6.1.1, 6.1, and on 6.0, you should use the one from 6.1.1. Similarly, if you are looking for emerse-solr-6.0.jar and you see it on release 6.0 but also see a emerse-solr.jar on release 6.1, you should use the 6.1 version. (We try not to have versions in our file names so that the file name is an exact match across versions.)
| This guide was written when 6.1.2 was the last release, so we’ll tell you to go to a specific release page to get a particular file, but (if at least you are trying to install the latest version) you should always find the latest version of the file by scanning from the most recent release. |
Solr indexes
We provide three indexes with the default distribution. Three of the indexes are populated with sample data to help with testing the initial setup and configuration.
The four indexes are:
-
patient -
patient-slave -
documents
| Do not change the names of these indexes. |
Two of the indexes (patient and patient-slave) store data about the patients (not real patients in the files that we distribute), and are meant to be populated from the PATIENT table within the database. These indexes are required by EMERSE and the overall structure/definition of them should not be changed even for your own localized installation. The patient demographic data stored within them will automatically be replaced from the database tables when EMERSE is running. The two patient indexes are used to rapidly summarize details used for graphing the demographics.
A third index is called documents and holds PubMed abstracts and open access case reports (containing no protected health information) as placeholders for sample documents. For your production system you can optionally rename this to something that is more suitable (you would then have to update the name in the database table called SOLR_INDEX, described in the Data Guide). Additionally, other aspects of the configuration for this document index will have to be changed from the included example to match your local institutional needs (e.g., the metadata types included for each document).
| These three sample indexes can be found on our GitHub page. |
Once you have access to our GitHub repository, navigate to the 6.0 release, and download the following files:
-
pubmed-documents.zip -
pubmed-patient.zip -
pubmed-patient-slave.zip -
solr.xml
Also navigate to the the 6.1 release and download the following files:
-
emerse-solr.jar
We’ll create a solr home directory under /app/indexes:
cd /app
mkdir indexes
cd indexes
cp ~/Downloads/solr.xml .
mkdir lib
cp ~/Downloads/emerse-solr.jar lib
unzip ~/Downloads/pubmed-documents.zip
unzip ~/Downloads/pubmed-patient.zip
unzip ~/Downloads/pubmed-patient-slave.zip
Each zip file is a Solr "core" or "index". Solr needs the solr.xml file to exist, but currently contains no settings that we need to specify; all the defaults in Solr are fine. Finally, the lib directory contains our plugin jar to Solr, which is used by the documents index.
|
Once this is done, we’ll stop solr, and start it back up, specifying the solr home directory as /app/indexes so it reads these indexes:
/app/solr/bin/solr stop
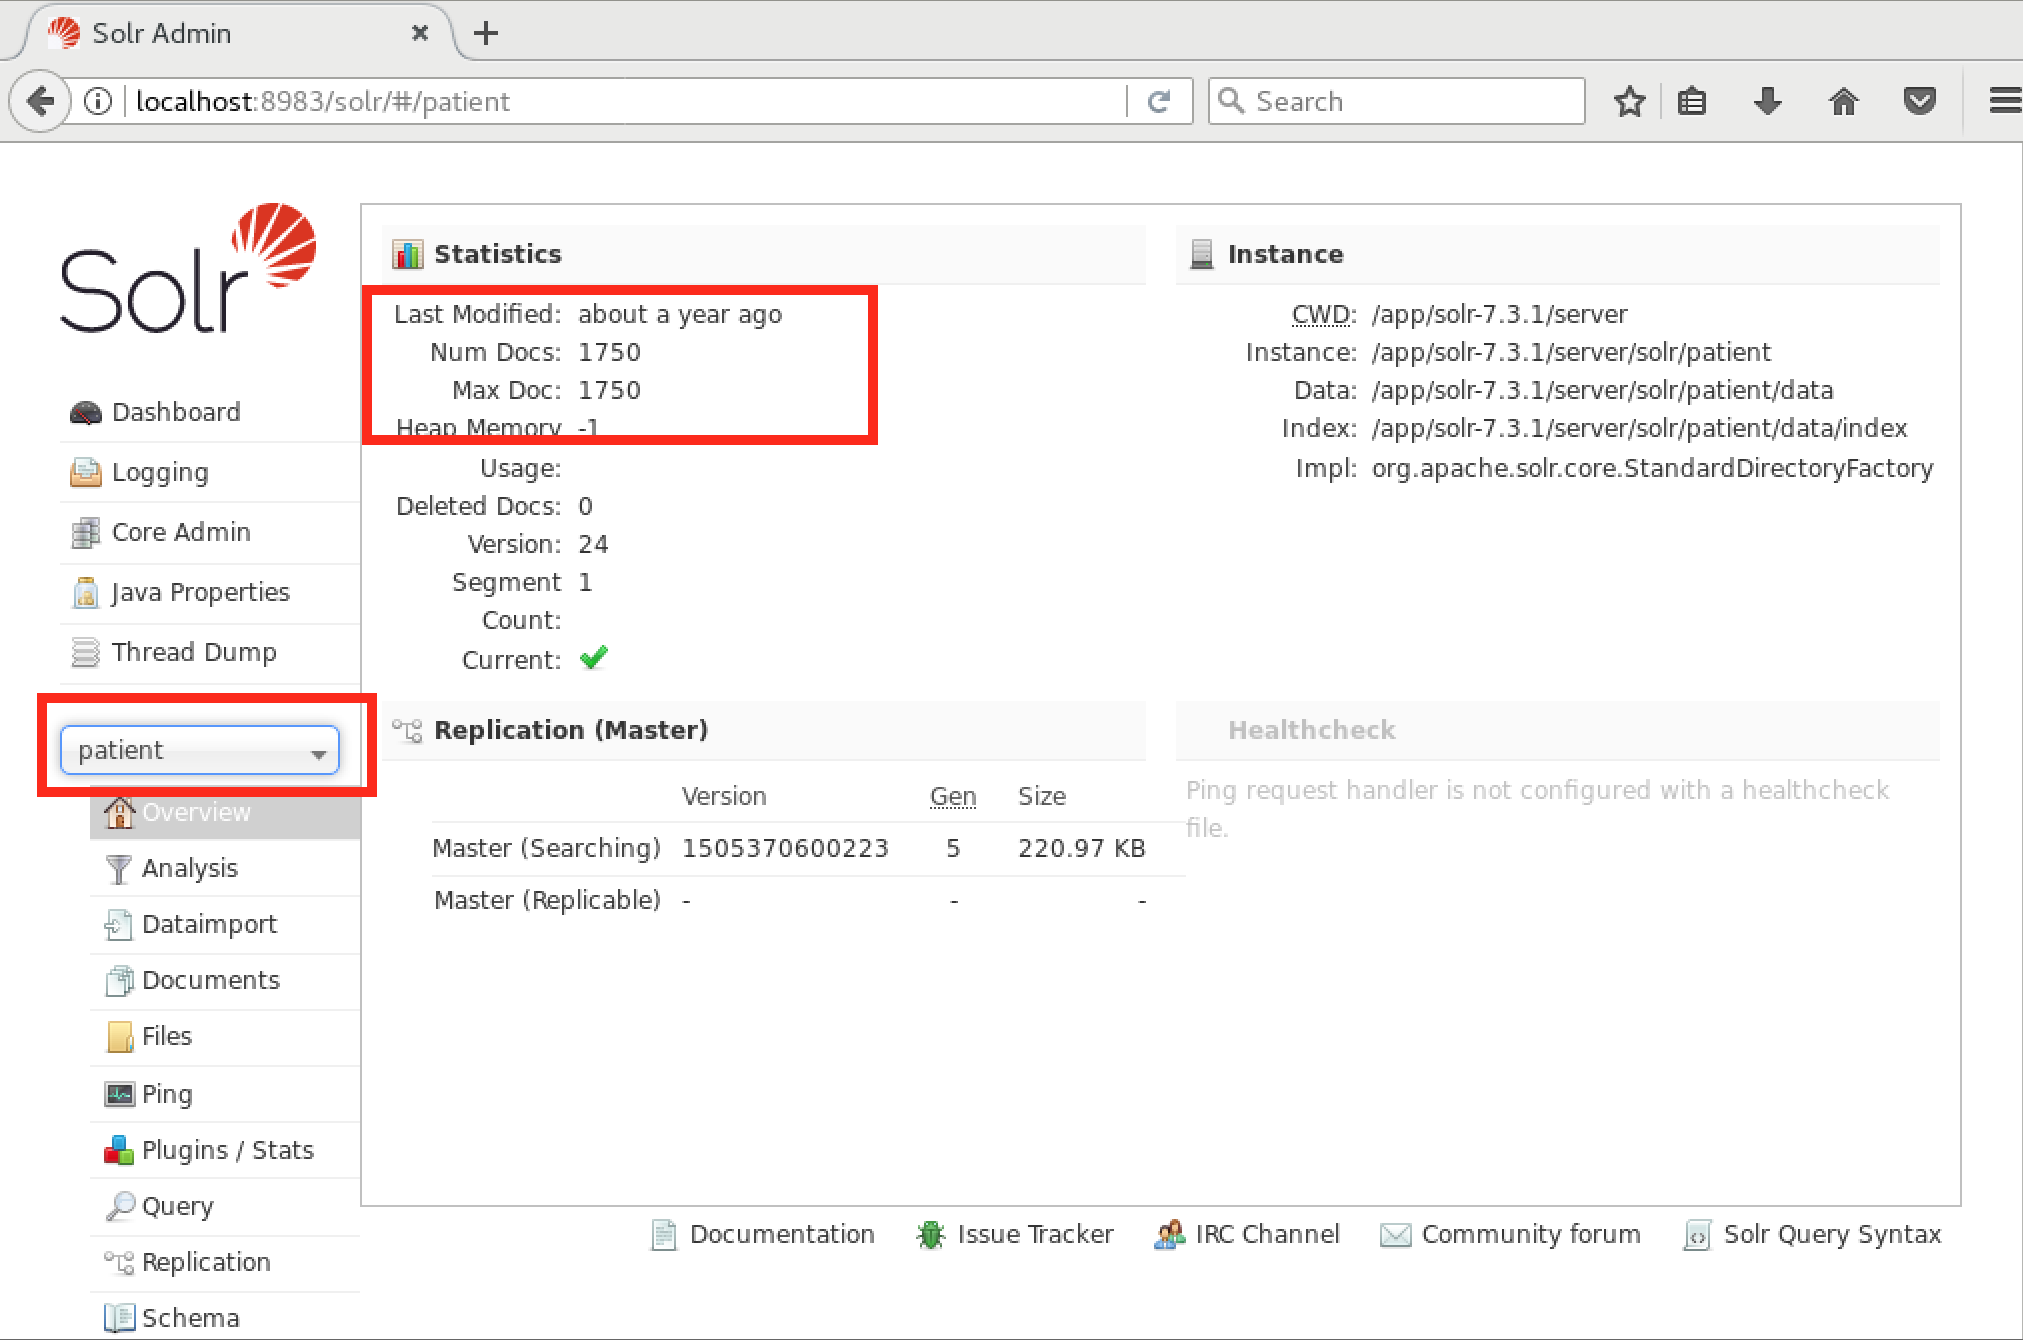
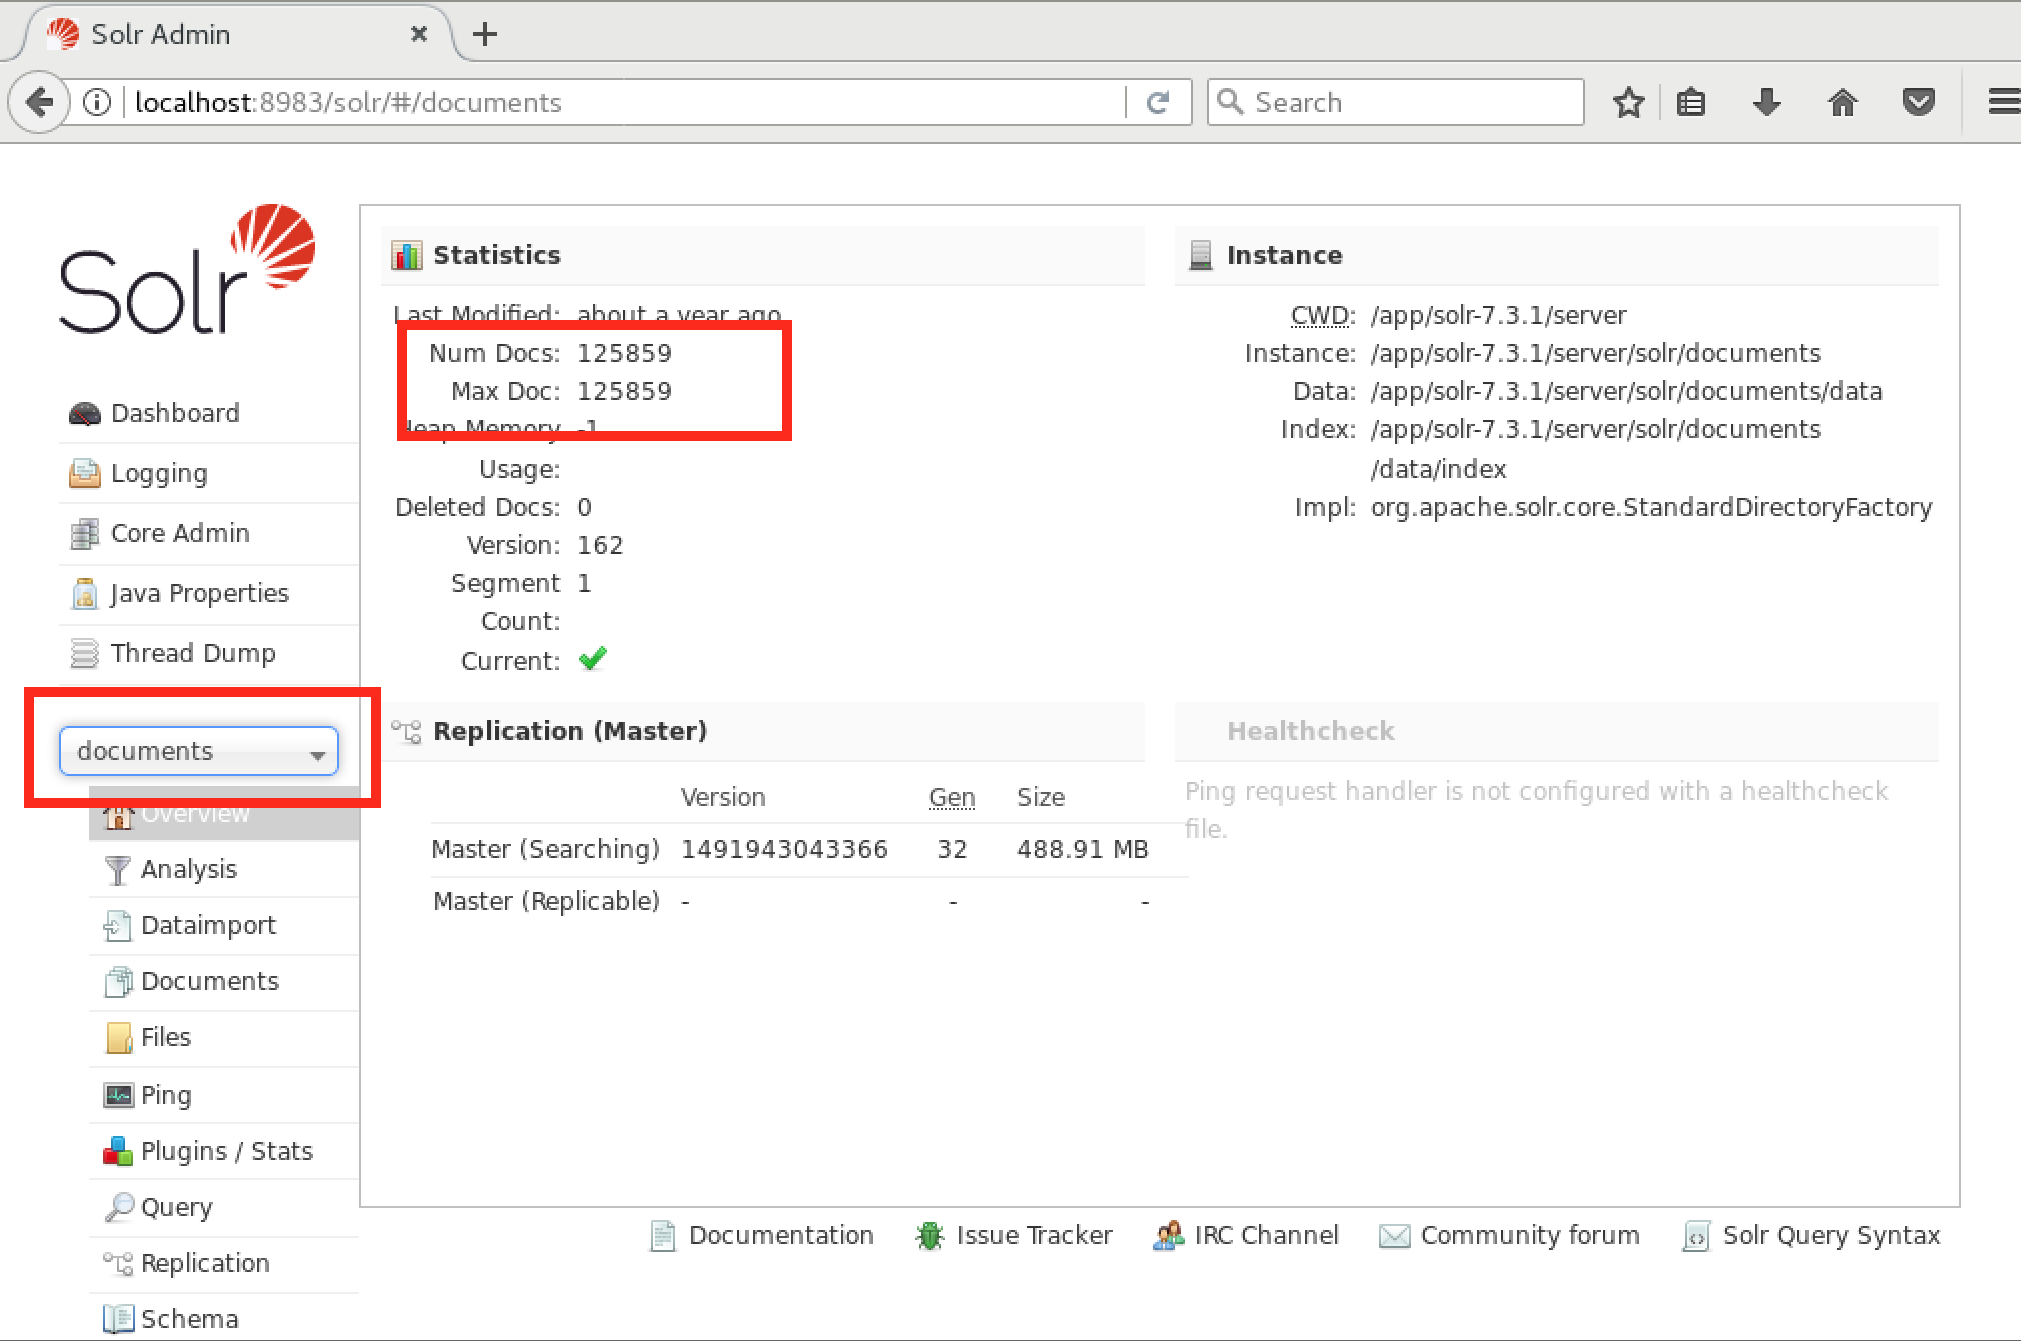
/app/solr/bin/solr start -s /app/indexesYou should be able to navigate to http://localhost:8983/solr/ again and see three cores in the "Core Selector" dropdown on the left side of the screen. There should be no red banner at the top describing an error.
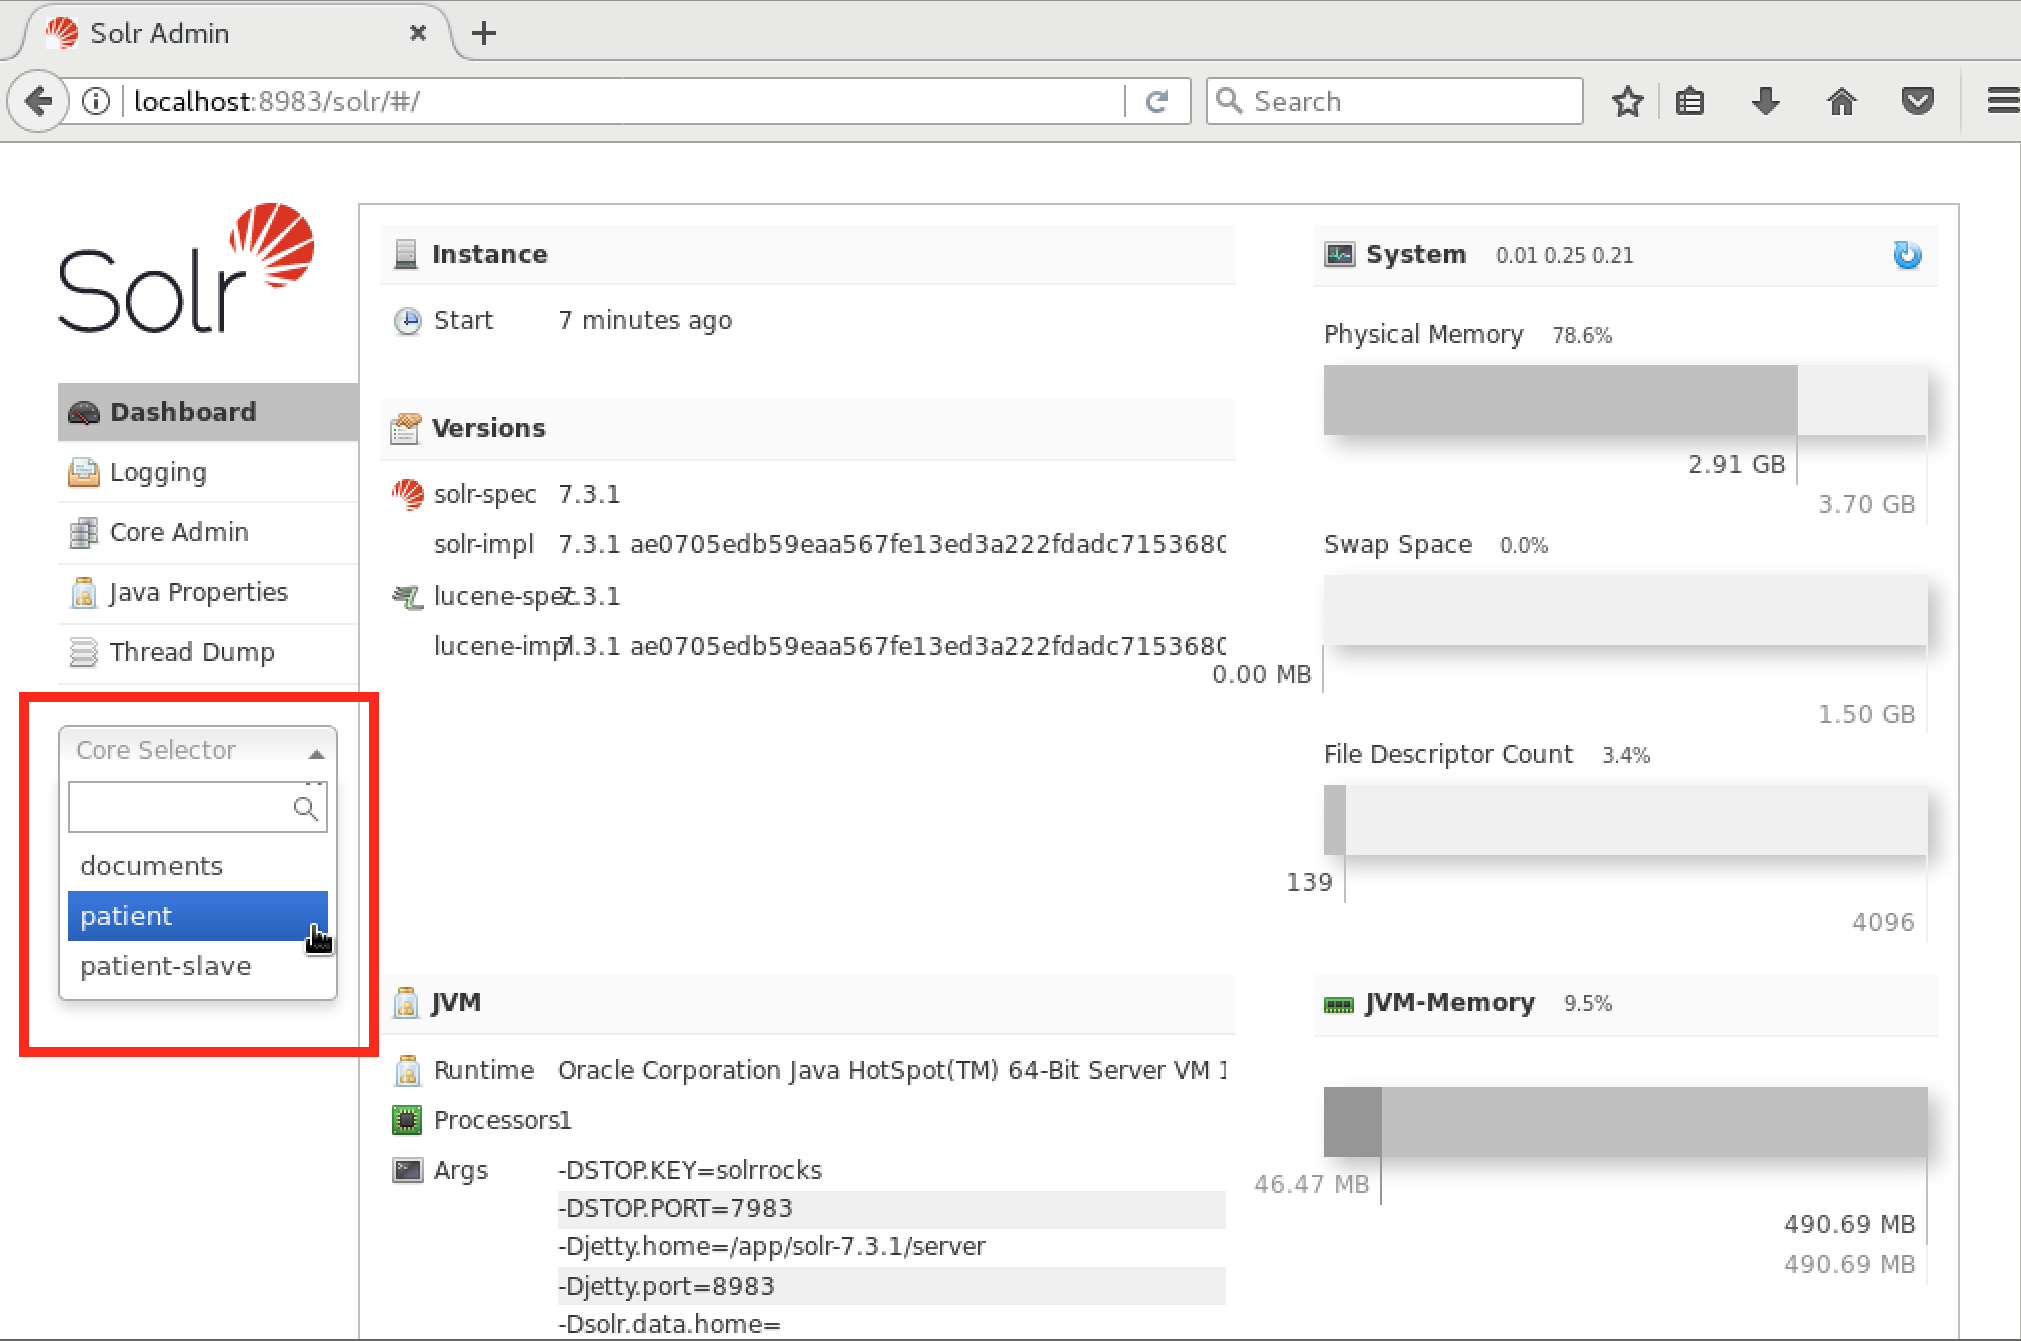
Select each core to verify that the proper counts are there. For the documents core there should be a little over 125,000 documents. For the patient and patient-slave cores, there should be 1750 "documents" (each representing a patient). However, you’ll notice a red error banner for the patient-slave index. To fix this, you’ll have to add the line:
SOLR_OPTS="$SOLR_OPTS -Dsolr.disable.shardsWhitelist=true"to /app/solr/bin/solr.in.sh.
Database initialization
Provided with the EMERSE distribution are a set of files, each containing SQL statements, that create all needed database objects and sample data that will allow the EMERSE application to startup with a default set of database objects, and sample data in the patients, research studies, synonyms and tables. *These scripts should be run as the user and schema setup for the EMERSE application (this will be set by each implementing site) We recommend a schema named emerse. The account doesn’t require a DBA role but needs to be able to create database objects such as tables, indexes, sequences and views.
To run these scripts, we need to create a user and schema for EMERSE. To do that, we need to login to the database as a privileged user. That depends on how the database is set up during installation, which if you installed MariaDB from the Linux distribution package manager, that depends on how they chose to set it up. Thus, you will have to consult the documentation from the Linux distribution on how to login to MariaDB. For Fedora Linux, we merely need to become root user, and issue the mariadb command. Usually either the mariadb or mysql command is used to connect to the database.
sudo su -
mariadb
Once we are connected as a privileged user, we should create the emerse user with password "demouser" and emerse schema (called a "database" in MariaDB parlance) by giving the following commands to the database in the mariadb / mysql commandline:
create user emerse identified by 'demouser';
create database emerse;
grant all privileges on emerse.* to emerse;
To check that this has been done correctly, login to the bash shell as yourself again (not root), and try:
mariadb emerse -u emerse -pand type the password "demouser". (You may need to use mysql as the command; it’s usage is exactly the same.) This should grant you access to the MariaDB sql commandline. Whenever we need to run sql, you should login to the database using this command, or a similar one.
Go back to the EMERSE GitHub 6.1 release page, and download the following files:
-
install_mariadb.sql
Different database need different sql scripts. install.sql is for Oracle. Other database should work, but we will need to generate scripts for you. If you are installing on such a database, please email us and we can upload a script for you.
To need to run this file against our emerse database, issue the following command:
mariadb emerse -u emerse -p < ~/Downloads/install_mariadb.sqlYou’ll have to type the password "demouser", and then this command will hang for a minute or so, but should return you back to the prompt without any further text.
To confirm everything was installed correctly, you can log into the database (using mariadb emerse -u emerse -p) and run the SQL:
show tables;And this should list 127 tables.
EMERSE Configuration
EMERSE is configured by primarily one file, emerse.properties. This file tells EMERSE how to connect to Oracle, Solr, and LDAP (if using). It also has additional internal configuration or presentation information such as contact email.
Go back to the GitHub release page for version 6.1 and download the following files:
-
emerse.properties
After downloading, move the properties to /app/etc/.
mkdir /app/etc
mv ~/Downloads/emerse.properties /app/etc/
Next, we need to tell Tomcat to tell EMERSE where this file is. We can do that by creating the file /app/tomcat/bin/setenv.sh with the following content:
export CATALINA_OPTS="$CATALINA_OPTS -Demerse.properties.filepath=/app/etc/emerse.properties"This can be done with the following command:
echo 'export CATALINA_OPTS="$CATALINA_OPTS -Demerse.properties.filepath=/app/etc/emerse.properties"' >> /app/tomcat/bin/setenv.shYou will need to make some changes to the emerse.properties file to reflect your installation properties such as the URL of the database. Information on configuring EMERSE application properties is located in the Configuration Guide.
For our installation, we need to replace the following lines in emerse.properties
ds.url=jdbc:oracle:thin:@localhost:1521/orcl
ds.driver=oracle.jdbc.driver.OracleDriver
ds.dialect=org.hibernate.dialect.Oracle12cDialect
with:
ds.url=jdbc:mariadb://localhost:3306/emerse
ds.dialect=org.hibernate.dialect.MariaDB103Dialect
For different database, you will need to look up the JDBC url and provide it for the value of ds.url. all databases except Oracle do not need the ds.driver property, so it should be removed. The ds.dialcet is a Hibernate dialect, which should be chosen based on Hibernate’s documentation. Just pick the class name that seems to match your database version most closely.
WAR file installation
The next step in getting EMERSE up and running after initial installation of the application server and configuration of the database with default settings is to deploy the EMERSE WAR file.
Go to the latest EMERSE release page (currently here) and download the emerse.war file.
Install that into tomcat by moving it into the webapps directory:
mv ~/Downloads/emerse.war /app/tomcat/webappsWe also need to download the JDBC database driver. For MariaDB, download the latest stable version here. (For MariaDB, they named the driver "Connector/J".) Their website has a lot of steps; you want to look for the "jar" packaging without sources. The file name should look like mariadb-java-client-VERSION.jar. For instance, a direct like to the most current version at the time of writing is here.
We’ll move the driver into the tomcat lib directory so it’s available to EMERSE:
mv ~/Downloads/mariadb-java-client-*.jar /app/tomcat/lib/Once both emerse.war and the correct database driver are installed into Tomcat, you should be able to restart tomcat and navigate to http://localhost:8080/emerse/ and see the login screen.
/app/tomcat/bin/catalina.sh stop
/app/tomcat/bin/catalina.sh start
You can login as the user emerse with the password demouser. (This account is completely different than the database account, but we use the same username and password so there’s less to remember.)
If the EMERSE application does not come up, check the tomcat logs at: /app/tomcat/logs/catalina.out
Further testing
To test the installation a bit futher, login and try a search:
-
Choose any button or type something in to get past the Attestation page.
-
Enter "chest pain" in the Add Terms Box and press Find Patients.
-
Click on the button Move patients to Temporary Patient List
-
Click the Highlight Documents button
-
Click on cell on the Overview page to see a document with the term "chest pain" highlighted on the following Summaries page.
-
Click on a Summary to open up an actual document with the term "chest pain" highlighted.
At this point, if everything worked, it’s is a very good indication that EMERSE is running well.
Setting startup scripts
While not necessary, it can be helpful to have the system startup every time the server is started or rebooted, rather than entering the startup commands for each component every time. To do this, create a shell script in /app that will contain the commands to launch the two components:
#!/usr/bin/env bash

cd /app
while (( $# ))
do
    case $1 in
        start)
            solr/bin/solr start -s indexes
            tomcat/bin/catalina.sh start
            ;;
        stop)
            solr/bin/solr stop
            tomcat/bin/catalina.sh stop
            ;;
    esac
    shift
done
Make the script executable:
chmod +x emerseThis script assumes the database starts up on reboot already. If you chose not to do that when you install the database and what to do that now, it should be a command similar to
sudo systemctl enable mariadbbut it depends on your linux distribution, or how you installed your database. Alternately, you can add the database start and stop commands to this script.
Now add that startup script to a crontab. To create the file, type:
crontab -eIf you have followed the directions outlined in this document and installed Redhat Linux, it may open up the file using the vi editor. If so, type i for insert, then type one line as follows:
@reboot /app/emerse startThen, to save the file, type esc [escape] and then :wq and enter to close and save the file. To verify that the crontab is there, type
crontab -lIt should show the line above (beginning with @reboot). At this point, restarting the server should allow all of the required components to startup automatically.
Next Steps
Once an initial implementation is complete, local customization work will need to be done including identifying document sources, proper indexing with metadata in Solr, and other configurations related to document display in EMERSE. These are detailed in other guides, such as the EMERSE Configuration and Optimization Guide and the EMERSE Data Guide. However, a good place to go to next is the EMERSE Setup Guide which will walk you through additional steps in setting up the system with your own data.
Useful Post-Implementation Details
-
The
solrconfig.xmlfile should be located on the server. It is located inside/app/indexes/documents/conf/(where "documents" is the name of the Solr core/collection). -
For changes made to the Solr
schema.xmlyou will need to make corresponding changes in the EMERSE database, described in the Data Guide. -
When interacting with the Solr API you may need to use a URL that points to the specific index/collection, such as https://localhost:8983/solr/documents/. However, to get anything back you will need to specify an action such as
https://localhost:8983/solr/documents/select?q=RPT_TEXT:asthma
-
As you are updating the underlying data, note that the patient counts shown in the user interface do not come from the patient database table, but rather is derived from a unique count of the medical record numbers (MRNs) in the indexed documents. This was intentional because it might be the case that a patient in the database has no documents, and thus would return no results within EMERSE. The actual source of the patient count that the GUI uses is in the
SOLR_INDEXdatabase table (thepatient_countcolumn). This column is updated by the app in the background using an async batch process that runs occasionally to update the patient count by retrieving unique MRN’s from the Solr index calleddocuments. An update of the counts for the UI can be forced by the "System Synchronization" feature found within the EMERSE admin application (http://localhost:8080/emerse/admin2/).