Overview
This guide provides directions on how to upgrade an older version of EMERSE to a newer version. We are not able to support all versions of EMERSE indefinitely, so we recommend upgrading the system whenever updates becomes available.
In general we will support upgrades from one publicly released prior version. If upgrading from an older version that is not the prior one, multiple upgrades will likely have to be done sequentially; that is, upgrade from the prior version to the subsequent version, but do not skip versions.
| We update the software on a routine basis, but not all versions are released publicly. This is to reduce the number of versions used by other sites and to reduced the number of upgrades that will be needed. Our goal is to release a public version of EMERSE approximately every 6 months. If a vital bug fix is needed (for security purposes, for example), we will release the software at a more rapid interval. |
Database Table Modifications
We are using Liquibase as a tool to keep track of database changes (adding/dropping/renaming tables, columns, etc). Liquibase outputs SQL scripts to update these tables, which can be run locally to make any needed changes. If you have modified any of the standard tables within EMERSE, these update scripts could create conflicts. However, if you have created new database tables within EMERSE, these additional tables should not cause a problem since the update scripts would only make changes to the standard EMERSE tables.
The only exception would be a situation in which you created a database table with a name that ended up being the name of a new table that was created for the default EMERSE distribution. To avoid this, just make sure you name any new tables you create locally in a way that it would be highly unlikely to ever conflict with a name that the standard distribution would use (you could add the name of your institution to the table name, for example).
Version Specific Upgrade Notes
These include specific items that must be considered when upgrading from a specific version, mostly when new changes may affect how the system is configured, and were not present in earlier versions.
Upgrading from EMERSE Version 7.0.2 to 7.1.0
The only steps needed in this upgrade are to run the upgrade sql script for your database, then use the new emerse.war file.
Upgrading from EMERSE Version 6.5 to 7.0
There are a lot of changes in the 7.0 release. First and foremost is that EMERSE changed the tokenization of text stored the Solr index. Before, each a word such as "Diabetes" was recorded as the token "diabetes" in one field (RPT_TEXT) and "Diabetes" (with the original case) in another field (RPT_TEXT_NOIC). Now, there is only one field, and it stores both tokens plus more from NLP. For the above word, the tokens stored would be tx_diabetes, TX_Diabetes, CUI_11847, CUI_11859, and SMG_Disorder. These changes require a re-index, meaning you need to create a new empty index, and send all the documents from your source systems into the Solr to index and store into your new index location.
Finally, you will have to upgrade your database, which has an extra step in this release because of formats in how we store search terms to account for the NLP concepts in search. We recommend uprgading your index and pipeline first, then upgrading the database.
Upgrading your Index and Document Pipeline
Here’s a short list of steps to, but we’ll go over details below:
-
Download the demo system indexes, and delete their data.
-
Copy over your
<field>from the olddocuments/conf/managed-schemafile to the new one -
Remove
RPT_TEXT_NOICfield or its equivalent -
Change type of
RPT_TEXTor its equivalent -
Remove excess attributes on
<field>elements -
Add field for AGE_MONTHS, AGE_DAYS (optional)
-
Alter your document pipeline to append the NLP header to documents before sending them to Solr
-
Alter your document pipeline to calculate the AGE_MONTHS and AGE_DAYS fields from the encounter date and patient birth date (again, optional).
-
Start solr on the new index, then run your document pipeline to load all documents from your document repository into the new index.
If you wish to use your own NLP pipeline, instead of your own, the steps are very similar, but you will want to change some of the tokenizers or filters of the field type text_with_header_post_analysis. Take a look at the NLP Guide for more information.
For your new index, get the demo index from here, and expand them on the disk you want your new index to be. You can then go in and remove the patient/data and documents/data directories. You may notice an extra folder named nlp under documents/conf. That’s the root directory for all NLP pipeline files, including configurations, UMLS dictionaries and NLP models. If you need to customize NLP behaviors, please refer to NLP Guide.
Next, you can copy over your <field> elements and the <uinqueKey> element in the documents/conf/managed-schema of the old/current index to the same file in the new index. Don’t copy over <fieldType> elements or the <copyField> element.
Remove (or just don’t copy over) the RPT_TEXT_NOIC field as it is unused now. You may have renamed this, but it’s the field that stores the case sensitive version of the report text, that was the destination of the <copyField> element in the old schema.
Next, change the type of the field you store the report text in (usually RPT_TEXT) to text_with_header_post_analysis, which is our new NLP tokenizing type. (You might also want to check that the type of each field type has a corresponding <fieldType> element. If not, you may want to copy over that field type, or use a similar type name already in the new file.)
Next, you can remve any attributes other than name, type, default, required, and 'multivalued' on your <field> elements, as these attributes have been moved to the new <fieldType> to reduce repetition.
Age-at-time-of-Document Fields
We support a filter on patient age at the time of the document. This requries you to record the age of the patient in days and months as separate fields in each document when indexing, so similiarly, to use this feature (which is optional), you will need to re-index as well, so you might as well add this calculation to your indexing ETL jobs. The calculation is relatively simple, assuming your programming language / environment supports basic date manipulation.
The following Java code should correctly do the calculation:
class AgeCalculation
{
   private static final short[] LEAP_YEAR;
   private static final short[] NORMAL_YEAR;

   static
   {
      LEAP_YEAR = new short[]{0, 31, 29, 31, 30, 31, 30, 31, 31, 30, 31, 30, 31};
      NORMAL_YEAR = new short[]{0, 31, 28, 31, 30, 31, 30, 31, 31, 30, 31, 30, 31};
      short c = 0;
      for (int i = 0; i < LEAP_YEAR.length; i++)
      {
         c += LEAP_YEAR[i];
         LEAP_YEAR[i] = c;
      }
      c = 0;
      for (int i = 0; i < NORMAL_YEAR.length; i++)
      {
         c += NORMAL_YEAR[i];
         NORMAL_YEAR[i] = c;
      }
      // So, NORMAL_YEAR[m] is number of days in the year prior
      // to the first of the zero-indexed month m
      // Eg, NORMAL_YEAR[FEBRUARY = 1] = 31, since there are 31 days before Feb 1st.
      // So, NORMAL_YEAR[MARCH] = 59
   }

   public static int[] age(GregorianCalendar birth, GregorianCalendar enc)
   {
      int ageInMonths;
      int ageInDays;
      // Java month numbers start from zero.  Eg, January = 0.
      {
         var years = enc.get(YEAR) - birth.get(YEAR);
         var months = enc.get(MONTH) - birth.get(MONTH);
         var days = enc.get(DAY_OF_MONTH) - birth.get(DAY_OF_MONTH);
         ageInMonths = years * 12 + months;
         if (days < 0) ageInMonths--;
      }
      {
         var birthYear = birth.get(YEAR) % 4 == 0 ? LEAP_YEAR : NORMAL_YEAR;
         var encYear = enc.get(YEAR) % 4 == 0 ? LEAP_YEAR : NORMAL_YEAR;
         var years = Math.max(0, enc.get(YEAR) - birth.get(YEAR) - 1);
         ageInDays =
            (years * 365 + years / 4) +
            (enc.get(DAY_OF_MONTH) + encYear[enc.get(MONTH)]) +
            (birthYear[12] - birthYear[birth.get(MONTH)] - birth.get(DAY_OF_MONTH));
         if (enc.get(YEAR) == birth.get(YEAR)) ageInDays -= birthYear[12];
      }
      return new int[]{ageInMonths, ageInDays};
   }
}
Of course, your language may make it much easier. For instance, also in Java, you can just do birth.until(enc, DAYS) to get the age in days.
The age in months and days should be put into two new fields in the documents index. These fields are typically called AGE_DAYS and AGE_MONTHS though their names are configurable. These should be defined in the managed-schema of the new index like so:
managed-schema<?xml version="1.0" encoding="UTF-8"?>
<schema name="example" version="1.5">
<field name="AGE_DAYS" type="int"/>
<field name="AGE_MONTHS" type="int"/>
</schema>For EMERSE to use them, you will also have to tell EMERSE about them by mappnig the Solr fields into EMERSE fields inside the EMERSE admin app. See the
Upgrading Your Document Pipeline
Finally, you’ll need to update your document pipeline code (that is, the code that loads documents into Solr), to prepend the NLP header to the RPT_TEXT field instead of just passing the report text. See the NLP guide to learn more about the NLP system and the meaning of this header. But, if you want to keep things simple and use our built-in NLP, just prepend the line:
RU1FUlNFX0g=1|5|
to each HTML document. For plain-text documents, you can change the =1 to an =2. The 1 and the 5 are parameters that describe how text should be broken into sections. The first is the number of consecutive newlines that create a section break, and the second is the number of consecutive spaces that make a section break. Because plain-text files sometimes put newline at the end of lines within a paragraph, we want at least two consecutive newlines to delimit sections so as to prevent each line of a paragraph from being its own section.
Remember you document pipeline code should also compute the AGE_MONTHS and AGE_DAYS fields as described above, assuming you want to use the new age-at-time-of-document filters. Neglecting to handle this now means if you want this feature in the future, you will have to re-index again.
Once you’ve made these changes to your document pipeline, you will need to re-index all documents from your document repository into the new index. This should be pretty similar to what you already do to index documents into your existing Solr index.
Using the Index Migration Tool
If you don’t have an document repository, or that index repository is very slow, it is possible to grab documents from your old/current Solr index, and push them into the new Solr index. The code only really needs to query the one instance, add the NLP header and compute the age in days and months, then send it to the new Solr instance to be indexed. You can write one yourself, however, we wrote a jar file that does exactly this. Though it may not be as fast as other methods, it is an option.
To use our migration tool, download the jar file from here. Invoke using Java 21 or later, in an empty directory on a storage device that can hold at least a few megabytes, as it caches a patient-to-birthdate in a file. Invocation should look like the following:
java -jar migrate-index-7.0.0.jarThis should print a message giving further instructions. Basically, a bunch of parameters are specified in a file named index-migration-params.json which will be created in the current directory. You can modify these parameters, and then re-invoke the command and it will begin the transfer. It will always prompt you to confirm the source and destination before continuing the transfer, and records some state of the transfer in the file index-migration-state.json. This way, if the command dies for some reason, you can just re-invoke it and it will start off approximately from where it left off. This transfer tool assumes you are using the default NLP pipeline, and want to compute the age-at-time-of-document fields.
I would recommend trying out the transfer tool on the demo indexes or other non-production indexes to make sure it’s doing what you expect, and that you understand how to invoke it before running it on your production instance of Solr. Though this tool does not delete any documents, only queries and adds documents, it’s best to be safe.
| Though we call it a "migration" tool, it’s mostly just a copy tool. It will add in the NLP header, set the NLP_HEADER field, and compute the age-at-time-of-document fields, so it does some migration-related work, but setting up the new index, changing the field types, etc, all still must be done. |
Database Upgrade
Once you have an upgraded copy of your document index, the next step is upgrading the database. The basic steps are:
-
Run the
emerse-solr-phrase-checkjar on the database before running the upgrade scripts. This will produce a SQL file. -
Run the upgrade scripts attached to the release on GitHub.
-
Delete all rows from the
SEARCH_TERMtable manually. -
Run the SQL file produced from the
emerse-solr-phrase-check. This will insert a fixed version of the search terms at the time the tool was run.
Running emerse-solr-phrase-check
Prior to EMERSE version 7, limited validation of queries was done. EMERSE 7 does not maintain full backward compatibility of the syntax of its queries and therefore the search terms prior to version 7 may not be valid after upgrading. In order to address this issue, a command line tool, emerse-solr-phrase-check, is provided by the EMERSE team. We encourage EMERSE administrators to run this tool against the EMERSE database before upgrading to version 7.
emerse-solr-phrase-check is able to transform most search terms prior to version 7 into the latest format, if possible. The output includes a SQL file which can be fed to EMERSE 7 database to populate the SEARCH_TERM table. A detailed error/warning report in HTML format is provided as well. The search terms that cannot be transformed into version 7 format will be tagged as ERROR and not present in the SQL file. EMERSE administrator can review the items, especially those are tagged as ERROR in the error report, with end users. Migrating search terms with errors can only be done in a manual manner.
emerse-solr-phrase-check requires JRE 21 and can be executed on the command line:
PATH_TO_YOUR_JDK_OR_JRE/bin/java -jar emerse-solr-phrase-check-1.0-SNAPSHOT-all.jar OPTIONSemerse-solr-phrase-check supports reading search terms from databases or a TSV file. The supported databases are: Oracle, SQL Server, MYSQL, MariaDB and PostgreSQL. If connecting with the database is not possible, one can export the data from the EMERSE database using available database management software. Please make sure the header row is included. The SQL statement is:
SELECT st.ID, st.STRING, st.NEGATION
     , st.DISPLAY_FG_COLOR_HEX, st.DISPLAY_BG_COLOR_HEX
     , st.BUNDLE_ID, st.DISPLAY_ORDER
     , b.ID, b.NAME, p.NAME, la.USER_ID
  FROM SEARCH_TERM st
  JOIN BUNDLE b
    ON st.BUNDLE_ID = b.ID
  JOIN PARTY p
    ON p.ID = b.OWNER_PARTY_ID
  JOIN PERSON p1
    ON p1.ID = p.ID
  JOIN LOGIN_ACCOUNT la
    ON la.ID = p1.LOGIN_ID
A sample of such a TSV file may look like:
| TERM_ID | STRING | NEGATION | DISPLAY_FG_COLOR_HEX | DISPLAY_BG_COLOR_HEX | BUNDLE_ID | DISPLAY_ORDER | BUNDLE_ID | BUNDLE_NAME | USER_NAME | USER_ID |
|---|---|---|---|---|---|---|---|---|---|---|
16104 |
asthma |
0 |
000000 |
ffff66 |
16051 |
0 |
16051 |
my first bundle renamed |
EMERSE USER |
emerse |
19153 |
albuterol |
0 |
000000 |
a0ffff |
16051 |
1 |
16051 |
my first bundle renamed |
EMERSE USER |
emerse |
The extra information collected through the query is for generating the error report if necessary.
Here are all options that emerse-solr-phrase-check can recognize:
--out-dir <output_dir>-
Output directory for migrated terms file containing SQL statements and error report in HTML
--db-type <database_type>-
Database type for EMERSE, if not provided, ORACLE is the default. Valid values are ORACLE, SQLSERVER, MARIADB, and POSTGRESQL.
--input-tsv <tsv_path>-
TSV file path. Path to the TSV file that containing the content of SearchTerm table exported from EMERSE database prior to version 7.
--emerse-properties-
The location of the emerse.properties file to get database connection details
--help-
Print help
Here is an example of running this tool against a TSV file and the target database for generated SQL is MySQL. The generated SQL file and error report is located in the path specified by -–out-dir
PATH_TO_YOUR_JDK_OR_JRE/bin/java -jar emerse-solr-phrase-check-1.0-SNAPSHOT-all.jar --input-tsv "C:\term_bundle\merged.tsv" --out-dir "C:\emerse-solr-phrase-check\output" --db-type MARIADBHere is an example of running this tool against Oracle database and the target database for generated SQL is ORACLE:
PATH_TO_YOUR_JDK_OR_JRE/bin/java -jar emerse-solr-phrase-check-1.0-SNAPSHOT-all.jar --emerse-properties "C:\app\etc\emerse.properties" --out-dir "C:\emerse-solr-phrase-check\output"Upgrading from EMERSE version 6.4 to 6.5
Upgrading from 6.4 to 6.5 follows the usual steps of upgrading the database with the database script, and replacing the war file. However, after upgrading you should review the fields in the admin application.
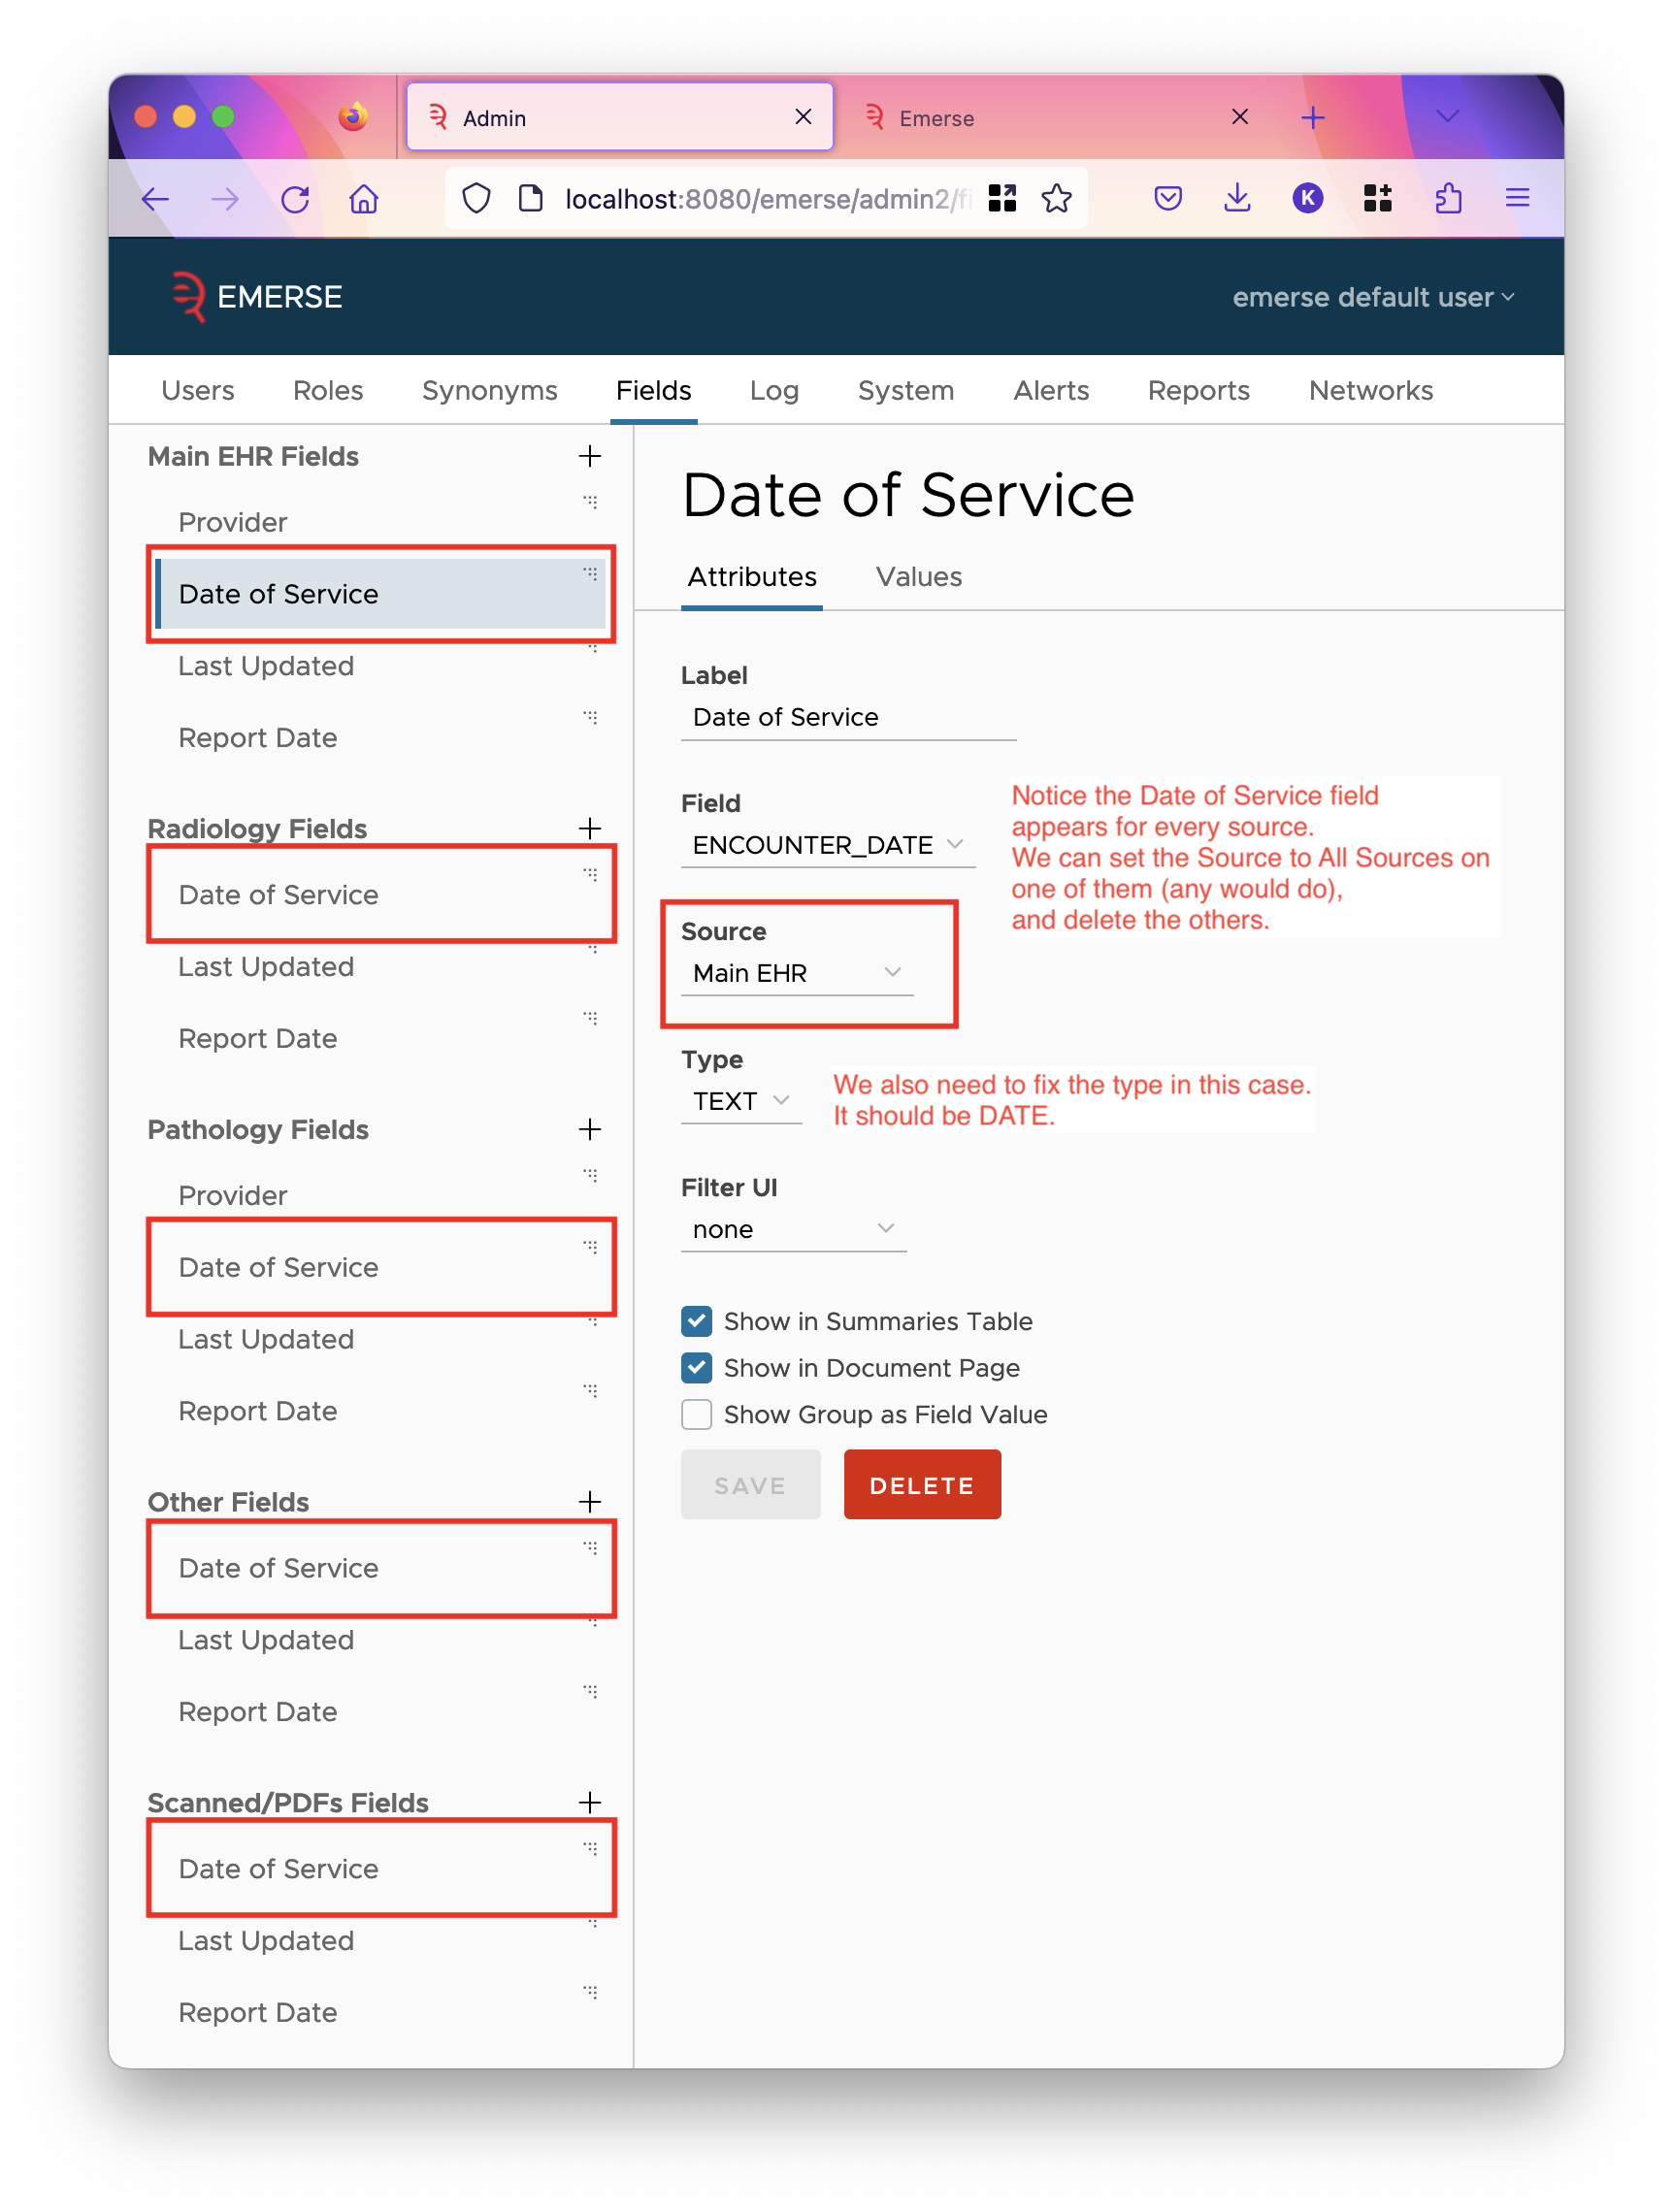
First, in the Admin application, consolidate fields that appear in every source into a single field with its source set to All Sources. This makes the admin interface less cluttered, and allows you to have a single filter on that field. Also go through all the fields and make sure they are in the correct order, have the correct labels, and are set to be displayed in the correct parts of the application. Review the Admin Guide for how this part of the admin page works.
The following properties in emerse.properties are no longer used:
-
search.facets.excluded -
patient.hideName
Instead, you can configure the same behavior through settings on the fields in the Admin app. Unfortunately, since these are properties in the emerse.properties file, we cannot automatically migrate the configuration, so you must do this yourself. If there were any search facets you excluded (using the first property), go to the corresponding patient field, and uncheck the option "Show in Demographics Dialog, Charts, and Excel". This will duplicate the behavior of the search.facets.excluded property.
If you have set patient.hideName, then go to the NAME patient field, and uncheck all checkboxes there. This will hide the name like the property did.
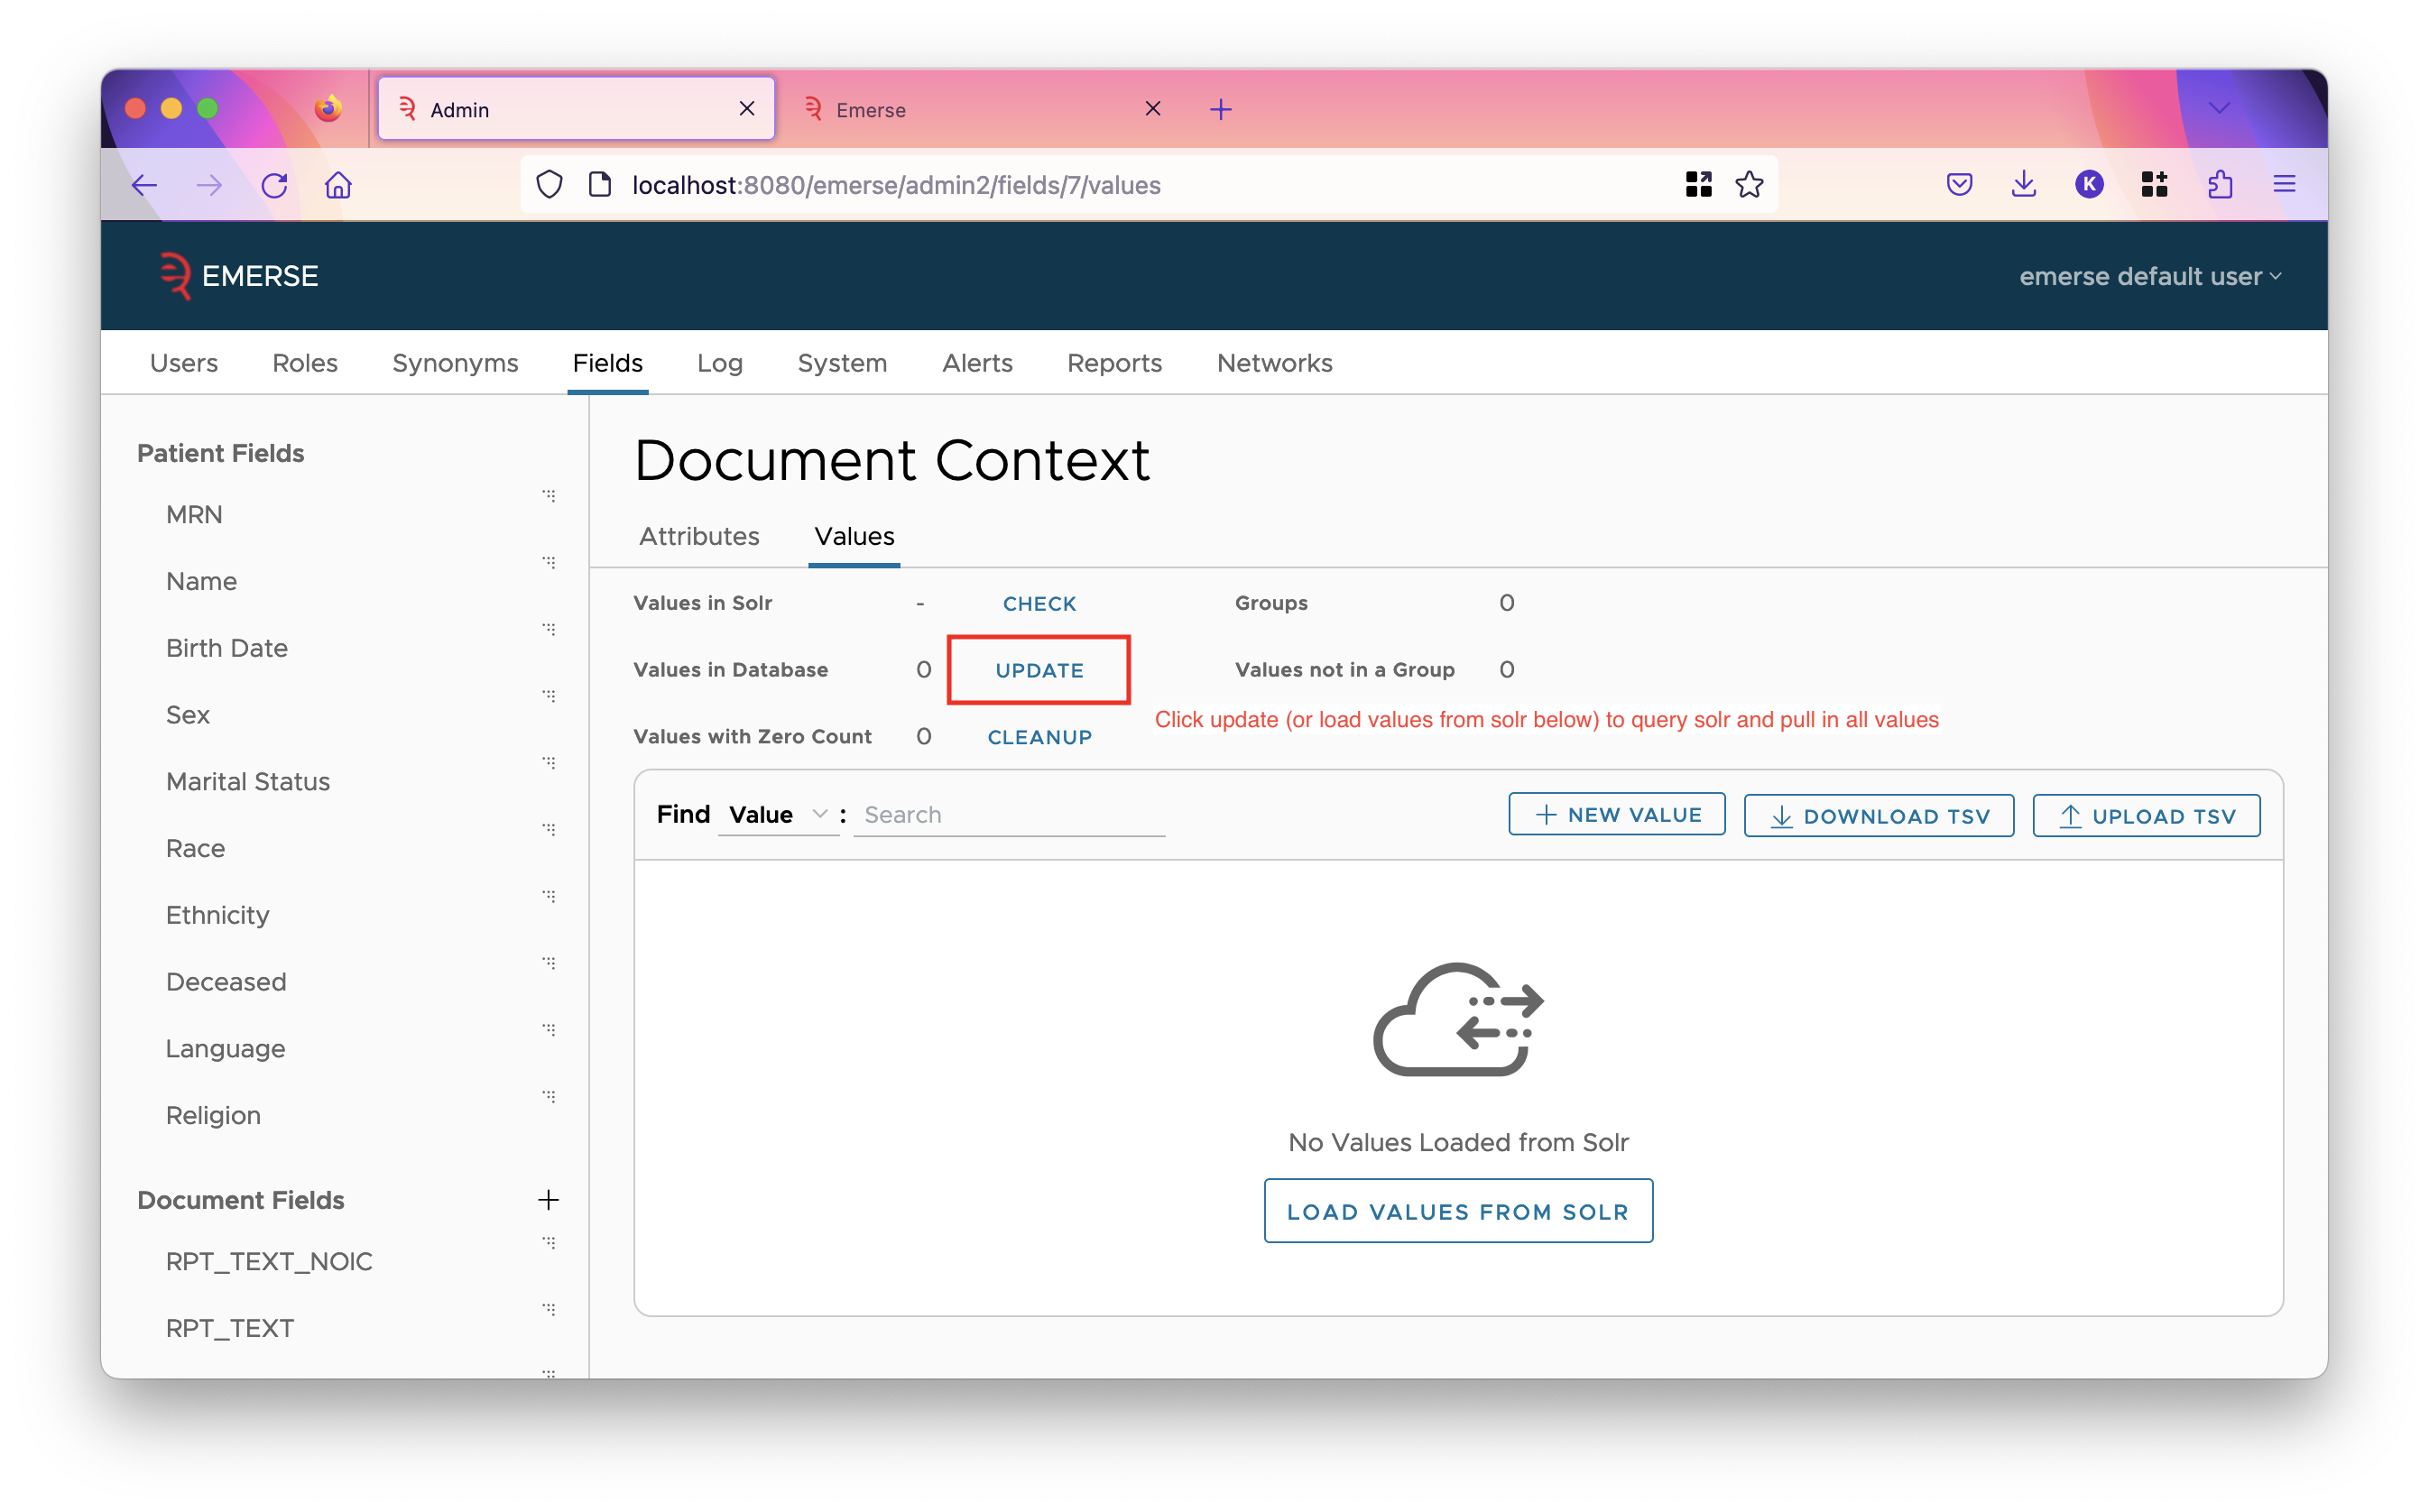
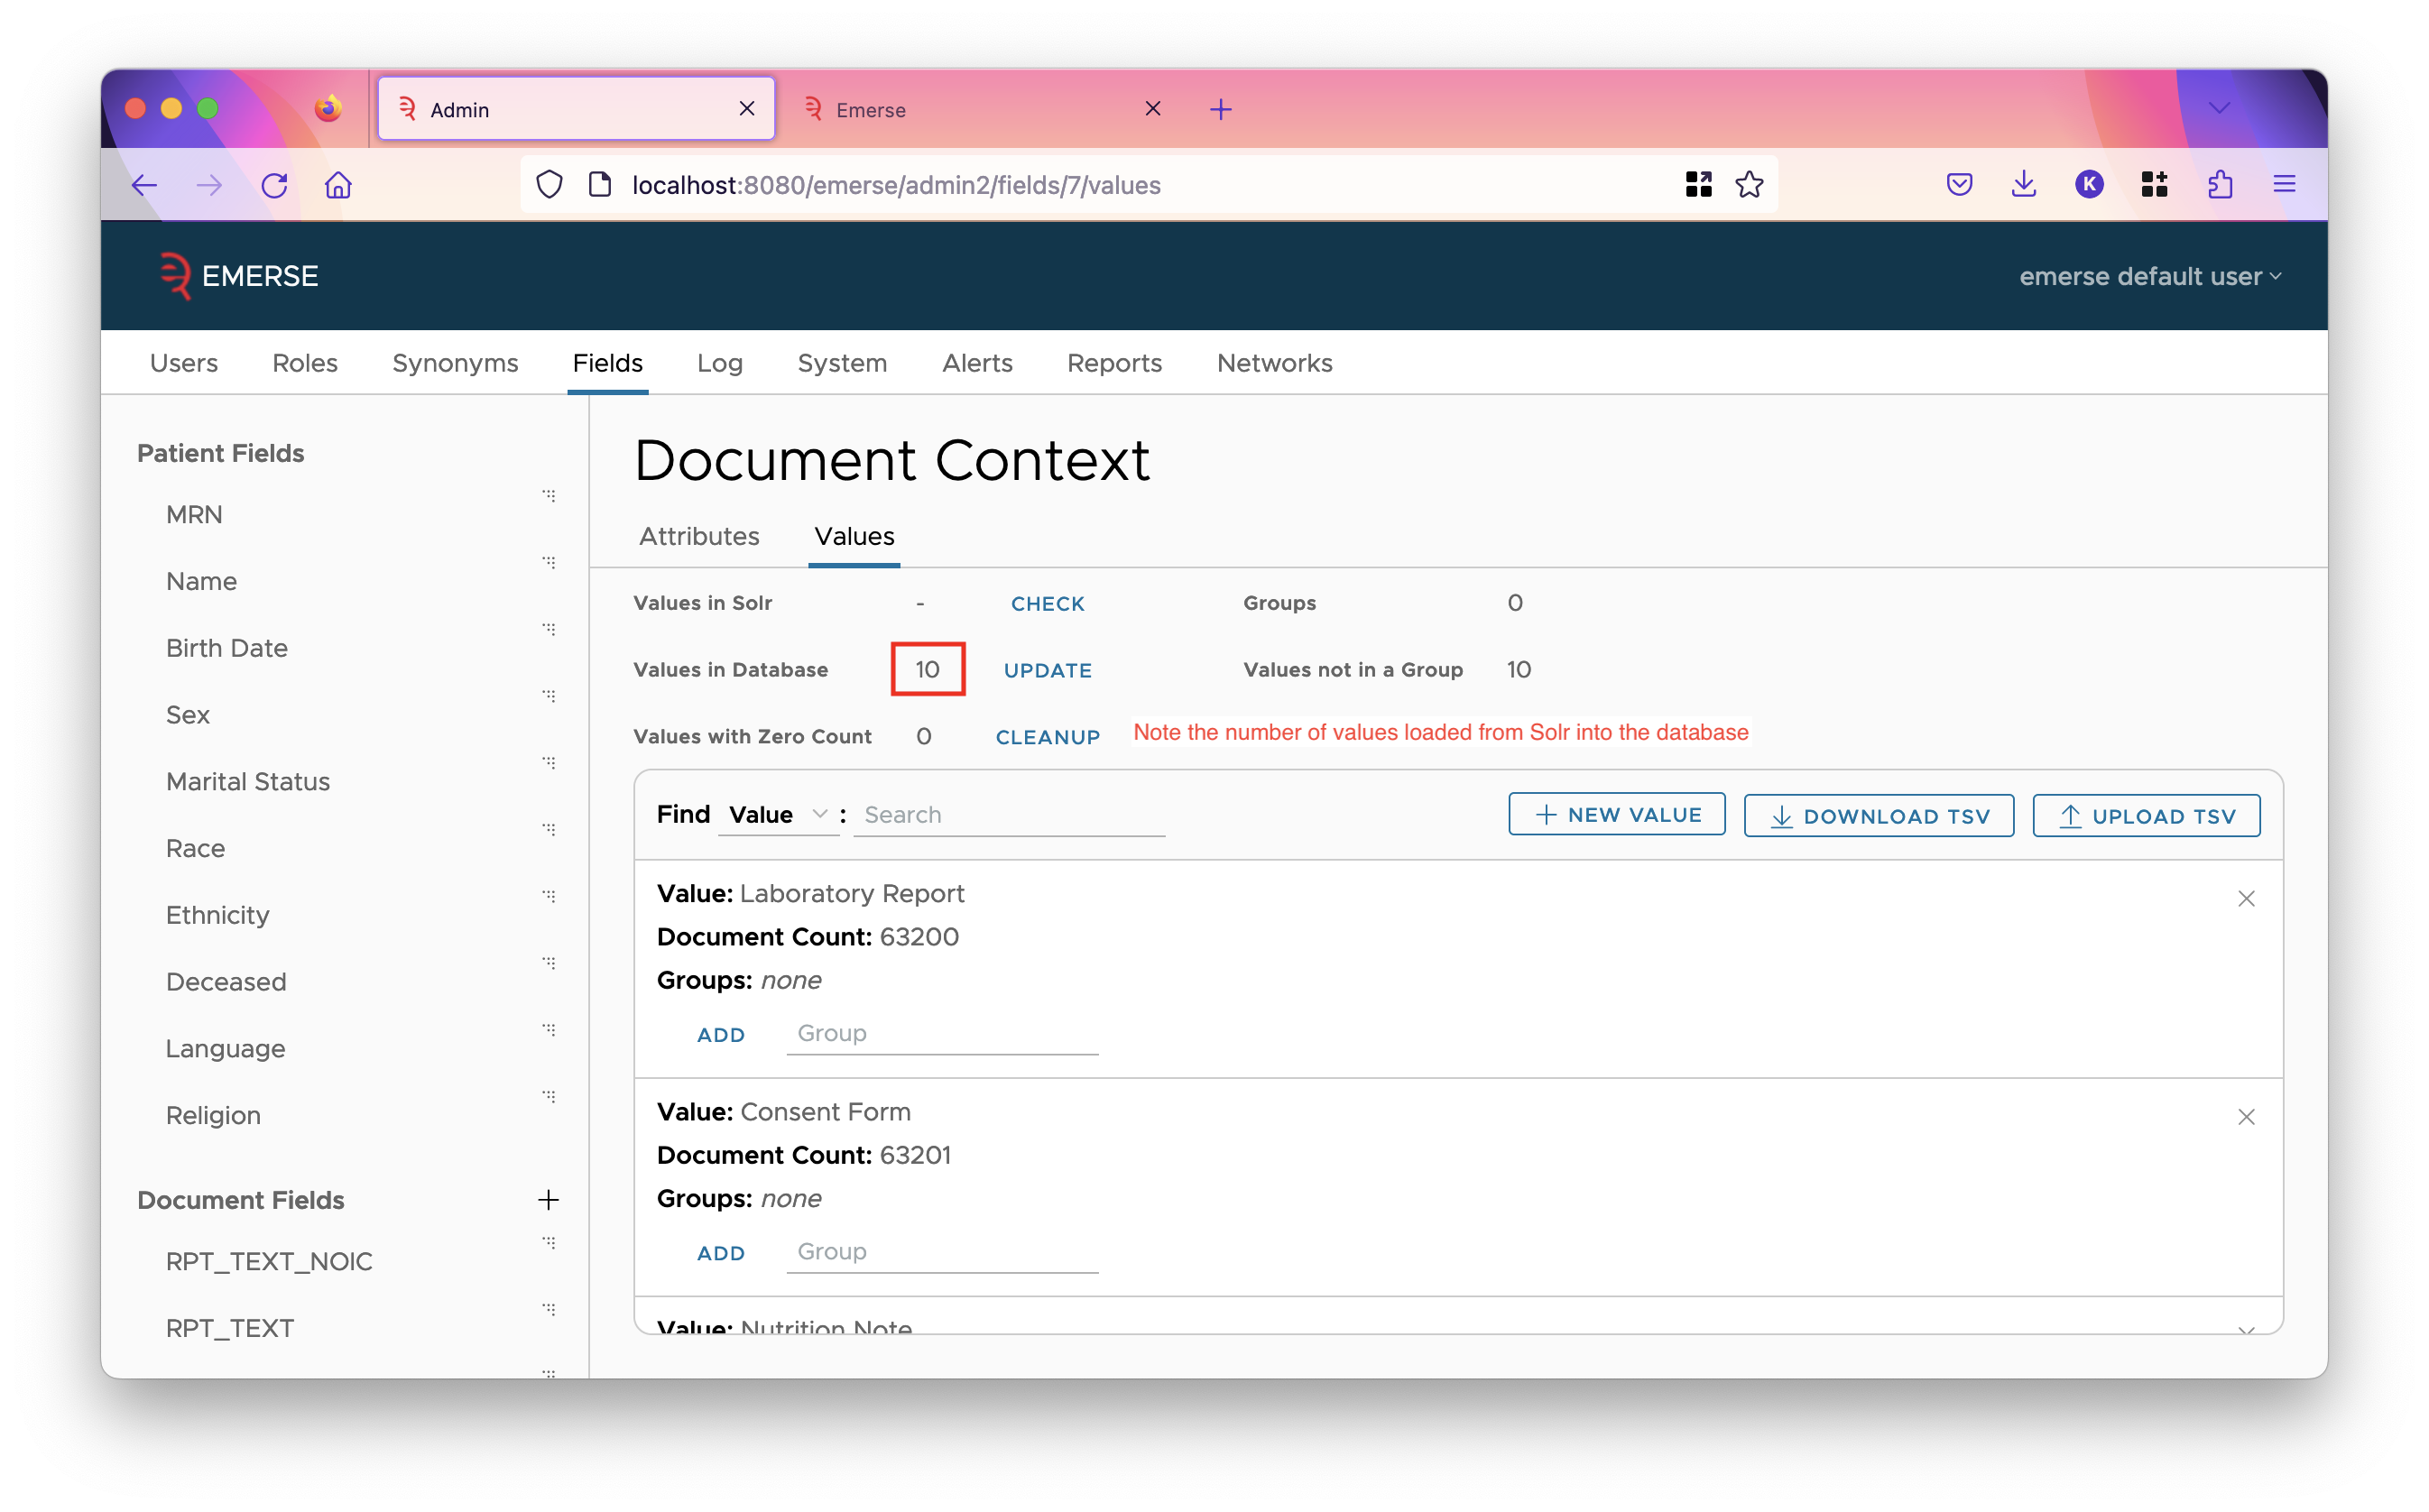
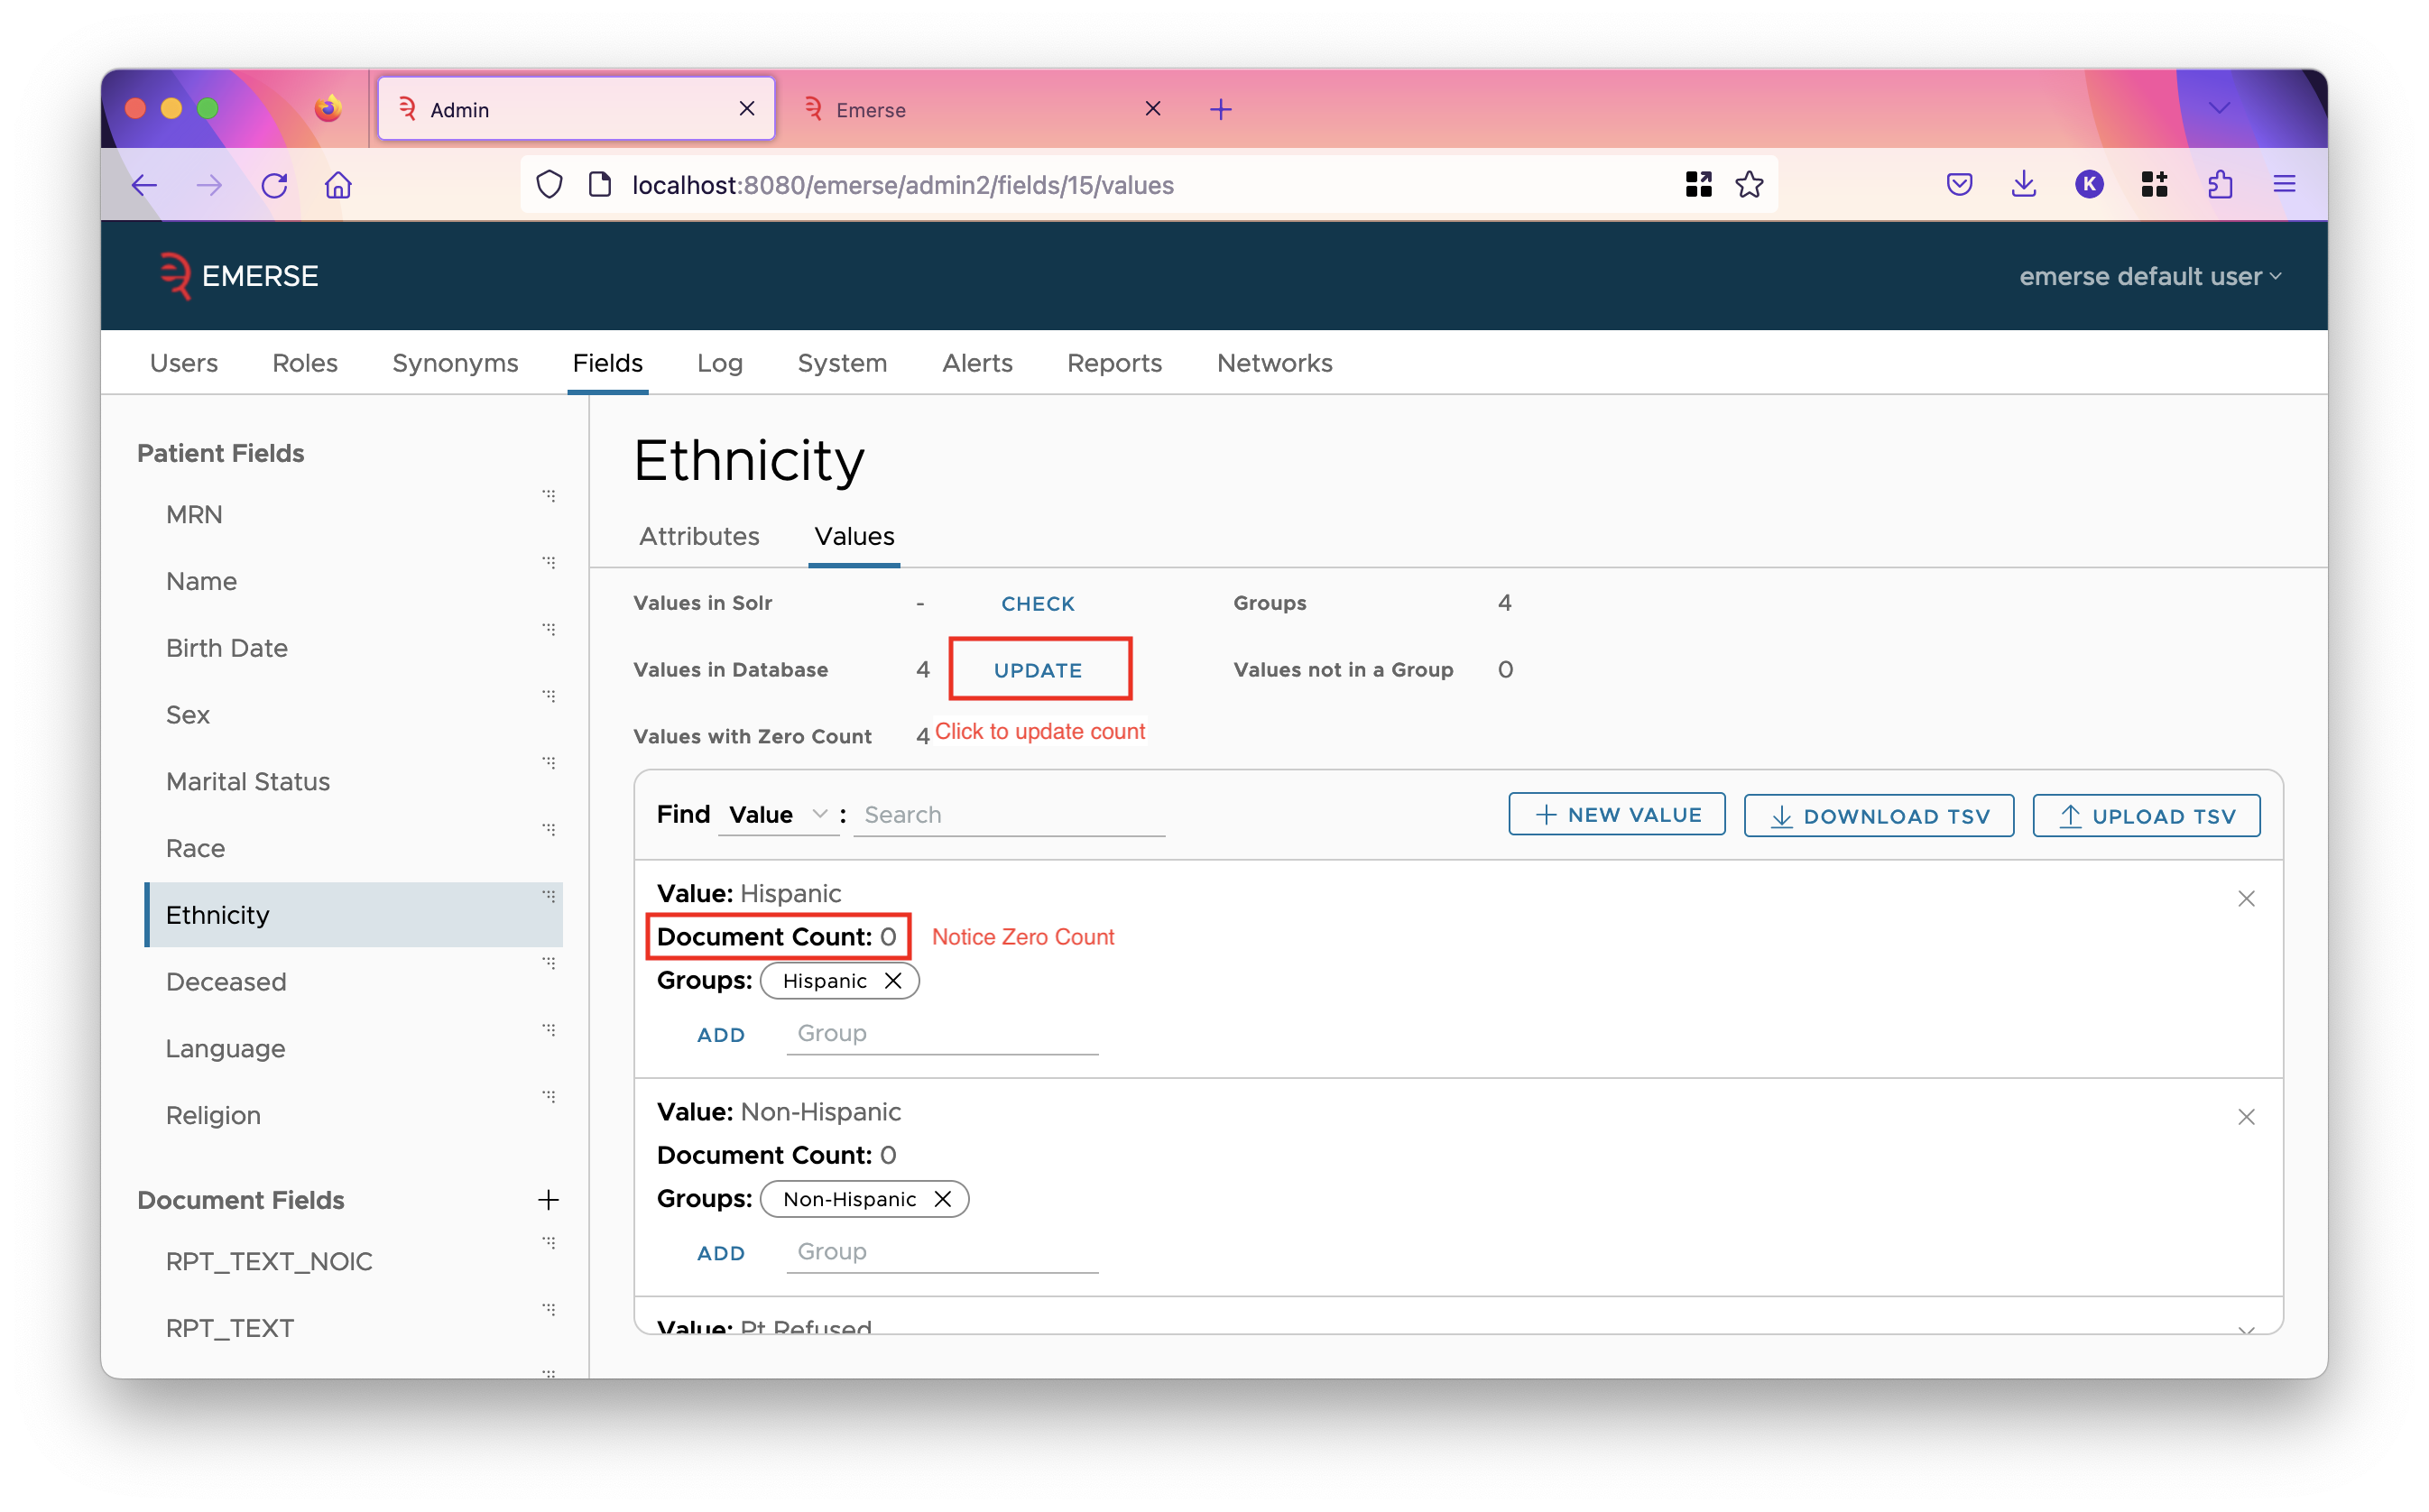
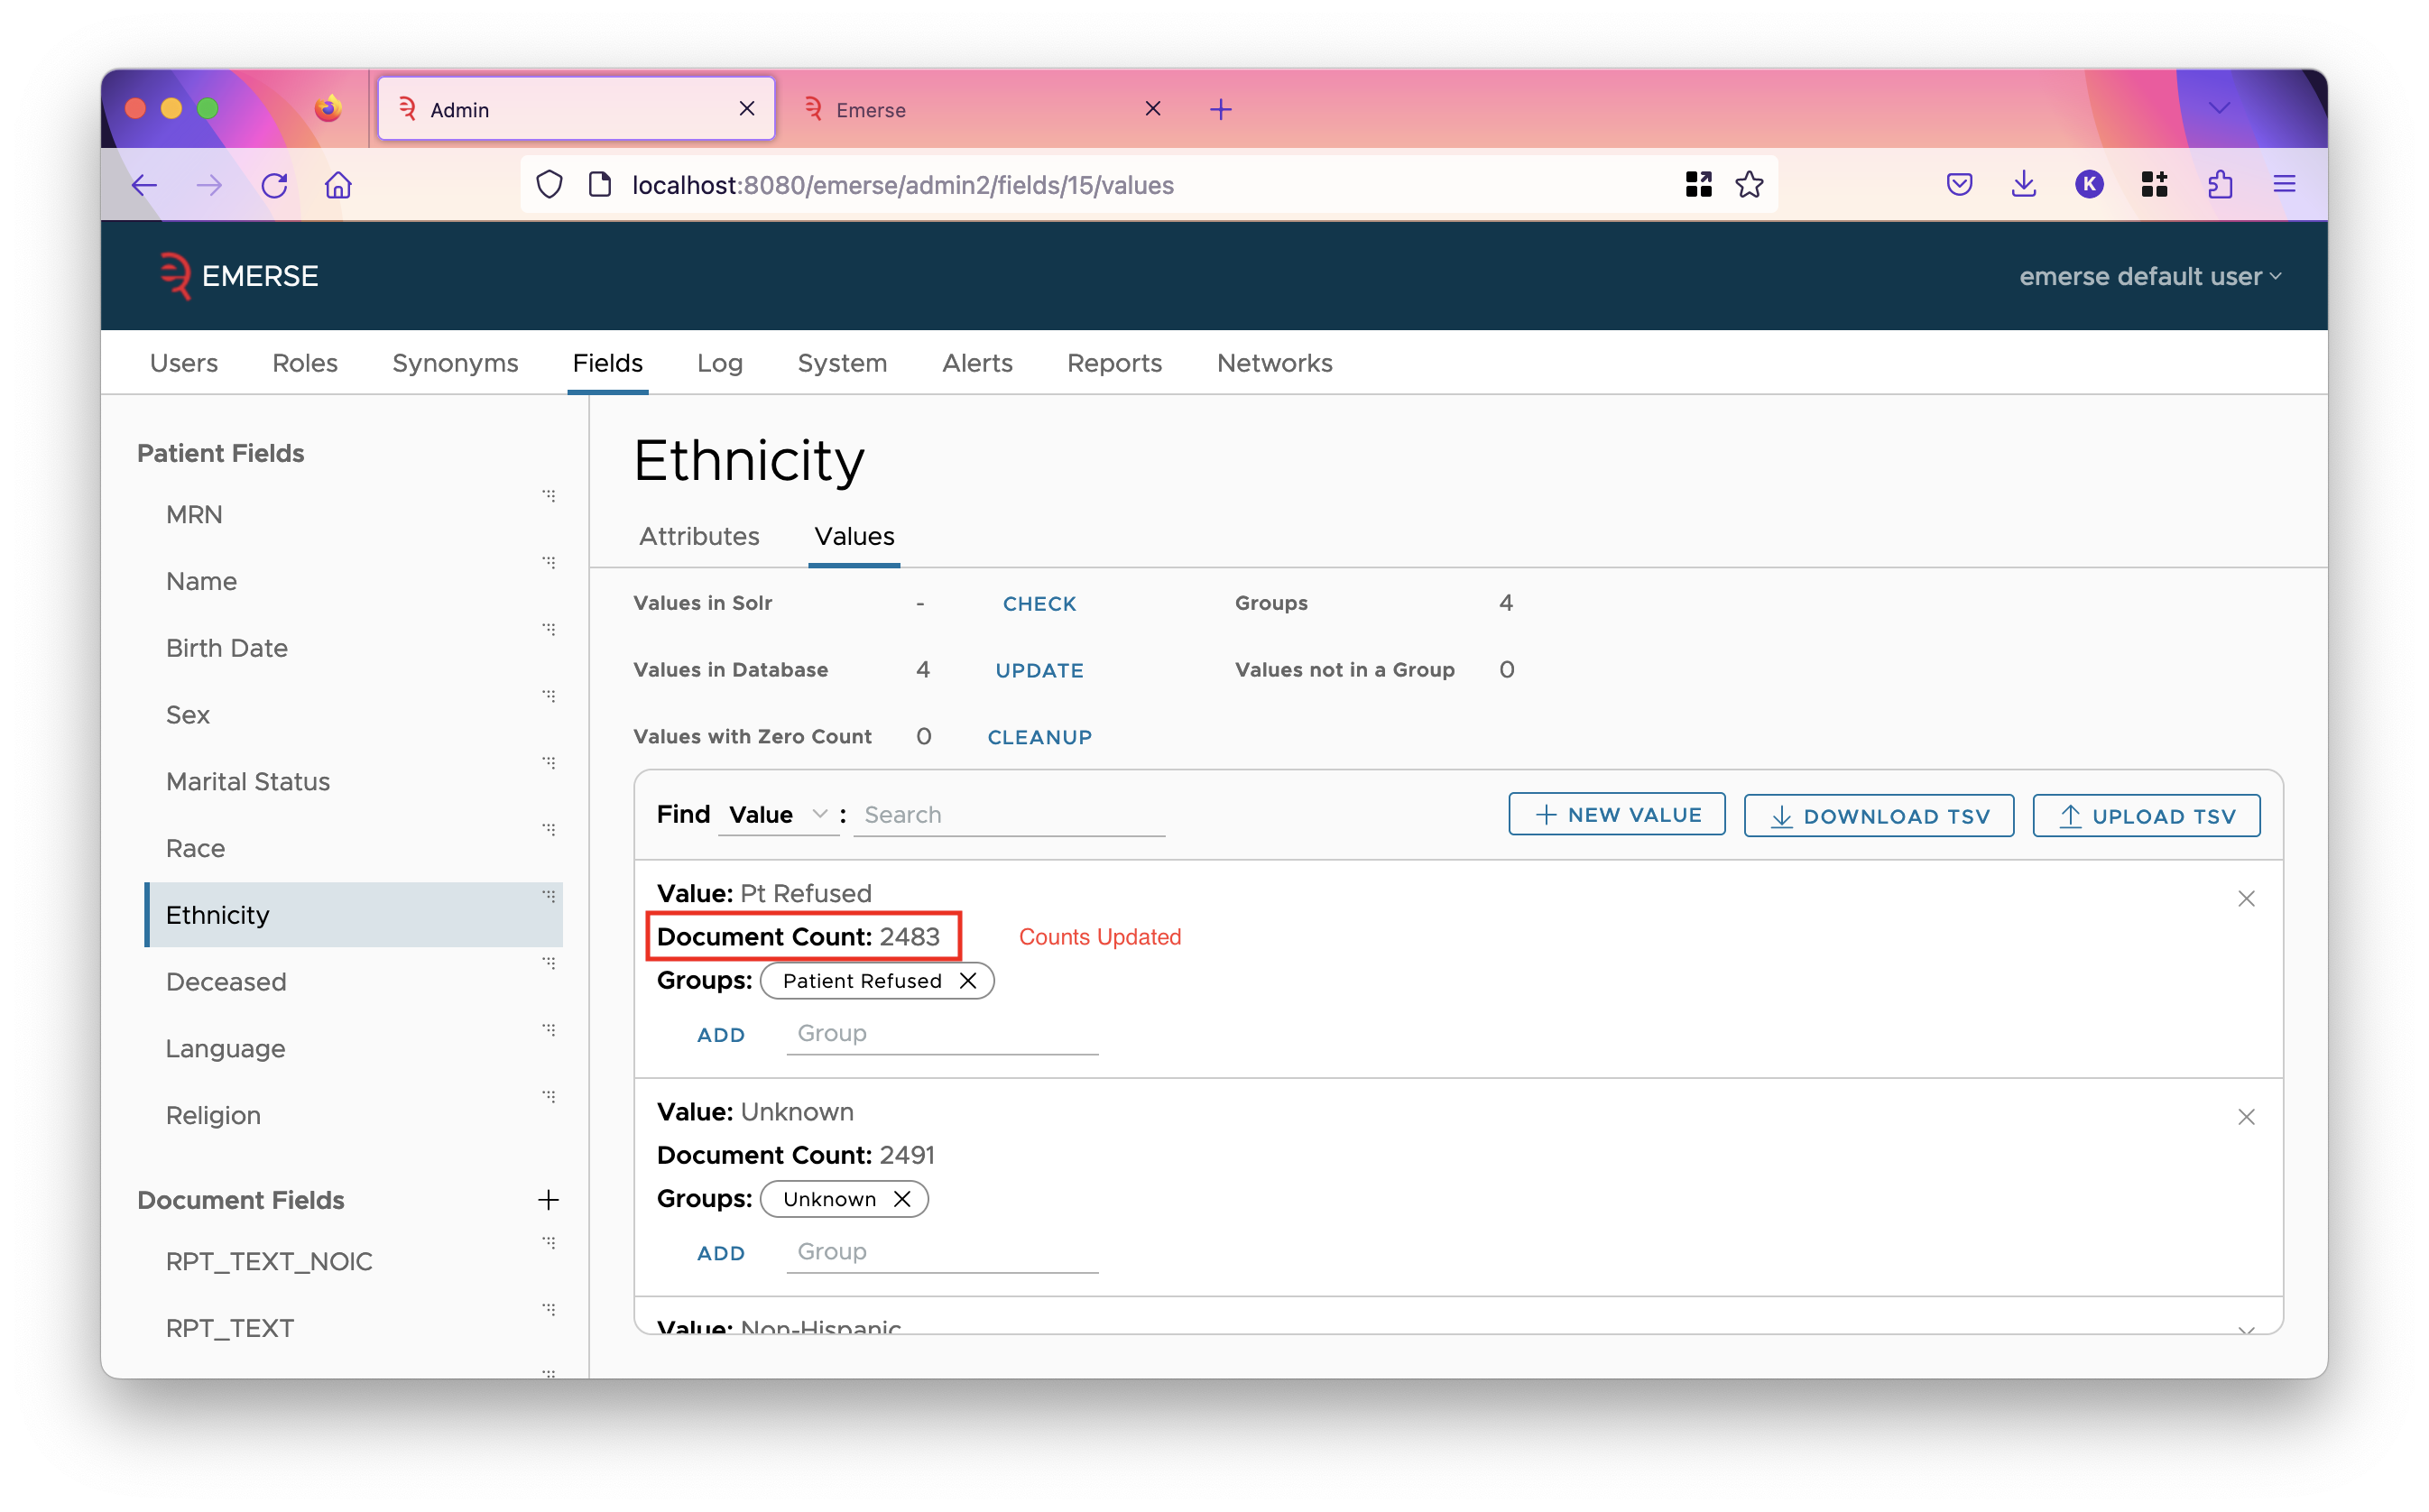
Next, for fields you wish to set up filters on, except for fields such as CSN / Encounter ID which have a huge number of values, we recommend that you go to the values tab for that field, and click the update button. This will query Solr and pull in all values of the field, including their counts. It could take up to a minute, possibly longer, depending on how much data you have in Solr. After it has pulled in the values, go to the attributes tab and set the filter UI based on how many values it found (shown in the "Values in Database" line). If it’s more than 100, we recommend setting AUTOCOMPLETE as the filter UI, otherwise set CHECKBOXES.
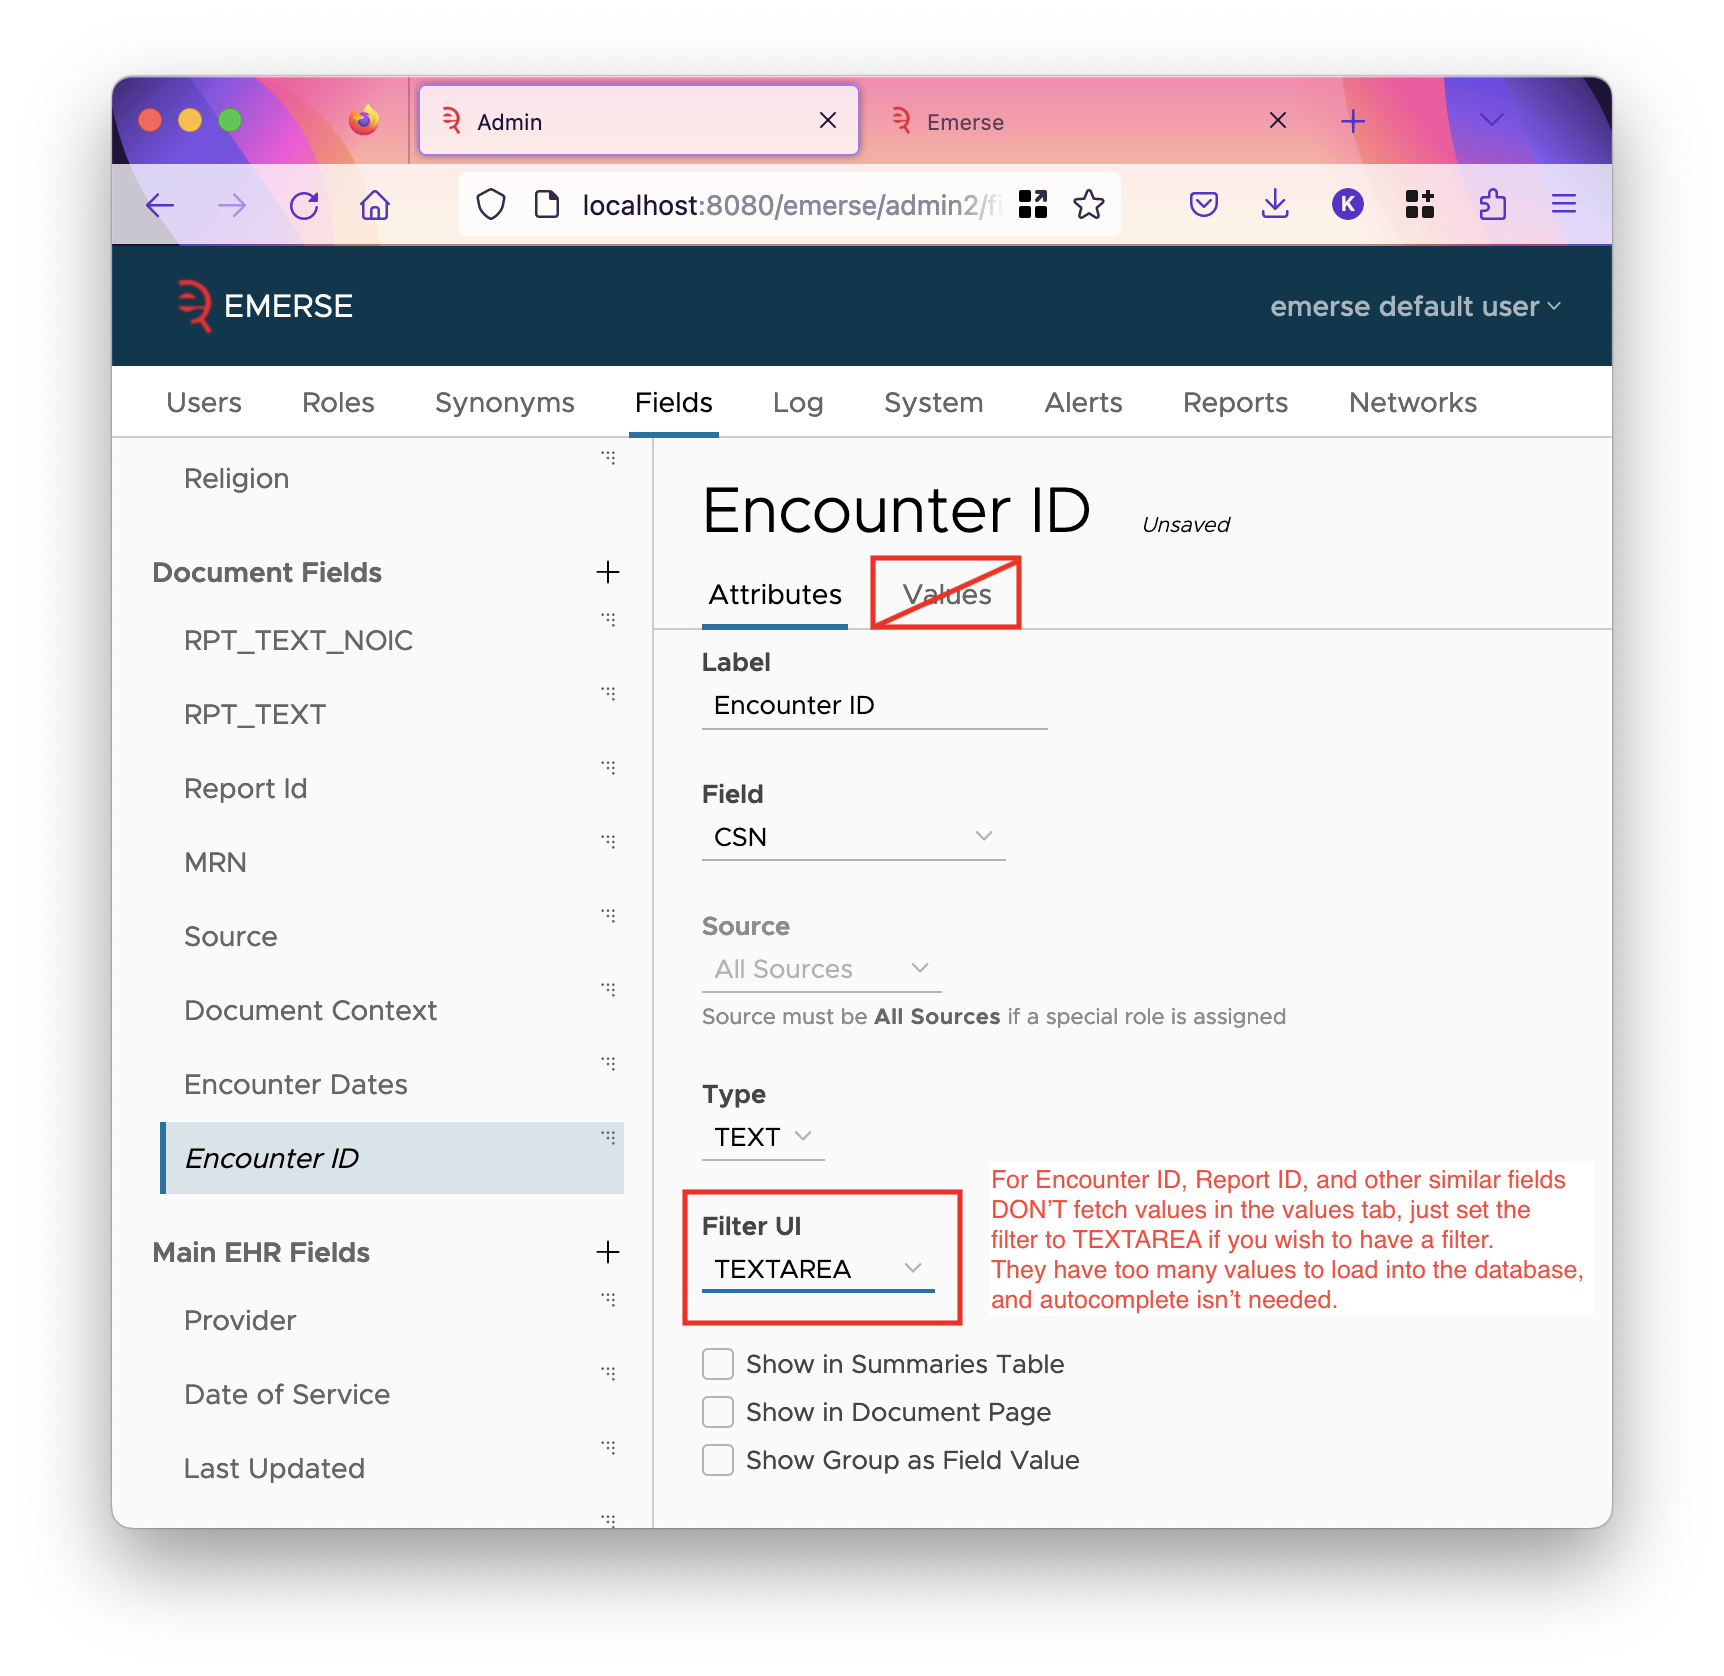
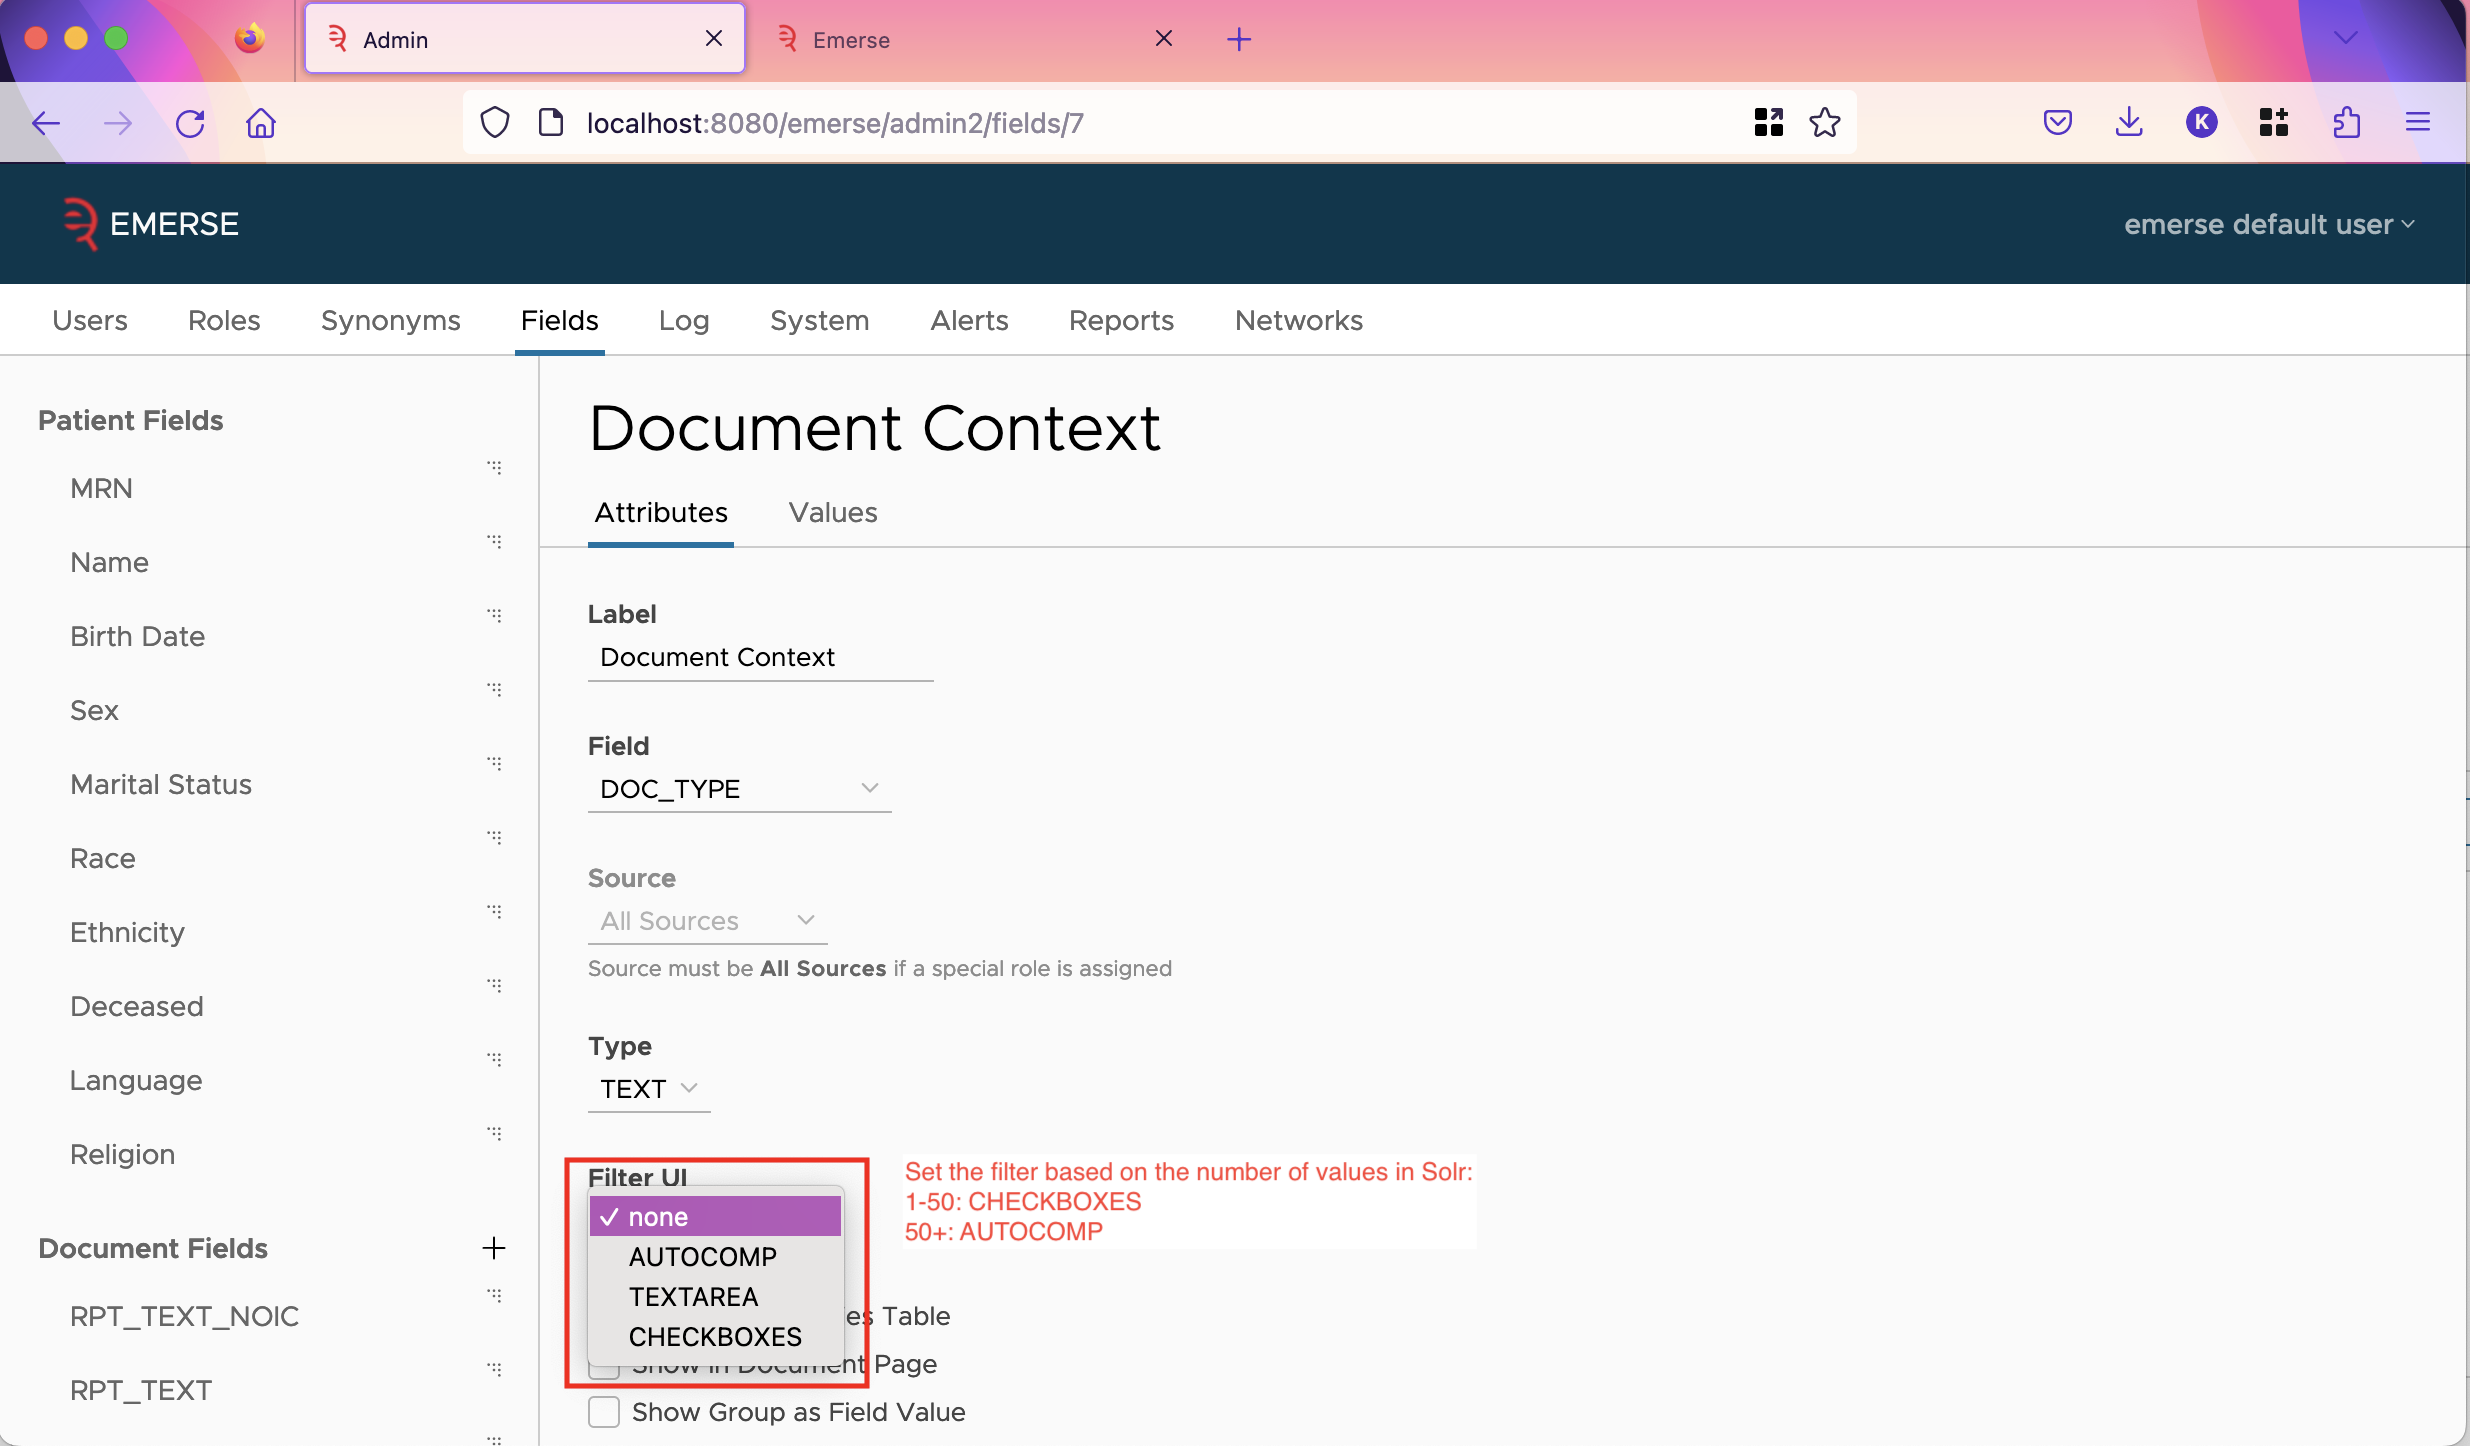
For the CSN / Encounter ID field, we recommend setting the filter UI to be TEXTAREA which allows users to type or paste in whatever IDs they have, and doesn’t store any IDs in the database, which would be wasteful since you don’t need autocomplete, and more IDs are always being added.
Also in the admin app, hit update on all the patient fields for which you know you have data. They should have filters already set up on them by default, but you can change that if you wish. Hitting update will add counts to the values, and add new values from Solr if there are any.
Upgrading from EMERSE version 6.1 to version 6.3
To upgrade from 6.1 to 6.3, you will need to:
-
Download and run the SQL upgrade script for your database
-
Replace the
emerse.warwith the updated one -
Replace the
emerse-solr.jarwith the new one.
All files can be downloaded from the release page.
The emerse.war file should be in the webapps directory of the tomcat installation.
The emerse-solr.jar should be in the lib directory of the index files, which in the same directory as the documents, patient and patient-slave directories. This file may have a different name from prior versions so be sure to delete the old one; there should only be one file in the lib directory, unless you have other non-EMERSE plugins installed in your Solr instance.
| If you don’t find an upgrade script for your vendor of database in the release page, please contact us and we can generate one for you. |
Upgrading from EMERSE version 6.0 to version 6.1
To upgrade, you will need to:
-
Run the SQL upgrade script
-
Replace the emerse.war with the updated one
-
Set
ds.dialectinemerse.properties -
Add a database driver to Tomcat’s
libdirectory -
Replace the emerse-solr.jar in Solr with the updated version
-
Add a request handler to the document index configuration
You can download the files of the release (such as the SQL script or new war file) from the 6.1 release page on GitHub. You will need to be logged into your github account, and added as a member of the EMERSE project to see it. Email us with your GitHub username to be added.
The value of ds.dialect is the name of a Hibernate class that should match the database you use. For Oracle, this value should be:
ds.dialect=org.hibernate.dialect.Oracle12cDialectNext, you’ll need to add a jdbc jar to Tomacat’s lib directory. (This directory is in the installation of tomcat, next to the conf directory and webapps directory, and should contain many other jar files.) This depends on which database you are using. For oracle, you can download the jar here.
Finally, after replacing the emerse-solr.jar in the lib directory of Solr’s index directory (aka SOLR_HOME), you’ll need to modify the solrconfig.xml of the same index by adding the following line underneath the root element:
<requestHandler name="/unique-mrns" class="edu.umich.med.emerse.solr.handler.MRNCountHandler"/>Upgrading from EMERSE version 4.10.7 to version 6.0
-
Due to the substantial changes required for this upgrade, please see the separate 4.10.7 to 6 Upgrade Guide.
Upgrading from EMERSE version 4.4 to version 4.10.7
-
In general to upgrade to version 4.10.7 from version 4.4, you will need to:
-
Replace the existing WAR file with the new WAR.
-
Run the 4.4 to 4.10.7 SQL update scripts
-
Update the
emerse.propertiesfile -
Update to Java 11
-
-
Several database tables/columns have been dropped since they are no longer used. If you have data in these tables you may want to back them up first to preserve their data. The following have been dropped:
<dropTable tableName="PATIENT_HISTORY"/>
<dropTable tableName="PATIENT_LIST_ENTRY_HISTORY"/>
<dropTable tableName="PATIENT_LIST_DOWNLOAD"/>
<dropTable tableName="PT_LIST_ENTRY_COMMENT_SNAPSHOT"/>
<dropColumn tableName="DOCUMENT_VIEW" columnName="document_pk2"/>
-
In the
emerse.propertiesfile theemailproperty has been removed and replaced by two new properties calledcontact.urlandcontact.text. This is detailed in the configuration guide. -
Other new properties have been added, such as a URL about who to contact for help, as well as a URL pointing to the EMERSE help guide, which defaults to the official guide found at project-emerse.org
-
It is a good idea to keep a copy of the old
emerse.propertiesfile to make sure that nothing is lost with the transition to the new version. -
There are no changes to the Solr indexes when upgrading from version 4.4 to 4.10.6
Upgrading from EMERSE version 3.5
-
Several database tables have been updated. We are providing several SQL script to update these tables as part of the release. We will provide these updating scripts upon request.
-
Changes have been made to how Hibernate assigns sequence numbers between version 3.5 and 4.4. Therefore, you will need to run a validation script to validate the setup (
V41_CHECK_SEQ_PROC), and if there are no concerns, then proceed to updating the sequences with the update script (V41_UPDATE_SEQ_PROC). Please contact us if you have any questions about this change. We strongly encourage you to first make any changes in a test environment. -
If you have modified the EMERSE source code to change or add new tables to the EMERSE DB using sequences, then please contact us to discuss how to make sure the the update scripts work properly with your custom changes.
-
Make sure that you define the two timeout properties that are now defined in the
project.propertiesfile. This is described in the Configuration Guide and involves the two propertiesapplication.idle.timeoutandapplication.warn.length. -
Make sure that you define the email in the
project.propertiesfile since that is now where this is defined. This is the email that is used to send feedback from users to the local EMERSE team. -
In general, check the
project.propertiesfiles carefully for any additions that may not exist in the prior file. Some of these may not matter much since if they are missing they will be set to default values. Additionally, make sure that prior properties are preserved if replacing the file with the new one. -
If you have set up Basic Auth, you will have to remove a line from inside the
<Configure></Configure>tags within thejetty.xmlfile. This file is located inside theSOLR_INSTALL_DIR/server/etcfolder. Remove the line:
<Set name="refreshInterval">0</Set> -
Moving from EMERSE version 3.5 to 4.4 involves upgrading Solr to from version 6.0.0 to 7.3.1. Because the Solr indexes are formatted differently between these versions, the indexes also need to be updated. Directions for doing this are detailed in the Solr 7 upgrade guide.
