
Accessing the Admin App
You can reach the Admin App directly by going to the usual URL for EMERSE and appending /admin/ to the URL. For instance, if the URL for EMERSE is http://example.org/emerse/, the admin app is at http://example.org/emerse/admin/. Only users with the ACCESS_ADMIN privilege are allowed access to the admin app.
The Users Tab
- User Search
-
You can search for a user by username or first or last name by typing in the start of one of those three. Matches to the middle or end of a username or first or last name will not work. For instance, if a username is
emersesearch foremwill find them, butseanderwill not. Hit enter to update the table. - Enabling Users
-
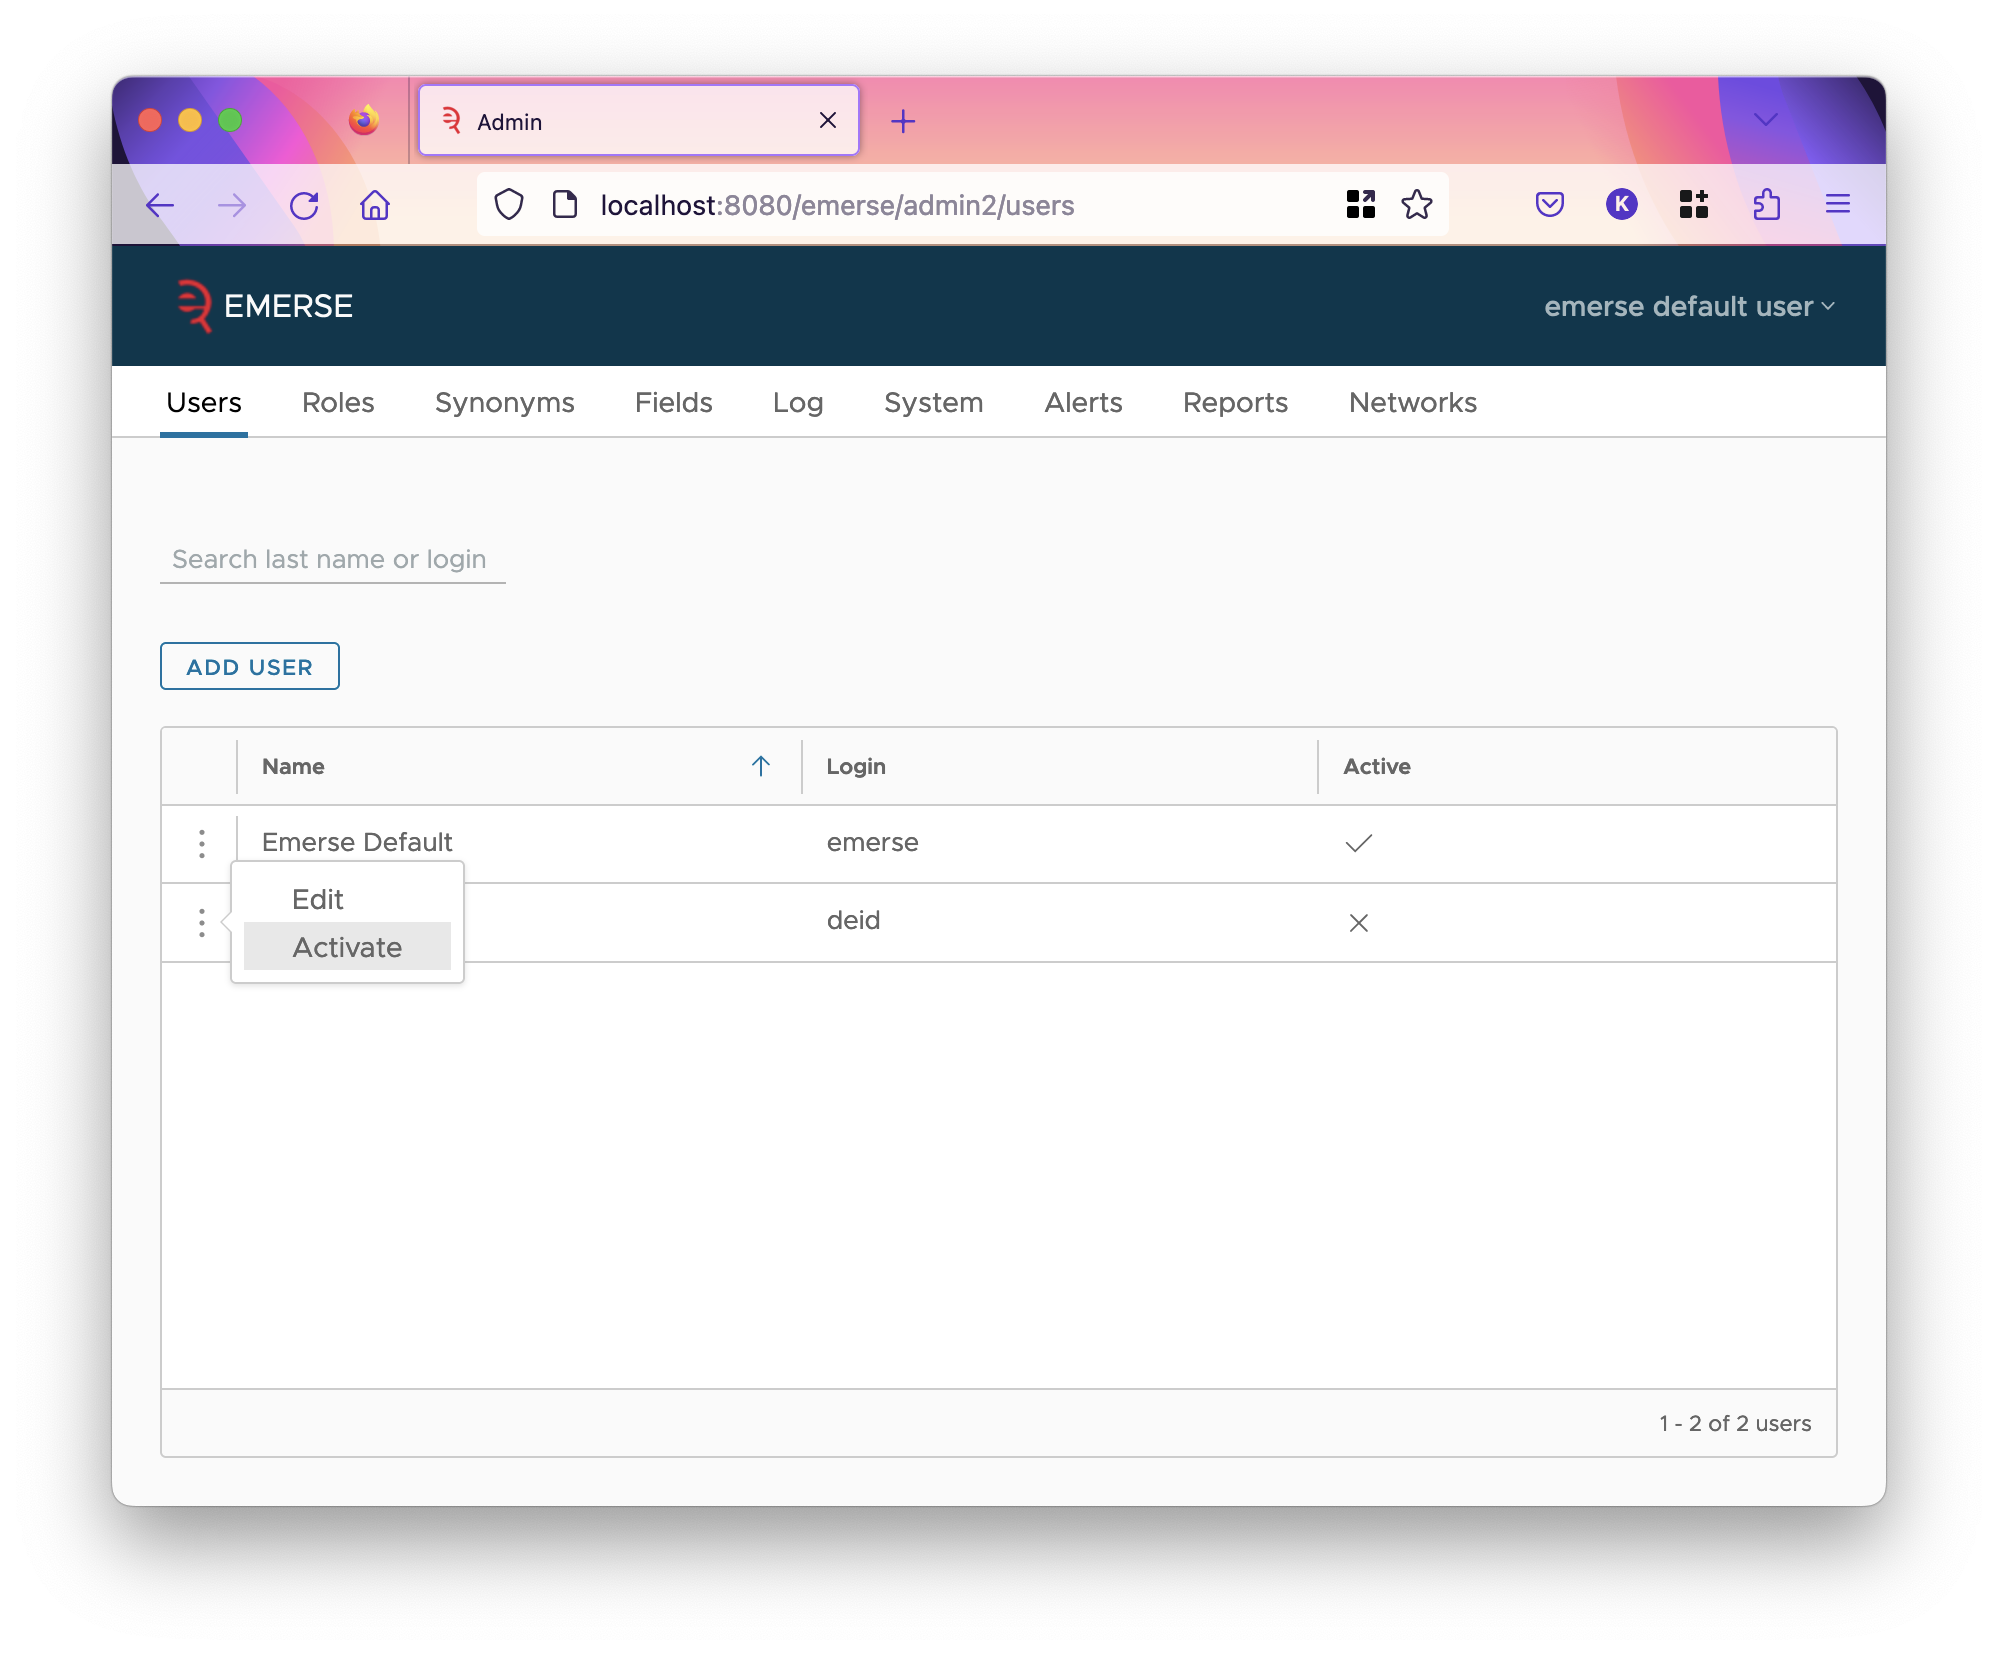
Users can be enabled or disabled. Disabled users cannot log in and can use neither the main EMERSE app nor the admin app. You can disable or enable a user by clicking on the triple dots to bring up a context menu on their row, and selecting either disable or enable option.
- Editing Users
-
To edit a user, click on the three dots of the user’s row, and select the edit option.
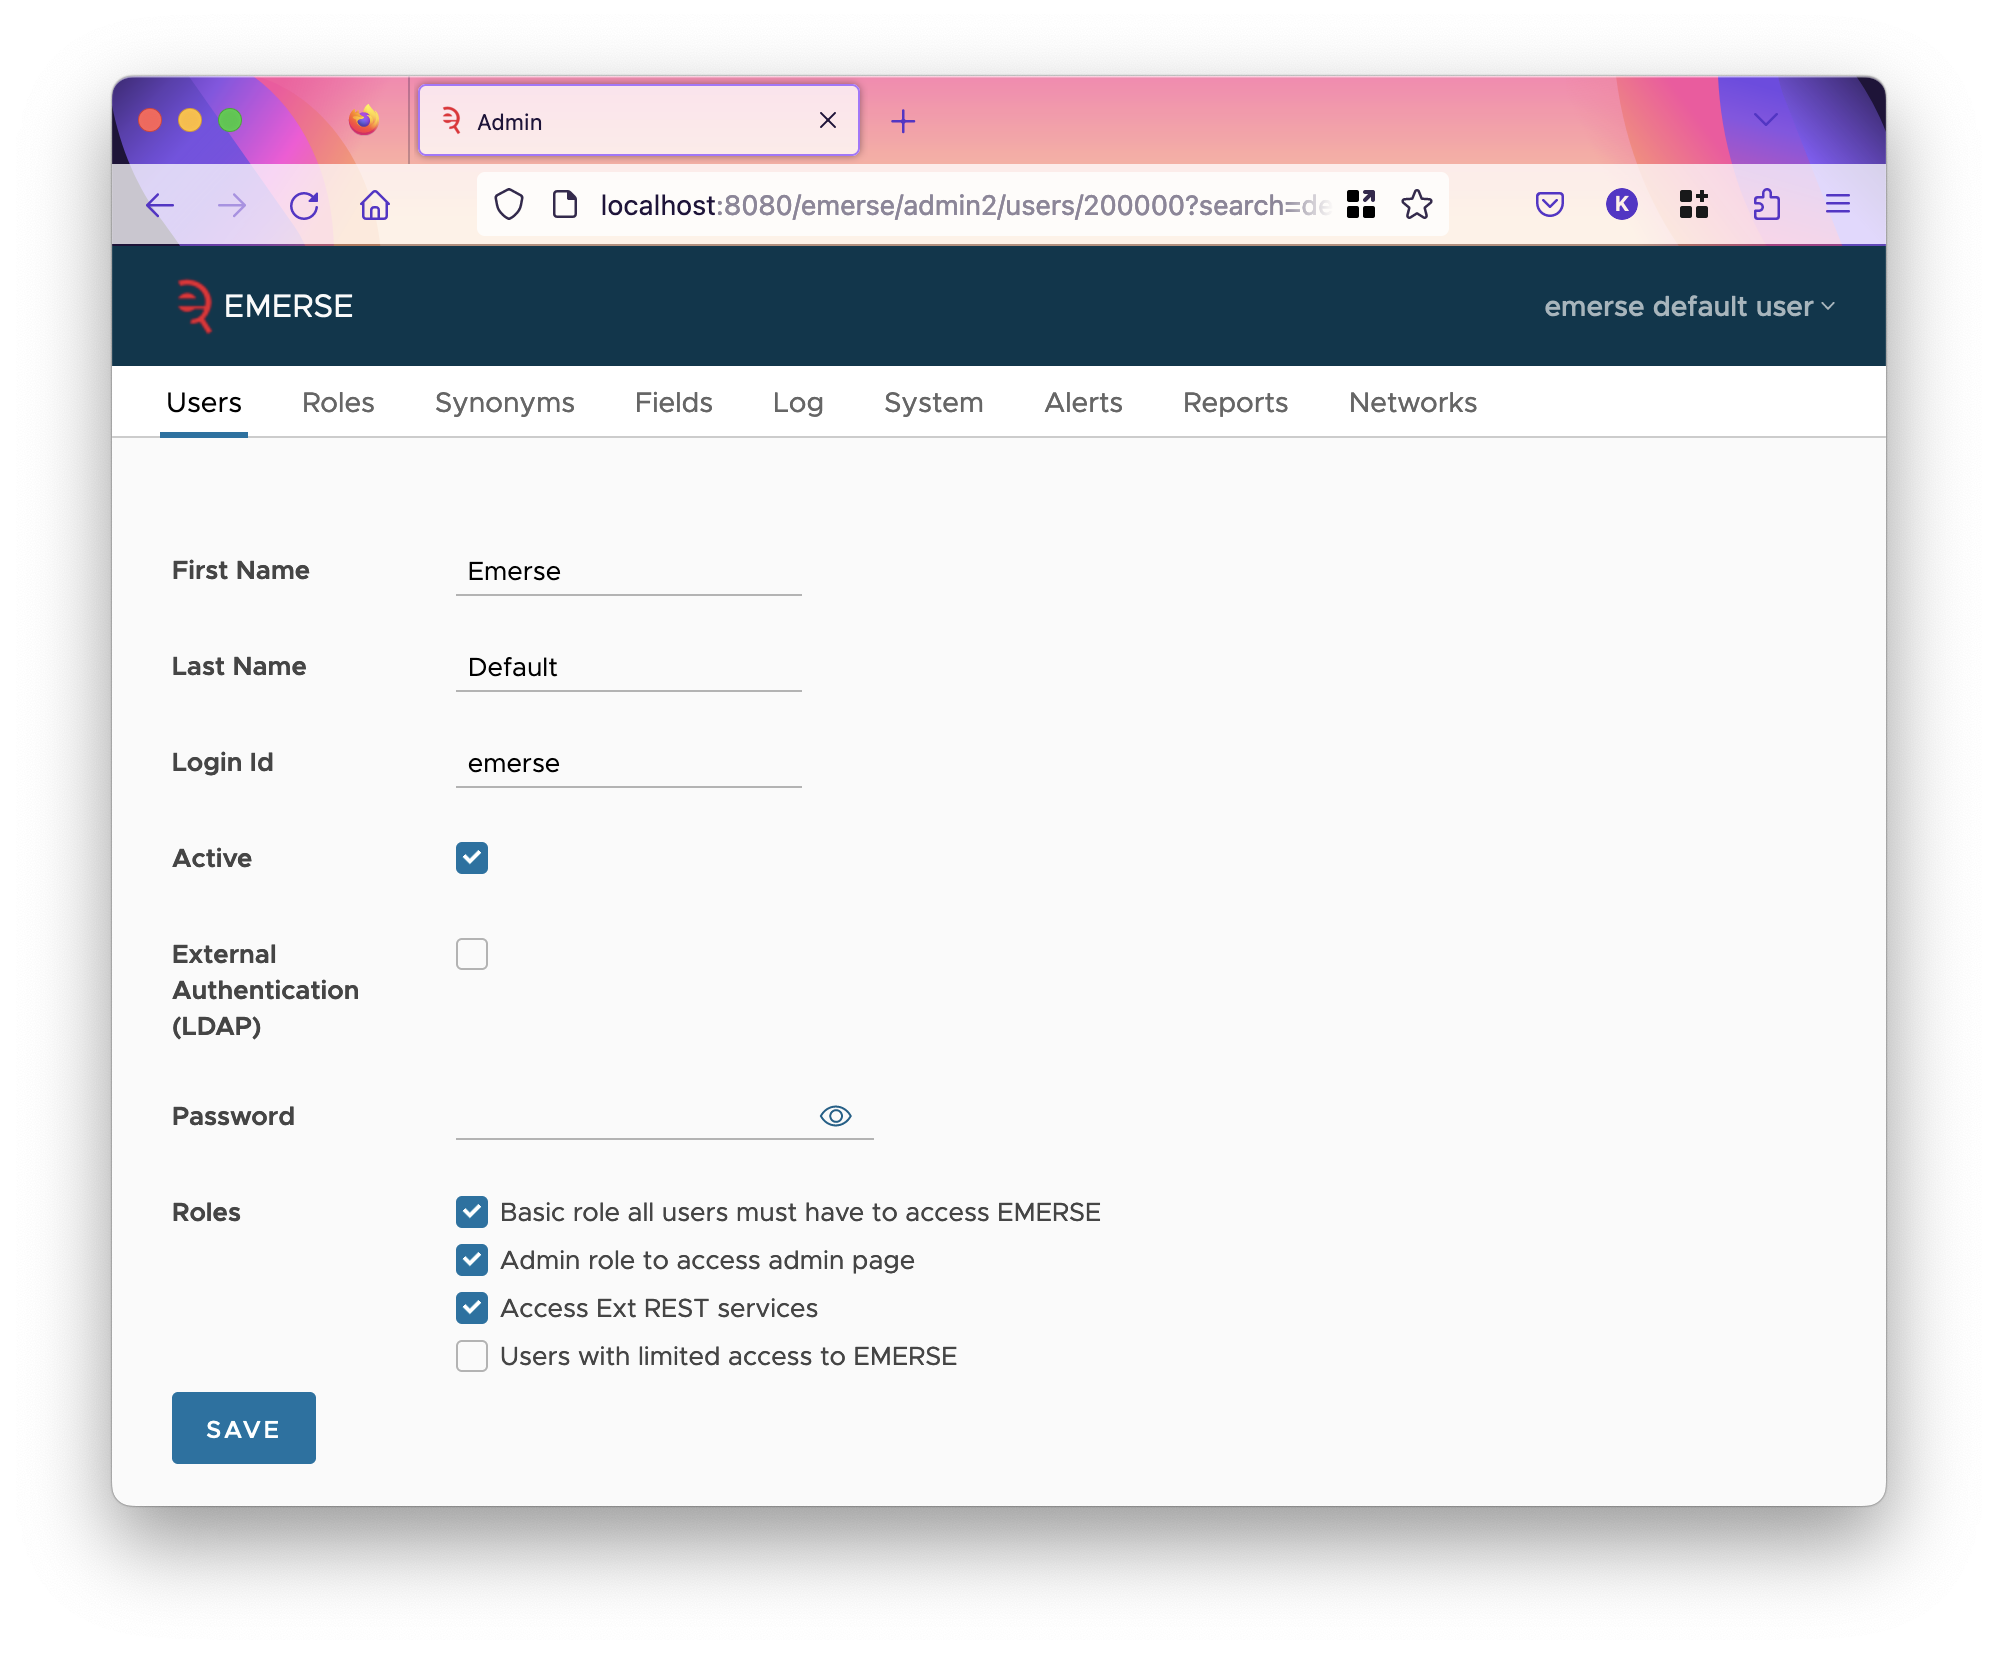
Editing a User
| After making changes, you must remember to click the save button; the application will not automatically save changes. |
When editing a user, you can change the roles, first name, last name and username (login ID).
EMERSE verifies a user’s password in one of two ways. The password can be stored in EMERSE’s database, in which case you can set the password on this page. The password field is always empty even if this is the method of authentication, but filling it in and saving the user will change their password.
The other way to verify the password is to use LDAP. In this case, the password cannot be changed by EMERSE, and the password field is always not used. To use LDAP, check the External Authentication (LDAP) checkbox and save the user. Using LDAP to authenticate requires that LDAP has been configured in emerse.properties. See the configuration documentation on how to do that.
Finally, you can select which roles the user has. Each role is listed at the end, with its description shown, not the internal code. Roles and privileges are described next. Changing a user’s roles doesn’t take effect until their next login. So, if they are currently logged in and need a new privilege you just assigned, they will have to log out, then log back in to get it.
Roles Tab
| Changes to the table are saved immediately upon being changed. However, changes won’t take effect for currently logged-in users; they will have to log out and log back in again to see changes. |
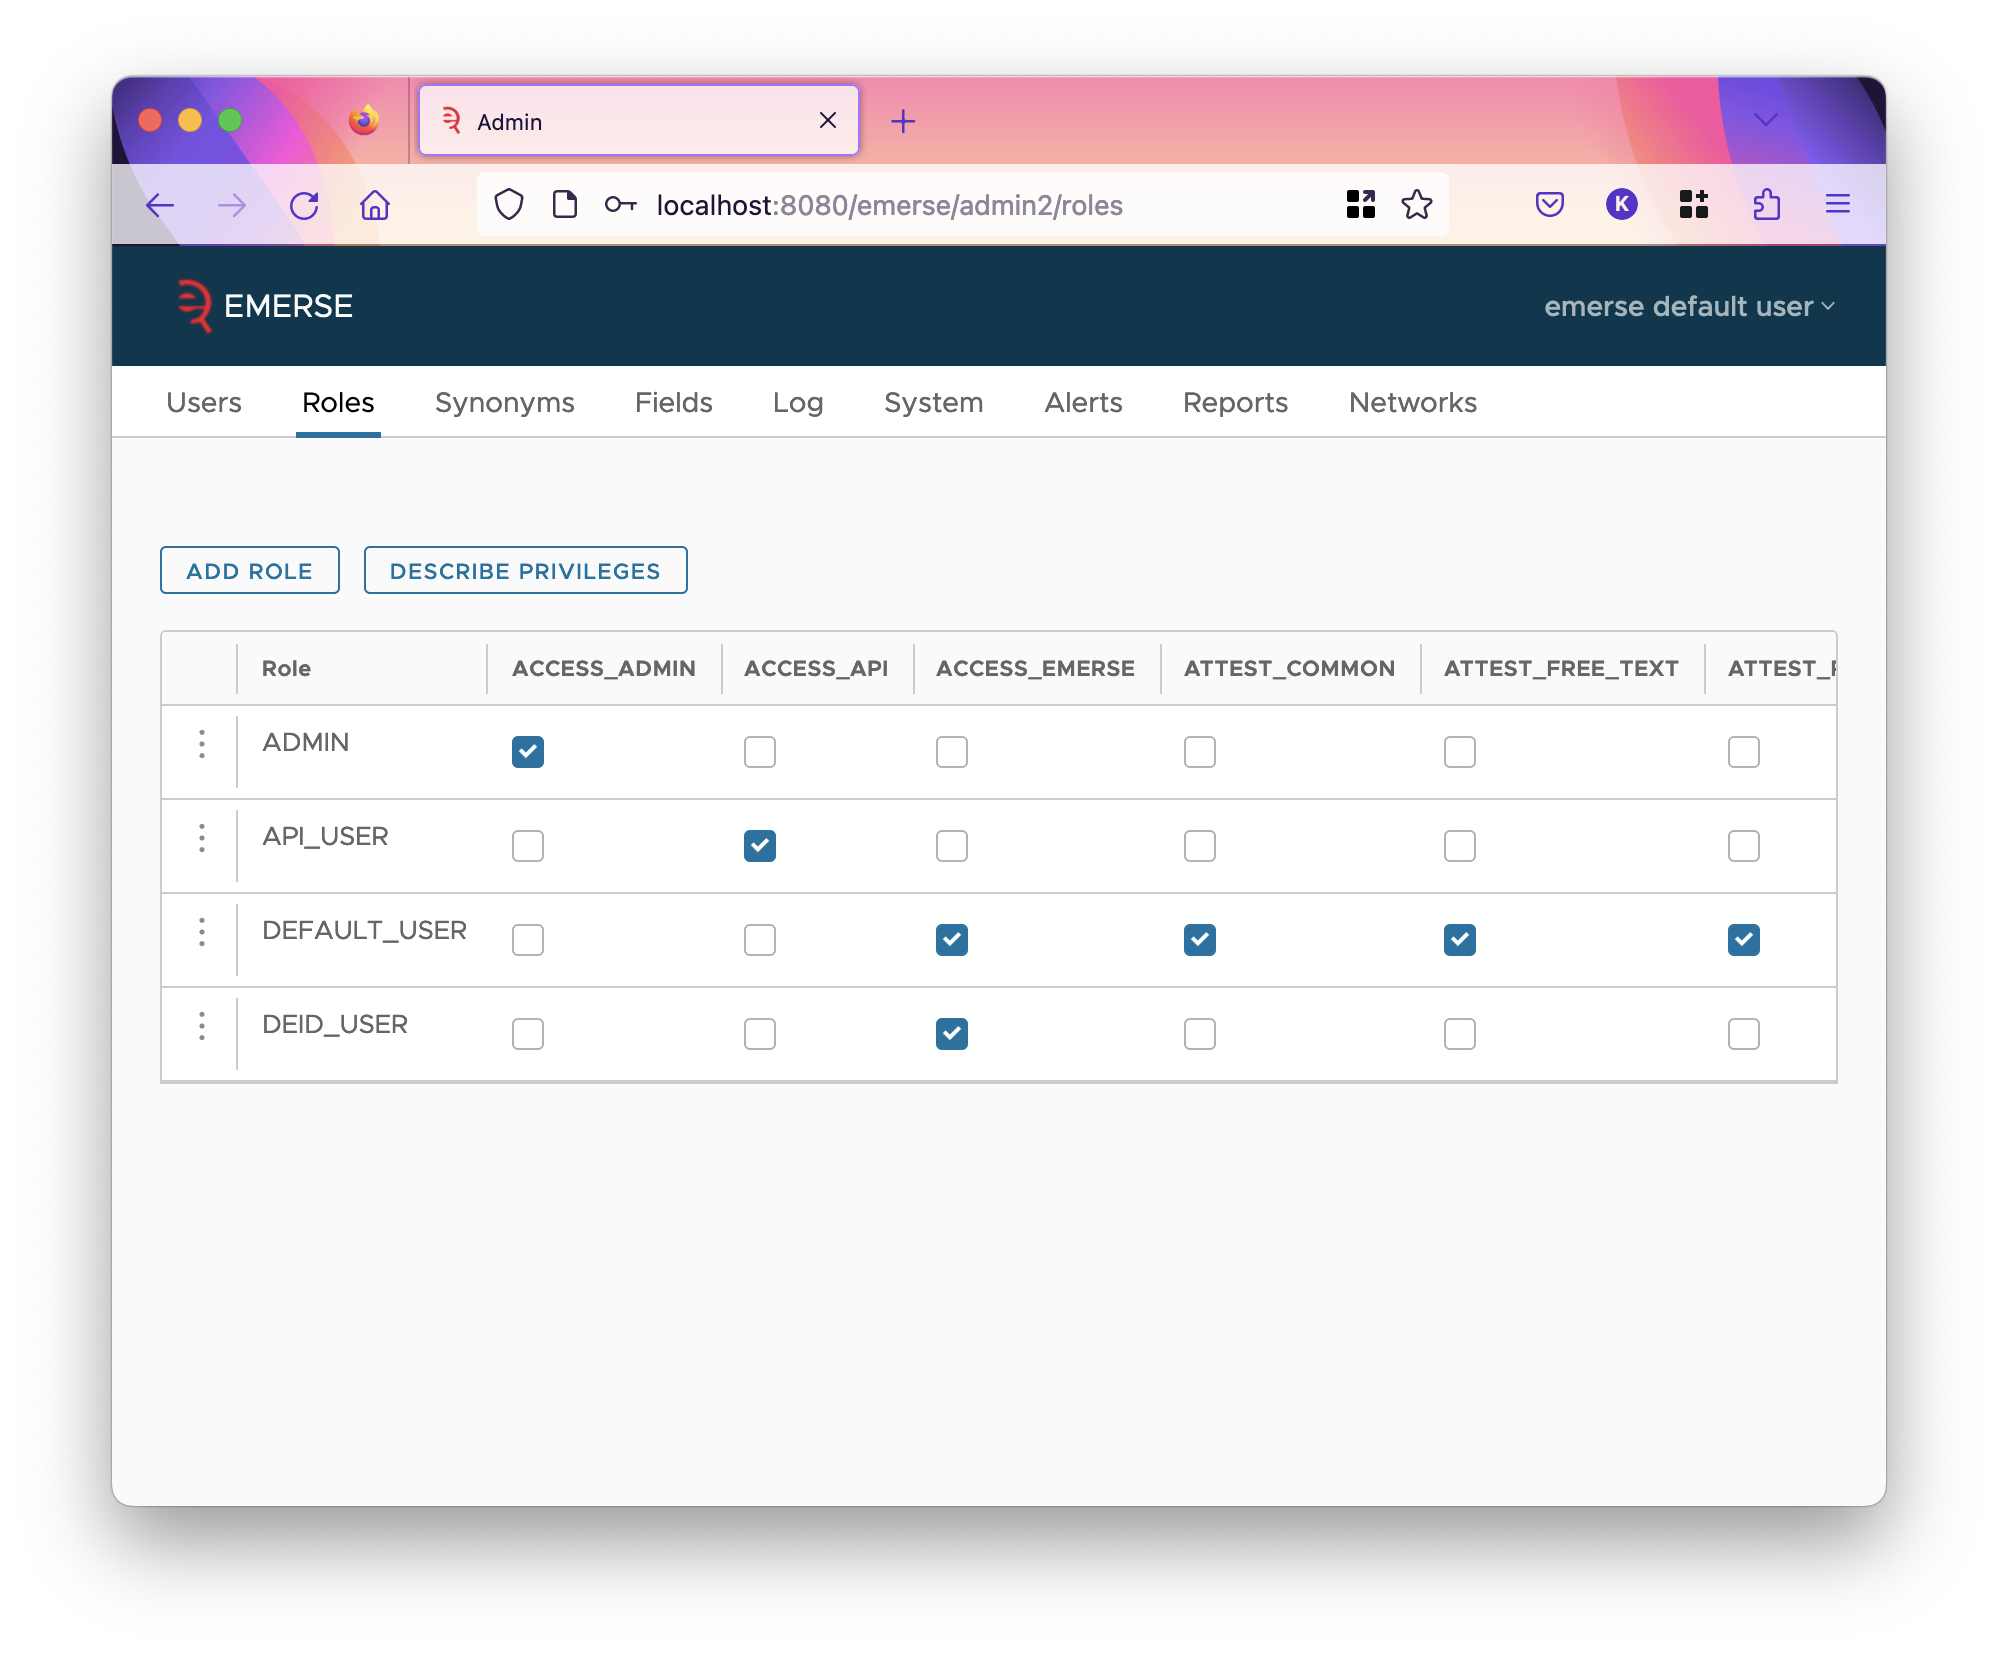
EMERSE’s authorization model uses roles and privileges. Privileges determine what actions a user can do in the system. Privileges are assigned to roles, and roles are assigned to users (as seen when editing a user in the roles tab). A role can have many assigned privileges, and a user can have many assigned roles. A user can do an action if they have the privilege from any of their assigned roles.
The roles page lists each role as a row in a table, with columns of the table being privileges. There are a lot of privileges, so you will need to scroll the table horizontally to see all of them. A role is assigned a privilege if the corresponding column’s checkbox is checked. You can click on the "Describe Privileges" button to see a description of what each privilege does.
The first column is the code of the role, which is not shown when editing a user, but the description. Codes must be unique and short. To see and edit the description of a role, click on the three dots and select the edit option.
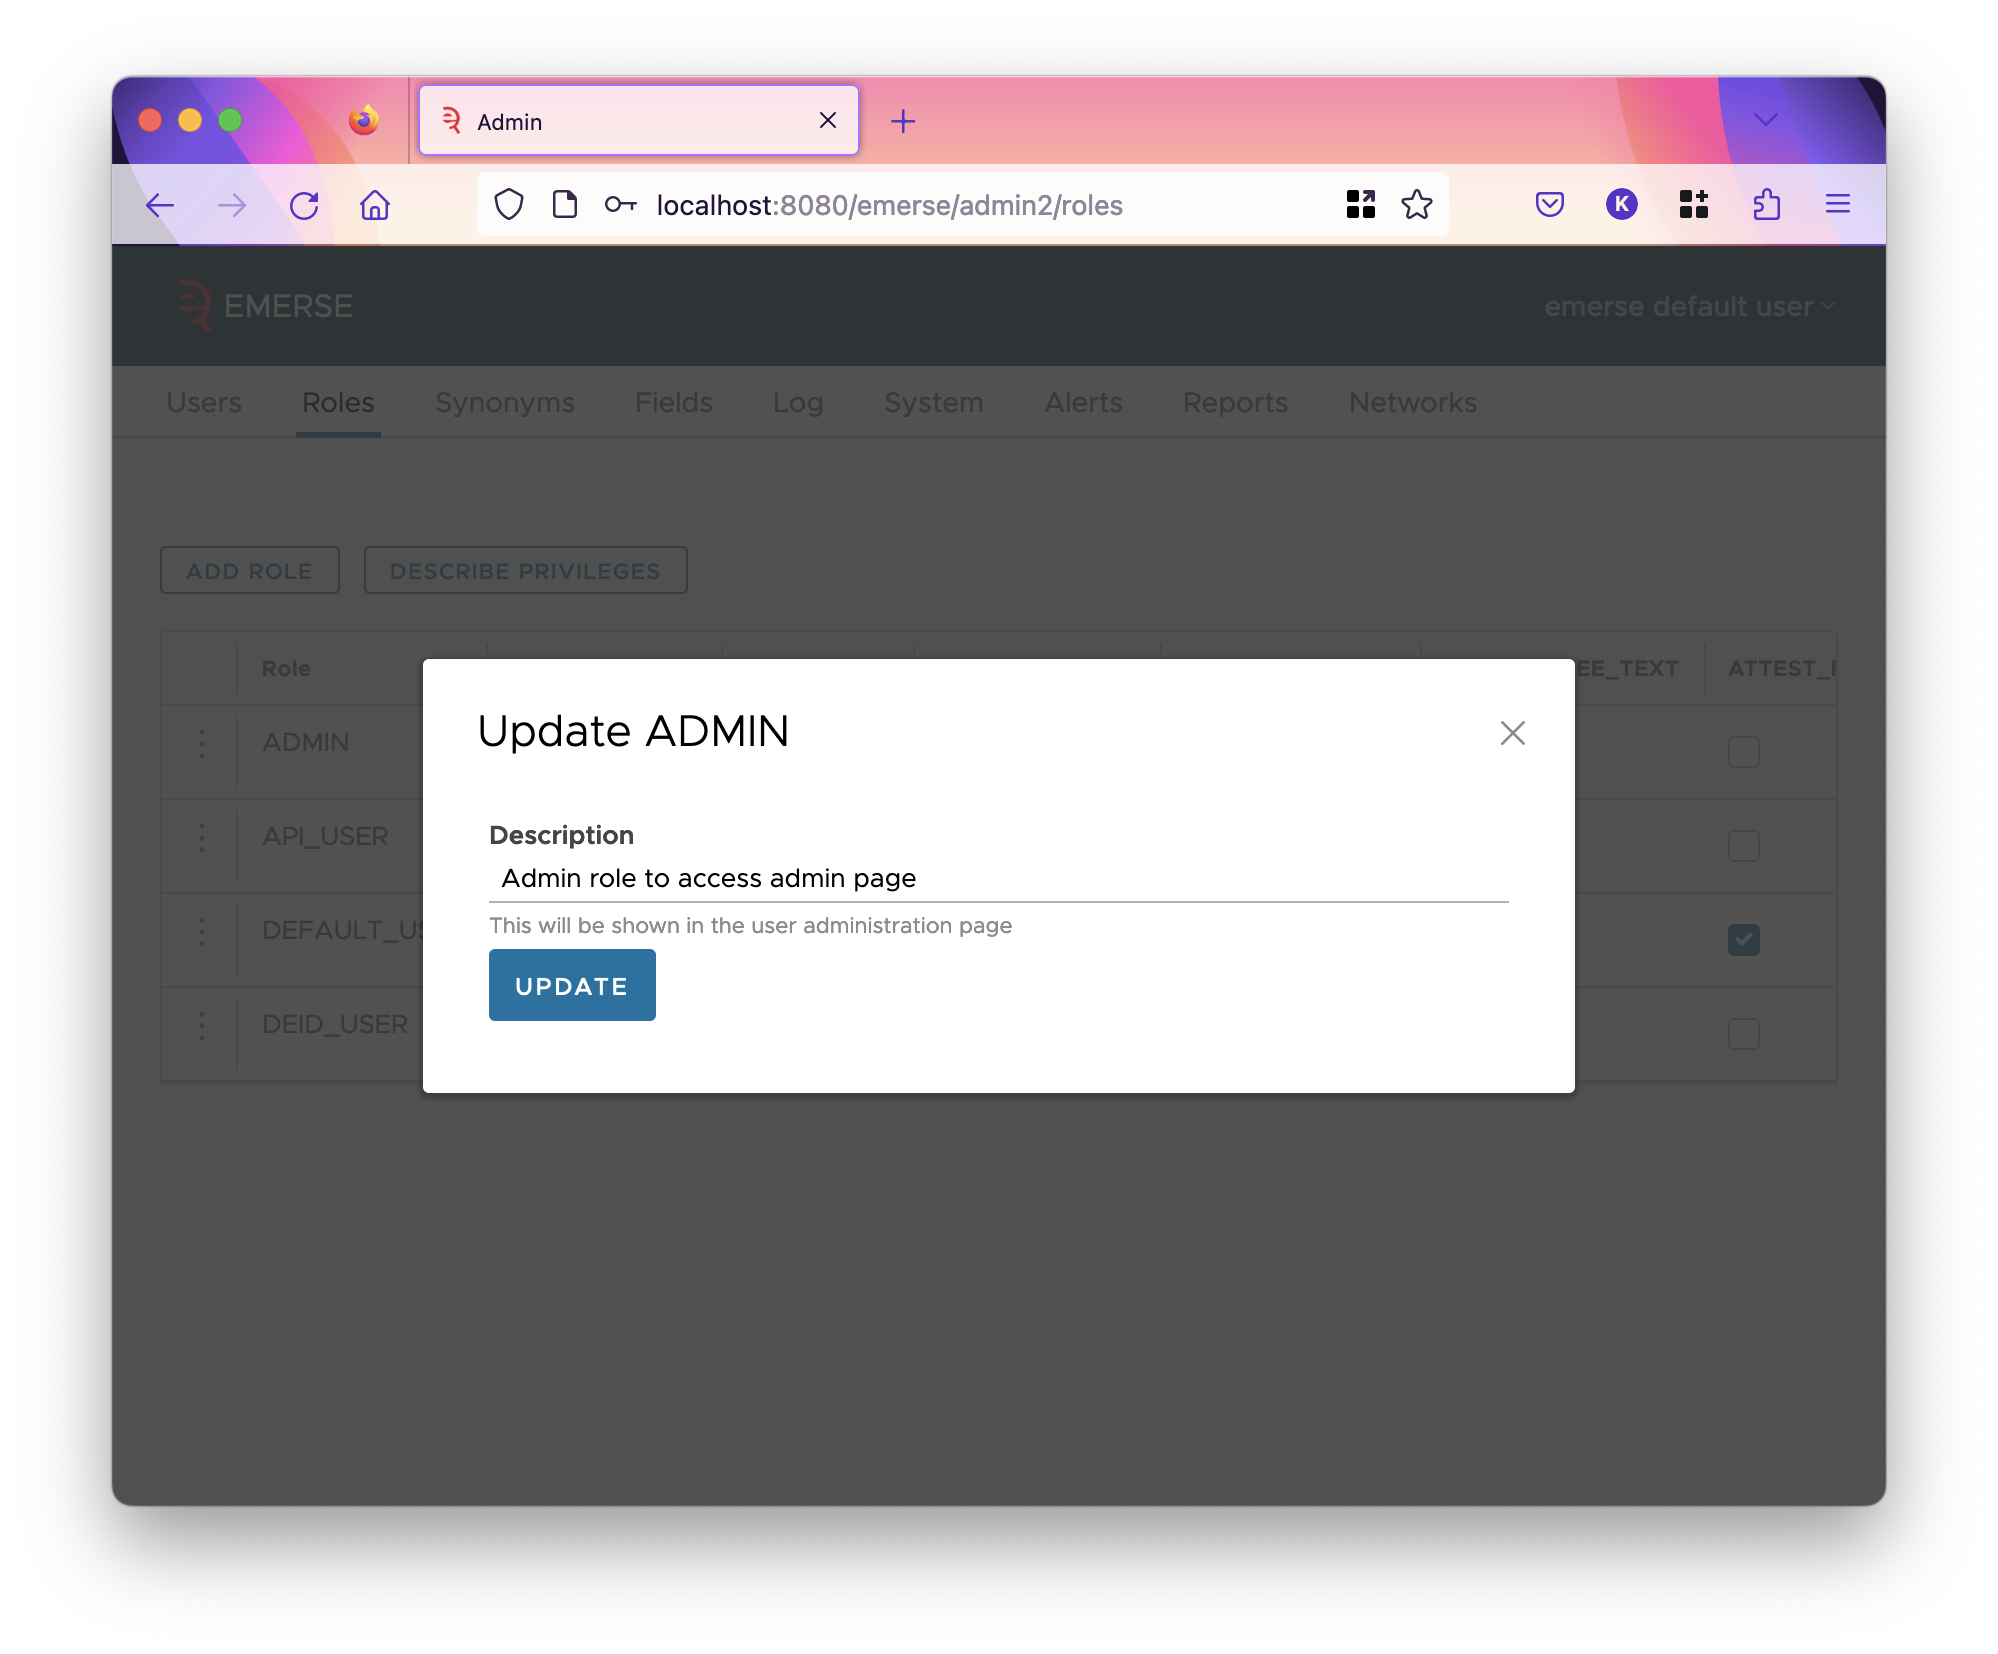
You cannot delete roles or change their code through the admin app. You can add a role using the "Add Role" button, which will add a row to the table.
Privileges are given here for reference as well:
| Privilege | Description |
|---|---|
ACCESS_ADMIN |
Allows the user to use all parts of this admin application. |
ACCESS_API |
Allows the user to use |
ACCESS_EMERSE |
This allows the user to use the main application at all. Without further privileges, they won’t be able to actually do anything in EMERSE. |
ATTEST_COMMON |
On the Attestation page, allows the user to attest to common attestation reasons for using EMERSE. (Common reasons can be set up by the admins). |
ATTEST_FREE_TEXT |
On the Attestation page, allows the user to write (free-text) their own reason for using EMERSE. |
ATTEST_PRIOR_REASON |
On the Attestation page, allows the user to select a previous free-text reason for attestation.
This privilege is useless if the user doesn’t have |
ATTEST_RESEARCH_STUDY |
On the Attestation page, allows the user to attest to an active research study they are a member of. This requires that research study and study team data is loaded into EMERSE’s database through an ETL process you write. |
EXPORT_PT_LIST |
Allows the user to download a patient list as a password-protected Excel file. |
NEW_PT_LIST |
Allows the user to create a patient list. This includes copying a patient list, create a new empty one, creating a patient list by combining two existing lists using the "Compare Lists" feature, and converting a temporary patient list to a saved one. |
SAVE_ALL_PT_LIST |
Allows the user to create a temporary patient list from an all-patient search. |
SEARCH_ALL_PT |
Allows the user to do all-patient search. This gives them the ability to see the exact count of patients that match their search. The ability to view the demographic charts, document snippets, and the trend-over-time chart are controlled by separate privileges. |
SEARCH_NETWORK |
Allows the user to search the federated network of EMERSE instances, if the EMERSE instance is configured to connect to it. |
UPLOAD_MRNS |
Allows the user to add patients to a saved patient list or their temporary patient list by uploading MRNs directly to that list. |
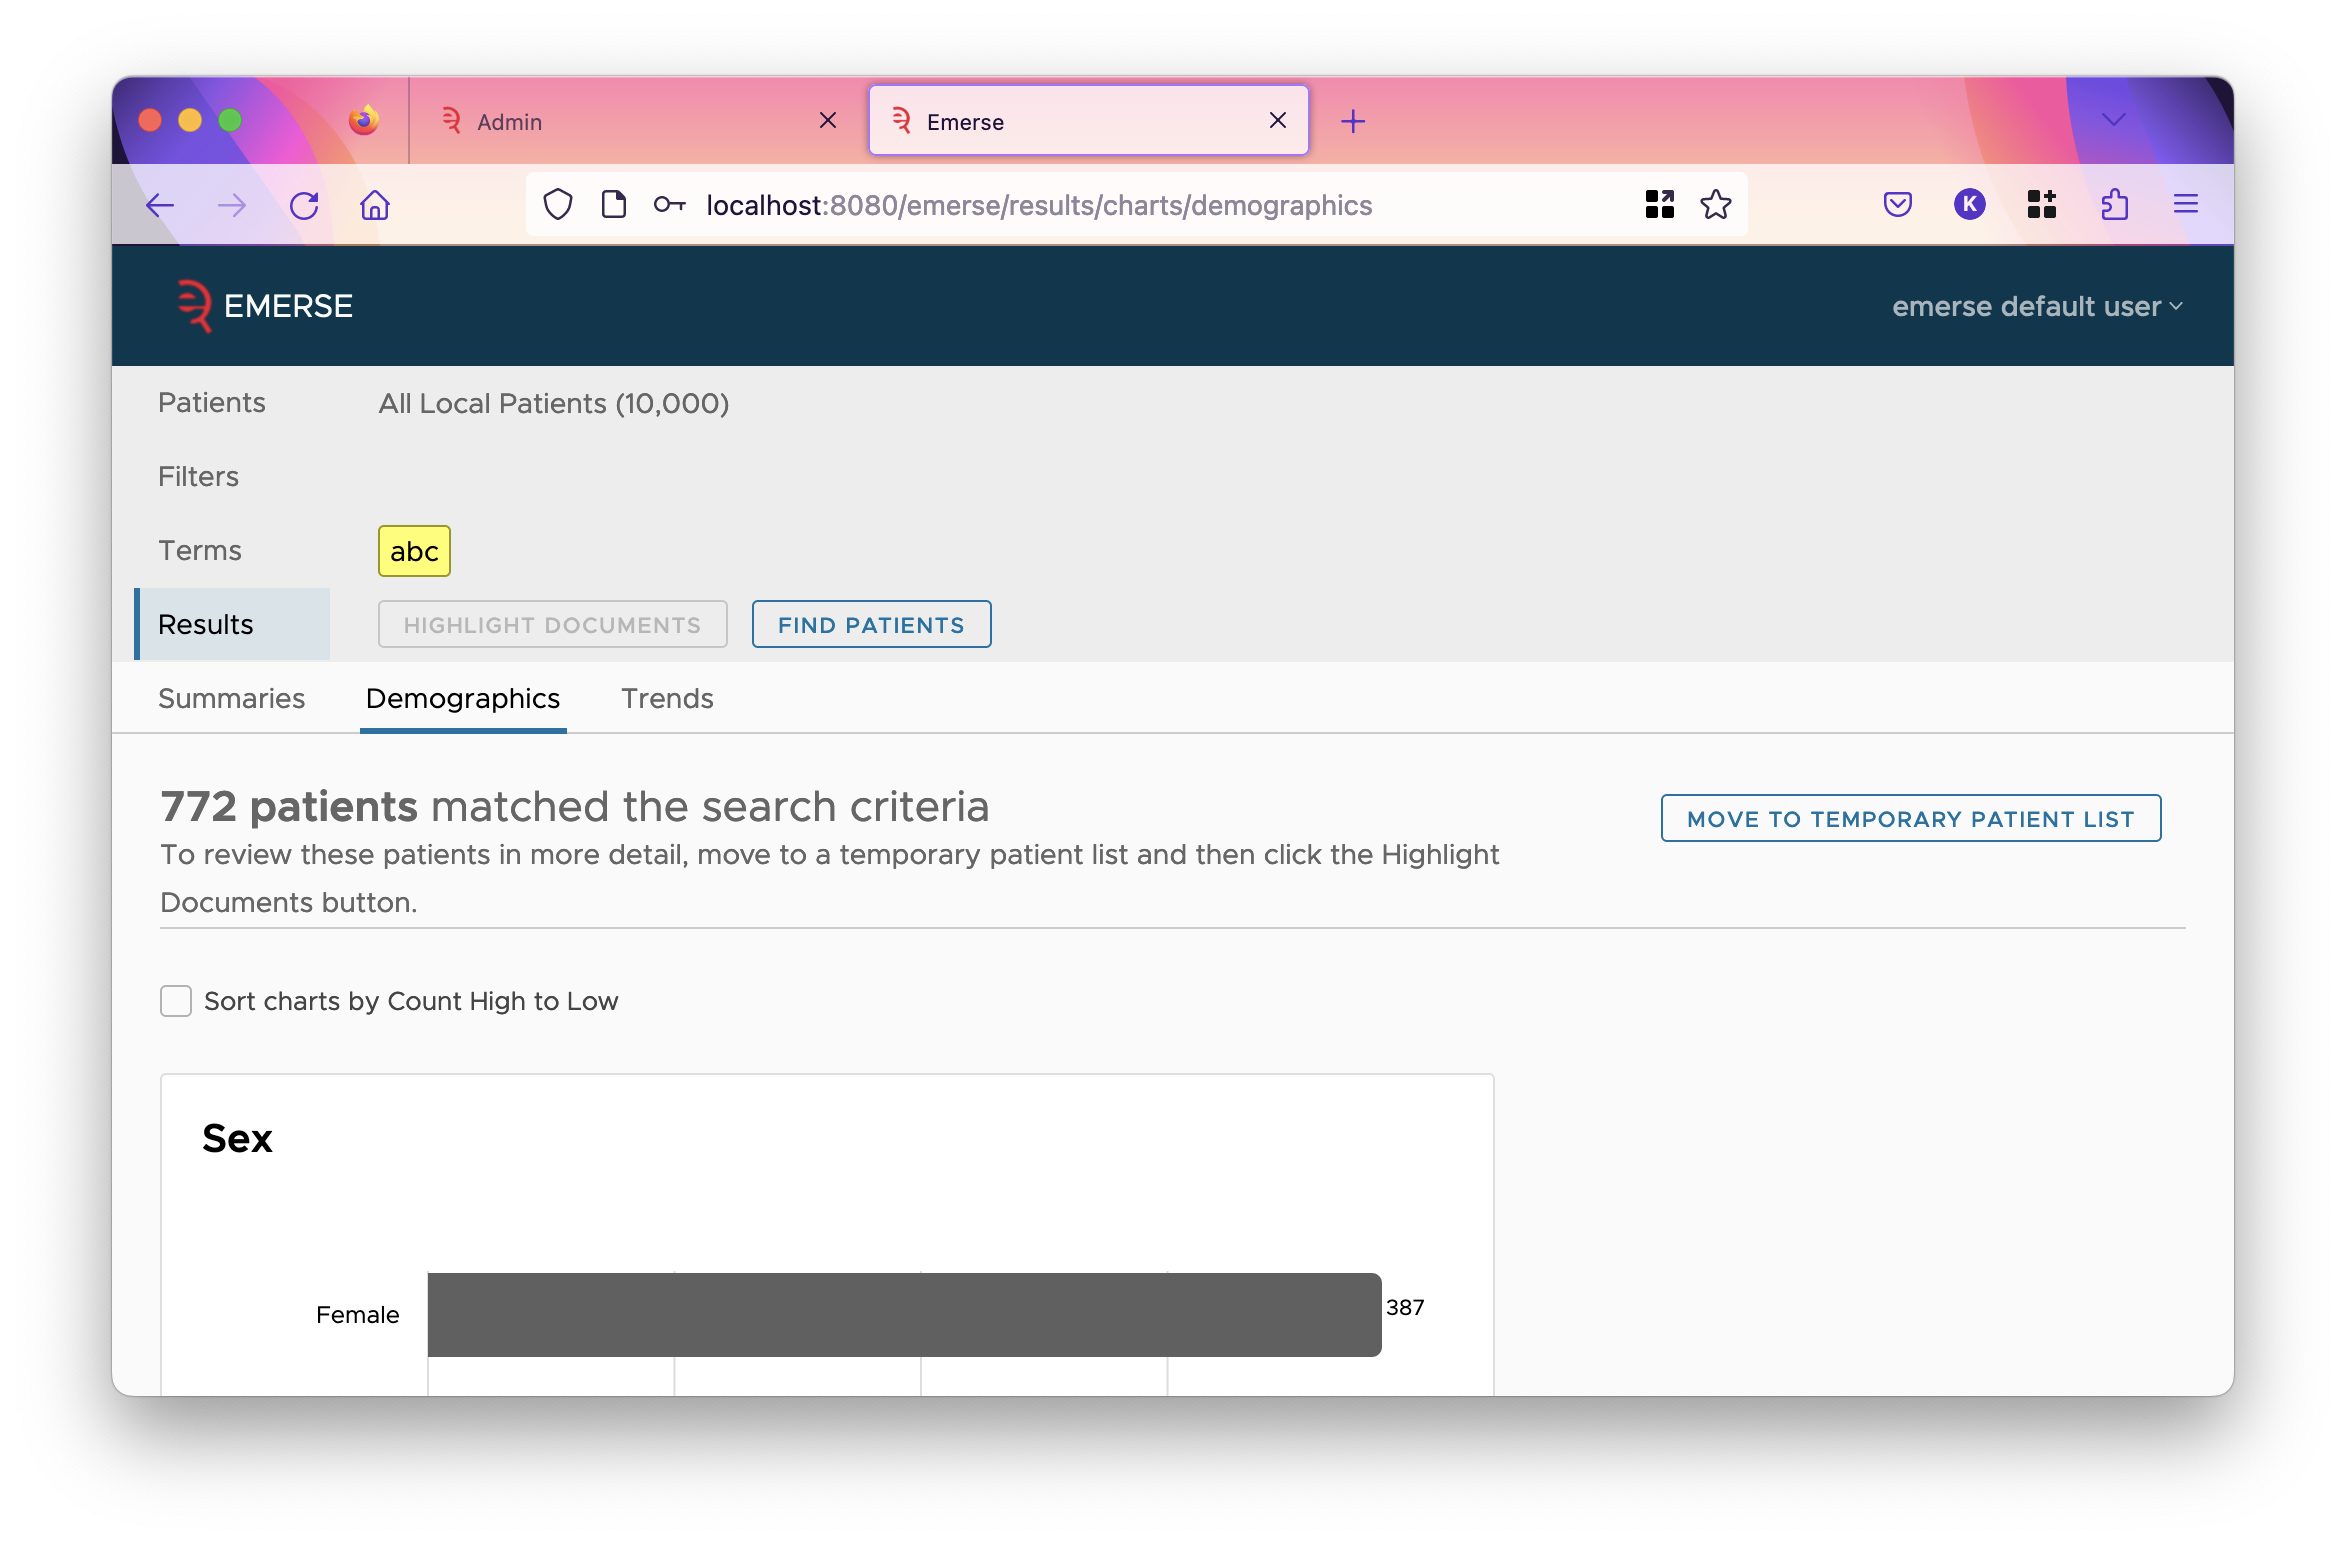
VIEW_ALL_PT_CHARTS |
Allows the user to view the demographic charts when doing all patient search.
Useful only if the user has |
VIEW_ALL_PT_SNIPPETS |
Allows the user to see snippets of documents matching the search terms in all-patient search. This allows users to correct mistakes in their search, and see the kind of data they are matching to quickly refine their search without (likely) seeing PHI. However, PHI could appear in the snippets, so it is important to be aware of that when enabling it for a user. Useful only if the user has |
VIEW_ALL_PT_TRENDS |
Allows the user to see a graph of how many patients match the search over time, in all-patient search.
Useful only if the user has |
Privileges can be given or not given in specific ways to get specific capabilities within EMERSE. These effects are not always obvious, so here are a few examples:
| Granted Privileges | Implication |
|---|---|
|
User can identify a set of patients with an All Patient Search and can see the text Summaries ( |
|
User can identify a set of patients with an All Patient Search and can see the text Summaries ( |
|
User can find a set of patients with an All Patient Search, but will not be able to see the text Summaries ( |
|
The user can only search patient lists they are given permission to access. This is the most locked-down role. |
|
The user can only search patient lists they are given permission to access. They can create derivative lists from the lists that they were given access to. They cannot add any new patients from MRNs they get from sources outside EMERSE, nor can they identify new patients to add to the list from within EMERSE. |
|
The user can search patient lists they are given permission to access. They can create derivative lists from the lists that they were given access to. They can also add new MRNs they get from sources outside EMERSE. |
|
This configures an administer role. Administrators can add and edit users and roles, and assign roles to users. Users with a role with such permissions cannot access EMERSE itself (so they cannot do any kind of search with EMERSE, but being an administrator, they can give themselves that permission). |
|
This configures a service role. Users in this role can access the server endpoints under |
The Synonyms Tab
EMERSE supports a type of query expansion we call Synonyms to help make user’s searches more thorough. A Synonym dataset is like a network of associated terms and phrases, connecting things such as alternative phrasings, acronyms, abbreviations, misspellings, conjugations, and related concepts to one another. After a user has added a term or phrase into their search, EMERSE will check it against activated synonyms, and suggest connected terms and phrases which the user can select and add to their search if they wish. These system-wide term suggestions can be leveraged by users but can only be updated by an administrator. There is no need to make your own synonyms dataset since we provide several that have been formatted specifically for EMERSE, including Enesmbl gene names and associated diseases, the Human Phenotype Ontology, and others. Details can be found on the EMERSE website. You can download these datasets from the project-emerse.org website and then upload on the synonyms page described here.
In addition to the sytem-wide Synonyms users can make their own collection of terms using the Saved Terms feature (previously called a Term Bundle), and can incorporate system-suggested Synonyms into their Bundles. User-created terms can be made available to other users through the Saved Terms sharing feature but they will not automatically become a part of the system-suggested Synonyms unless they are added by an administrator.
| To be as quick as possible when matching terms entered by users, all Synonyms are loaded into memory at the time the system starts up. This might cause a slight delay between starting the system and the availability of the datasets. |
Preparing a synonyms file
To prepare a synonyms file for importing into EMERSE, you must structure the file as a three-column tab-separated values (TSV) file.
Column 1: A key value that links related concepts together. This can be anything but should be unique for each grouping of concepts.
Column 2: The term/phrase
Column 3: The Concept Type, of which there are 4. These Concept Types are used for categorizing how the suggestions are displayed to users and also how the terms will be matched. They are:
| Concept Type | Concept Type Name | Concept Type Description |
|---|---|---|
1 |
Regular Synonym |
This is a standard type of "synonym", although that term is used loosely since it can mean any type of meaningful relationship between the terms. No formal ontological relationships are defined. Rather, the co-occurence of terms with the same key value implies that a relationship of some type exists. |
2 |
Related Term |
This is for terms that are related to the synonym it is grouped with but usually more distantly related. It provides a means for "one-way" matching. For example, in a group of connected terms (grouped by the key value), if one of the terms is "amoxicillin" (Concept Type = 1) and the related term is "antibiotic" (Concept Type = 2), then searching for "amoxicillin" would bring up "antibiotic" as a Related Term, but searching for "antibiotic" would not bring up "amoxicillin" at all. |
3 |
Spelling Alternative |
This is meant for misspellings of a term/phrase. |
4 |
UMLS Concept Unique Identifier (CUI) |
UMLS CUIs are special coded concepts that can be included in the EMERSE index. They have a specific structure, the letter C, followed by 7 digits, e.g. |
| The maximum length of each synonym entry is 255 characters, not including the Key Value or the Concept Type. This constraint is set by the database, so to go beyond that limit the database would need to be modified. We recommend not exceeding about 200 characters for the length of the term simply because we’ve noted that some Unicode characters can take up additional space in the database and can exceed the database character limit. Also note that because the files is a TSV, there should be no tabs in the terms/phrases themselves. While it should not be necessary to change the maximum length of a synonym entry or the tab delimiter used in the file, these can be changed through properties if desired. See: synonymList.valueLimit and synonymList.delimiter. |
Synonyms file metadata
Additional metadata can be added to the file which will be displayed to the users. These also must follow the three column TSV format and should appear at the beginning of the file, using the following formatting
Column 1: The phrase: emerse_synonyms_metadata
Column 2: An attribute, which is case-insensitive.
Column 3: The value for the attribute.
Note that you can provide any attribute, but only specific ones are supported by EMERSE. Other attributes not supported will be stored in the database but not used.
Currently supported Attributes are as follows:
| Attribute | Description | Example | Required or Optional |
|---|---|---|---|
|
The name of the Synonyms dataset to be shown to users. This is case-sensitive and needs to be unique. If a dataset with the same case-sensitive name is uploaded, it will replace the prior dataset. |
Local health center synonyms |
Required |
|
A brief description of the dataset to help a user understand what kind of terms it contains. |
Local acronyms/abbreviations used at our health center |
Optional |
|
A URL that points back to the original resource from where the terms were obtained. For the users, the name of the dataset will become an active link if a URL is provided. |
Optional |
|
|
The date that the dataset was last updated. This is treated as a String, so any format is acceptable. |
08/25/2011 |
Optional |
The name attribute must appear as the first line in the dataset. The other attributes can appear in any order as long as they are not on the first line. Furthermore, the name cannot exceed 256 characters.
|
The beginning of an example Synonyms import file would look like:
emerse_synonyms_metadata	name	Local health center synonyms
emerse_synonyms_metadata	description	Local acronyms/abbreviations used at our health center
emerse_synonyms_metadata	url	https://link-to-website.org
emerse_synonyms_metadata	last_updated	07/15/2024
1001	endocervical type adenocarcinomas	1
1001	endocervical type adenocarcinoma	1
1001	endocervical adenocarcinomas	1
1001	endocervical adenocarcinoma	1
1001	adenocarcinoma, endocervical type	1
1001	adenocarcinoma	1
1021	adenomatoid	1
1021	adenomatous polyps	1
1021	adenomatous polyp	1
1021	adenomatous	1
1021	adenomata	1
1021	adenomas	1
1021	adenoma	1
1021	polyps	2
1021	adeomas	3
1021	adeoma	3
1021	ademoa	3
1021	ademoma	3
1021	ademona	3
1041	C0018681	4
1041	ache head	1
1041	cephalalgia	1
1041	cephalalgias	1
1041	cephalgia	1
1041	cephalgias	1
1041	cephalodynia	1
1041	cephalodynias	1
1041	cranial pain	1
1041	cranial pains	1
1041	HA	1
1041	head ache	1
1041	head pained	1
1041	head pains	1
1041	head; pain	1
1041	headache	1
1041	headaches	1
1041	pain in head	1
1041	pain, cranial	1
1041	pain, head	1
1041	pains, cranial	1
1041	pains, head	1
In the example above, there are three groups of concepts (group 1001, group 1021, and group 1041). The group numbers are arbitrary and have no meaning, but must be distinct from one another. Group 1021 has mix of three concept types: seven regular Synonyms (Concept Type = 1), one Related Term (Concept Type = 2), and five Spelling Alternatives (Concept Type = 3). Group 1041 has a CUI (Concept Type = 4) and multiple regular Synonyms (Concept Type = 1). For group 1041 if the CUI ("C0018681") is entered, all of the other terms mapped to that group will be suggested. If any standard term/regular synonym (e.g., "head pained") for group 1041 is entered, then the CUI will be suggested.
When a user enters a term, EMERSE does the following to determine which Synonyms to display:
-
The user-entered term is matched to all Regular synonyms (Concept Type = 1) in a case-insensitive manner.
-
For all matches, the key values are obtained (a concept may belong to more than one grouping and thus may have more than one key value).
-
All other terms related to the key value(s) are obtained
-
Duplicates are removed
-
The final set is displayed to the user, organized by the three Concept Types, as shown in the figure below
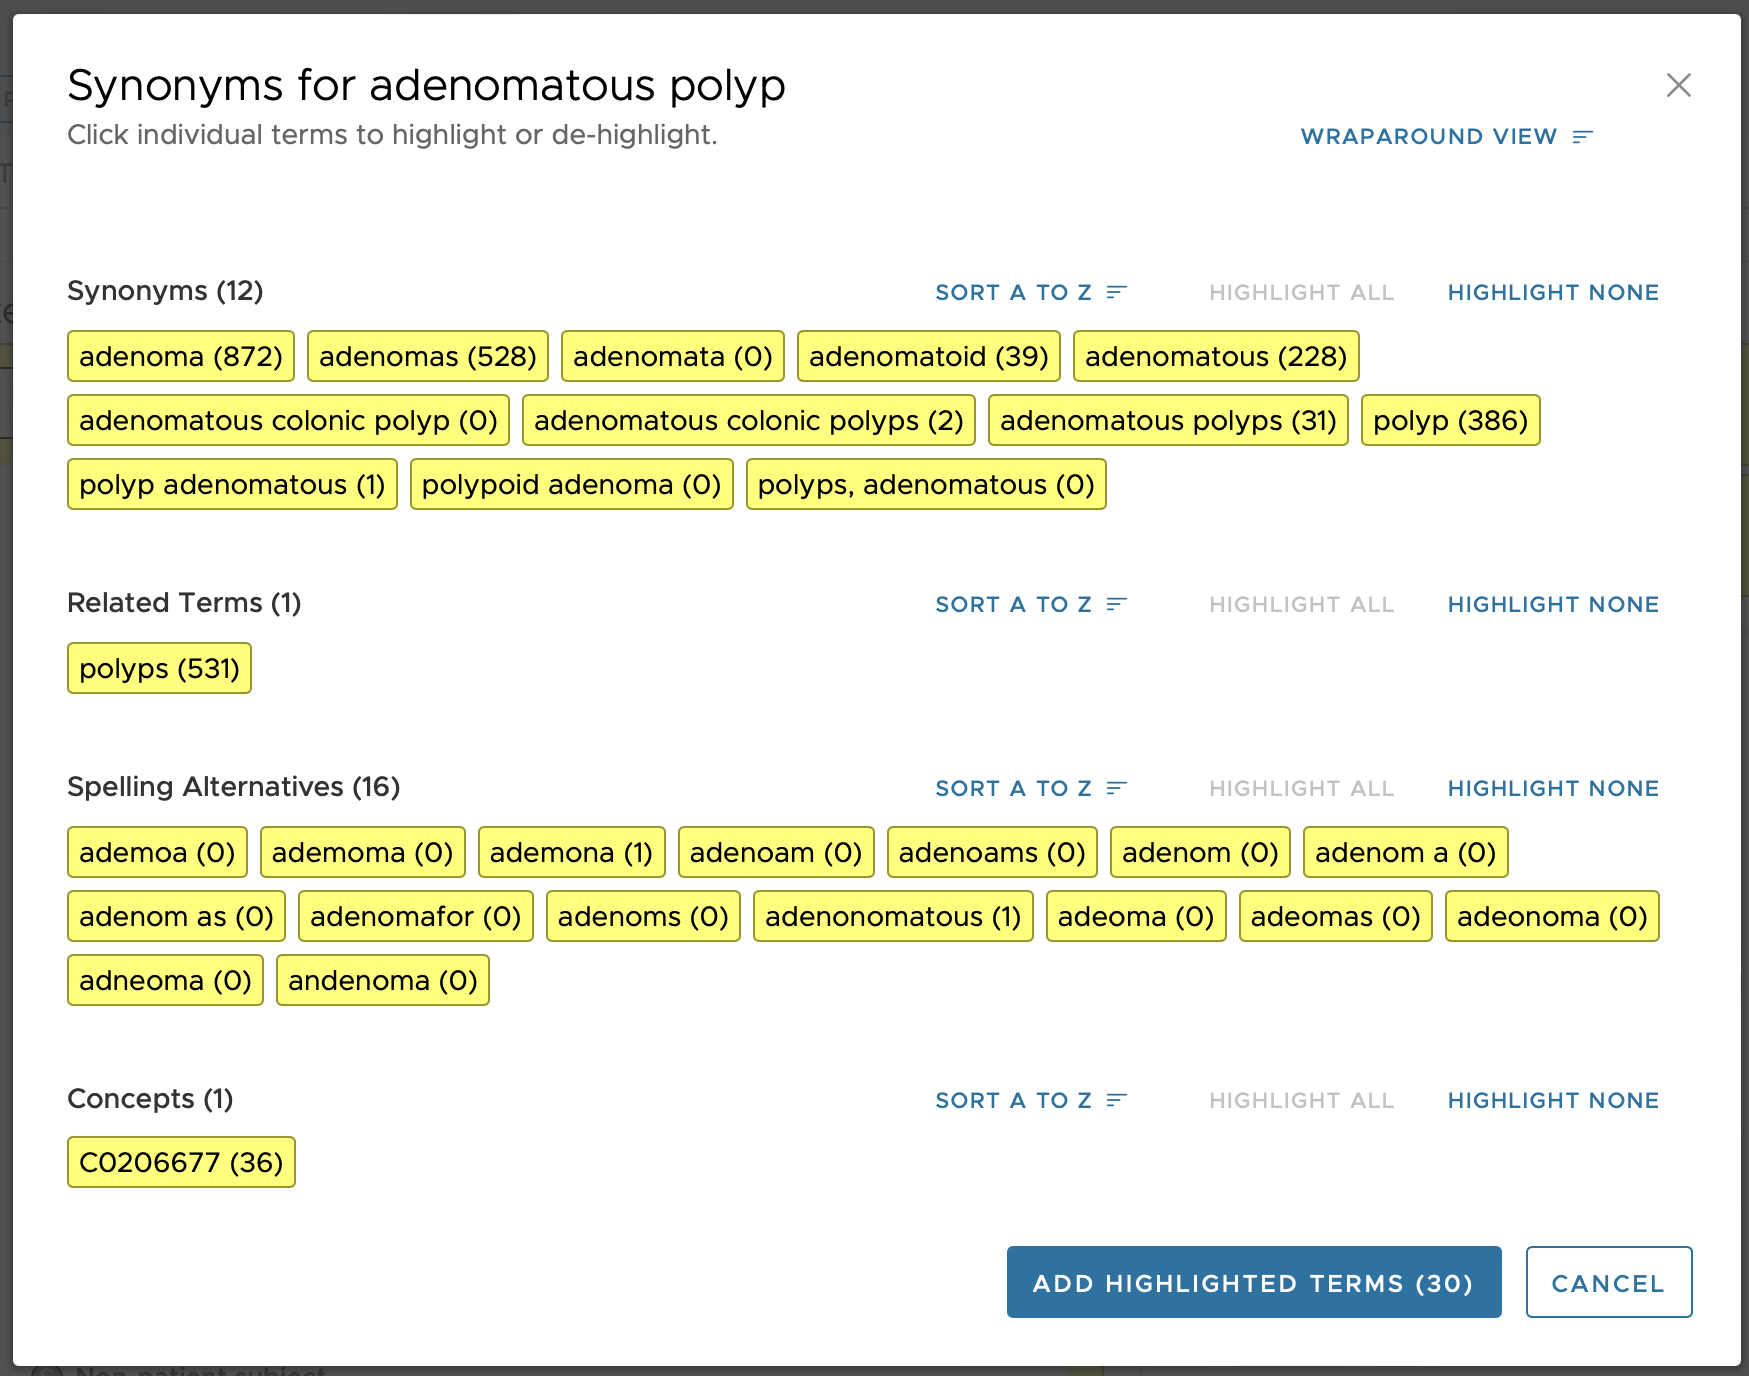
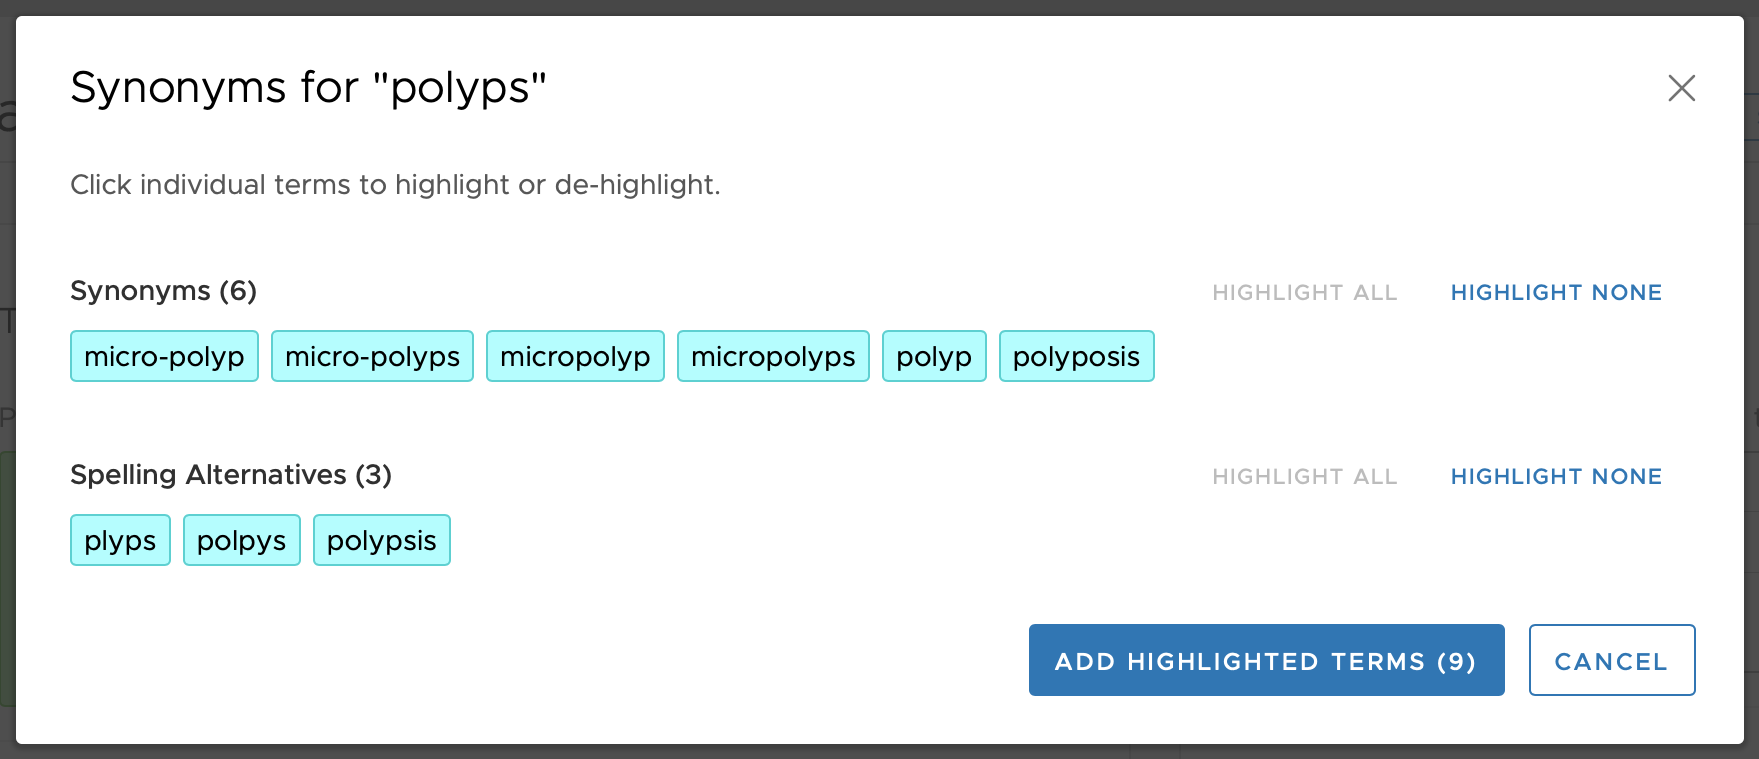
This organizational scheme of four Concept Types allows for some terms to be suggested based on a user-entered term, but supports the ability to have a one-way match to reduce extraneous matching when desired. For example, if the terms entered is 'adenomatous', the term 'polyps' will be displayed as a Related Term (see figure above). However, since in that grouping (group 1021 in the above example) the term 'polyps' is not a Regular concept type (i.e., it is not Concept Type 1 but rather Concept Type 2) then it means that a user-entered search term of 'polyps' will not match to anything in that 1021 grouping. This can be seen in the figure, below, where none of the terms in group 1021 are displayed to the user when 'polyps' is entered as a search term.
Uploading a Synonyms File
A Synonyms file should be prepared as a 3 column TSV file as described above. To upload the file, login to the Administrator App and choose the Synonyms tab. Then select Upload, and click on the Choose button to select the TSV file. After the file is selected press Upload.
Minimal feedback is provided while the file is loaded and verified. Common problems include a file size too large for the server to handle, an upload time that exceeds the server’s timeout maximum, or a string length that exceeds what the database allows (we recommend no terms > 200 characters). A description of a few problems that might be encountered, and possible solutions, can be found in the Troubleshooting Guide.
When uploading a Synonyms file, note that if the same name is used as an existing dataset (based on the included metadata; and a case-sensitive match), the newly uploaded dataset will replace the existing dataset. However, this replacement will not happen immediately. At first, the new file will have _TEMP appended to the name and both files will exist simultaneously in the table of datasets in admin Synonyms tab. This is so that counts can be done on the newly uploaed (_TEMP) file while the prior file with its existing counts is still available for users.
| Some synonym files (such as the licensed EMERSE synonyms) are very large, and might cause the database to fail. Usually the cause is that there isn’t enough temproray space, but it depends on the database vendor and settings. These issues are not something we can fix from the EMERSE codebase; you’ll have to talk to your DBA to find a solution. However, we are always willing to take the first look at a problem, so don’t hesitate to let us know if you’re having trouble uploading synonyms. |
Managing the Synonyms
Multiple Synonym datasets can be loaded into EMERSE via the Admin App. After loading, a dataset will be in a Deactivated state, meaning that it will not be available or even visible to users. Clicking the Activate button will do two things: (1) it will make the dataset available to users and (2) it will invoke a background process that counts how many times each term appears in the overall set of documents. The counts resulting from this background process provide an intelligent approach to displaying the synonyms to users because it allows users to rank the terms based on how often they appear, including providing the option to hide terms that never appear in the corpus of all notes in the Solr index.
Counting the terms can take hours, days, or even weeks, depending in part on how many terms are in the dataset and also on how many documents are indexed. While the count is ongoing for the first time, the synonyms will be available to users but users will not be able to change options that limit the results by count. Counts will not appear for a dataset until the entire counting process for all of the terms is complete. The counting process is refreshed only at the time a dataset is Activated. To refresh the counts with the existing dataset, Deactivate and then Activate the dataset again. Refreshing the counts may be desirable if many new documents have been added since the counts were last conducted, which could change the frequency of the Synonyms in the dataset. However, during this time when counts are being conducted, the prior counts will be lost.
As of version 7.1, a new counting process is also available so that prior counts can remain available for users even while new counts are ongoing. This is useful for large files where the counts cane take extended periods of time. To invoke this feature, simply upload the dataset that has the same name as the prior dataset (based on the name metadata field in the file). EMERSE will recognize that a prior dataset exists and it will append _TEMP to the newly uploaded file. Then, simply activate this file and the counting will begin. Once the counting is complete, EMERSE will remove the prior dataset and rename the new one by removing the _TEMP. At this point, the new counts will be available for that specific dataset. Users will not have to change any of their settings.
The Deactivate button retains the Synonyms dataset in the system but makes them unavailable to users. The Remove button deletes the dataset entirely from the database.
If the counting process was interrupted (for example, by the server being patched and restarted) the system should be able to recover from where it left off and complete the counts, but it must be restarted manually be pressing the the Resume button which will be displayed when an interrupted process is detected. The counting process can also be stopped manually by pressing the Stop button. When counts have been stopped before completion, the Synonyms will be available but without counts.
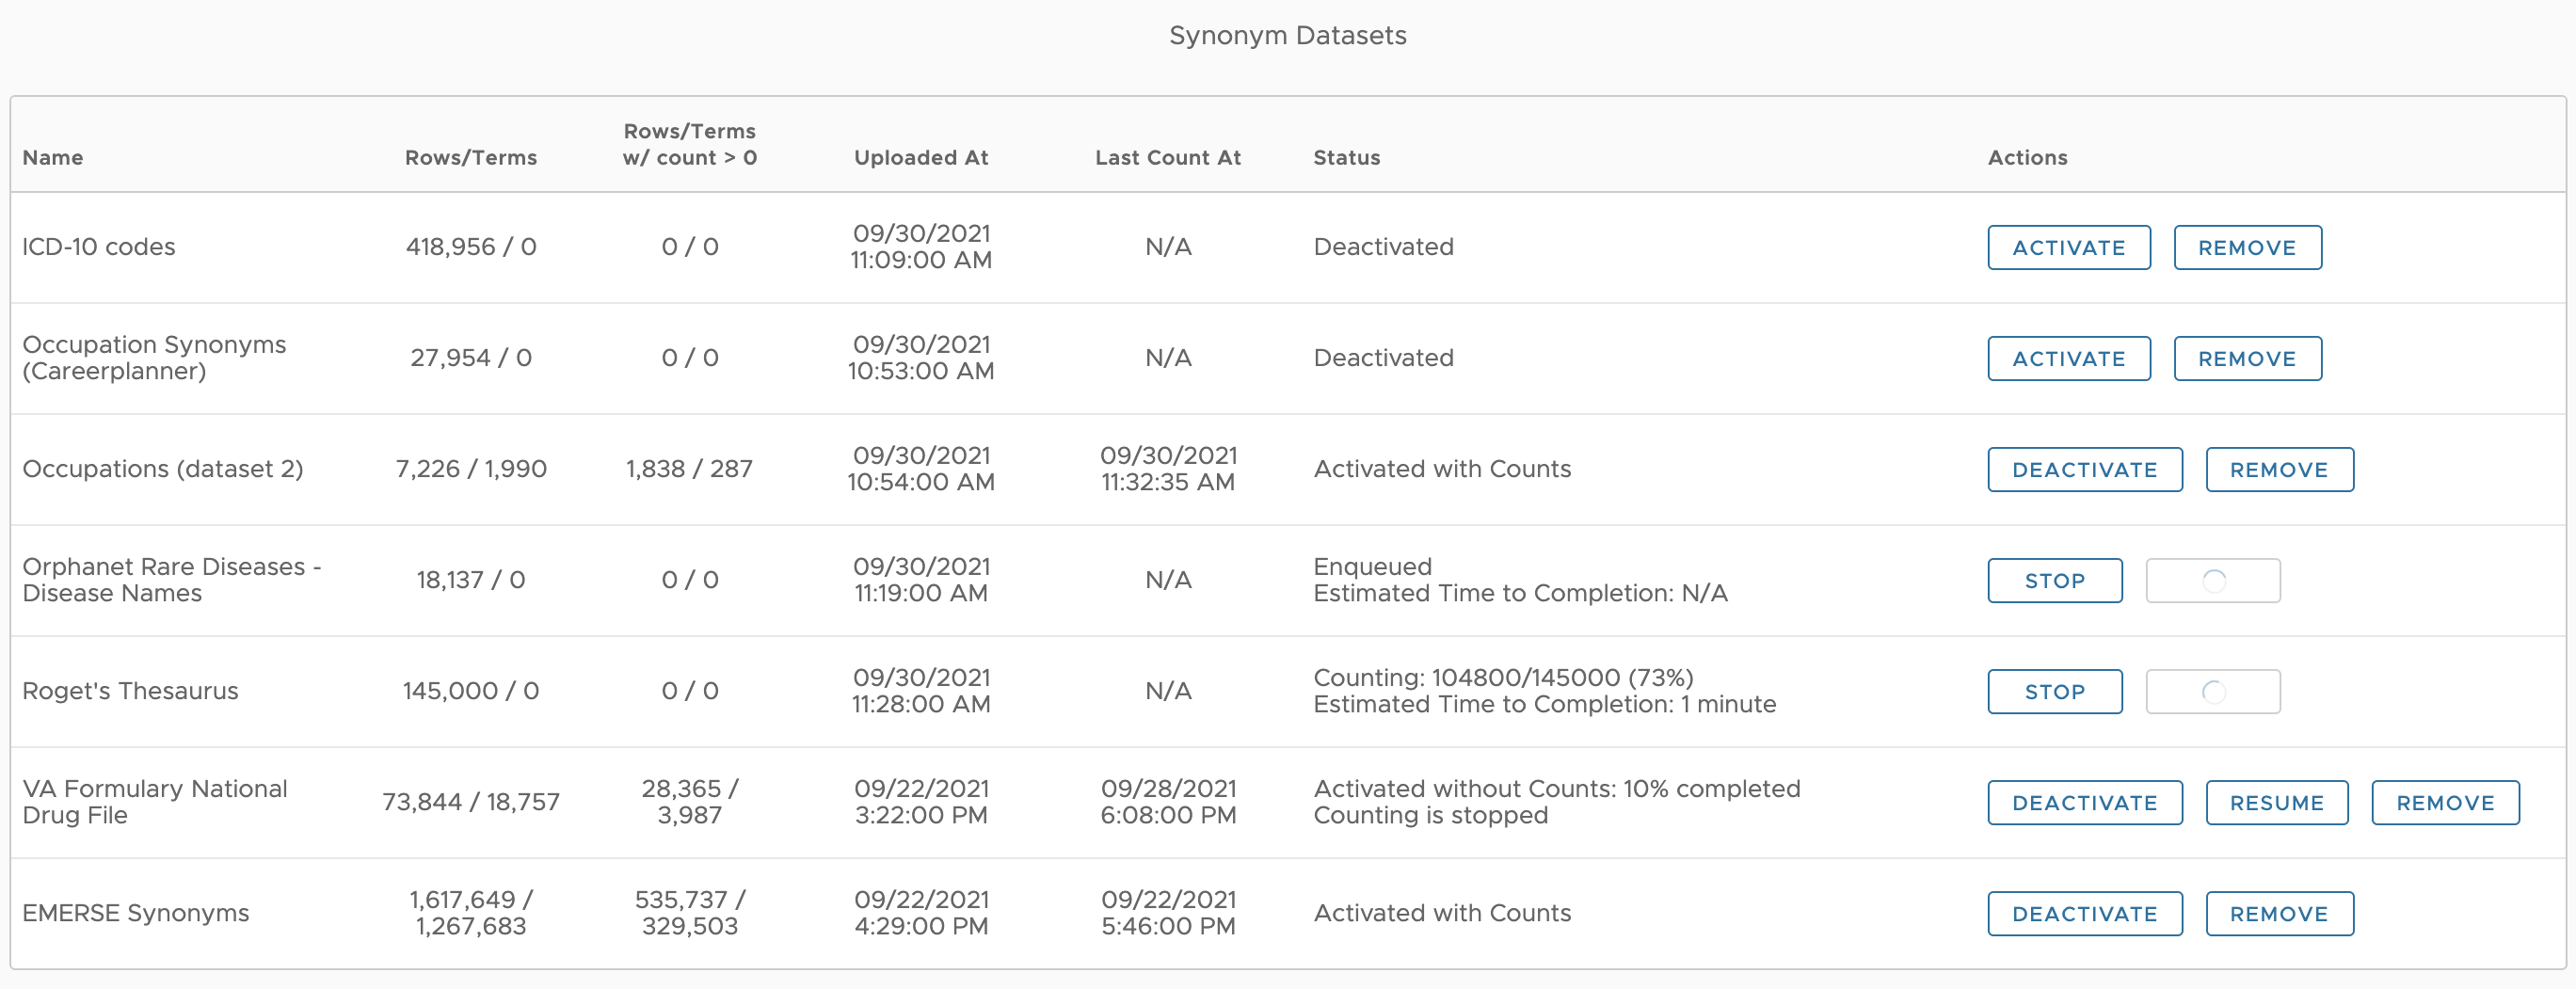
There are several things displayed in the table that may be useful. Some of these are described below:
Synonym Dataset Statistics
A few statistics are reported that can be helpful to understand how valuable the dataset might be for users. Some of these statistics will not be available until counting has completed for the entire dataset.
- Terms
-
Terms are the number of distinct terms in the dataset.
- Rows
-
Rows are the total number of rows in the dataset. Since a term can appear in more than one row if it is "mapped" to multiple different terms, this number it at least as large as the number of terms.
- Terms w/ count > 0
-
This lists the number of terms in the dataset that appear in at least 1 document across the entire document index. This will only be non-zero if the dataset has been activated before, since part of activation is counting how many documents match each term.
- Rows w/ count > 0
-
This lists the number of rows in the dataset that appear in at least 1 document across the entire document index. This will only be non-zero if the dataset has been activated before, since part of activation is counting how many documents match each term.
Synonym Dataset Statuses
A dataset can have several statuses, described below:
- Deactivated
-
The dataset has been successfully loaded, but it is not available to users. Users will not even be aware that it is in the system.
- Activated without Counts: XX% completed
-
The counting for the frequency for the dataset has begun, but it is not complete. After counting has begun (by pressing the Activate button) the dataset will be available to users, but counts will not be available until the counts are complete for the entire dataset.
- Counting is stopped
-
Counting is no longer occurring, either because it was interrupted by a problem with the system (such as a server restart) or because it was manually stopped by the Administrator. Counting can be restarted by pressing the Resume button.
- Activated with Counts
-
The synonym dataset is available to all users, along with the document counts.
- Enqueued
-
Only one synonym dataset can be counted at a time, so if multiple datases are activated in quick succession, some will be in the queue (enqueued) while waiting for counting to begin.
The Fields Tab
The fields tab in the admin interface tells EMERSE how to interpret and use the fields in Solr.

On the left hand side of the fields tab, you will see groups of fields. The first two groups are labelled "Patient Fields" and "Document Fields". The former describes the fields of the patients index. This is a fixed set of fields, with fixed field names in Solr. The latter is a group of fields that describe the documents index.
Below that, you may see additional groups. These are groups of fields that are specific to a source. There will be one group for each source configured in the system. Sources will be covered more later.
Whenever multiple fields are displayed in the same section, such as columns or rows of a table, the order of those columns or rows are ordered as they appear top-down in the sidebar shown here. To change that order, drag the fields by their triple dots on the right hand side. Fields cannot be dragged outside their group. A document field can be moved to a source-specific group or vice versa by changing the "source" of that field when editing it. (This will be discussed more below.)
To add a new field to a group, click the plus icon to the right of the group heading. You cannot add new patient fields.
Removing a field can be done in the edit page for the field. You cannot remove patient fields.
Solr Documents, Fields, Values, and Filters
To understand fields, their values, and filters on their values, a brief discussion of Solr, indexes, and the structure of documents is useful.
An index in Solr is a collection of documents which have been indexed, meaning you can find the document given the values they are indexed under. A more familiar example of an index in general would be the index of a textbook, which indexes the pages of the textbook by words, phrases, or concepts. Thus, you look up a concept like "mesoscale convective vortex" in the index of a meteorology textbook, and it tells you the pages that talk about that concept. Solr is similar, but instead of indexing the pages of a single book, we index documents of the institution-wide health record. Thus, the index tells us the document(s) in which a word or phrase appears.
Solr documents differ from pages of a book in one important way: Solr documents are not just a block of text, but a block of text with metadata. Metadata associated with the document can be anything you wish to load with the document, but typically includes things like the department that produced the document, the clinician that wrote the note, etc. Each piece of metadata is placed in a different "field" alongside the main text of the document. In fact, the main text of the document is contained in just another field, so the representation of a document is uniform, and could include many large chunks of free text (but EMERSE does not do so).
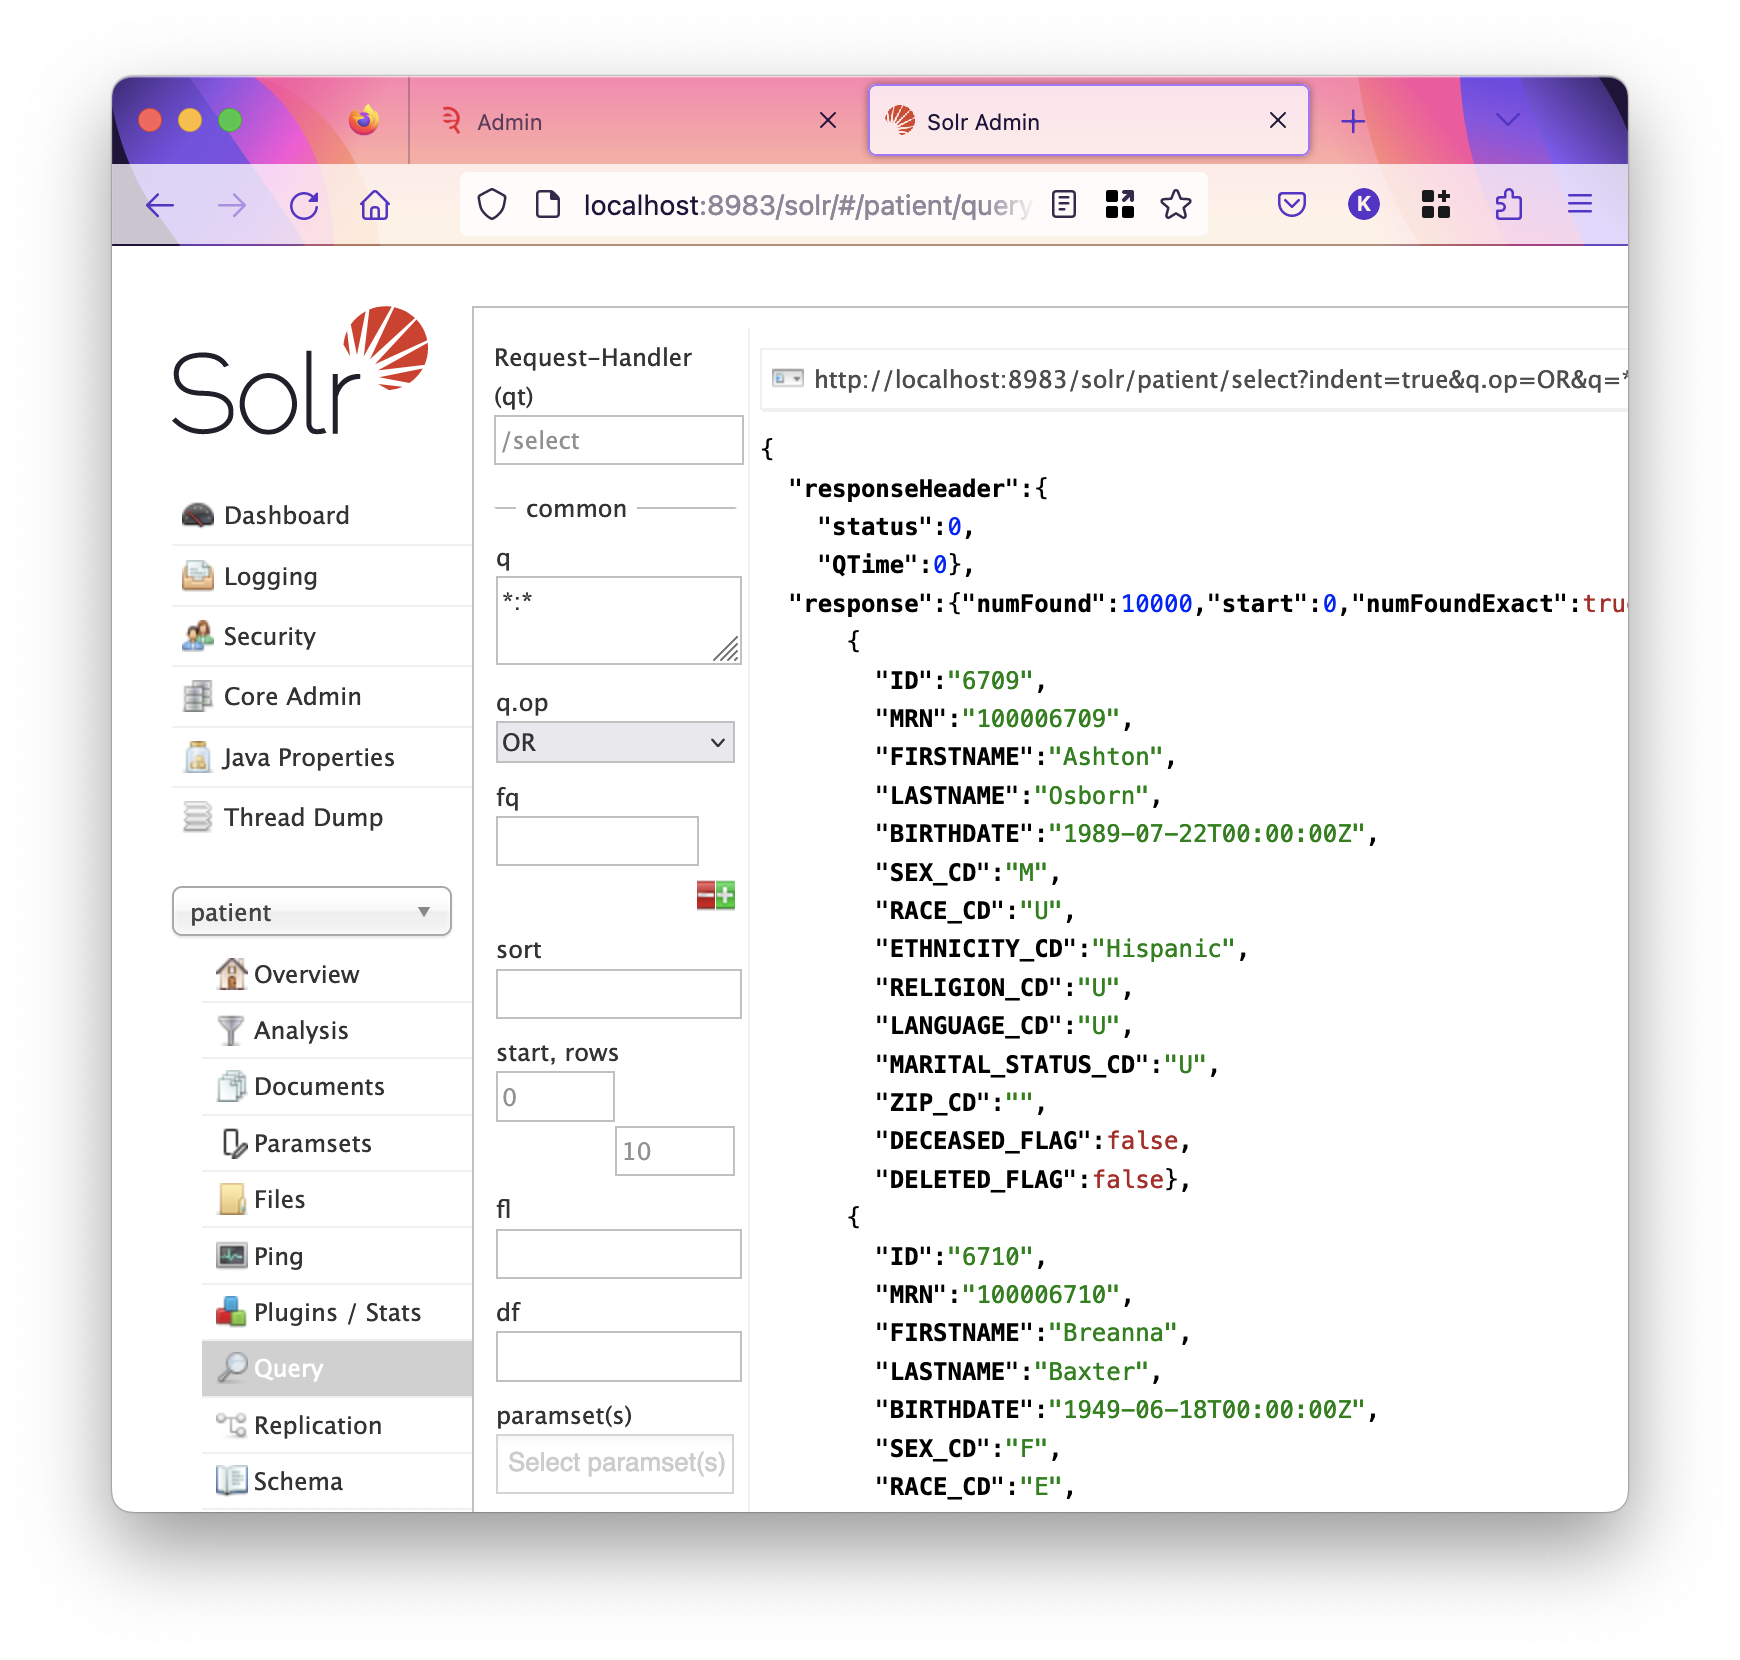
Look at the below screenshot of Solr, which shows a document in JSON format:
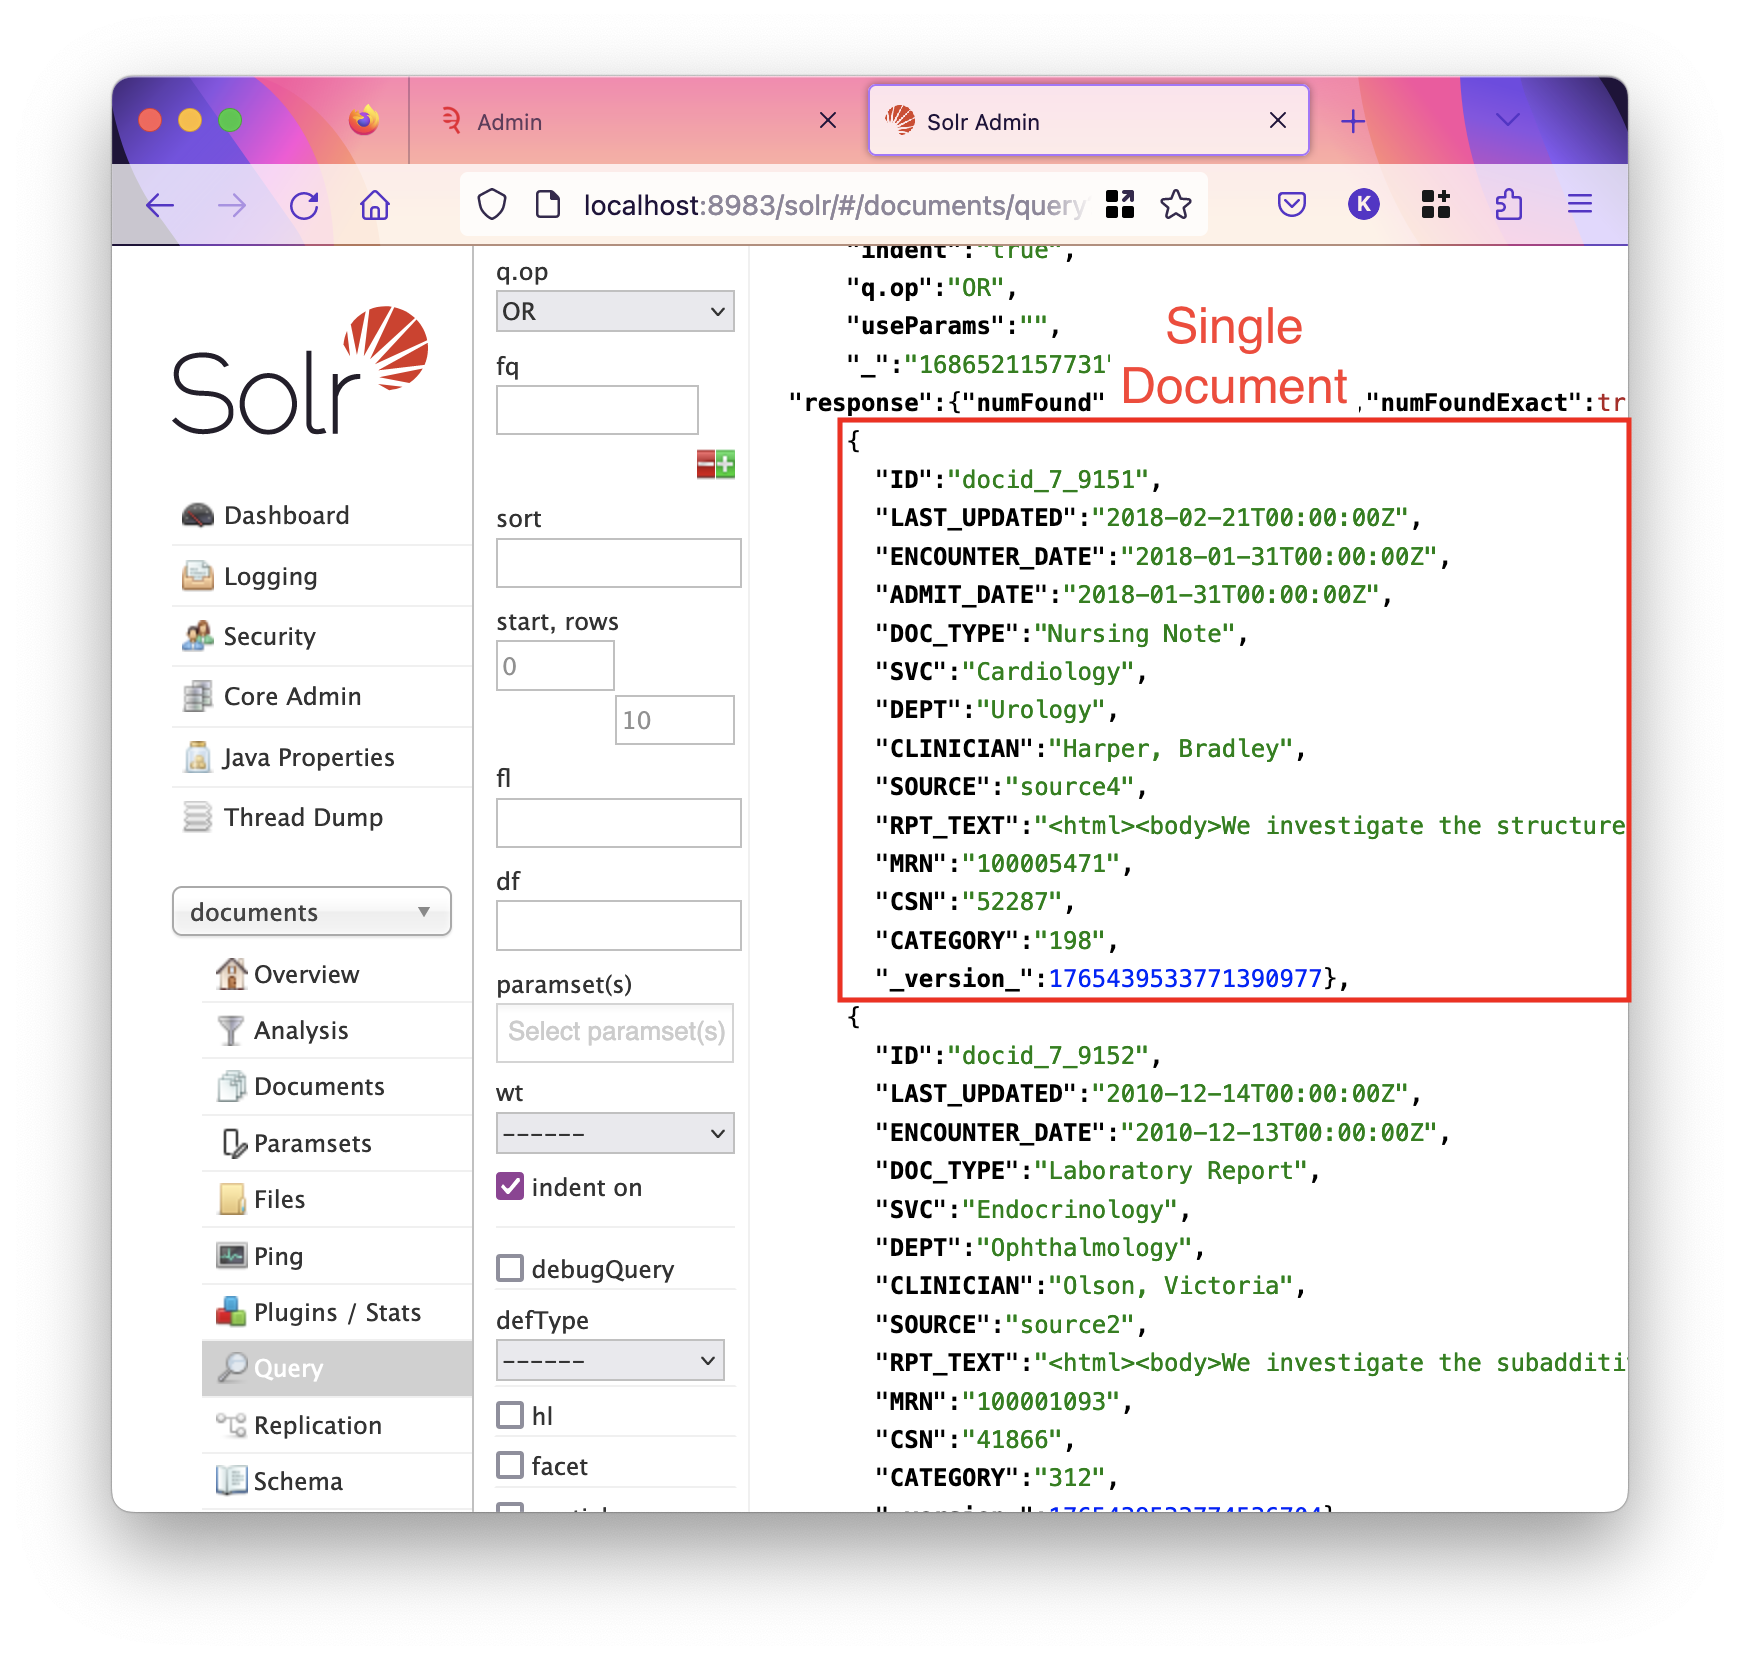
Here, we can see a number of fields written in bold text, such as DEPT or CLINICIAN, and their values Urology and Harper, Bradley. These are what we would call metadata fields, and RPT_TEXT can be seen to have a html-formatted value which runs off the page — this is the main text of the document.
Documents in the documents index represent medical records, notes, reports, etc, whereas documents in the patient index represent patients themselves, with no main text field. See the below screenshot for the raw JSON-formatted patient document.
The values of a field are all the values that appear for that field across all documents in the index. For instance, the values of the DEPT field are the departments. In the system pictured here, these values are human-readable, however you may have department codes loaded into Solr.
Field Types
As seen above, there are a number of different kinds of values that can be stored in Solr. The managed-schema file in Solr defines the fields, and their types. These fields look like:
<field name="RPT_DATE" type="date"                      docValues="true"/>
<field name="DOC_TYPE" type="string"                    docValues="true"/>
<field name="AGE_DAYS" type="int"                       docValues="true"/>
<field name="CATEGORY" type="string" multiValued="true" docValues="true"/>
There are three types, and each field can either be multi-valued or not. Multi-valued fields appear as an array of the underlying values in Solr. A document can be found by searching for any value in the array, and you can’t search for a document that contain a specific array of values. Consequently, the order of values in the array is not important.
text_general_htmlstrip-
This is the type of text that will be split into tokens, and each token is indexed. There are other types similar to this, and the exact transforms are defined in the definition of the type. This type is really only used for the document text.
string-
A string a charecters, that is text. The whole string is regarded as a single value.
date-
The type of a date. This is an ISO-8601 date string.
int-
A integer-valued field.
Patient and Document Field Page
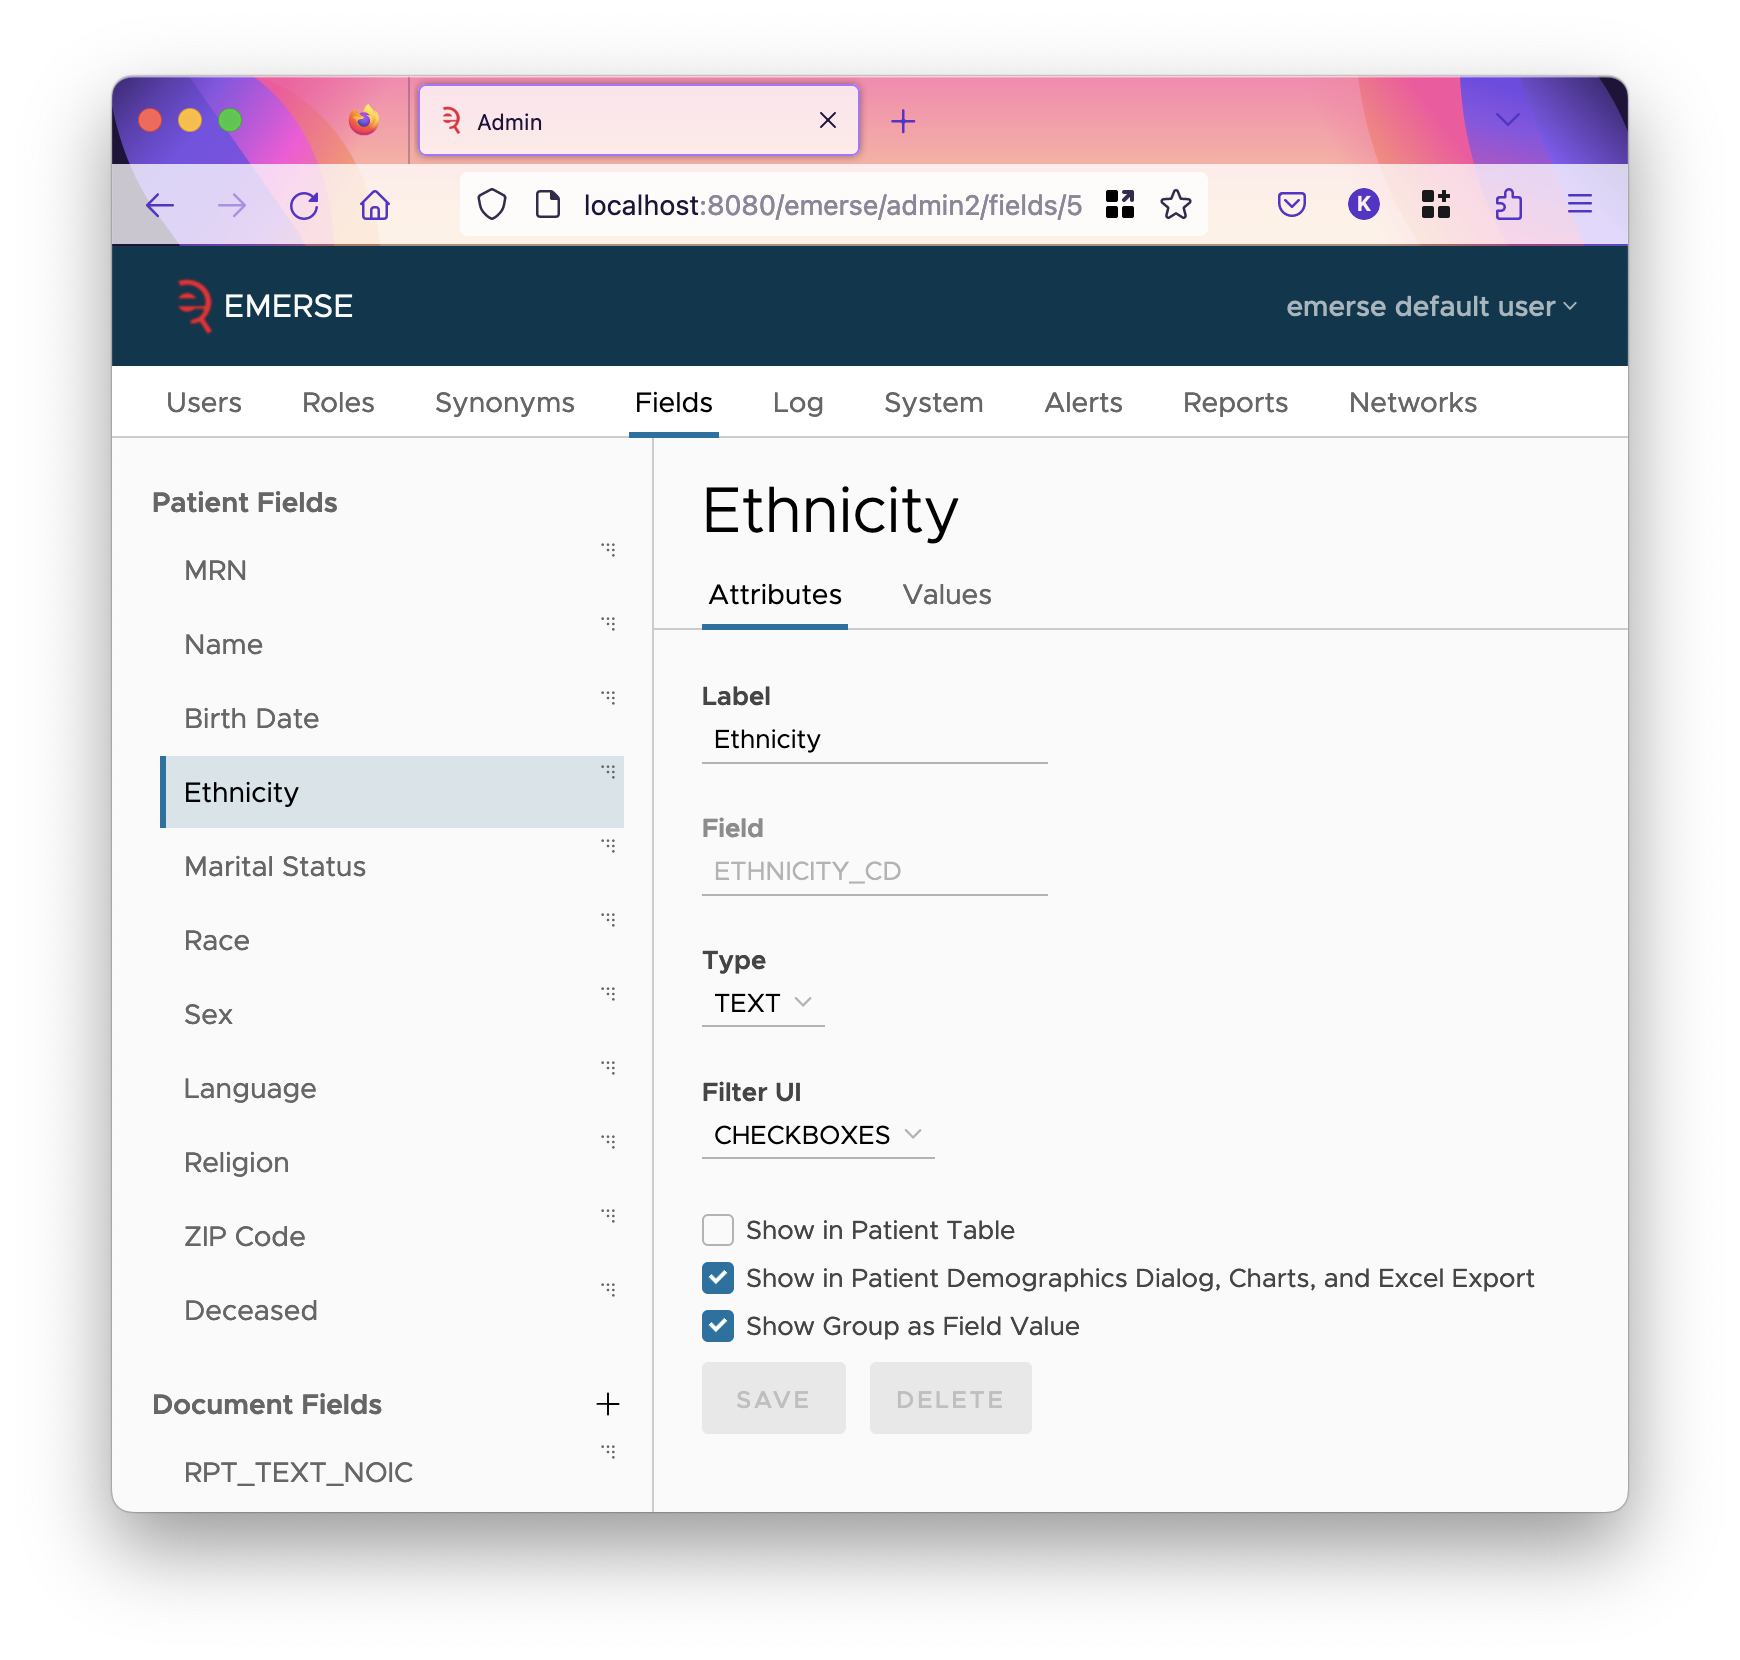
Clicking on a patient or document field allows you to customize the following things:
- Label
-
This is how the data will be labeled in EMERSE, both as titles of columns of tables in which it is shown, in demographic charts, and in the patient details dialog.
- Field
-
This is never changeable for patient fields.
- Type
-
This tells EMERSE what type of data to expect to be stored in the field. Typically, EMERSE only gives you one option for this, as it can tell based on the Solr type. But, for reference, be
DATEfordatefields,TEXTforstringfields, andNUMBERforintfields. - Filter UI
-
This determines if users can filter on this field, and if so, what filter’s user interface should be used to select such a filter. Not all filter types are available for all field types.
Filter UI Setting Required Field Type Description none
This field will not appear as an available filter for the user.
CHECKBOXES
TEXT
Each value of the field will be a checkbox in the UI. This is intended for small lists of values, usually less than 50.
AUTOCOMP
TEXT
This will show an input box where users can type a value of the field, and the input box will autocomplete the value. Users can also call up a list of all values and select from that. This is intended for when there are thousands of values for a field.
TEXTAREA
TEXT
This will show a textarea where users can write out a single value per line. There is no help in autocompleting these values, nor are they validated currently. This is useful when values are relatively unique, such as encounter IDs, document IDs, etc, and typically there are tens of hundreds of thousands of values in the field.
DATE
DATE
This will show two date inputs to allow the user to select minimum and maximum dates for the field.
BIRTH_DATE
DATE
This will show two date inputs to allow the user to select the minimum and maximum dates for the field, with help text indicating what that birthdate range means in terms of the current age of the patient. (For instance, if the birthdate age range is 2000-01-01 to 2002-01-01 the patients would be 22-24 years of age roughly at the time of writing this document in spring 2024.) This is intended only really to be used for the
BIRTHDATEfield in thePATIENTindex.NUMBER
NUMBER
This will show two numeric inputs to allow the user to select minimum and maximum values for the field.
AGE_DAYS
NUMBER
This will show four numeric inputs to allow the user to select minimum and maximum values for the field expressed in weeks and days. (For instance, match patients from 2 weeks and 2 days old to 8 weeks old.) The field is should contain the number of days old the patient is at the time of the document.
AGE_MONTHS
NUMBER
This will show four numeric inputs to allow the user to select minimum and maximum values for the field expressed in years and months. (For instance, match patients from 2 years 6 months old to 5 years old.) The field is should contain the number of months old the patient is at the time of the document.
- Filter UI for Admin Only
-
This means the filter will appear in the filters tab in the Admin app, but not the main EMERSE app. This allows administrators to create restrictions using fields that normal EMERSE users cannot see.
- Show Group as Field Value
-
This decides whether the field value groups are shown as the value of the field in filters and elsewhere in the application, or the raw Solr value. Read more about field values versus groups here.
Patient-specific Field Settings
These settings are only shown for patient fields:
- Show in Patient Table
-
This decides whether this field is shown as a column in the patient table. Typically, MRN, name, and birthdate are shown. If birthdate is shown, age is also shown in a column after it. The last columns of the table are always comment, tag, and action.
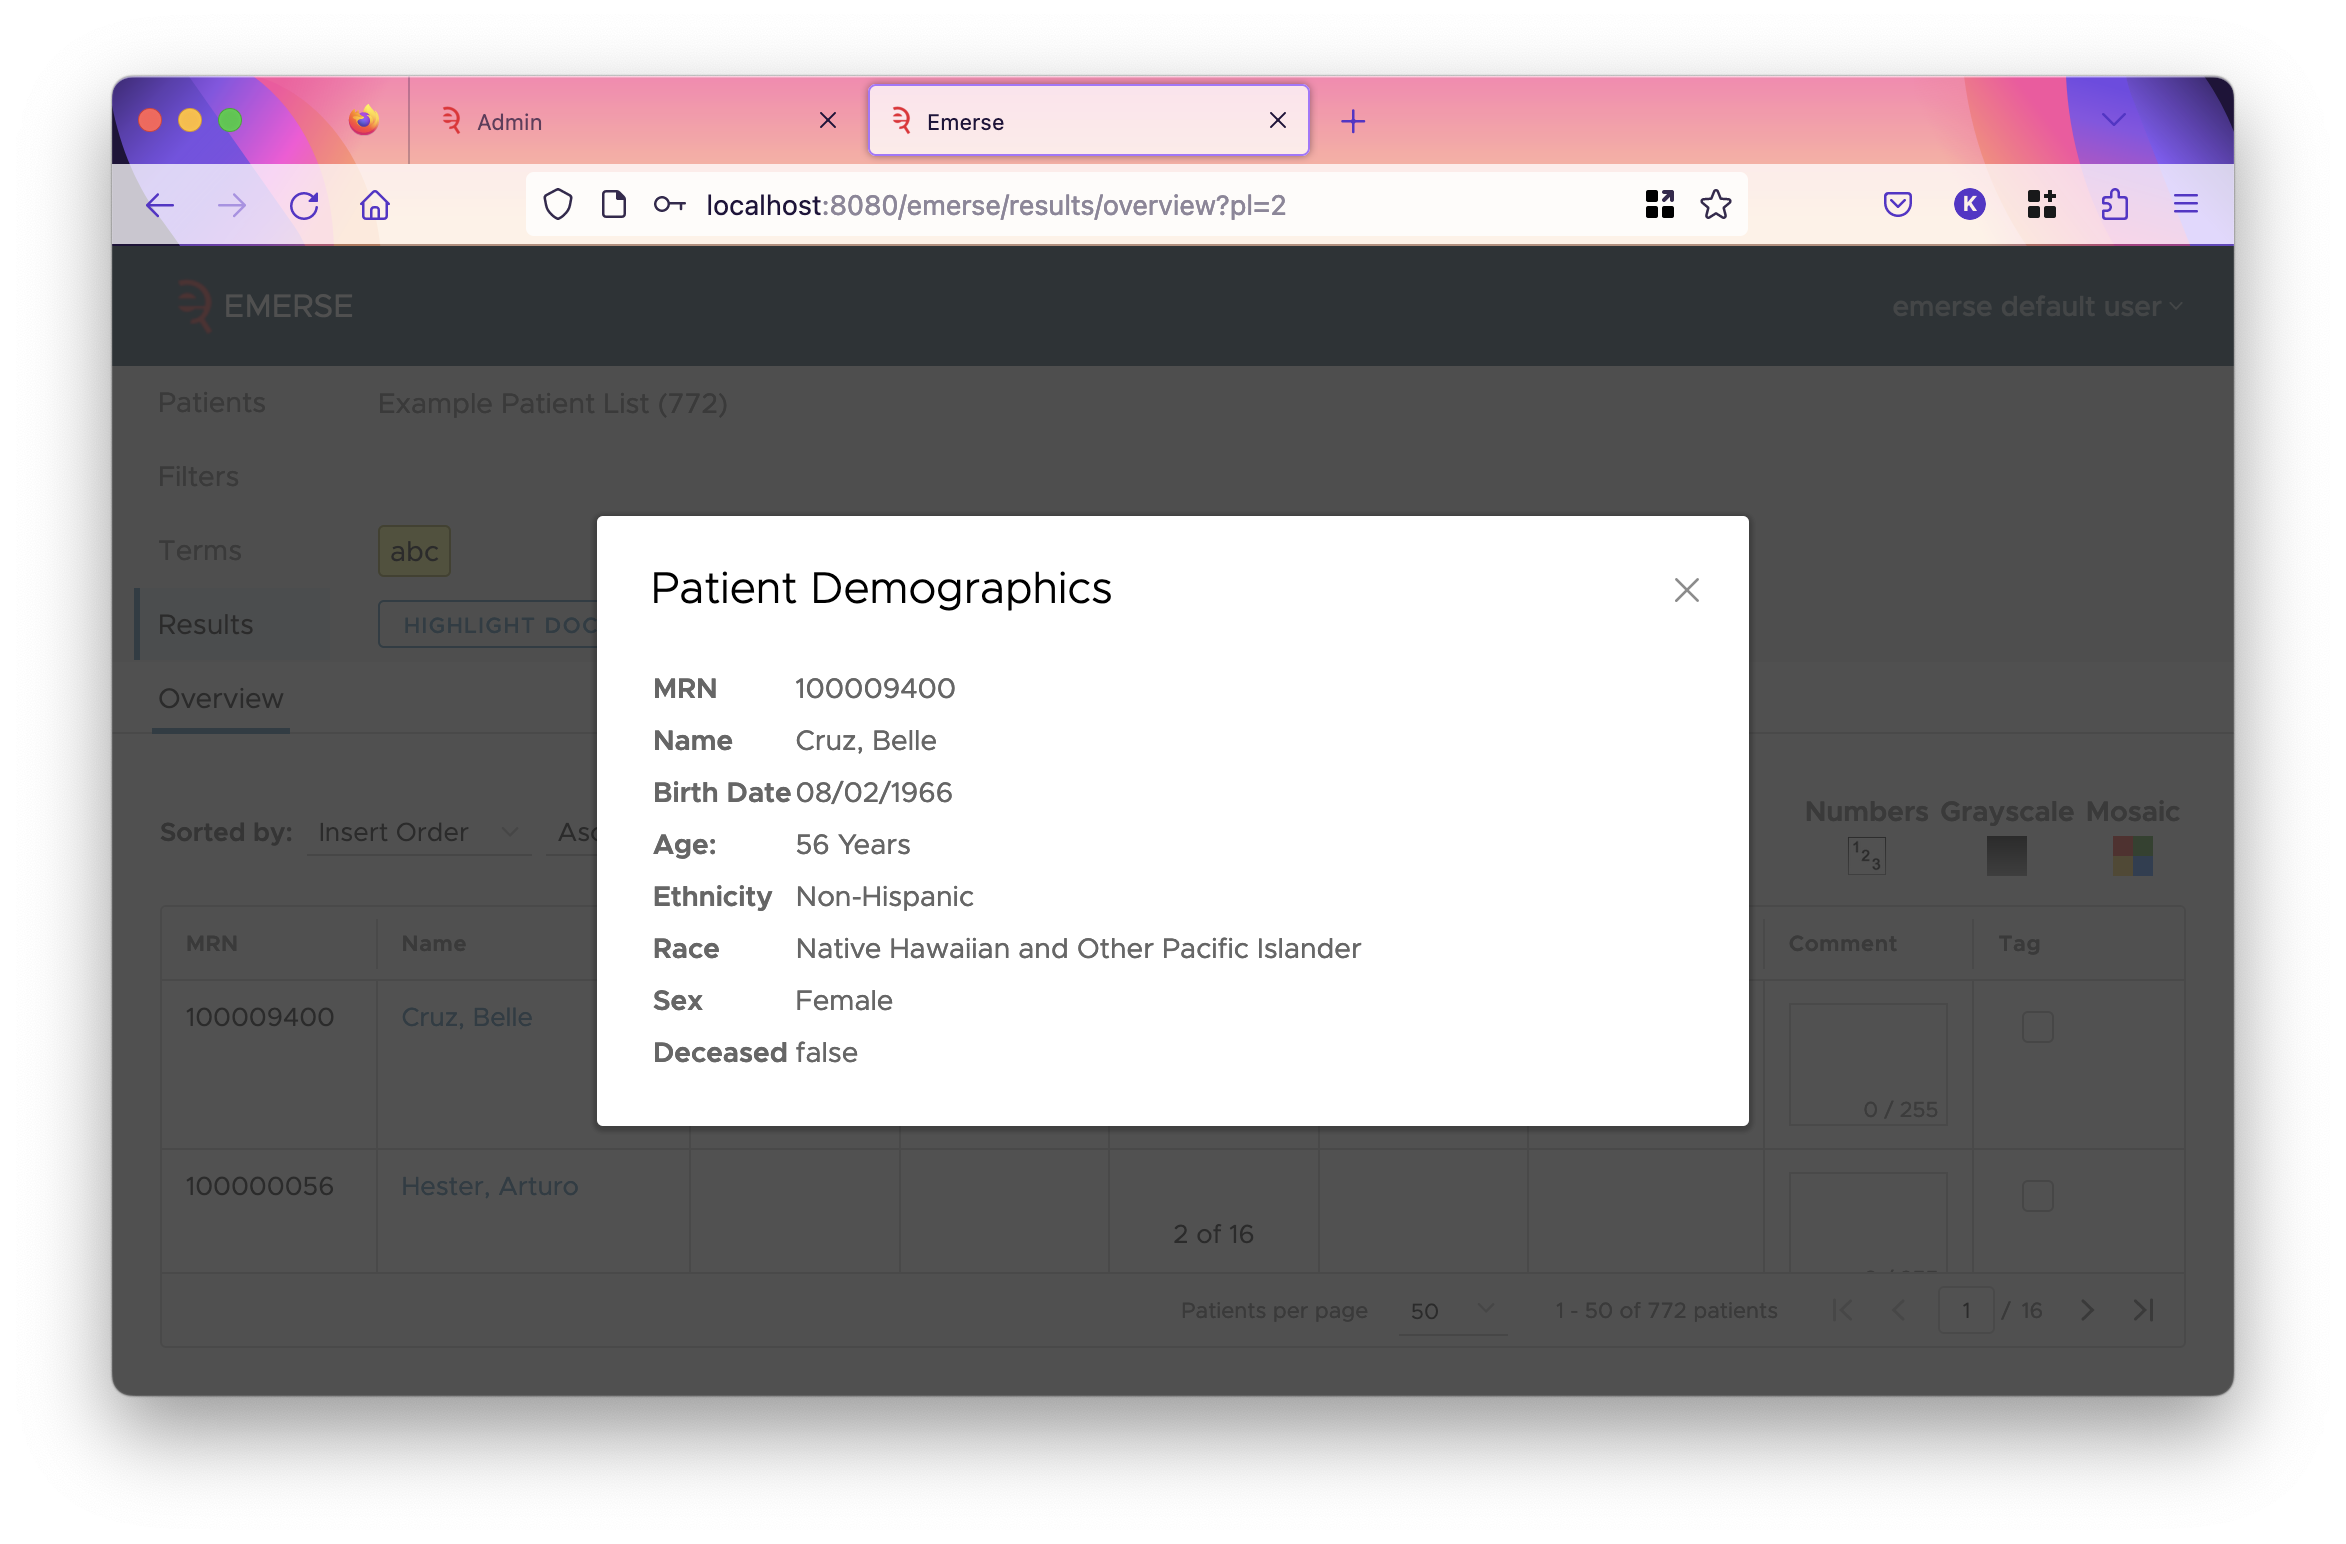
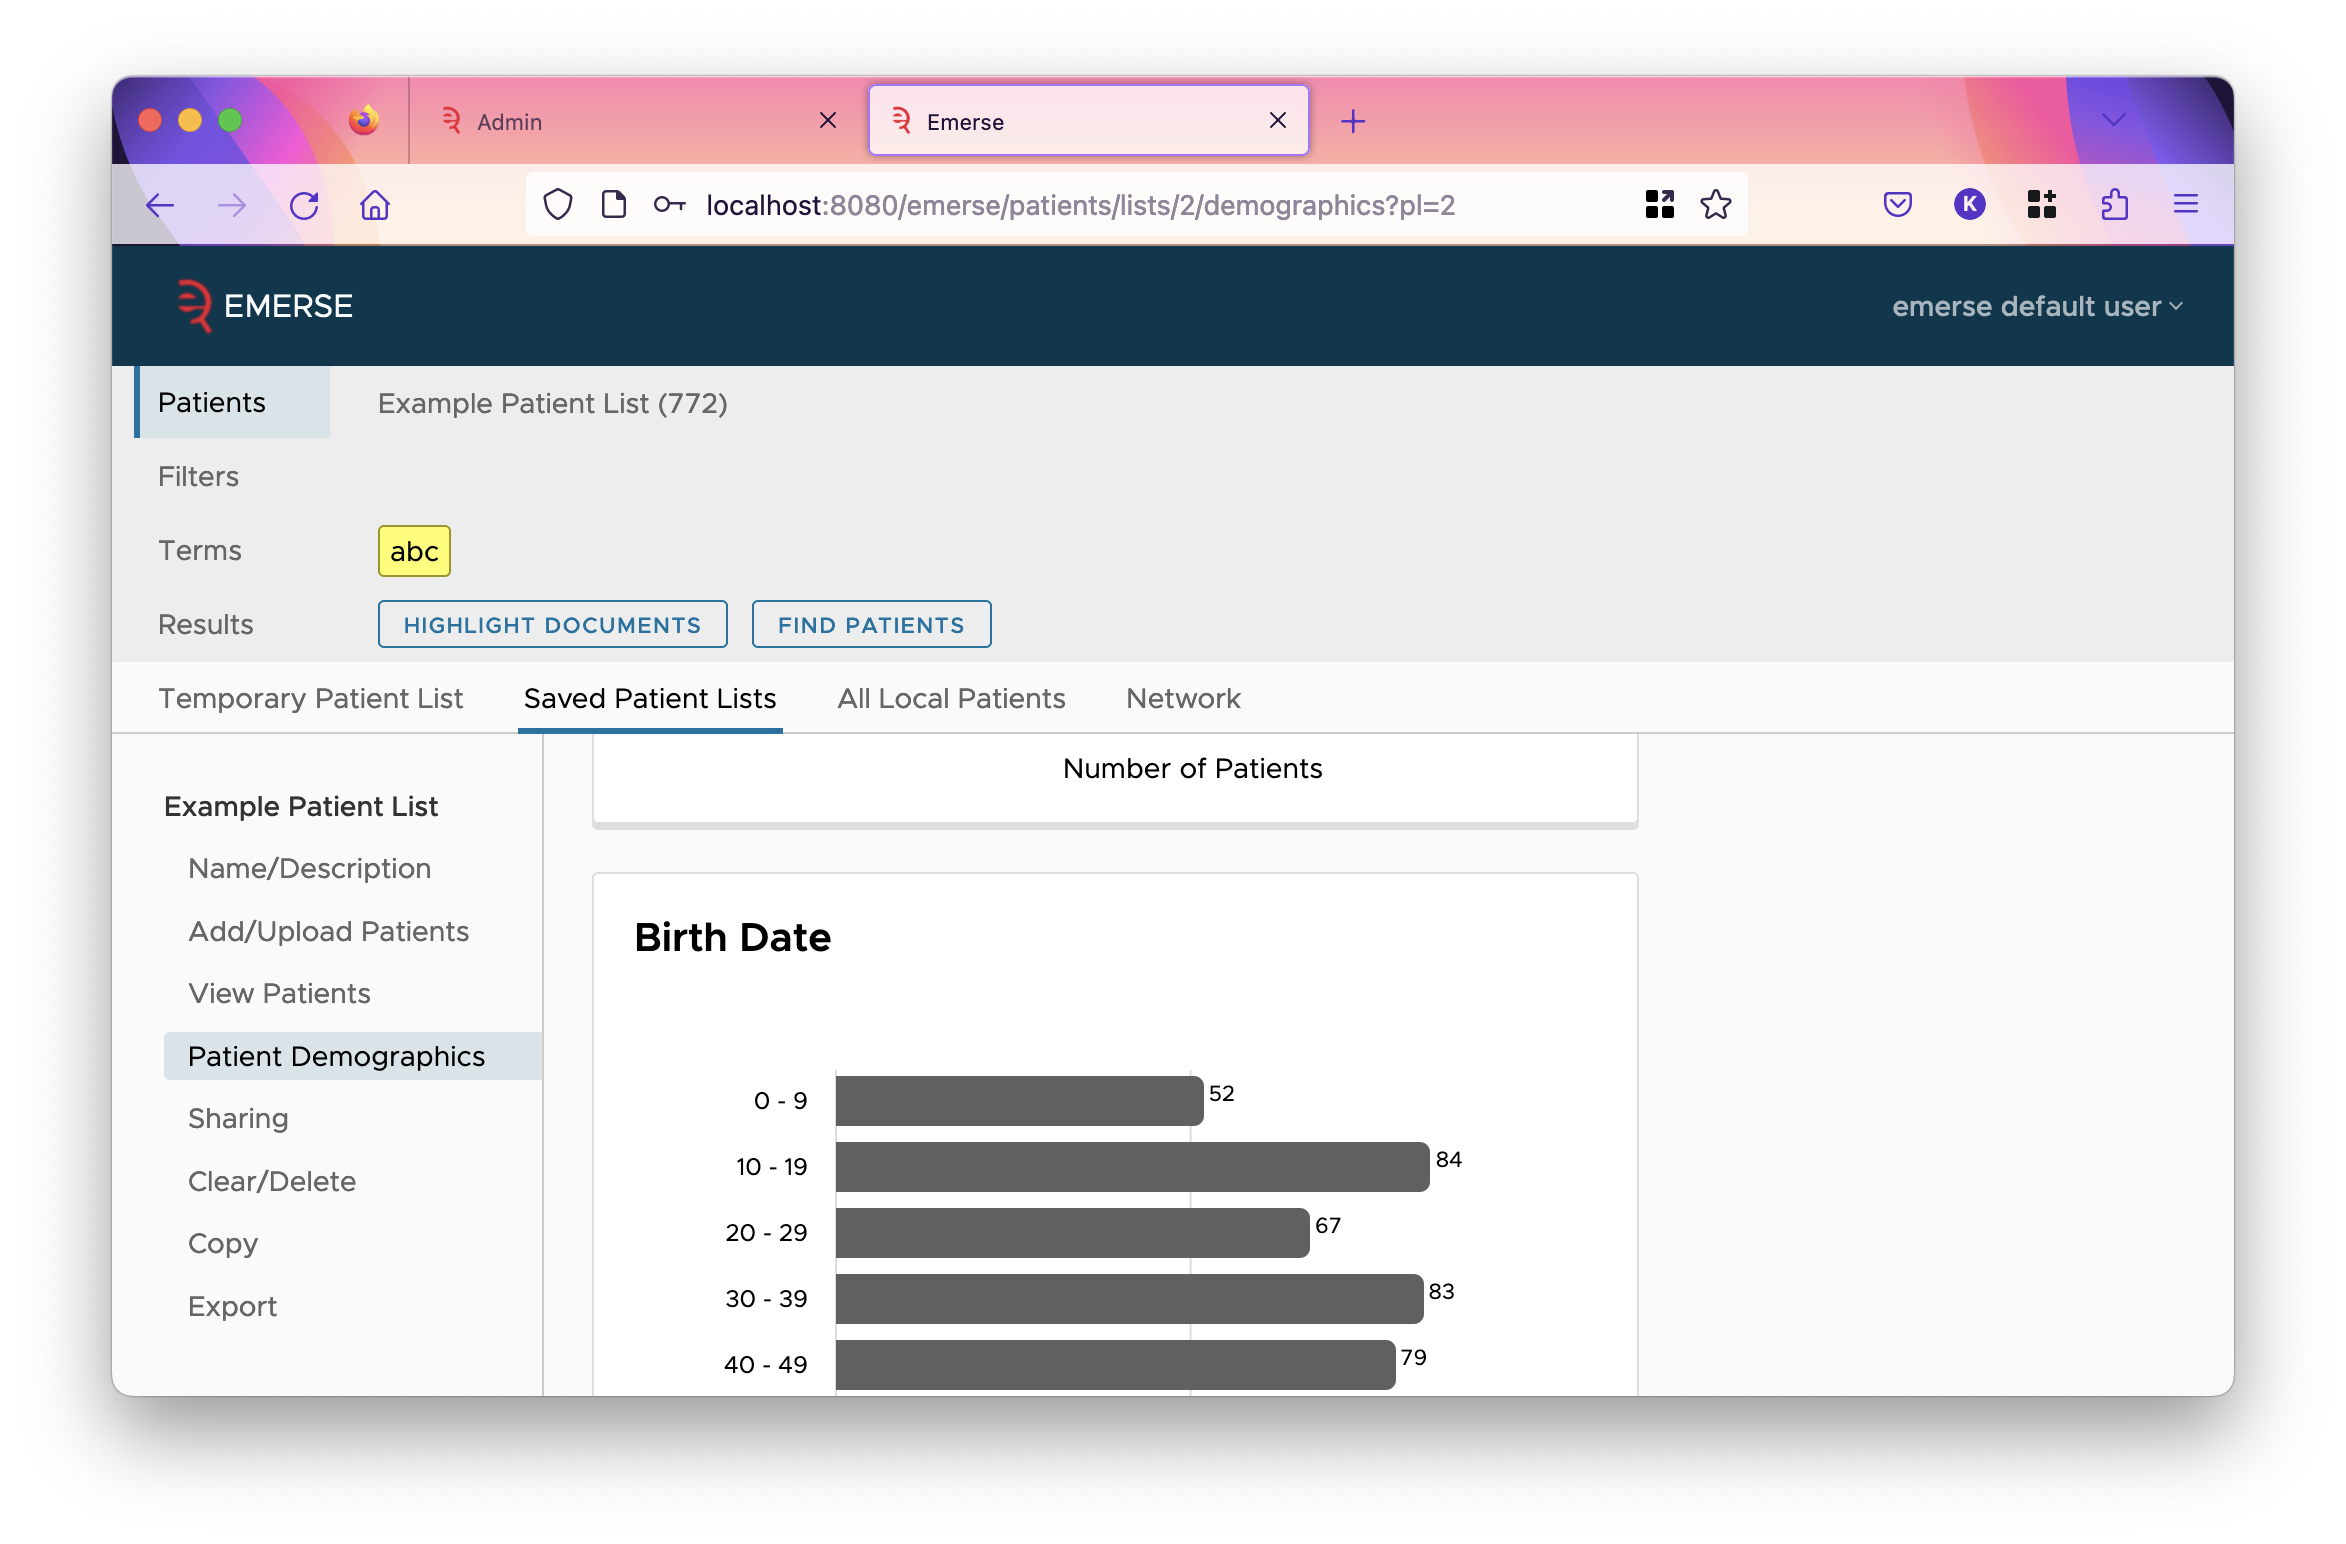
- Show in Patient Demographics Dialog, etc
-
This decides whether the field is shown in the listed items. The demographics dialog is found by clicking on the patient’s name in the overview table reached after clicking the "highlight documents" button. The "charts" the checkbox refers to are the demographic charts shown in all-patient search, and the demographics tab for a patient list.
For the
NAMEpatient field, unchecking this option will hide the entire name column in the overview table, thus preventing the user from viewing the demographics dialog.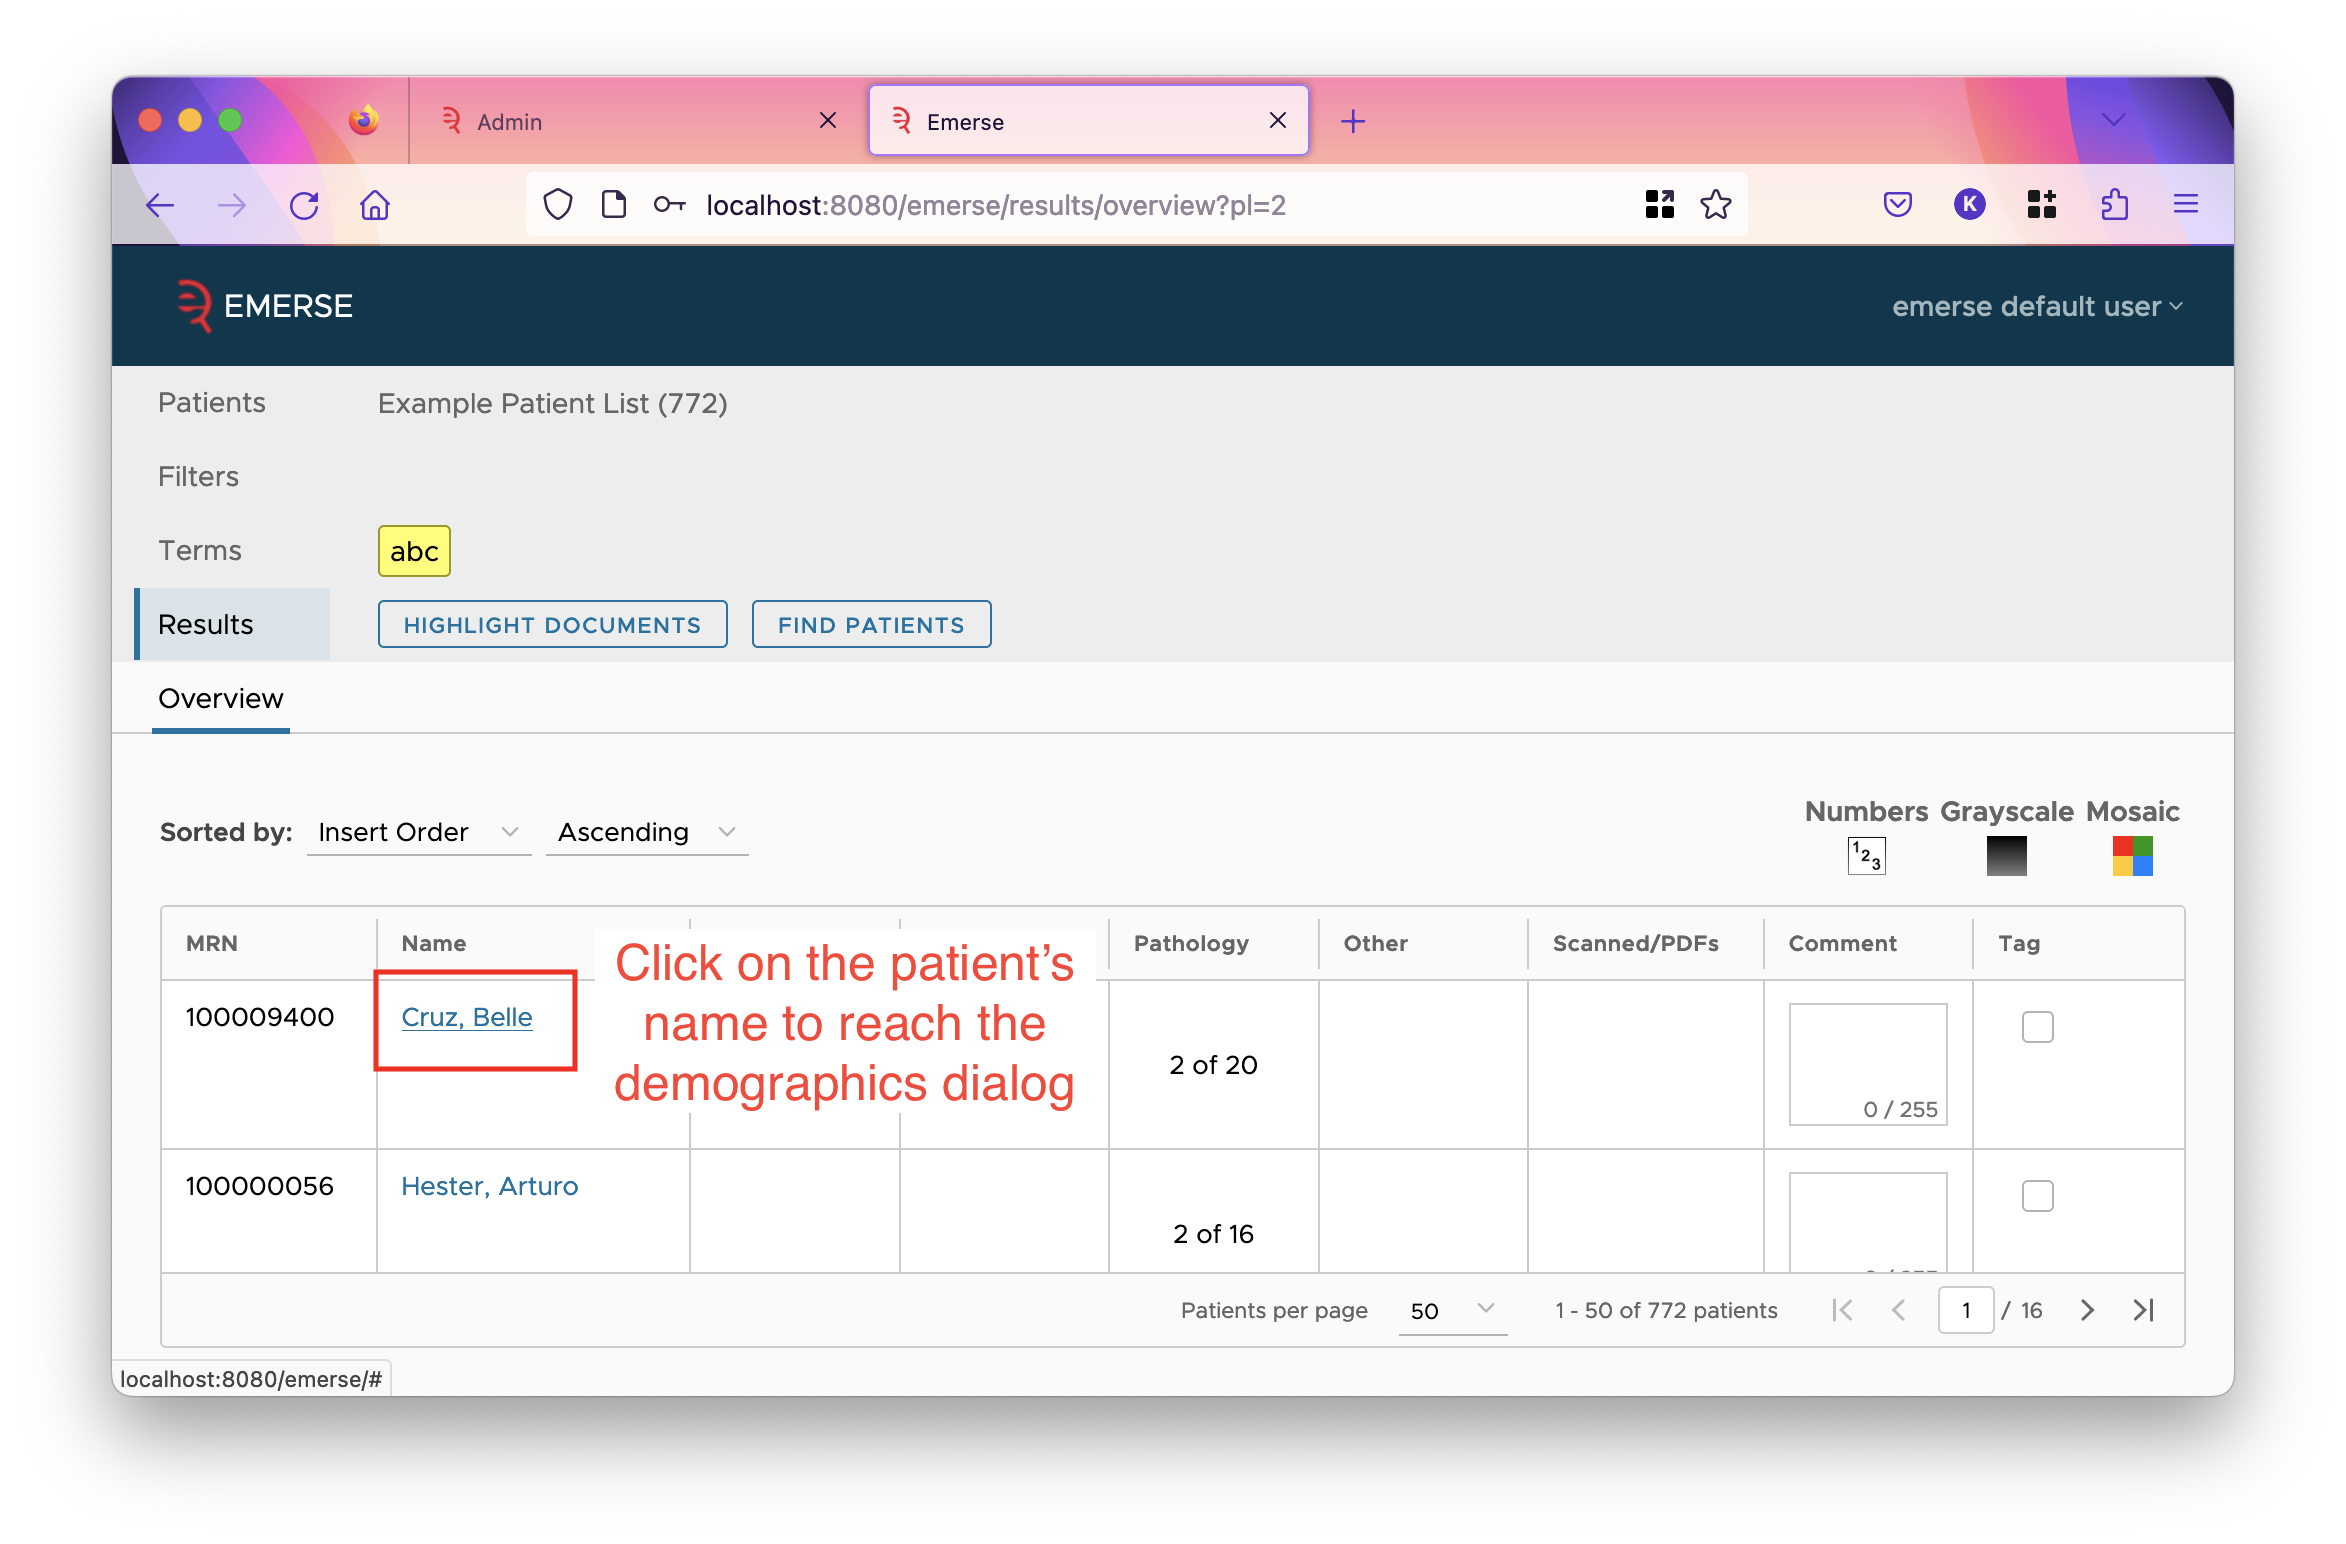
Document-specific Field Settings
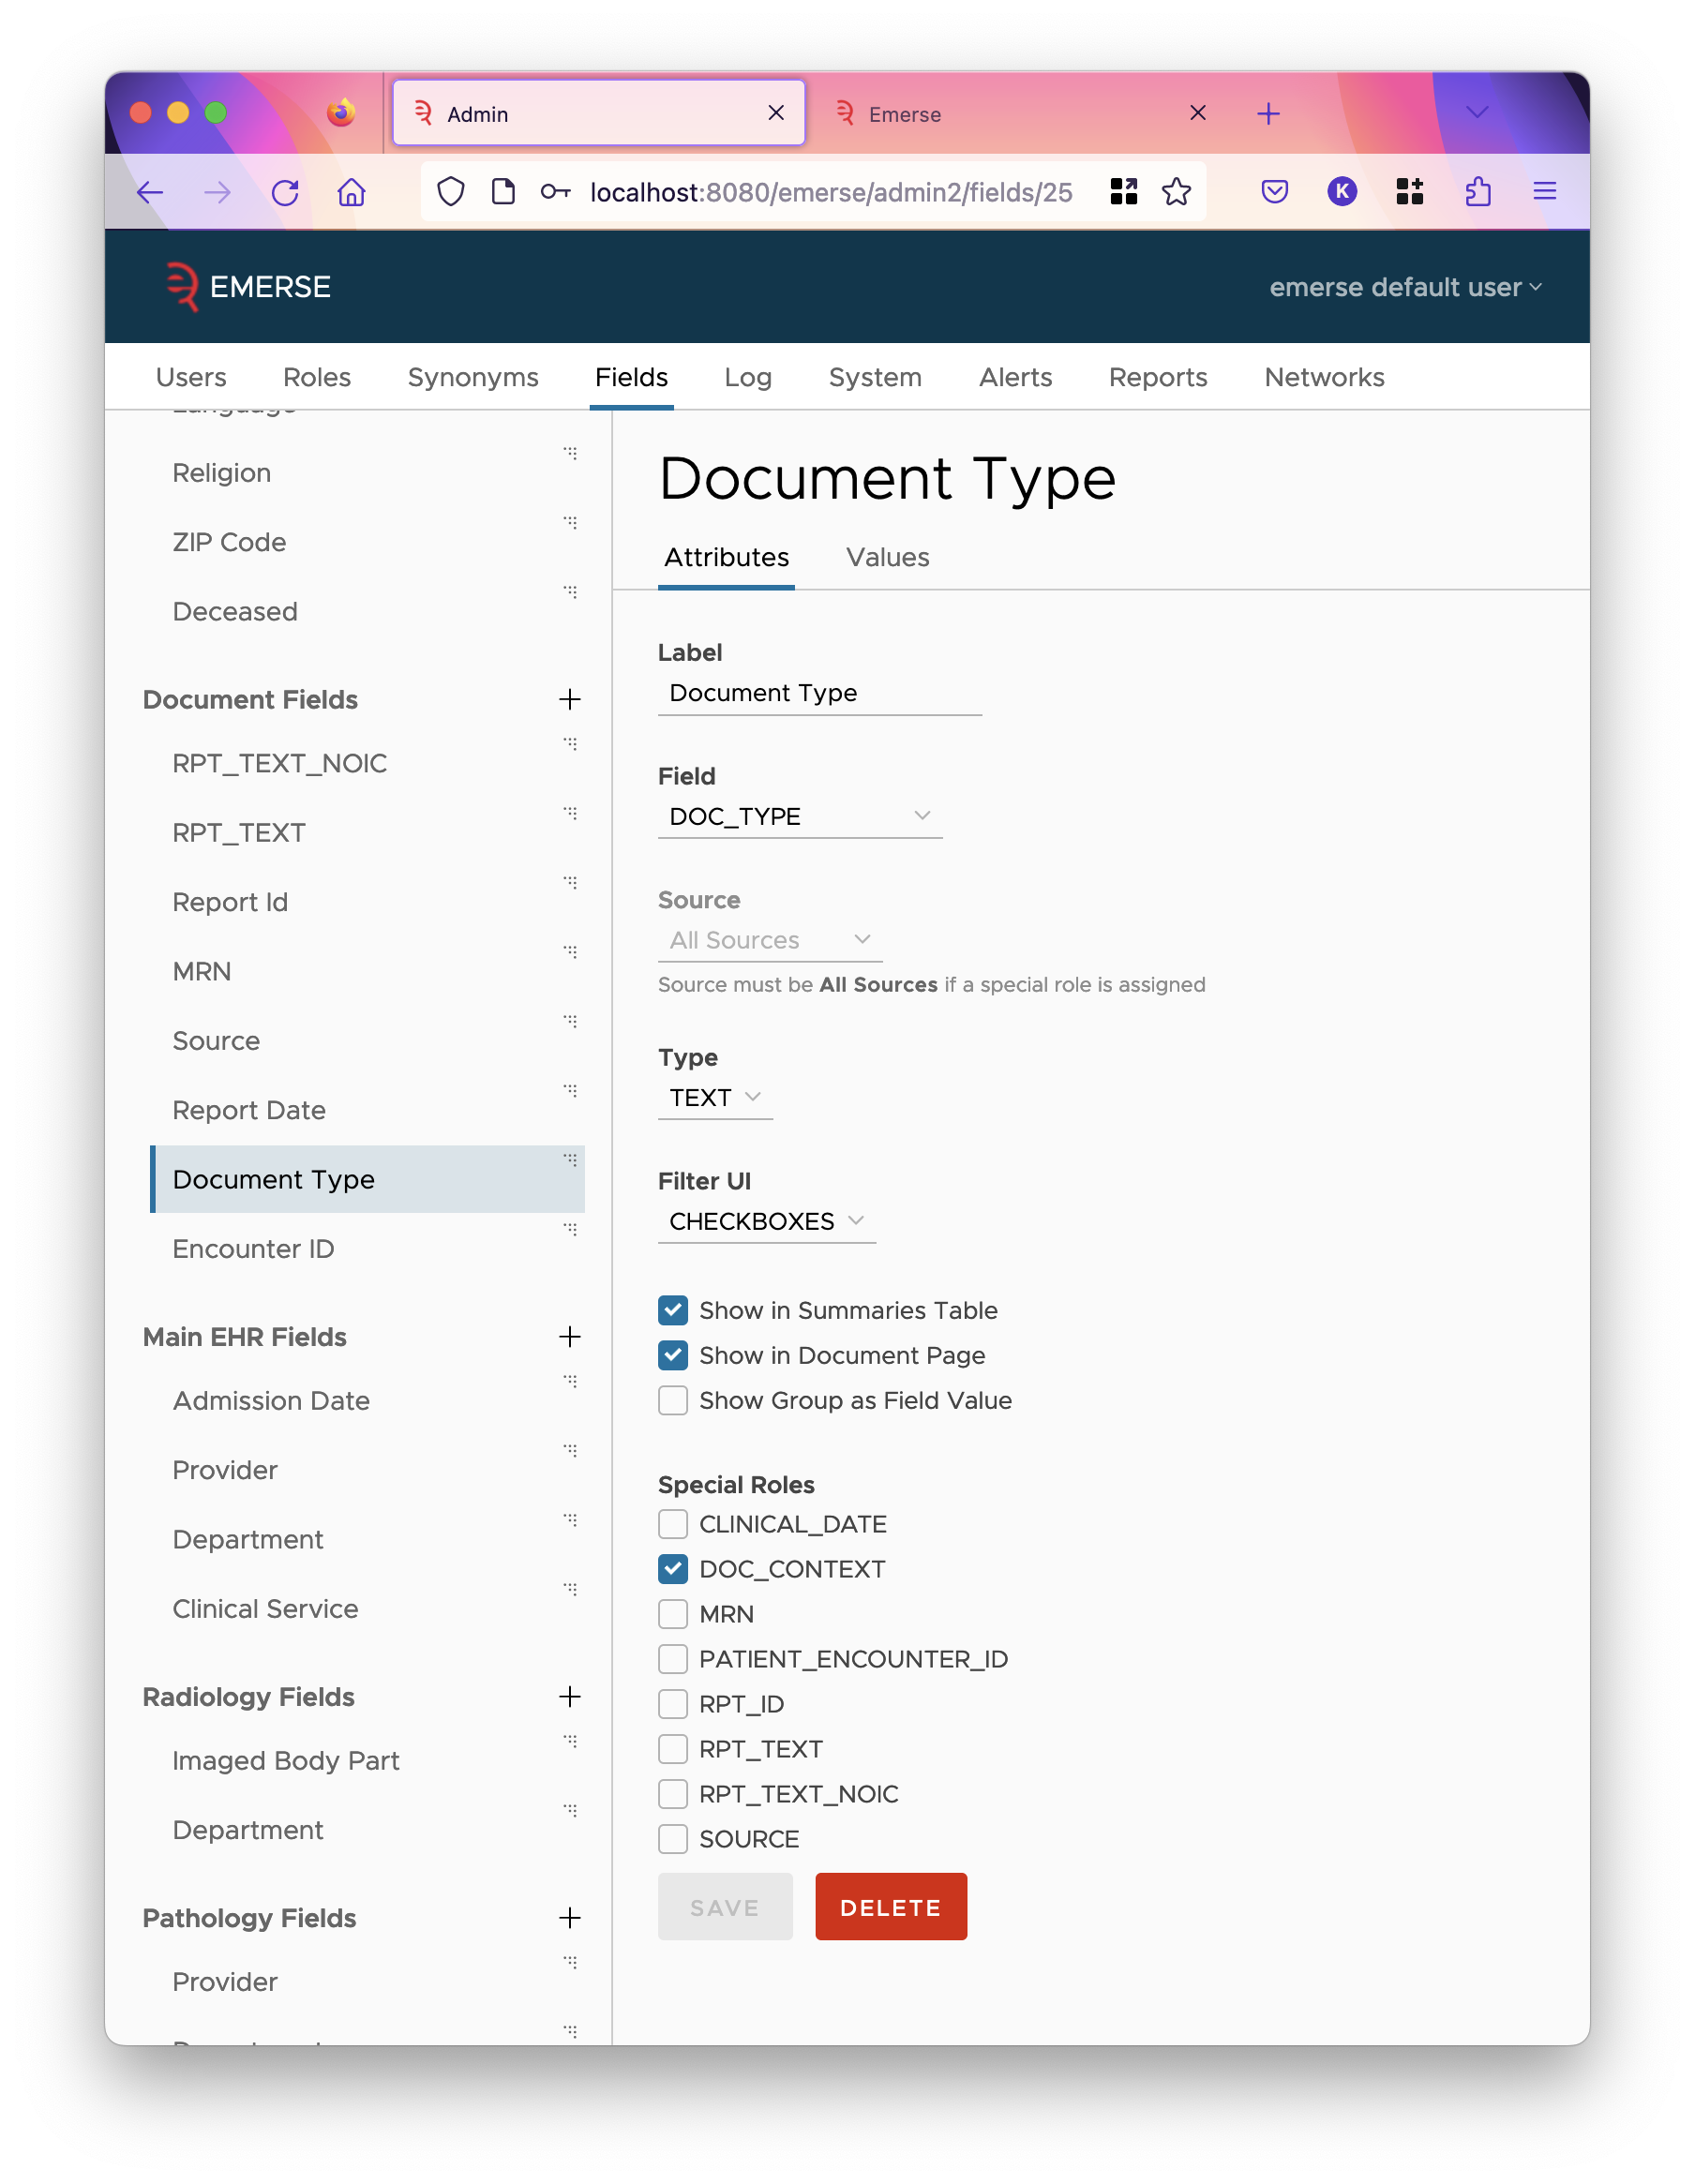
Document fields describe the documents index. The fields in the documents index are very customizable, however, EMERSE needs to know which fields to use for certain special purposes. These "special roles" are listed as checkboxes on the field edit page, but only when the field’s source is set "All Sources", which are those directly listed under the "Document Fields" section on the left. A single field can play many special roles, though only one is typical. The roles are described here:
RPT_TEXT-
This field should store the text of the document, and indexed case insensitively.
RPT_TEXT_NOIC-
This field should be a copy of the same field as
RPT_TEXT, but is indexed with different settings that make it case-sensitive. RPT_ID-
This is the unique identifier of the document in the index.
MRN-
This field should hold the MRN of the patient the document belongs to. It should match the values of the
MRNin the patient index. SOURCE-
This field should store the name of the "source" the document is from. More on sources below.
DOC_CONTEXT-
This field stores some value that provides context to the document in the results page of all-patient search. All patient search results show only snippets of matched text in the document, hopefully not exposing a lot of PHI, and this field should similarly not show a lot of PHI but help users understand the context around the shown snippets. Often it’s the note type.
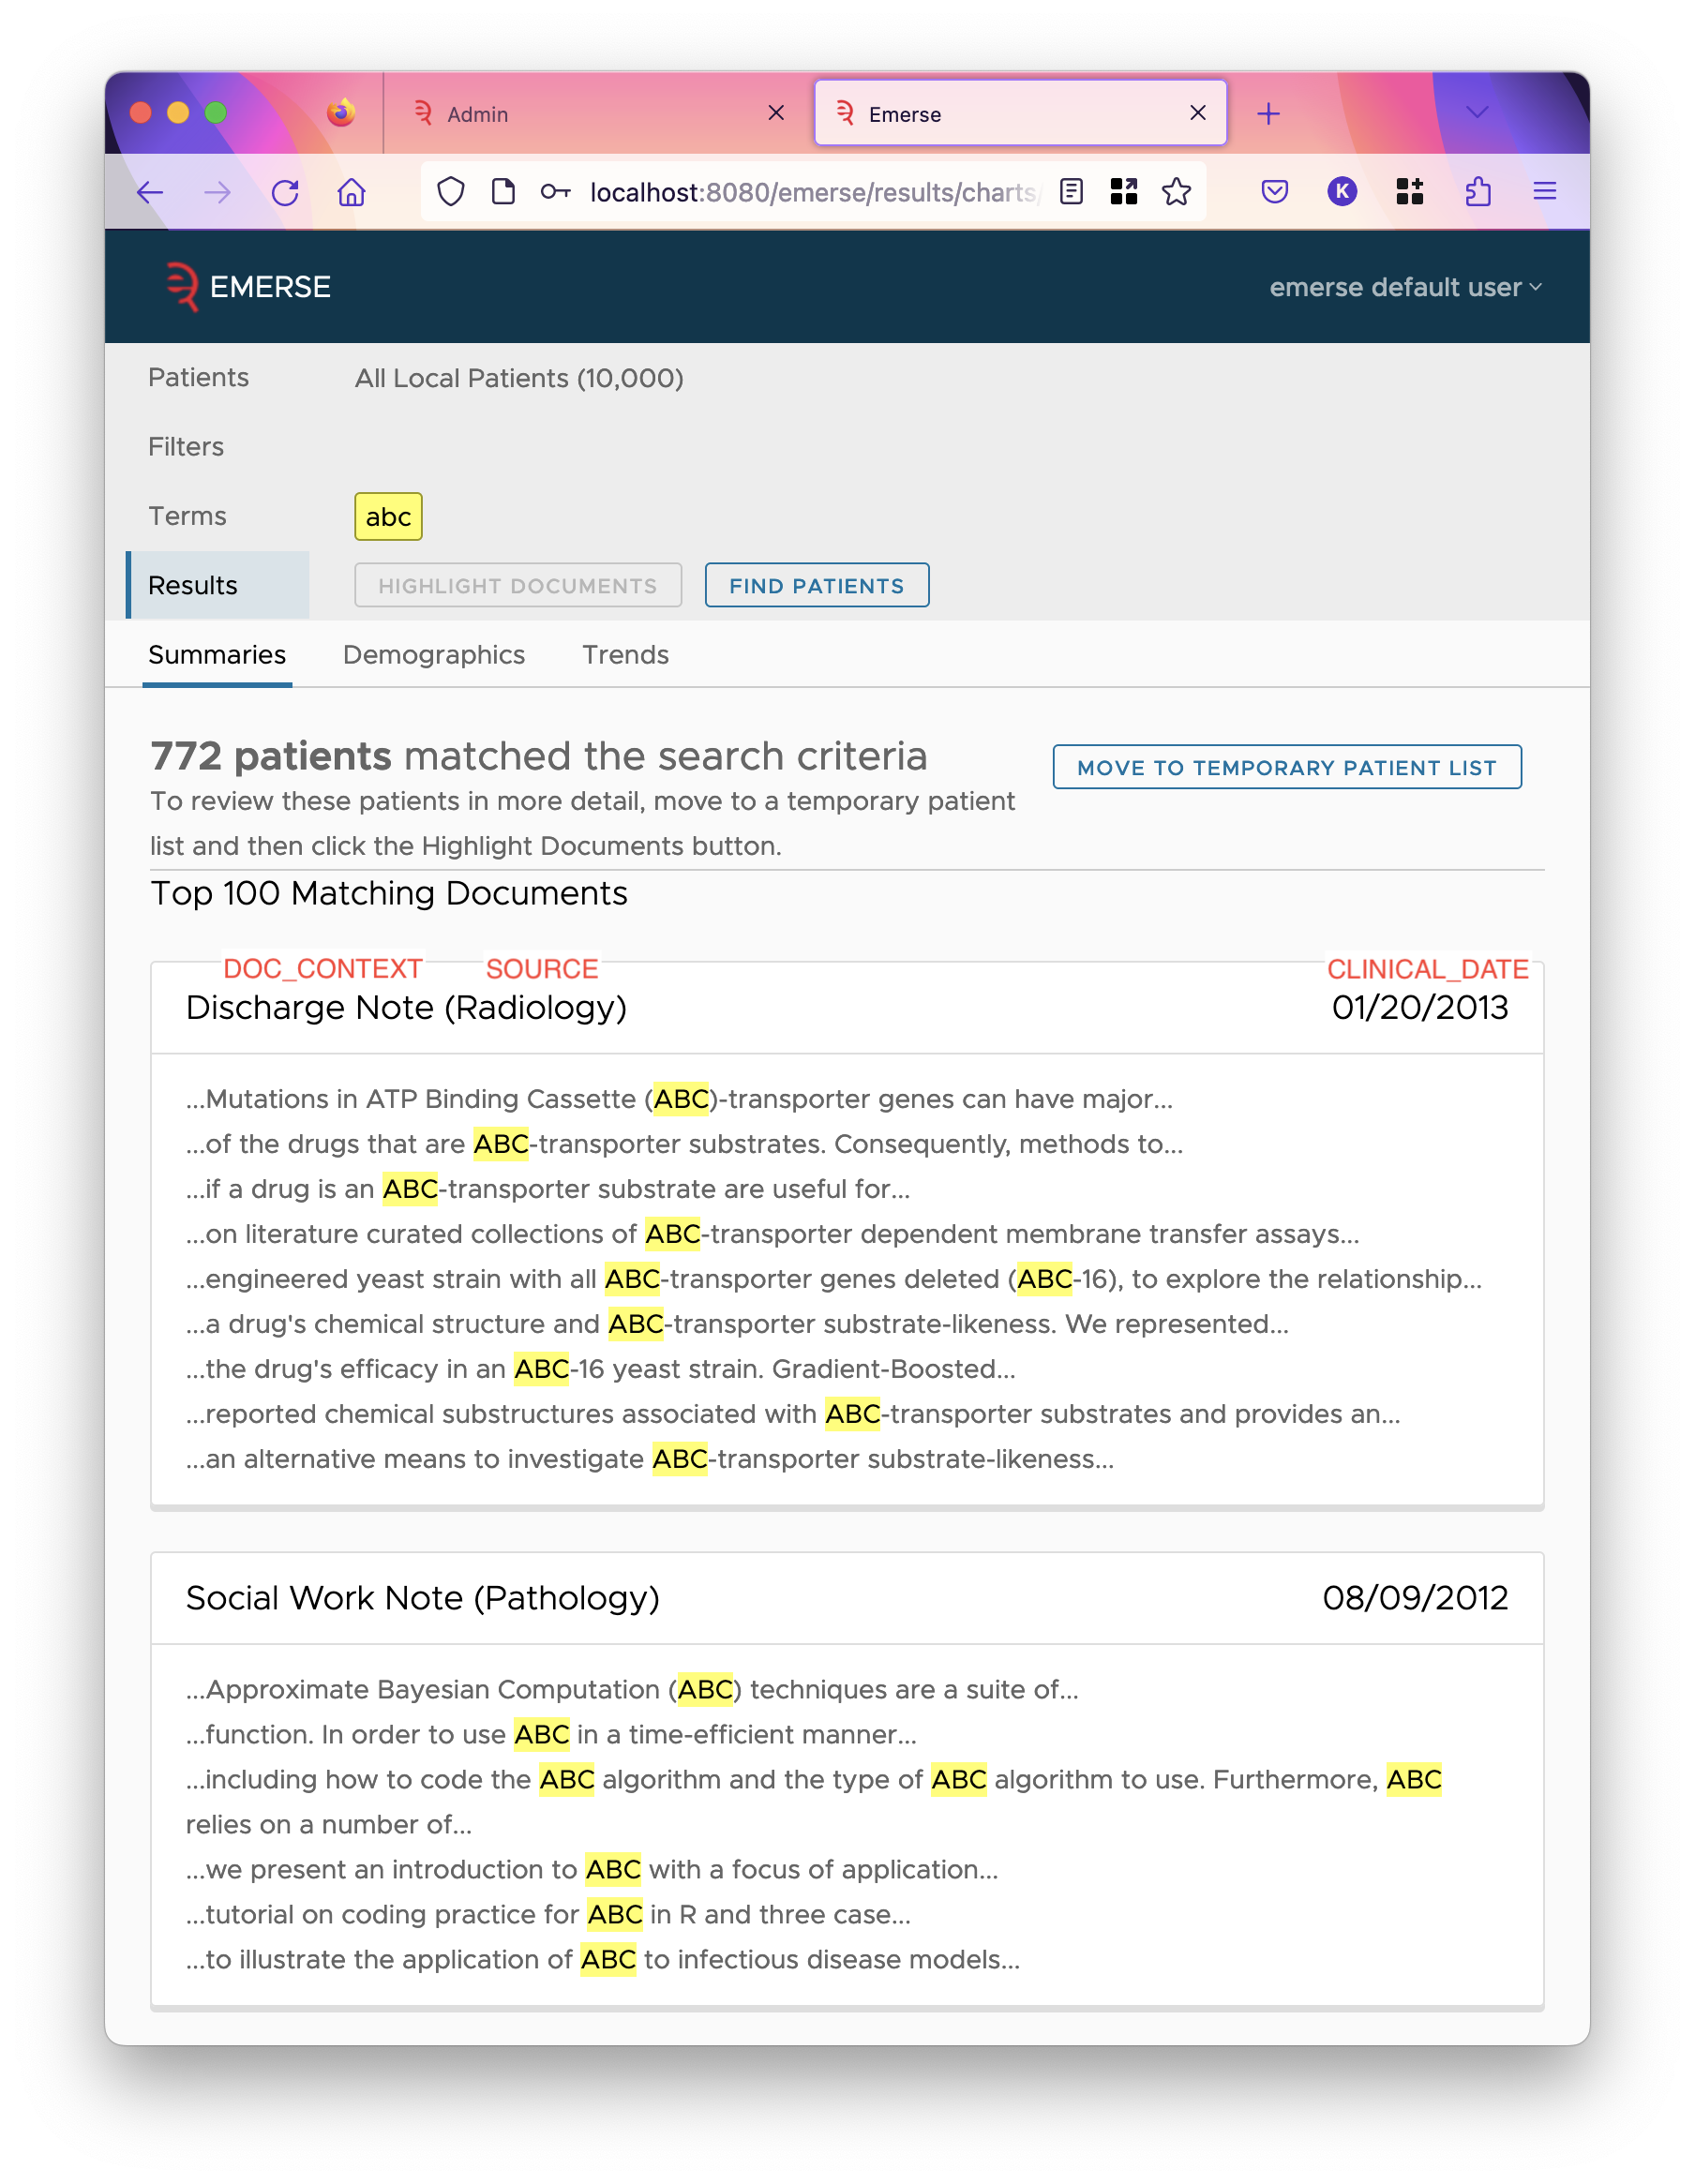
CLINICAL_DATE-
This field should store a relevant clinical date of the document, such as the encounter date, exam date, etc. This is used to determine the date range of the index, and shown in the snippets in all-patient search like
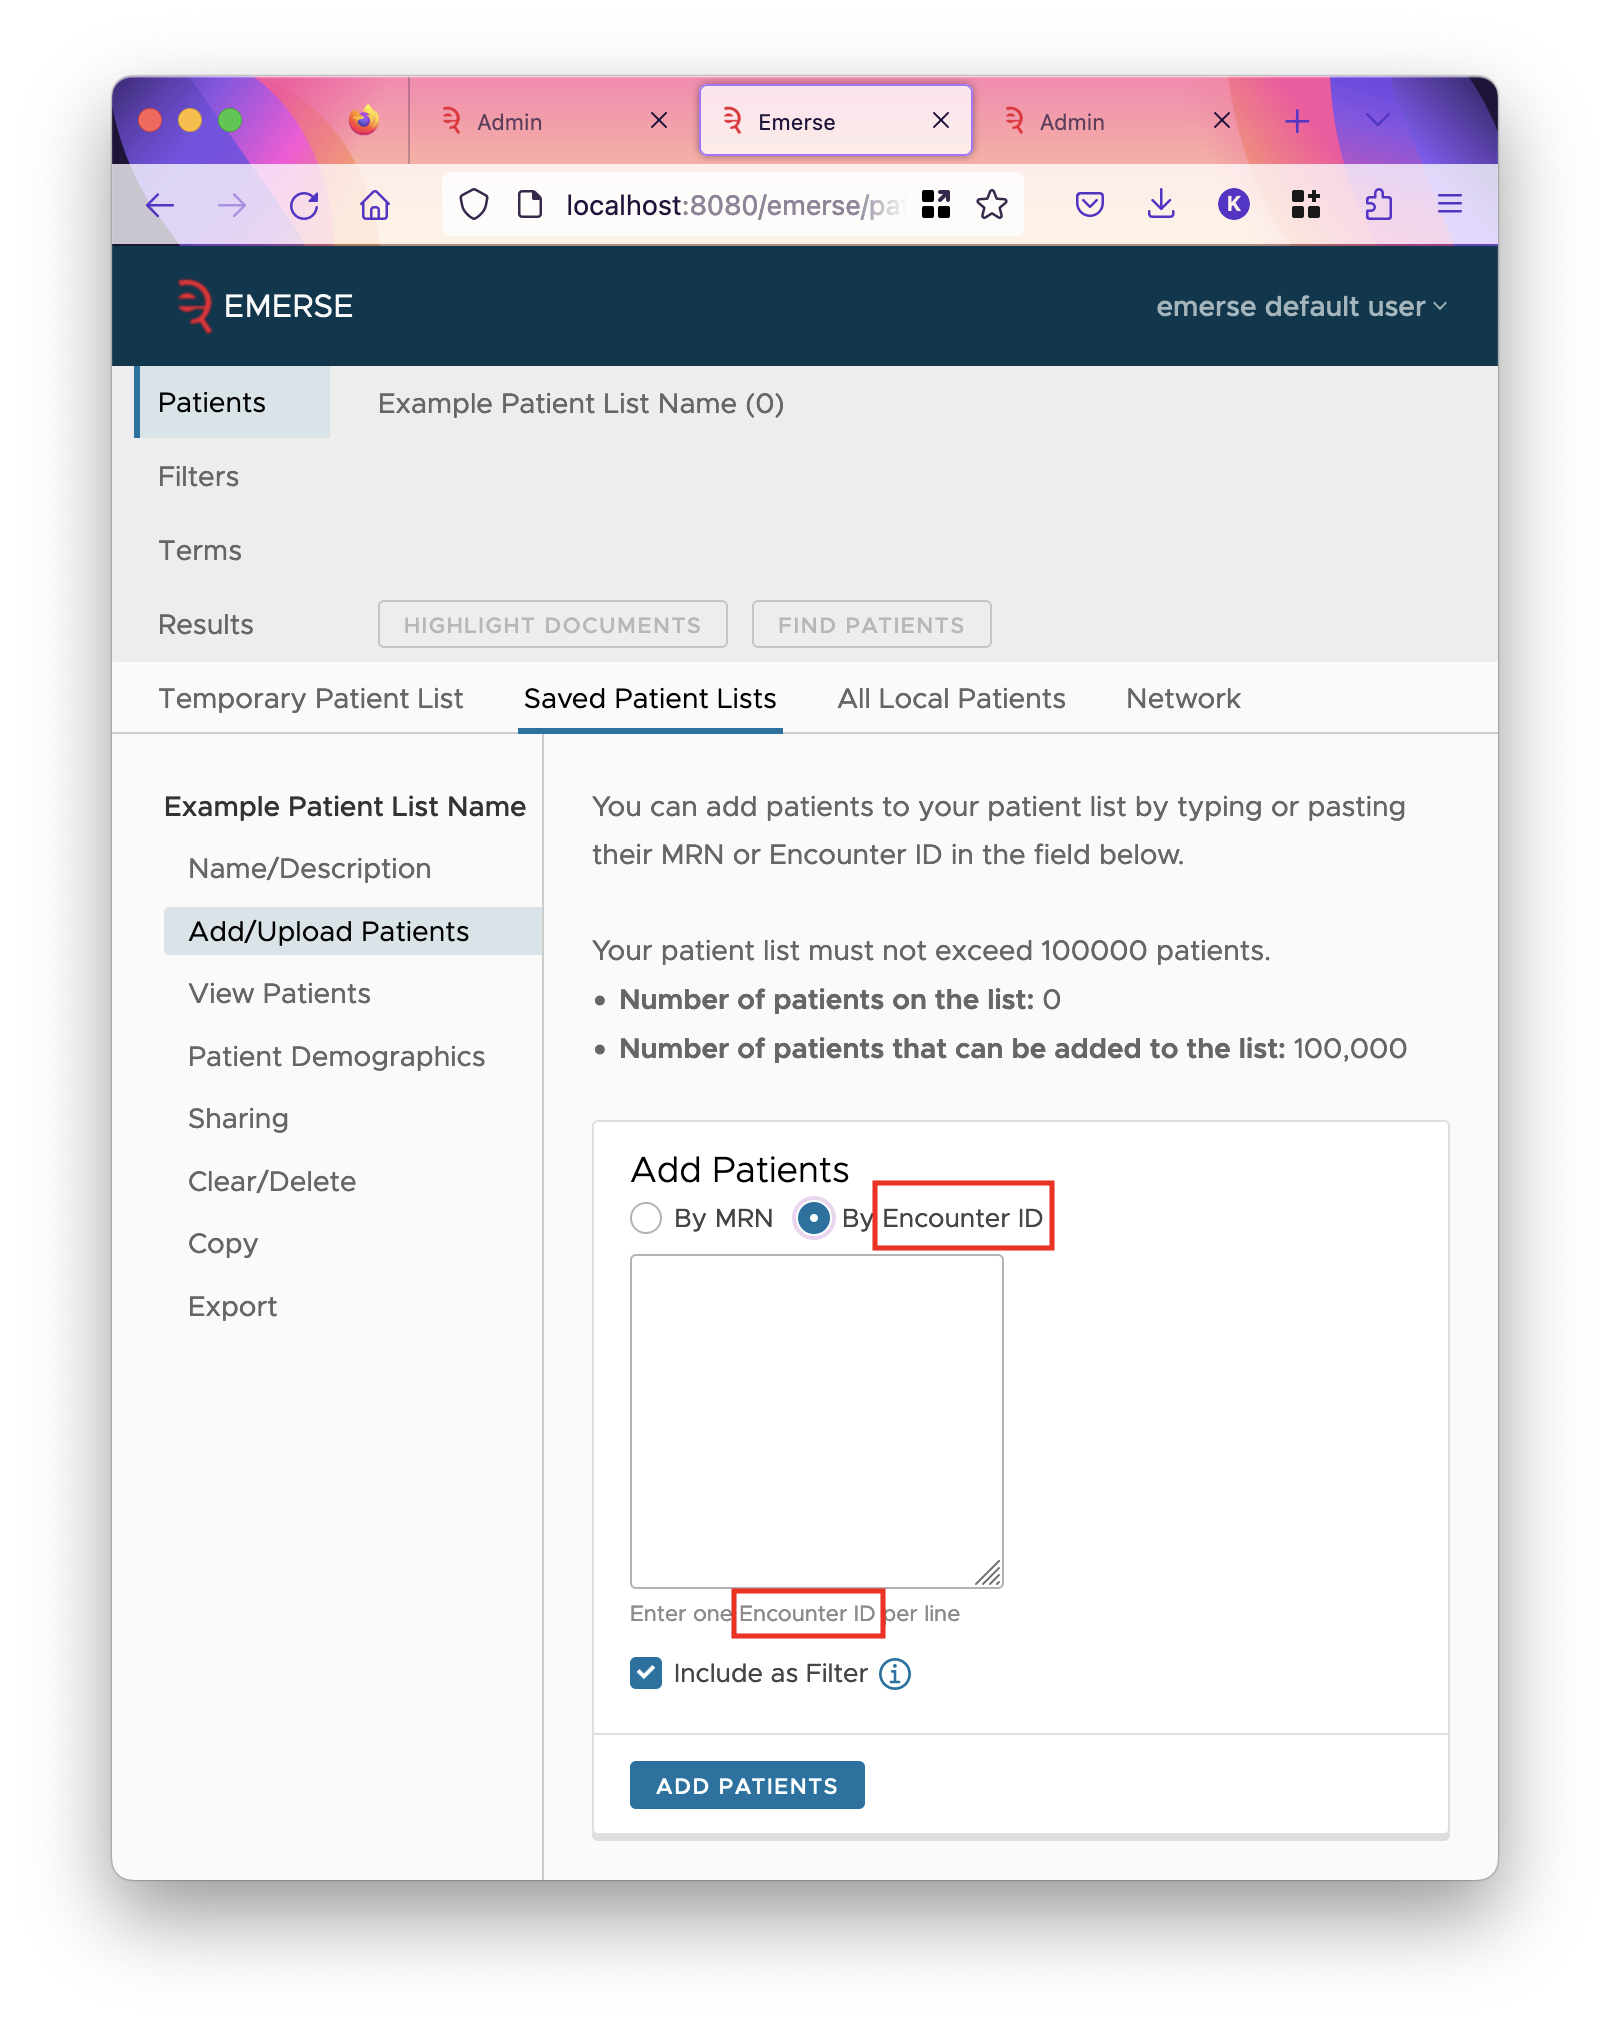
DOC_CONTEXT. This is generally going to be the most important date associated with the document, but is most likely going to be associated with when the actual care occurred. Other dates that can be associated with documents count include when it was written, when it was last updated, etc. PATIENT_ENCOUNTER_ID-
This field should contain an identifier that links a collection of documents together into an "encounter" or some other greater grouping. Users can add patients to a patient list by a list of these encounter IDs in the add/upload patients tab of a patient list. The label of this field controls the wording on that page. If a filter is enabled for this field, there will be an option to add the values as a filter as well.
Finally, there are a few other settings:
- Show in Summaries Table
-
Show the field as a column in the summaries table. That is the table users reach after clicking a cell inside the overview tab.
- Show in Document Page
-
Show the field as a column in the small table at the top of the document.
- Use Separate Section in Document Page
-
Show the field as a separate collapsible section instead of a column in a table at the top of the document.
- Source
-
Set the source of this field. Unlike patient fields, a document field can be associated only with a subset of all the documents. These subsets are grouped into "sources". Refer to the sources section for more information;
Field Value Groups
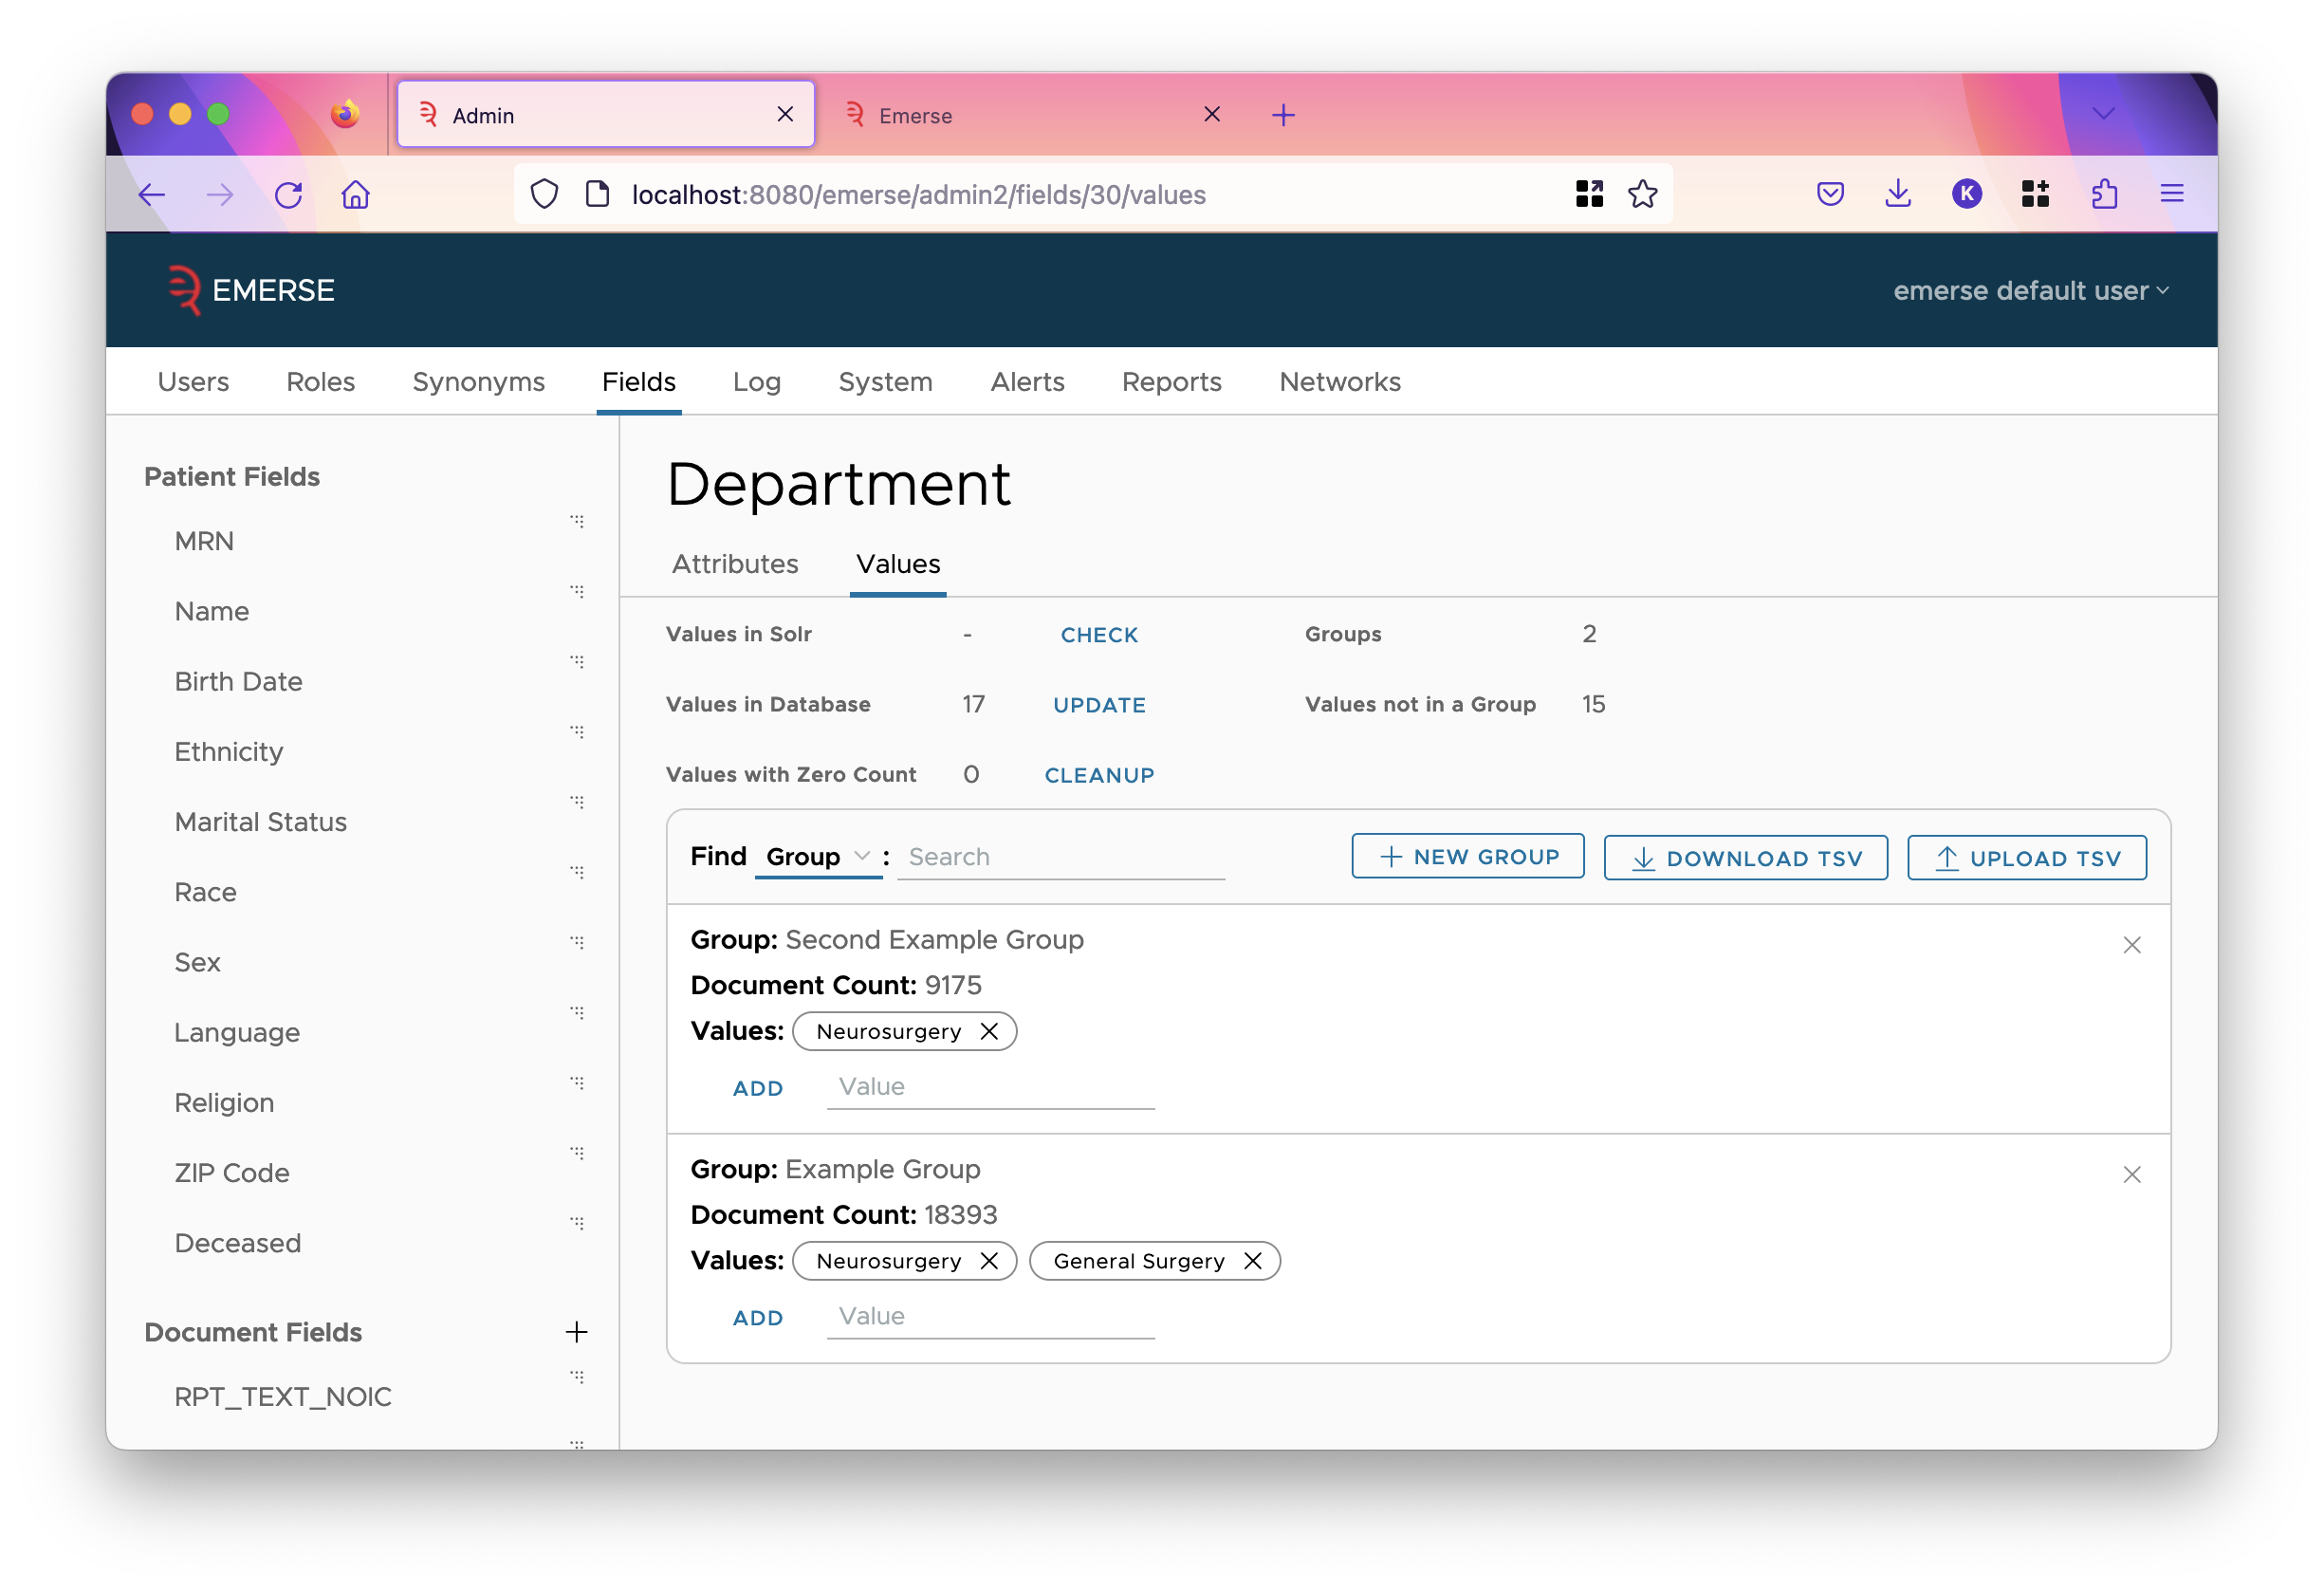
Normally, when a field is shown in EMERSE, the value of that field is shown. However, EMERSE can group field values together, showing the group label for every value in the group, instead of the value itself. This is configured on the values tab of the field.

The mapping between what value is in what group is stored in the SQL database. The first 100 values of that mapping is shown in the table on this page. Each value has a count associated with it, which is the number of documents in Solr that have that value. Despite the name, groups don’t have multiple values assigned. A group is essentially a user-readable label, so you can assign a single value to a label (group) or multiple values can be mapped to a group. A single value can be assigned to more than one group. For example, if the value is "XRAY CHEST AND ABDOMEN", you might want to assign it to a group called "Chest" and also to a group called "Abdomen" to denote the different body locations.
- Values in Solr
-
This is the number of values of this field in Solr. This is initially not calculated since it’s computationally expensive. To calculate it, click
CHECK. - Values in Database
-
This is the number of values stored in the SQL database. Click the
UPDATEbutton to fetch all values from Solr and store them into the database. As more values appear in Solr, you’ll occasionally have to do this. This updates the count for existing values in the database, along with pulling in any new values. It does not delete any values in the database. - Values with Zero Count
-
This is the number of values in the database that are marked with a count of zero. If you have recently clicked the
UPDATEbutton on theValues in Databaserow, then these counts should be up-to-date, and so those values in the database that have zero count never appear in any document in Solr. Thus, they are not really needed. If you wish to delete them from the database, clickCLEANUP. - Groups
-
This is the number of groups in the database.
- Values not in a Group
-
This is the number of values in the database that are not added into some group. Generally, if you are using groups at all, you want every value to be in some group, but this isn’t necessary.
The Field Value Groups Table
The table initially shows values, one value per row, and any groups that value is in. However, you can toggle this in the header of the table so the rows of the table are the groups, showing what values are in the groups. (This will not show values not in any group.)
You may search for a value (or group in the toggled view) with the adjacent input field.
- New Value/Group
-
Create a new row in the table by clicking this button. The new row will be in edit mode until you click
CREATEto save the value/group. - Download TSV
-
This will download a TSV of the entire mapping.
- Upload TSV
-
This will overwrite the entire mapping with the given TSV. The TSV is usually attained by downloading it first, filling in the groups, then uploading. This might be useful if you want to distribute the values to a team to collaboratively work on the mapping to groups.
The TSV format resembles the table:
| Count | Value | Group |
|---|---|---|
123 |
C282 |
Abdomen |
276 |
C147 |
Extremity |
276 |
C147 |
Hand |
276 |
C147 |
Left Hand |
18 |
C352 |
Extremity |
18 |
C352 |
Knee |
18 |
C352 |
Left Knee |
That is, the first line of the TSV is the header. The first column is the count, the second is the value, and the third is the group that value is in. If a value should be in multiple groups, duplicate the entire row, changing the group at the end. Only the count on the first row of a particular value is used; the others are ignored. However, the counts in the TSV are mainly there for reference. They will come from the database when downloaded and will give a sense of how common a certain value is (we’ve seen some with very small counts). When uploading the TSV, the counts don’t have to be accurate, since they are essentially placeholders until the counts are updated. Just make sure some type of integer is there when uploading the TSV.
On each row of the table, there is an X in the top right corner. Clicking this will remove the value/group, disassociating it from any groups/values. If a group is ever empty, it will automatically be deleted. The UI will show empty groups until a refresh (since they are never actually stored in the database).
Clicking on the X of the pill showing the associated group/value on the row will remove the connection, but does not delete the clicked-on entity. (But again, groups that become empty will be removed from the databsae.)
You can load values into the database, and configure groups whenever you wish. However, they are only used if EMERSE is configured to use them. Back on the attributes tab of the field, the checkbox "Show Group as Field Value" will cause EMERSE to show the group whenever it would have shown the value.

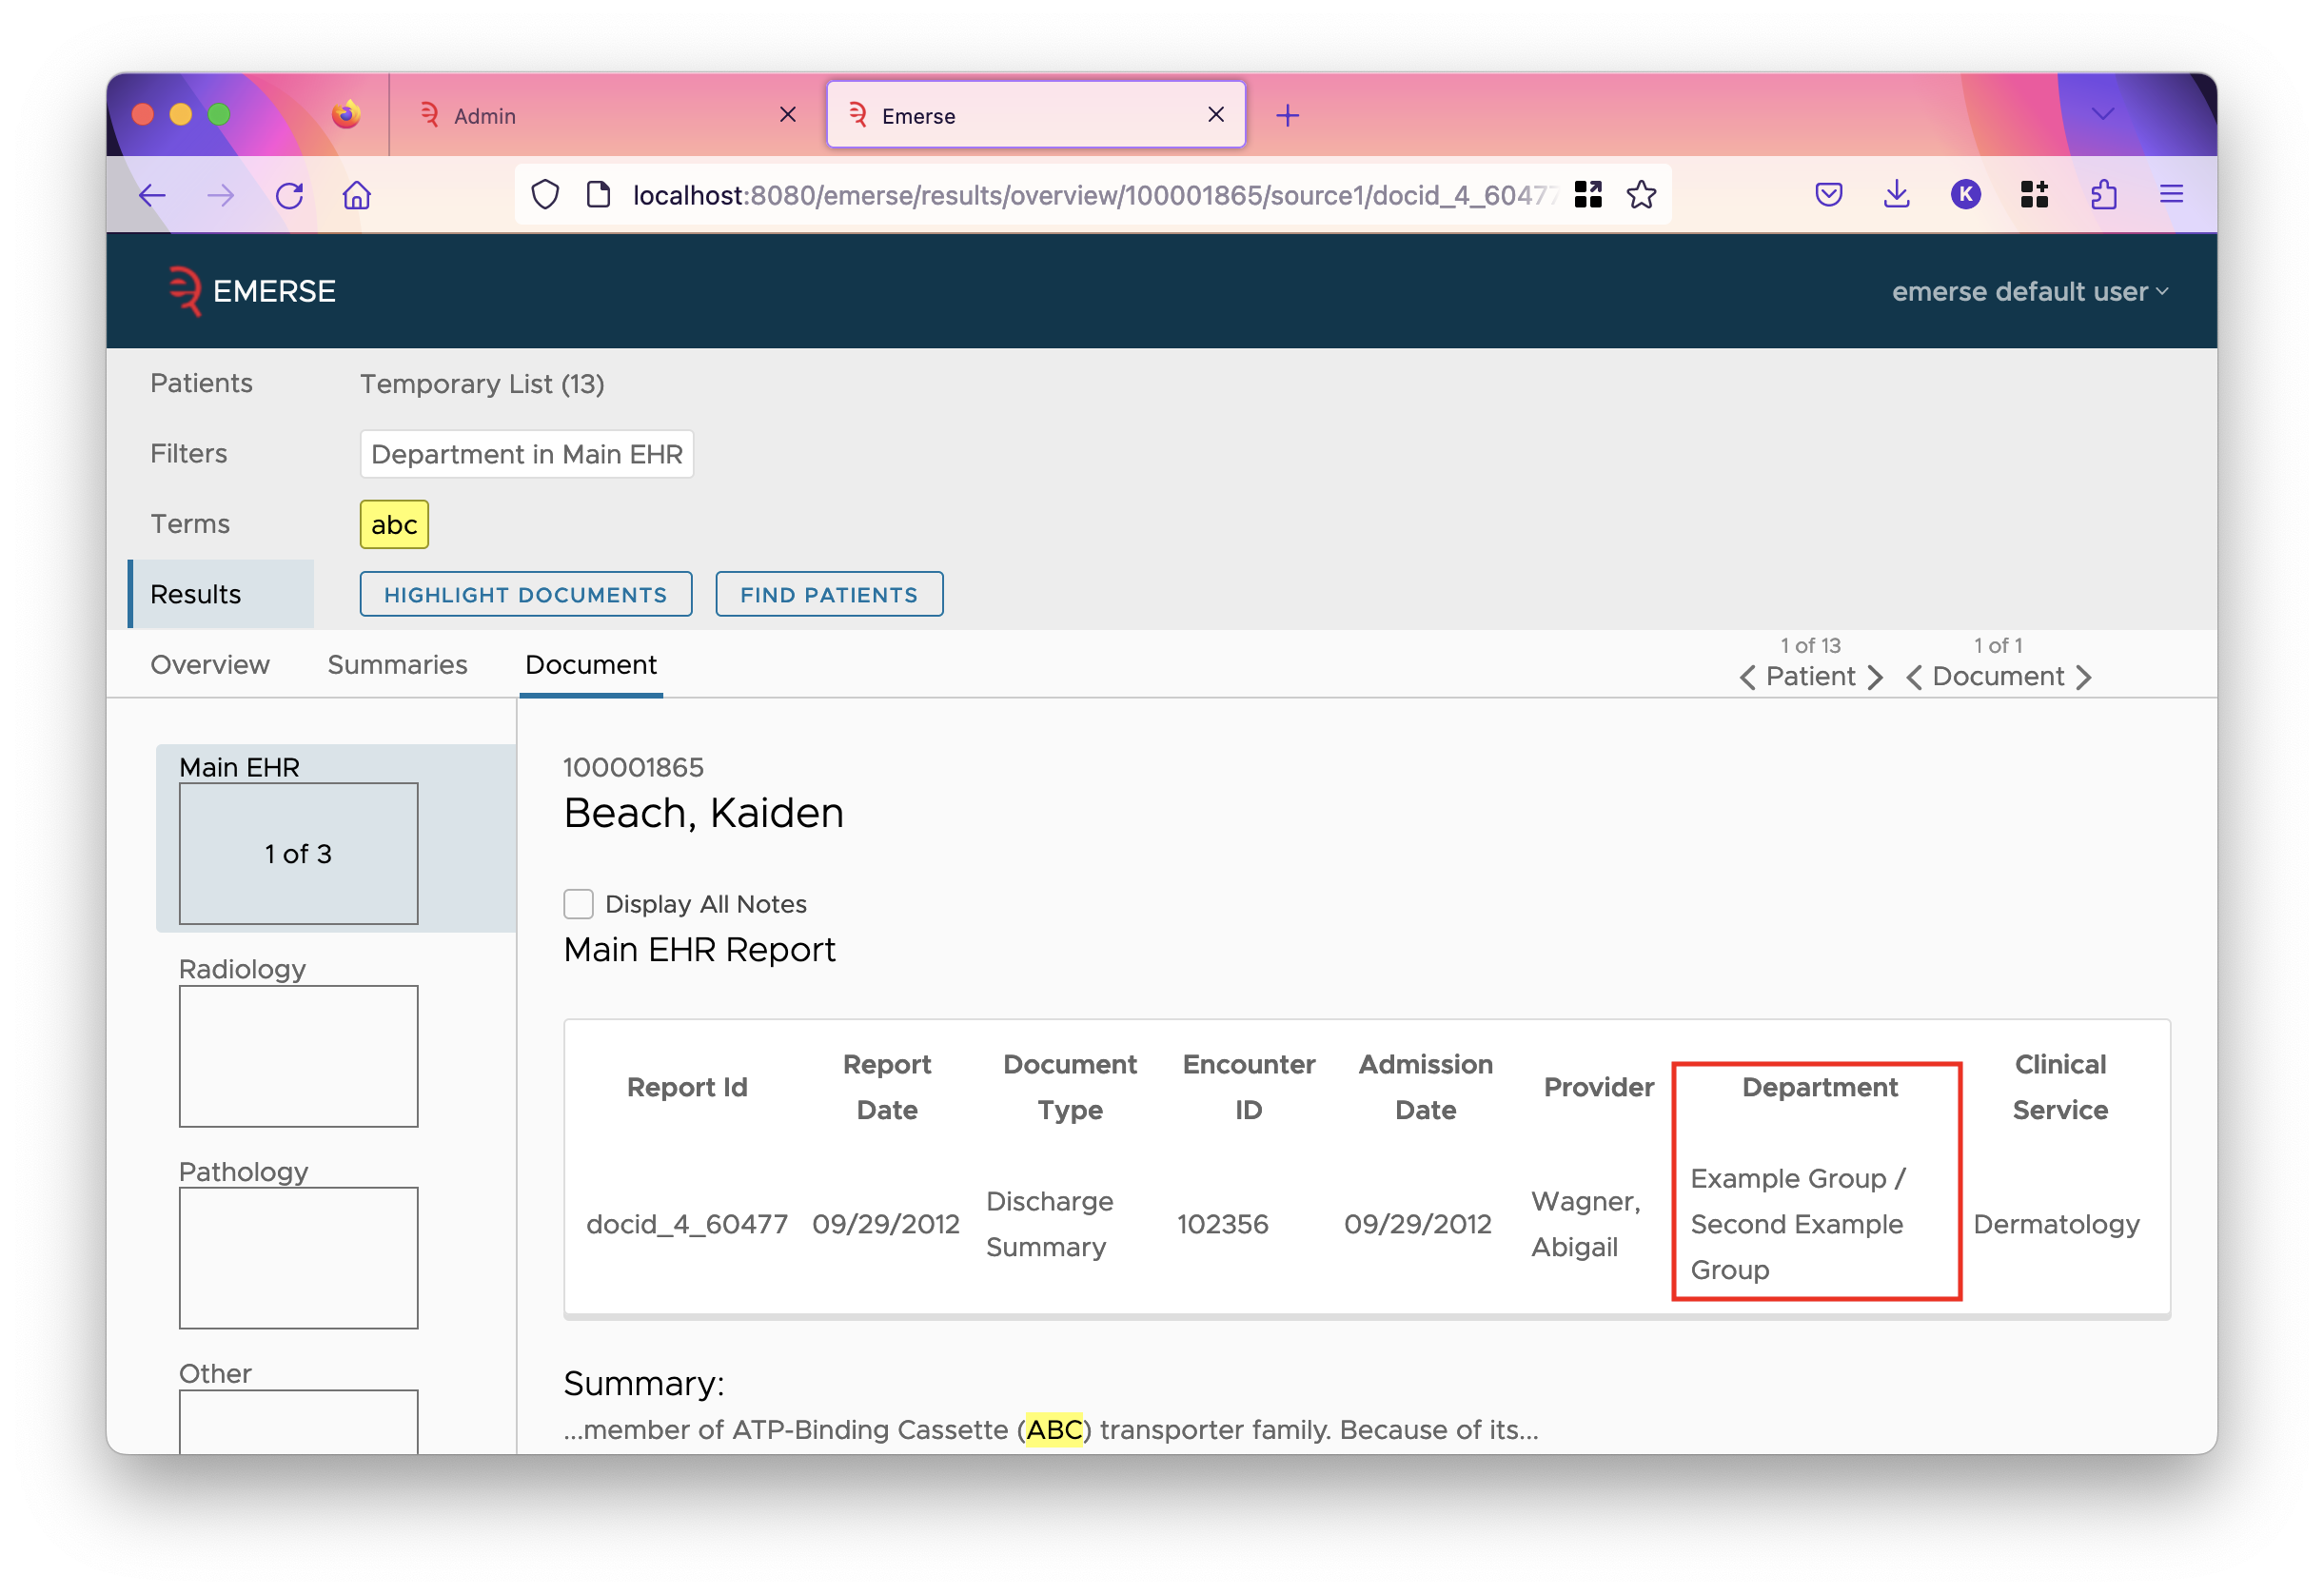
Notice that if a single value is mapped to multiple groups, each group is shown separated by slashes. Similarly, if a filter is set for the field, the options change to the groups:

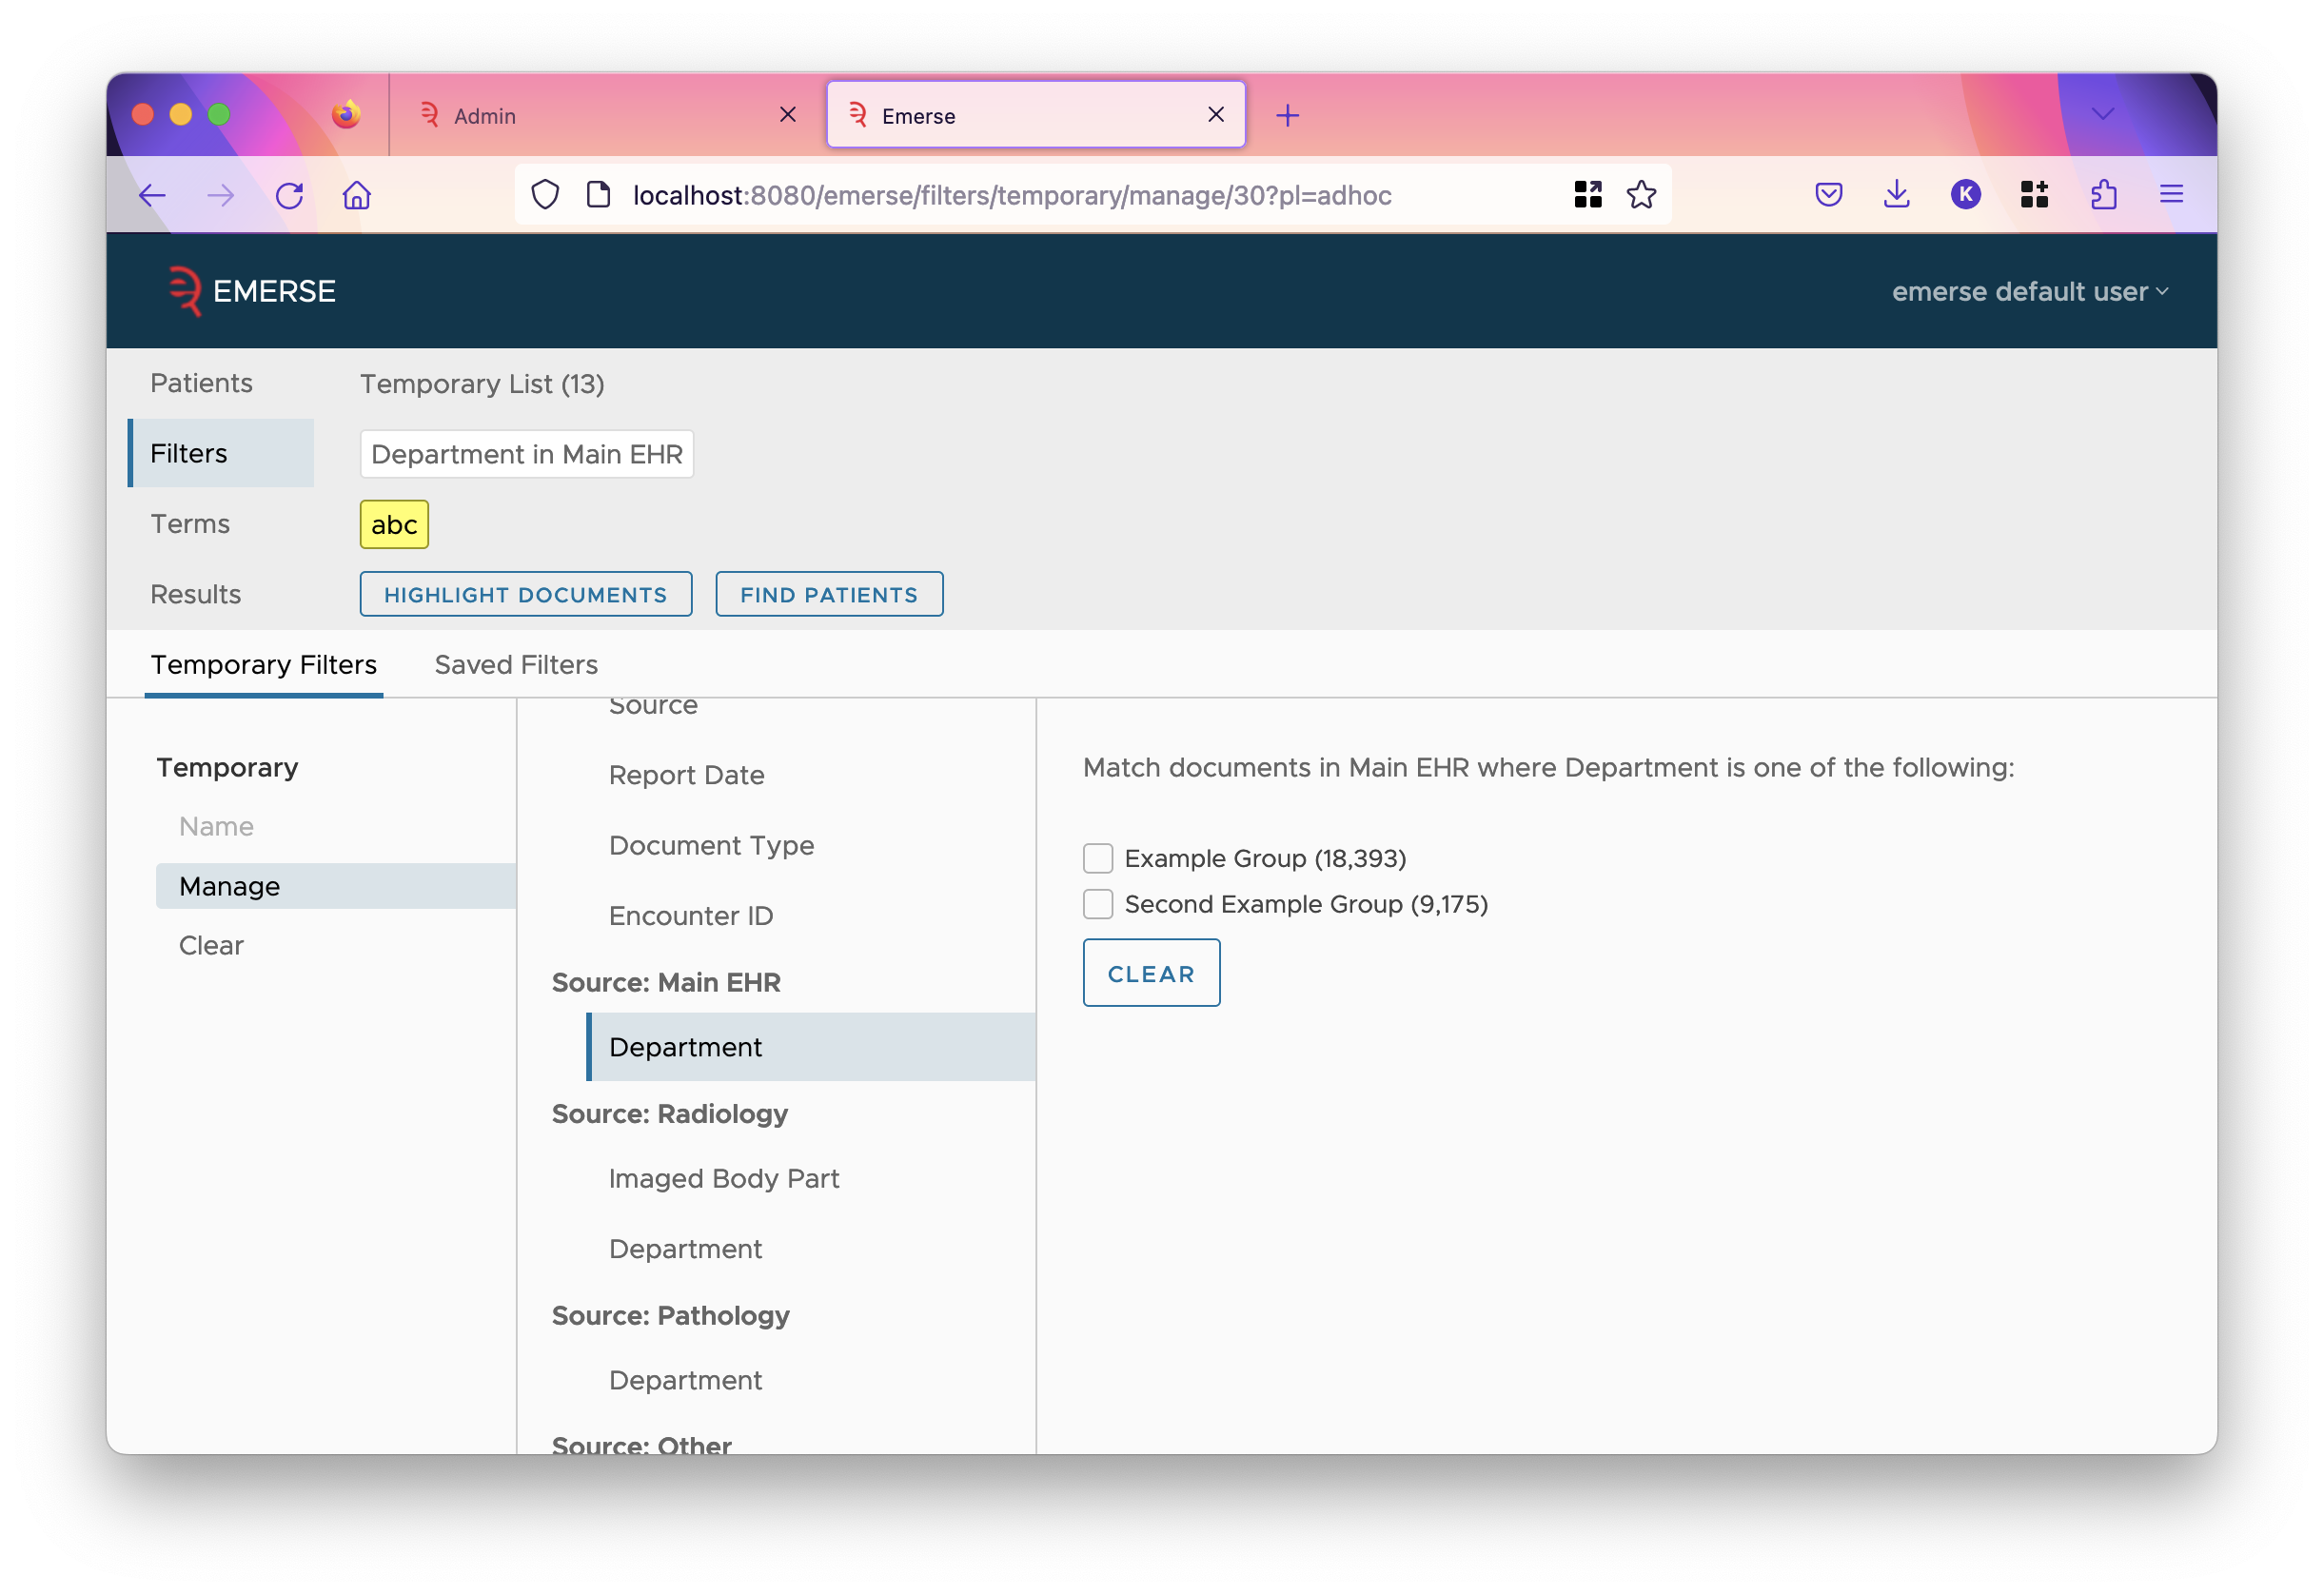
Sources
The field that plays the SOURCE special role tells EMERSE which source a document is from. A source is generally a source system of documents, such as the main EHR system, like Epic, or other more specialized systems, like SoftPathDx for Pathology, or legacy EHR systems. EMERSE allows documents from different sources to use and show Solr fields differently. For instance, the DEPT field might store department information if the document is from the main EHR source, but for the pathology source, it may store the lab instead. Thus, you would want to label the field "Department" for the main EHR, but "Lab" for pathology. To do this, EMERSE allows you to set a source for a field. Doing so will move the field to a separate group just for that source on the left-hand side. Once a field is associated with a source, it is only used on documents from that source. If a field is associated with a specific source, it cannot play a special role in EMERSE.
Sources are described as the values of the field that plays the SOURCE special role. If you go to the values tab for that field, you will get a different interface:
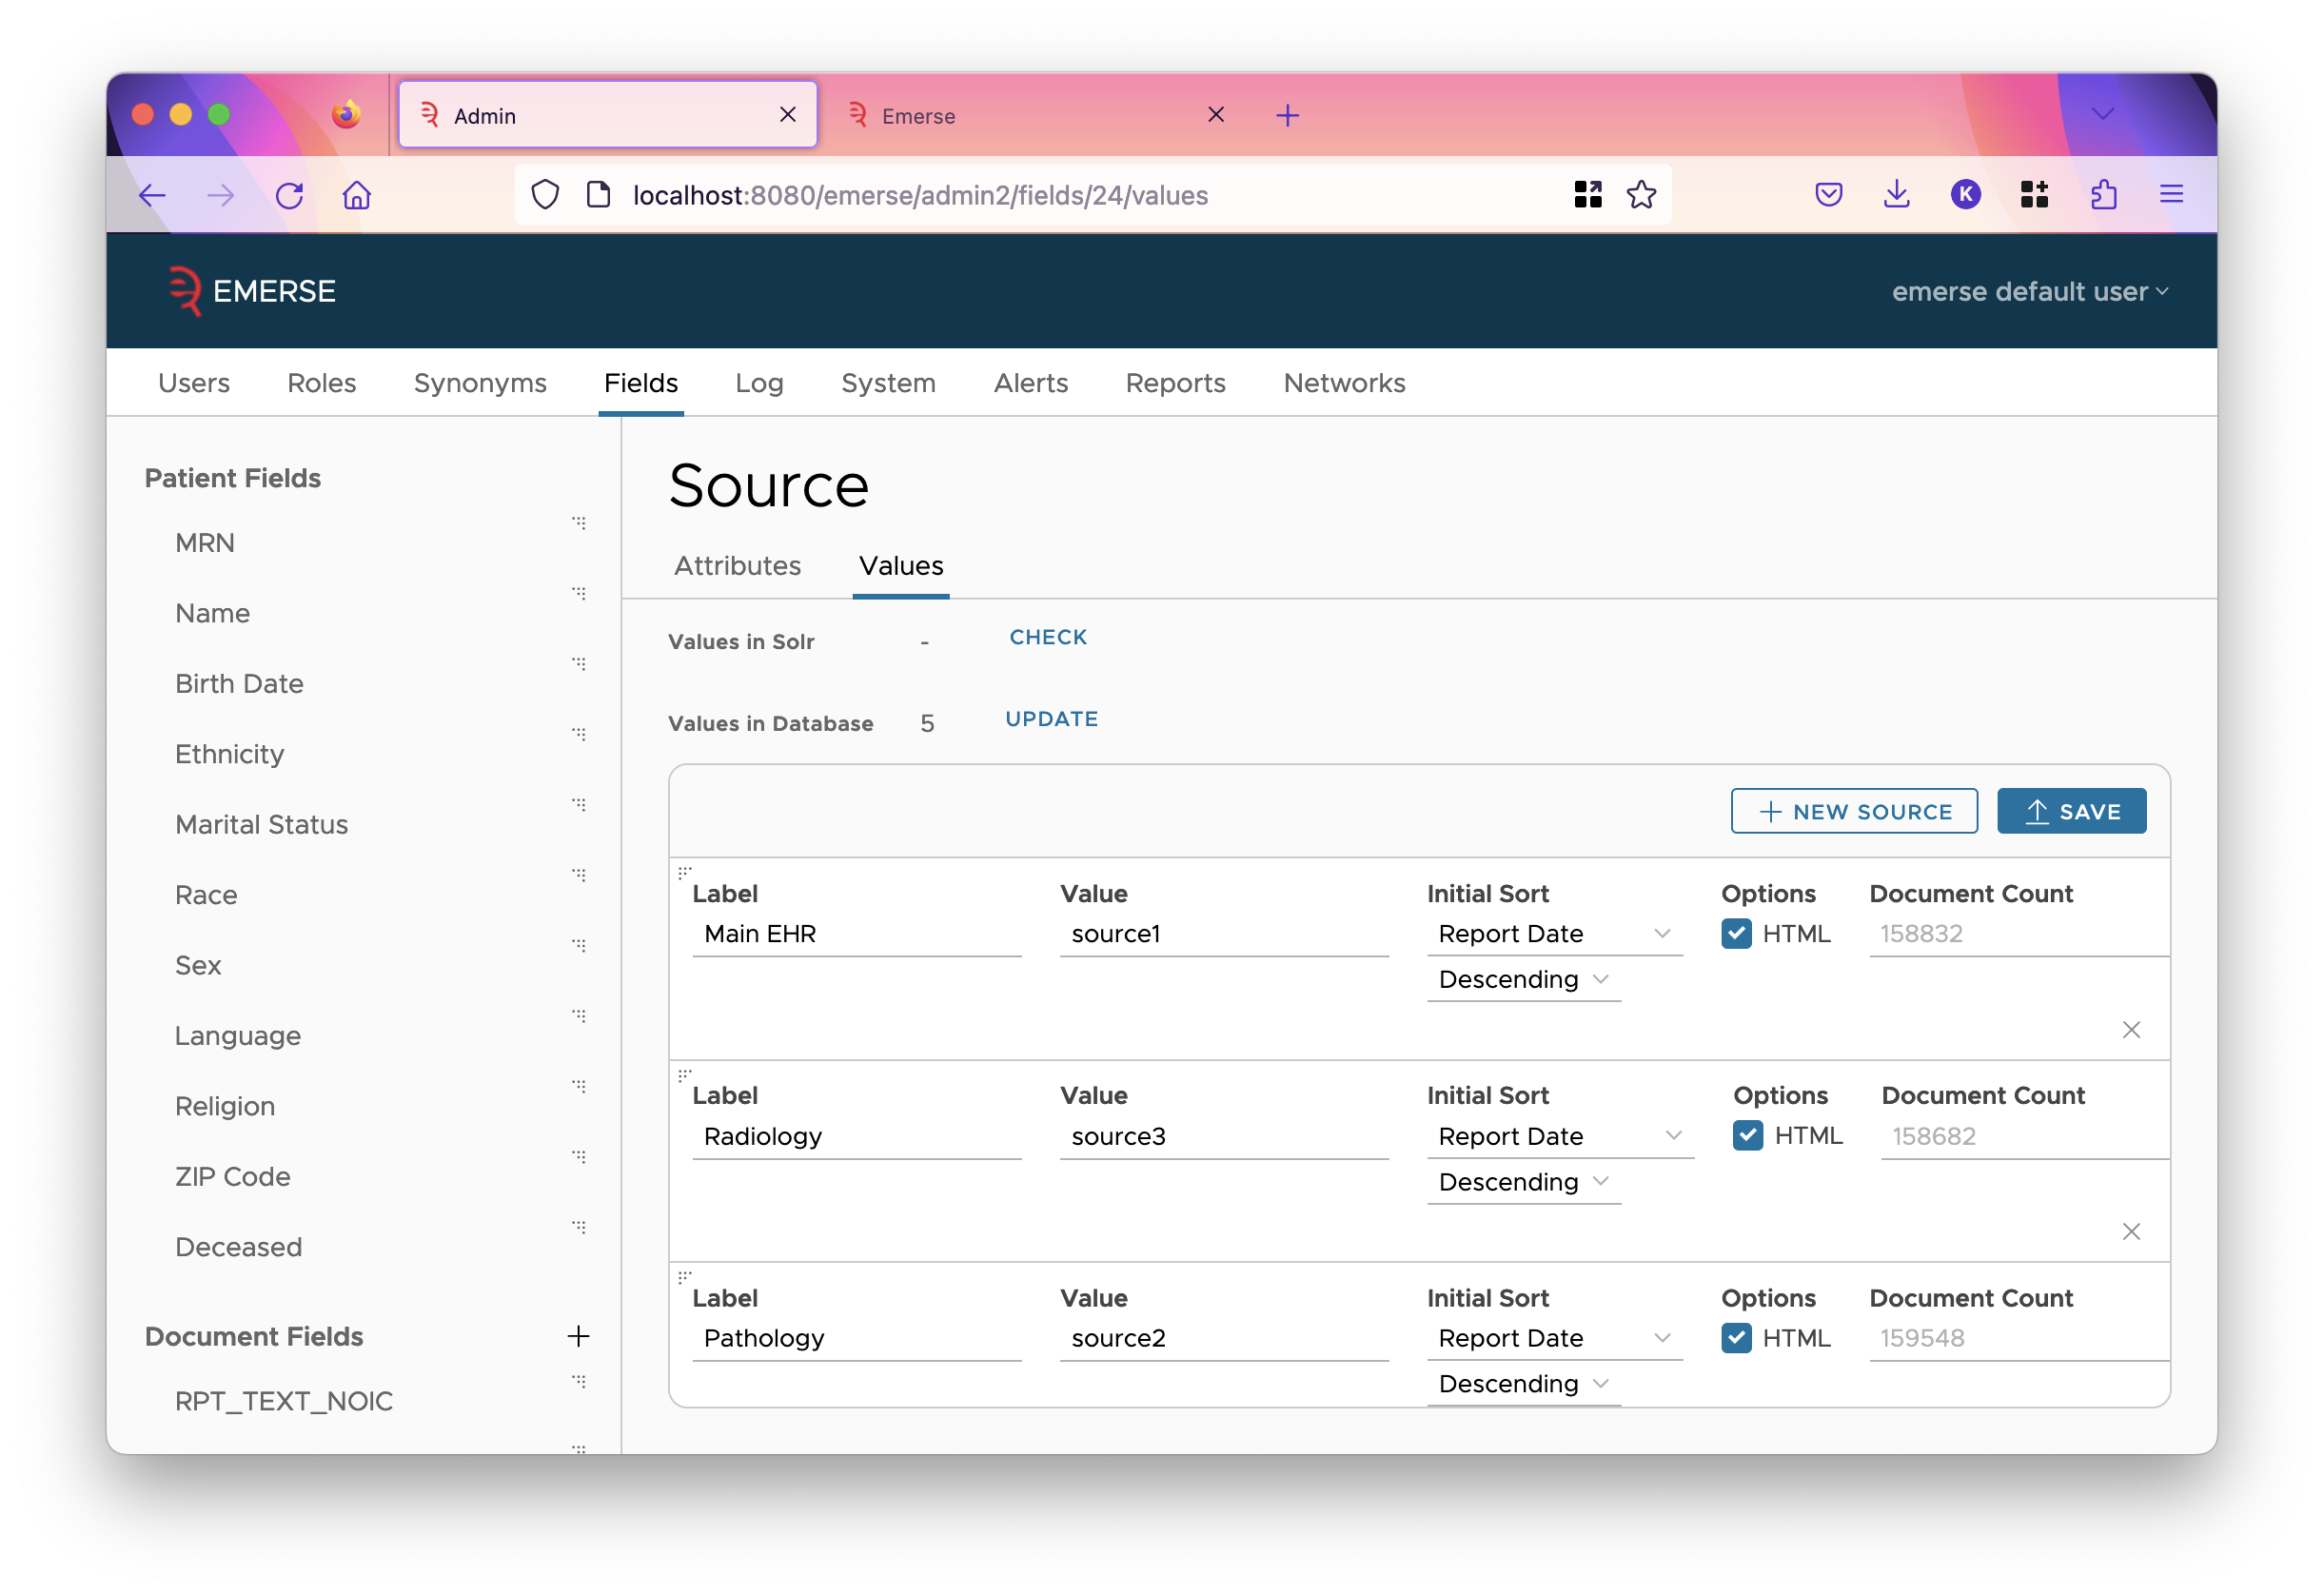
Here are a few differences between this sources page and other field value pages:
-
Sources cannot be grouped.
-
Each source (a row in the table) has a label and (Solr) value. The label is shown in the UI, the value must match the value in Solr.
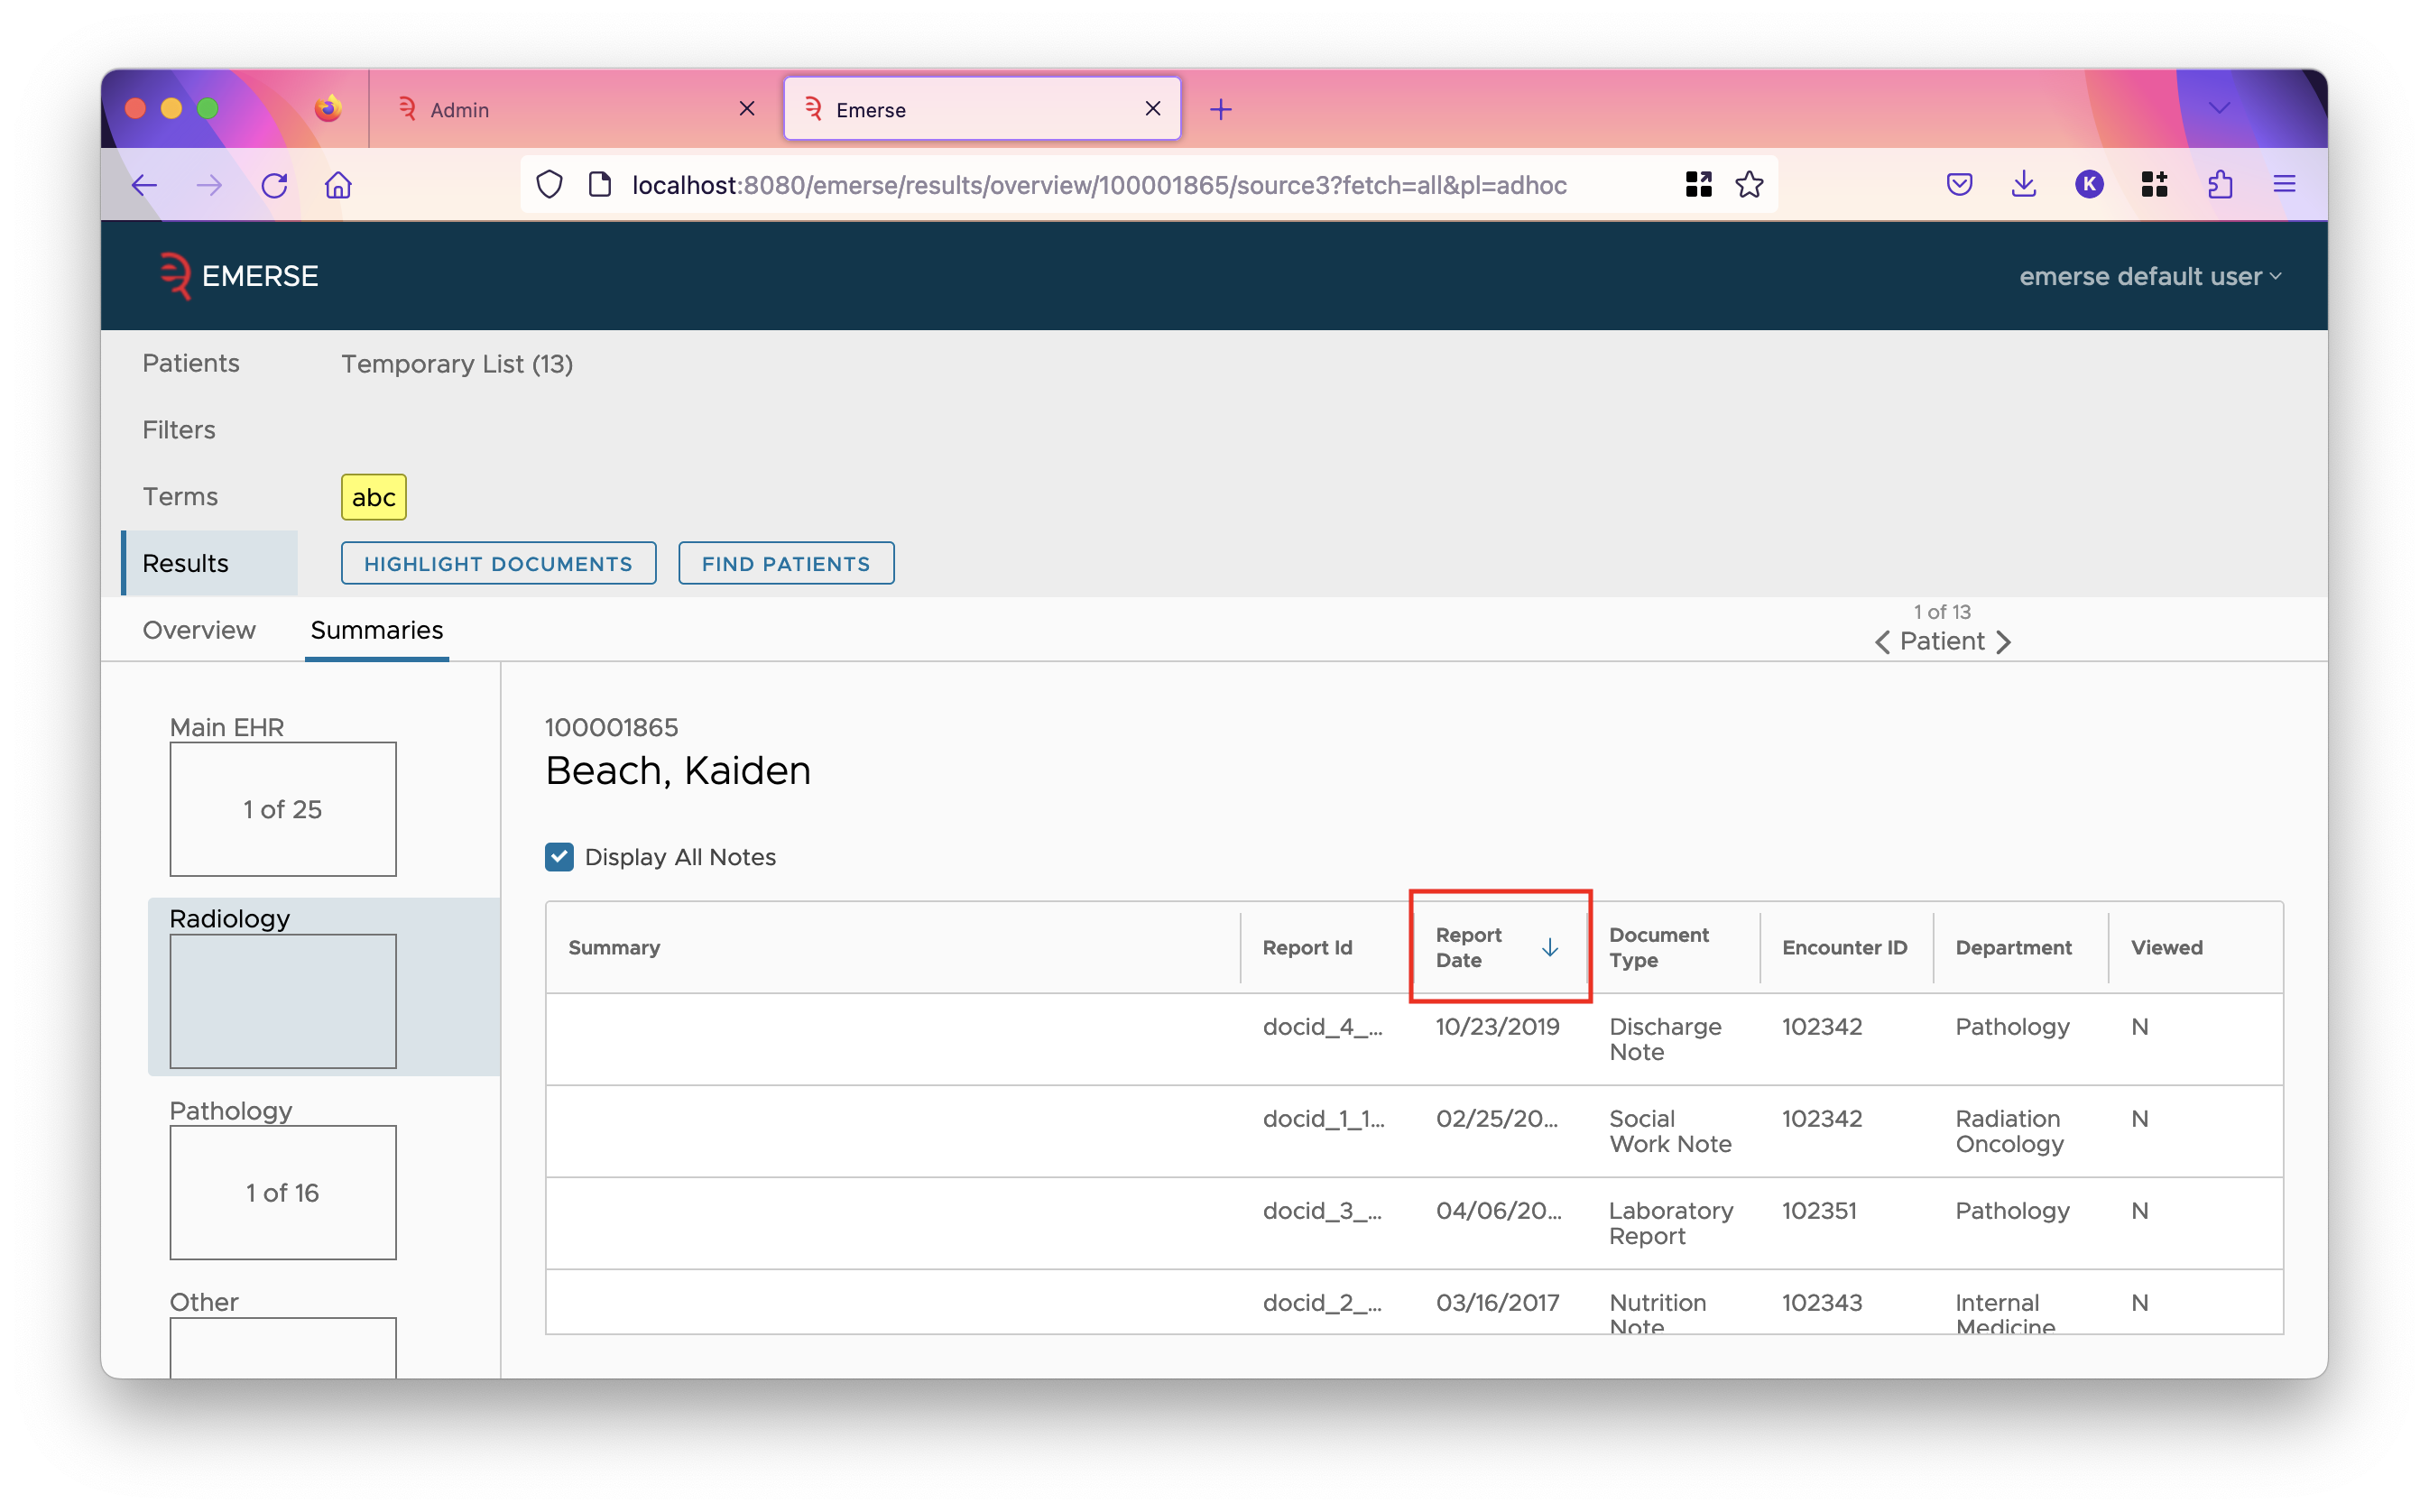
-
Each source has an "Initial Sort". This tells what column to sort the rows in the summaries table by. (The summaries table is reached after clicking on a cell of the overview table.) The field chosen should have the "Show in Summaries Table" checkbox checked so that the field is a column in the table.
-
If a field is marked as HTML, then its text will be rendered as HTML in the UI. (This allows showing images, tables, lists, and other rich formatting in documents.) Otherwise, it will be shown with a monospace font with newlines preserved (like in a <pre> tag).
-
Sources have an order like how fields have an order. You can re-order sources by dragging them from the triple dots in the top left corner. Source order determines the order of columns in the overview table, and the order of groups of fields in filters.
-
Finally, after you’ve made changes, to save them, you must click on the "Save" button.
Source-Specific Fields
Once sources have been defined, any document field can be made source-specific by setting the source on its attributes tab. Each source has its own group of fields in the left-hand sidebar, underneath the "Document Fields" group which are for document fields not associated with a specific source. Setting the field’s source will move it into the source’s group, where you can now order it with respect to the other source-specific fields. Source-specific fields always appear after cross-source fields whenever both are shown (just like they are in the sidebar).
Source specific fields are only shown when showing a document from that specific source. Similarly, when loading field values from Solr, a source-specific field only looks at documents from that particular source, instead of all documents loaded into the index.
Multiple Field Mappings
A single field in Solr can be the backing Solr field of many fields in EMERSE. That is, you can create multiple fields in the fields tab, and select the same Solr Field for all of them. This allows you to take the same field, and group its values two different ways.
Suppose you have a single Solr field called IMAGE_DESC which stores a kind of code of the imaging done (for example "XRAY ABDOMEN"), which practically speaking contains two pieces of information: what was imaged (ABDOMEN), and what the imaging modality was (XRAY). Even though there is only one field in Solr, we can split this into two fields in EMERSE by creating an imaged body part field and a imaging modality field, both backed by the same IMAGE_DESC field in Solr. We then group the values different. For the imaged body party field, the groups are body parts, putting any imaging description that mentions the body part under the group for that body part. We do the same for the imaging modality, but where the groups are the modalities.
Another way to use the ability to map the same field multiple times is to provide different levels of granularity of some hierarchy. You may have the field mapped once without grouping, and then once with grouping.
However, since a value can appear in many groups, it is possible to have all levels in a hierarchy in a single mapping by having both granular groups and coarse groups defined side-by-side. Similarly, you can define groups for imaged body parts and for imaging modality for a single EMERSE field, rather than splitting that into two fields.
The choice is of what to do is mainly a preference, and primarily what the users would expect, but remember that a document must match all filters to match the search (except filters for a source the document isn’t from), and to match a filter, the document must have only one of the values required by the user. Thus, selecting multiple values for a single filter is different than selecting a single value in a multiple filters (even when they are mapped to the same underlying Solr field).
In other words, selecting the Ankle and CT groups in a filter on an imaging description field has the semantics of matching documents marked as either ankle or CT, whereas selecting Ankle in a filter on the imaged body part field, and selecting CT in a filter on the imaging modality field has the semantics of matching documents marked as both ankle and CT.
Research Studies for Attesattion
EMERSE can be loaded with research studies to allow users to attest to using EMERSE for a study they are a member of. These studies will appear as attestation options when a user logs in. Often, it is best to populate these tables directly via a database-to-database ETL process every night. See the Integration Guide for details on the table structure to do that.
However, it is also possible to add studies directly in the admin interface. This is what the Studies tab is for. You can create studies, edit existing studies, and add existing users to those studies so they can attest using the study. Unlike as described in the integration guide, this interface doesn’t let you pick the project status of the study; instead, it is assumed that studies entered by hand are already in the approved status and ready to be used by users. Thus, as long as a study’s expiration date is not past, members of the study will be able to attest using the study.
| If your institution uses an ETL process to fill these tables, it’s best to not use this part of the admin interface, as changes to the tables made through this interface will likely be overwritten by the ETL process. Additionally, the ETL process can add non-approved studies to the tables, but this interface doesn’t show you whether the study is approved or not, so you can’t tell if the study can be attested to or not. |
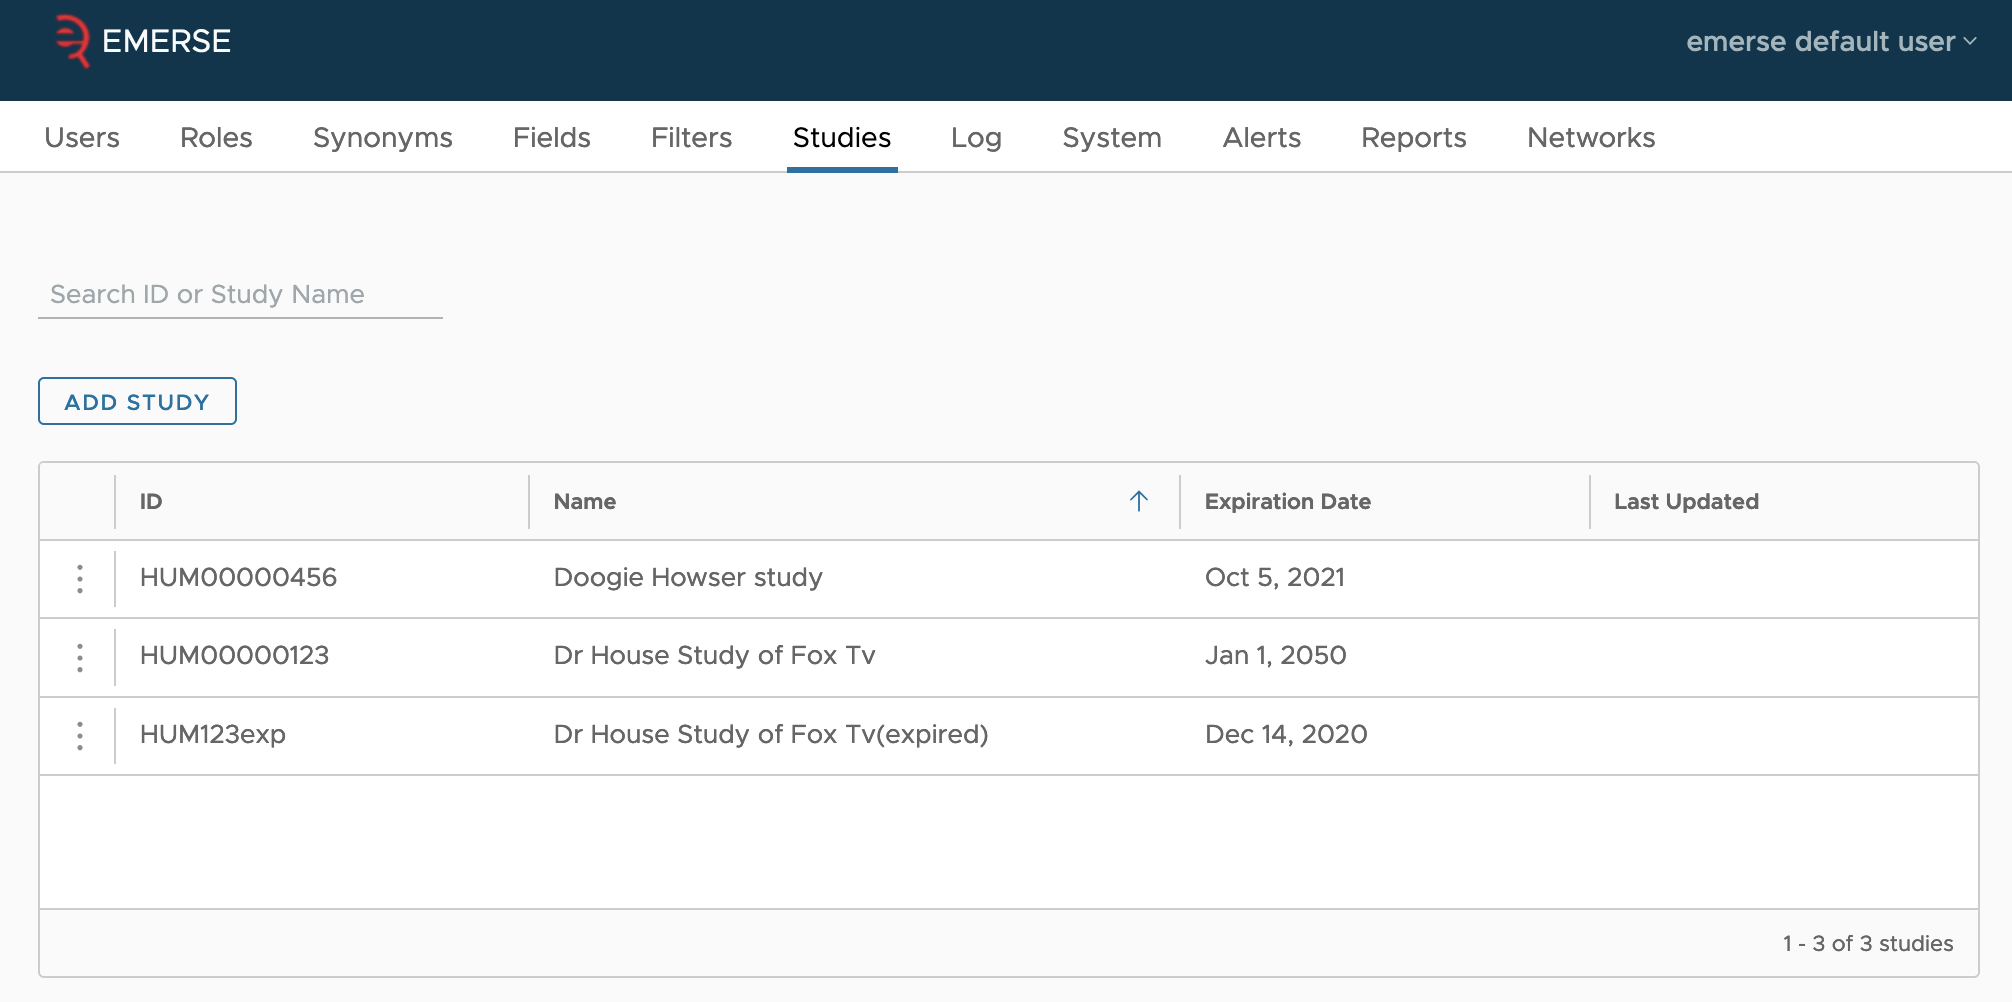
You can search for a study by entering text into the input box above the add study button, and hitting enter. Similarly, to clear out the search, just delete the text and hit enter.
To delete a study, click on the three dots at the start of the study’s row, and select the delete item from the pop-up. After confirmation, this will delete the study. Studies cannot be deleted if a user has already attested using the study, since that attestation is part of the audit log stored in the database. To deactivate such studies, just alter their expiration date to be in the past, by using the edit option instead.
To edit a study, click on the three dots at the start of the study’s row, then select the edit item from the pop-up. This will take you to a new page where you can edit the ID (which is the EXTERNAL_ID column in the database), the name, and expiration date (in the local time zone).
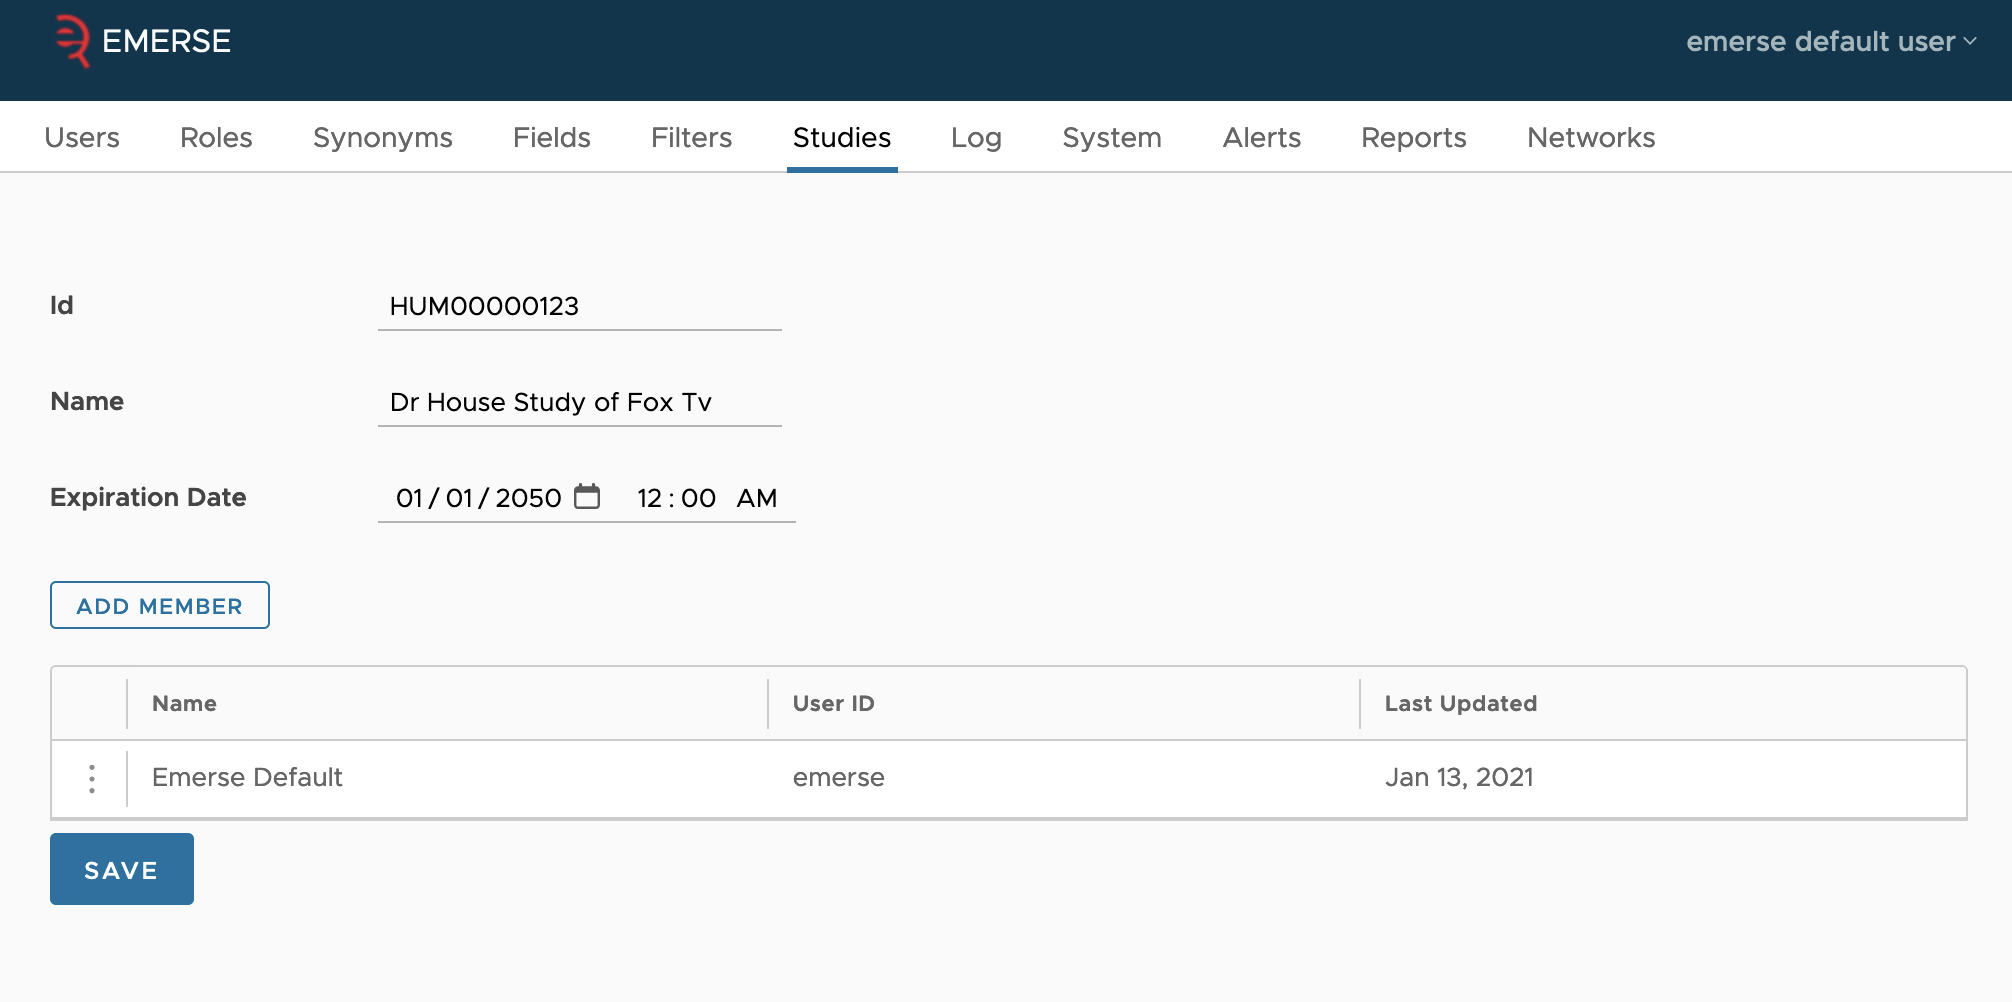
Once you’ve made your edits, click the save button at the bottom.
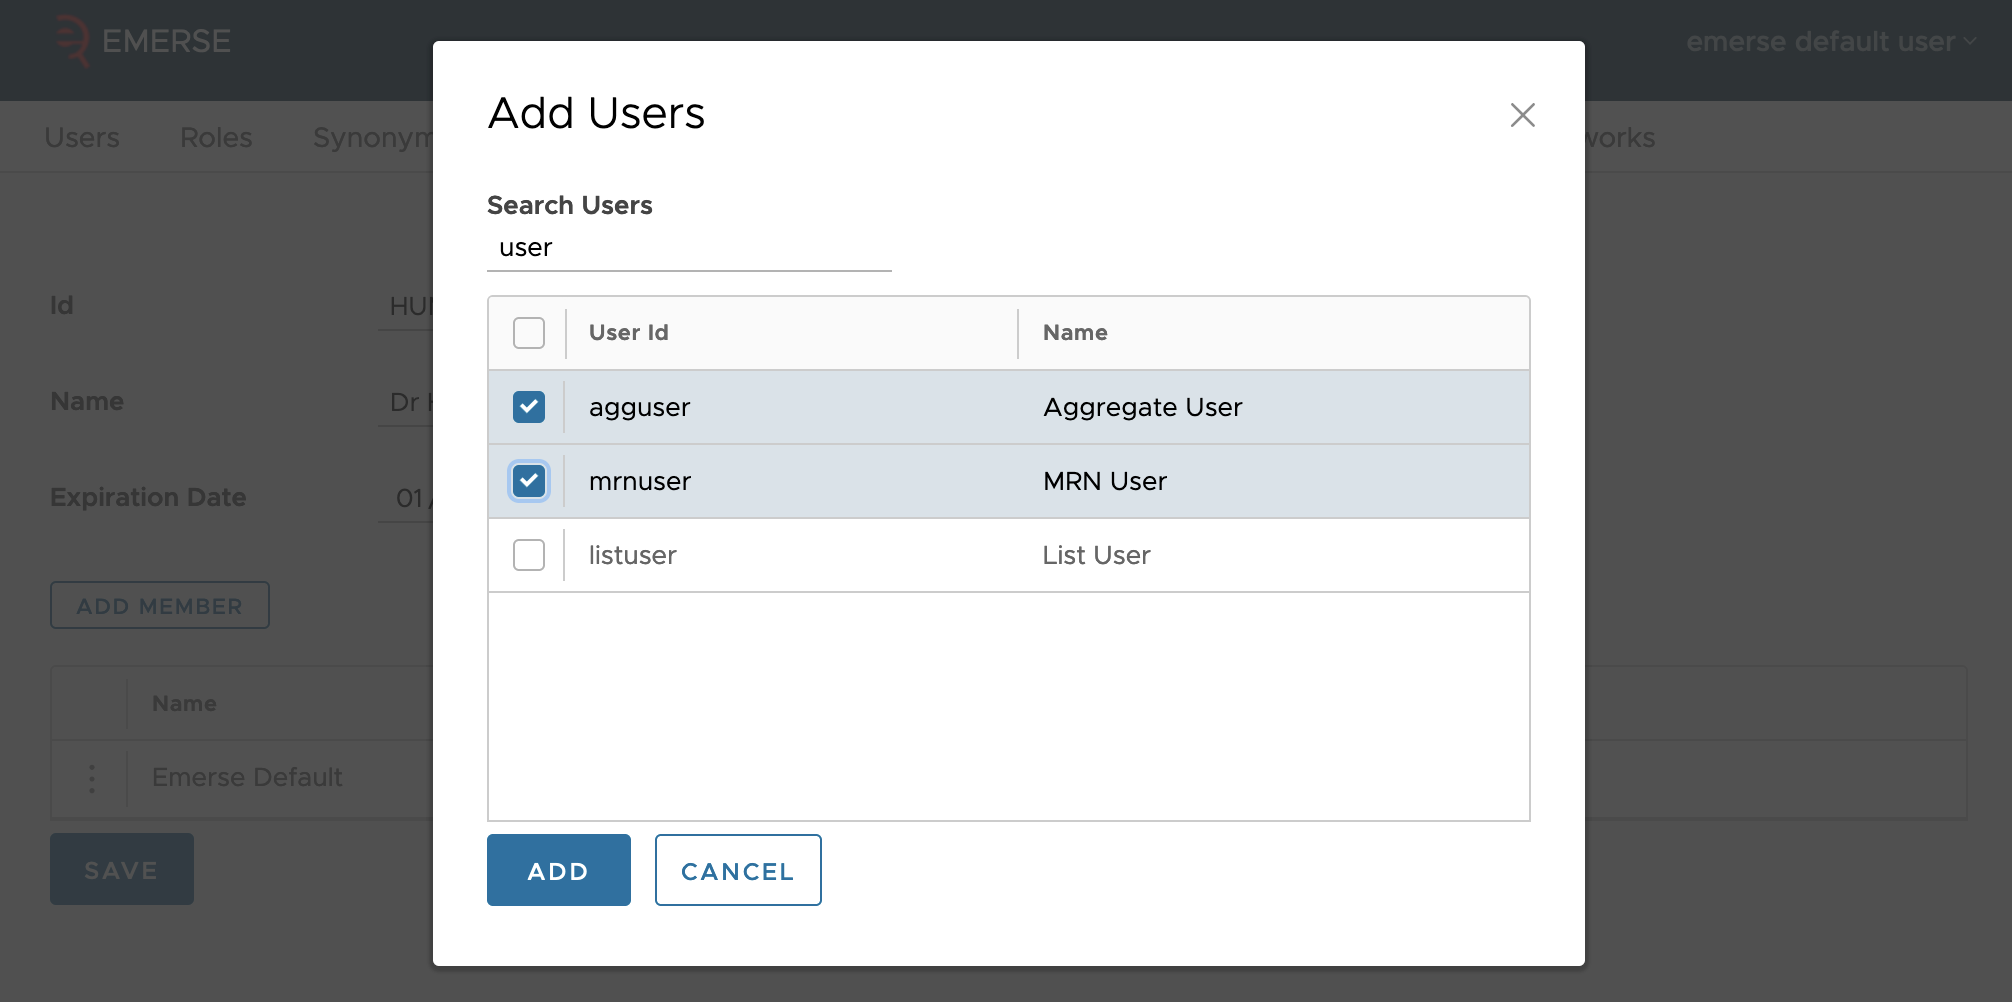
You can also add or remove members from the study in the table. Adding a member will bring up a dialog where you can search by name or user id. Only users who have account in EMERSE already can be added by the interface (though the underlying tables do not require study members to have accounts already).
To remove a user, click on the three dots on their row, and select the remove option. There is no confirmation for removal. You can remove users even if they’ve attested to using EMERSE for the purpose of the study.
System Synchronization
The System tab in the admin app provides a feature to help synchronize components of the system. In general this should not be needed since synchronization automatically occurs once per night. However, when installing the system or troubleshooting it may be useful to force these events to occur immediately so that changes can be verified. To invoke this, simply click on the Synchronize button. Some of these actions may take time, though.
The Synchronize action will:
-
Copy the
Patienttable from the database to thepatientSolr index -
Update document statistics as they are displayed in the UI, such as the number of patients and the date range of the documents. Note that the number of patients displayed in the UI is the number of distinct patients with at least one document in the Solr
documentsindex, not the number of patients in the Patient table.
Additional details about how to check the progress of these synchronization steps can be found in the Troubleshooting Guide.
System Caches
The Caches page under the System tab allows you to force EMERSE to refresh its caches of certain database tables. This is normally done periodically on a "cron job" (see the Configuration Guide), however, during installation, it may be helpful to force a refresh if you made significant changes to the database, but don’t want to restart EMERSE.
Heatmap (Overview) Statistics Page
The Heatmap (now called the Overview within the application) Statistics page under the System tab contains some statistics about the performance of EMERSE to run queries from the "Overview Page" in the EMERSE application. These can be especially slow to run since the queries can be complex and numerous, in addition to the fact that it’s one of the most used parts of EMERSE.
The statistics are split up into a few sections. The only statistics collected are simple minimum, maximum, and average. Some statistics are point-in-time snapshots, but most are cumulative, and can be reset to zero with the "Reset Stats" button. The "Reload Stats" button allows you to update the statistics displayed; they are not live. Reloading the whole page would do the same, but the button is much faster.
The Fair Heatmap Query Scheduler Algorithm
To understand many of the statistics, it’s best to explain the internal scheduling mechanism used to run heatmap queries.
When a user views a page of patients in the Overview table, this triggers the backend to add a batch of overview-table rows to a data structure we call the fair batch heap. All of the rows of a page of the table go into the same batch.
There are then a configurable number of threads that each pull a row from the highest-priority batch in the fair batch heap, and run queries to fill out that row. If there are N columns in the table (ie, N sources), then there are 2N queries done to produce simple counts of matching documents, or N + NC queries done for the mosaic view, where C is the number of colors in the term bundle.
After filling out the row, the thread sends the row to the browser, goes back to the fair batch heap, and re-proirities the batch based on the amount of time it took to fill out the row. It then starts again, pulling a row from the highest-priority batch.
The prioritization of batches is determined by a priority number maintained on the batch. Batches start with zero priority. If a row from a batch takes M milliseconds to fill out, and there are N other batches in the fair batch heap, then the batch that contained the processed row is docked MN priority, and every other batch is given M more priority. If a batch completes but has non-zero priority, it’s remaining priority is distributed evenly between the remaining batches in the fair batch heap. This ensures there is no "drift" from zero of the avarage priority of a batch in the heap. (In the code, this is actually phrased with "penality" which is just negative priority.)
The Statistics
- Batch Heat Statistics
-
These statistics are a point-in-time snapshot of the number of rows in the batches in the heap. In particular, this lets you know how many pages of the overview are being processed concurrently.
- Row Query Time Statistics
-
These statistics are cumulative since the last reset. Each data point is the duration needed to fill out a row. The unit is milliseconds.
- Intra-Batch Service Delay Statistics
-
These statistics are cumulative since the last reset. Since batches are processed in a changing priority order, if there are lot of batches, and if a batch is slow to process, it may be a rather long time before even one row is taken from the batch to be processed. The data points of these statistics are the durations from one row being taken from a batch to the next row being taken from the same batch. Generally, the minimum duration is very low, since at some point multiple threads will grab a row from the same batch roughly simultaneously, especially on the first batch in the heap, when all threads are inactive and grab from the one and only batch in the heap.
- Cancelled Batch Jobs
-
These statistics are cumulative since the last reset. This tracks the number of rows remaining in a batch that was cancelled. It’s mainly here to ensure the cancel mechanism is working, and to show how much work is saved by employing a cancel mechanism. A batch is cancelled if a user changes the search, or after a minute of inactivity from the browser, in the case they closed their browser tab that initiated the search.
- Batch Computation Stats
-
These statistics are a point-in-time snapshot. This section is actually a list of Row Query Time Statistics, but specific to each batch currently in the fair batch heap. The data points are the number of milliseconds it took to process a row from the given batch. If you suspect a single very long-running query is slowing down the system, you should be able to see that from the statistics here.
Clearing out the Demo Data
Under the System tab, there is a section called Clear Demo Data. This page allows you to delete all patients, documents, fields, audit logs, and the demo users from the system in prepreation to customize it for your site. Because this is very dangerous, you must configure a secret (eg, password) in the emerse.properties file first before you can use this feature. It’s recommended to remove that configuration to disable the feature afterward so it’s not configured in production. The secret is configured using the property admin.clearDemoDataSecret in the emerse.properties file. You’ll have to restart EMERSE for this to be picked up. On the page, just provide that same password before clearing the data. You can not clear out certain things by unchecking the boxes in the list beforehand as well. Some items may be dependent on others, and have an error if the dependent items are not cleared out. For instance, if you clear out patients but not patient lists, clearing out patients will fail since patient lists have a foreign key to patients.