Admin page
System administrator functions can be found on the admin page (which is actually a separate application). The administrator page provides mechanisms for adding users, making them active/inactive, adding system-wide synonyms, etc. The page can be found at:
http://host:port/emerse/admin2/
The Admin page can be accessed directly at the URL above with the right credentials (e.g., administrator privileges). Additionally, if the user is logged into the standard EMERSE application and also has administrator privileges then visiting this URL would not require a separate login.
The Admin page page also contains a way to view some of the EMERSE log files, which can be useful for troubleshooting, especially during initial installation. More details about this feature can be found in the Troubleshooting Guide.
User Announcements
EMERSE provides for the capability to have an announcement displayed to users after login (and after completing the Attestation page). This may be helpful if there is a need to communicate something to all users, such as a planned system shutdown. More than one announcement can be shown, and each announcement will be shown to every user until either the user clicks on the Don’t Show Again button or the administrator clears the announcement. If more than one announcement is entered for users, each will be shown in succession (not all together on the same announcement window).
To add an announcement, connect to the database and use the following SQL:
INSERT INTO app_config (ID, ATTRIBUTE, VALUE)
VALUES(app_config_seq.nextval, 'announcement', '<p>Announcement goes here.</p>')
The app_config table stores the announcements to be shown to users. The user_announcment_complete table keeps track of which users have clicked on the Don’t Show Again button for each announcement.
Adding an announcement could also be done by manually entering the information into the table, but it is important to make sure that each ID is unique and not re-used. The announcment_id in the user_announcment_complete table corresponds to the id in the app_config table.
Currently, the best way to remove an announcement is to blank out (null) the announcement text, using something like the following, where the id matches the row where the announcement should be made null:
UPDATE app_config t SET t.value = NULL WHERE t.id = 30Changing a user ID
There may be rare cases in which a user’s User ID has to be changed (for example, someone’s last name has changed leading to a change in the User ID). Such changes can be made from the Administrator page.
| As an admin you can change any User ID other than your own when you are logged in under that specific User ID. |
Internal vs External Authorization
Users can be authenticated via two mechanisms:
-
An internal encrypted password stored in the
LOGIN_ACCOUNTtable -
LDAP authentication external to EMERSE
This can be set, and later changed, on the Administrator page by choosing either Active or Inactive for the switch that allows for "External Authentication (Ldap, etc)".
This result is stored in the EXTERNAL_AUTH column (1, 0) in the LOGIN_ACCOUNT table, and it tells the application what authentication to prefer.
When EMERSE is configured to use LDAP as an authentication source (see the Configuration Guide for how to do this), it is still possible that a user can login if their password matches the encrypted credentials in the password field of the LOGIN_ACCOUNT table. If the EXTERNAL_AUTH flag is set to true (EXTERNAL_AUTH=1), however, the application won’t try to match the user’s credentials against the LOGIN_ACCOUNT table. In other words, when this flag is set to 1, the password field has no impact for the user, and only the external authentication mechanism is used.
Roles and Privileges
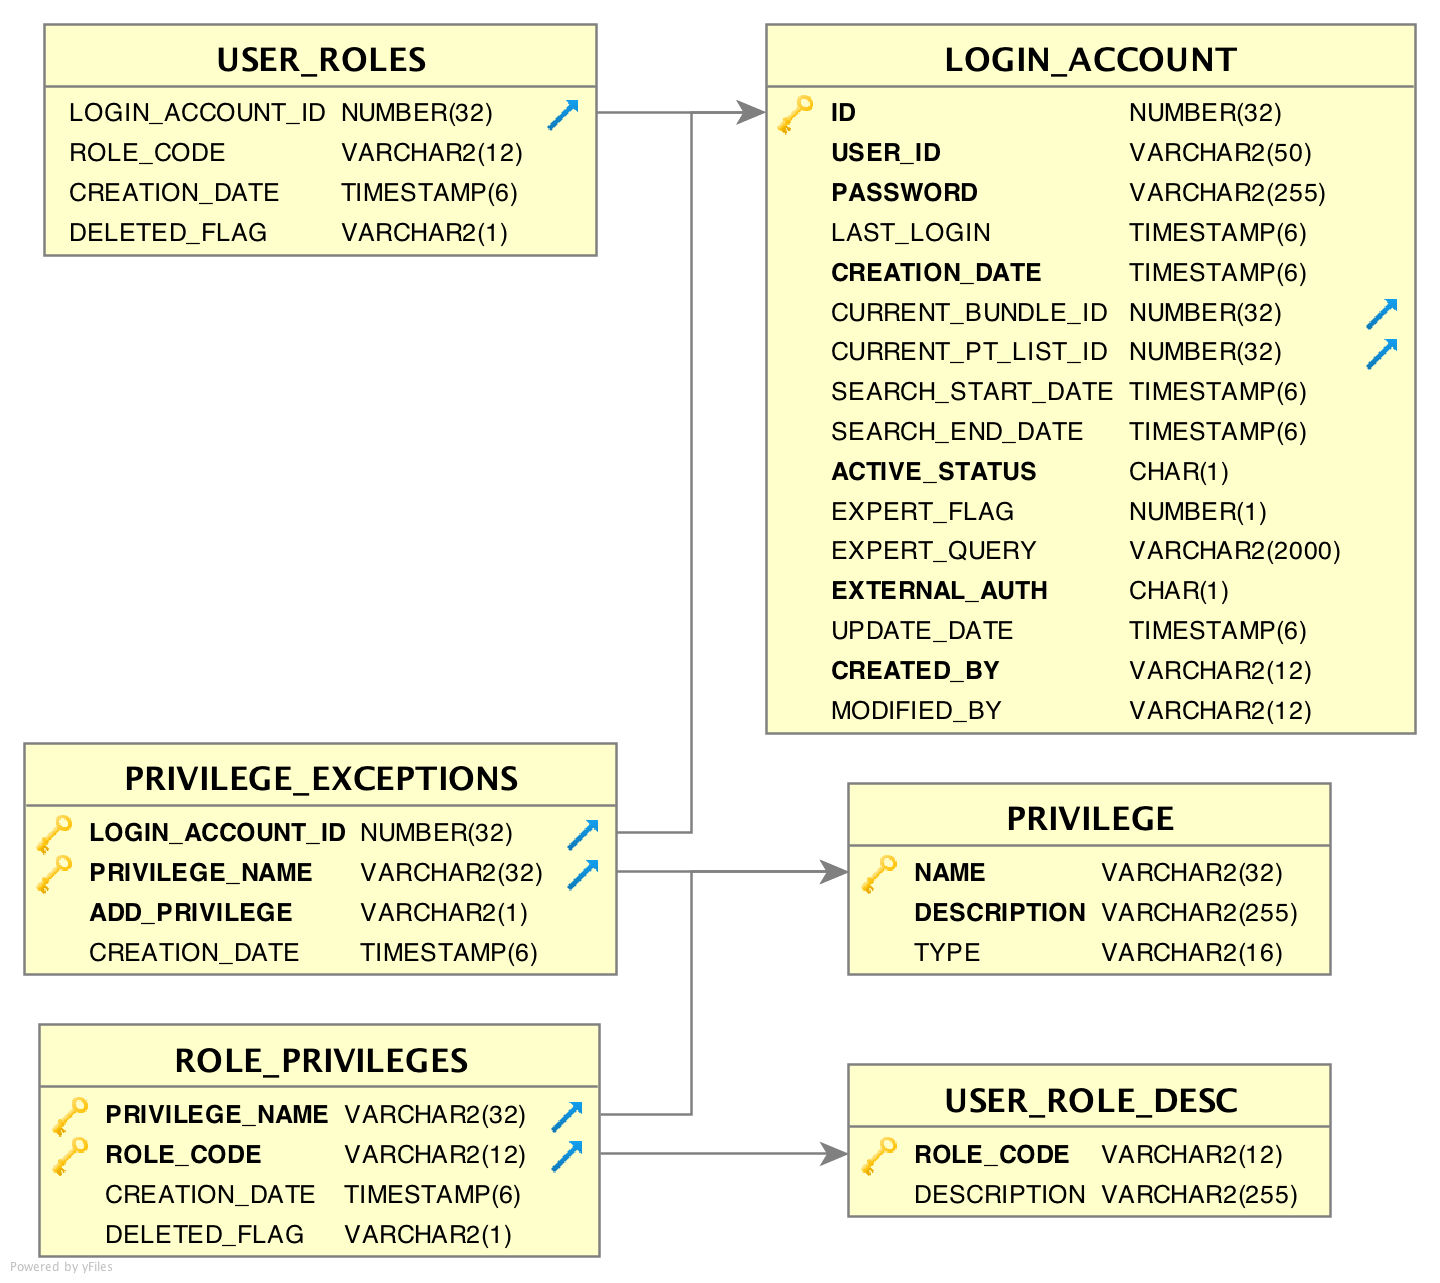
The visibility/accessibility of some user interface elements or features within EMERSE are controlled directly by a user’s set of privileges. Privileges are determined mainly through the users’ roles that are set up in the USER_ROLES table. Each role is mapped system-wide to a set of privileges. The ROLE_PRIVILEGES table contains a full list of possible actions/components/features that are assigned to a specific role in the application.

Table Name |
Purpose/Description |
|
System-defined privileges that give access to certain features or displays of information within EMERSE (e.g., ability to export patient lists). |
|
How specific privileges are assigned to a type of role ( |
|
A way to over-ride individual privileges for a specific user who has been assigned a role with a set of default privileges. Such privileges exceptions can be added or taken away from a user’s set of privileges. |
|
Defines the role(s) a user can have, based on one or more |
|
Descriptions of the roles, used for display on the admin page when selecting the roles a new user will have |
Currently EMERSE has only one role where this is implemented, the “DEFAULT_USER” role. The ROLE_PRIVILEGE table contains a mapping of roles to privileges. For example, the "DEFAULT_USER" role has privileges:
-
NEW_PT_LIST -
EDIT_PT_LIST -
VIEW_ALL_PT_SNIPPETS -
SAVE_ALL_PT_LIST -
EXPORT_PT_LIST
An example of what can be done using this primary "DEFAULT_USER" role is that one could disable all users’ access (assuming no other roles have the same privilege) to exporting patient lists by removing EXPORT_PT_LIST privilege from the ROLE_PRIVILEGE table.
Privileges can also be invoked/revoked for a specific user by adding rows to the PRIVILEGE_EXCEPTIONS table. The ADD_PRIVILEGE column determines whether the privilege will be added to the user, or removed from the user, essentially an over-ride white/black list. Adding N to the ADD_PRIVILEGE column would revoke a user’s existing privilege, whereas adding Y to the column would grant a user that privilege even if their assigned role would not have allowed it.
LOGIN_ACCOUNT_ID |
PRIVILEGE_NAME |
ADD_PRIVILEGE |
CREATION_DATE |
100 |
EXPORT_PT_LIST |
N |
sysdate |
NAME |
DESCRIPTION |
|
Allows user to create a Saved Patient list. This would be a blank Saved Patient List unless the user then added patients to the list. The privilege to add patients to the list is defined by the |
|
Allows user to edit a patient list, which essentially means being able to add new patients to the list (by pasting in a set of medical record numbers or uploading a file of medical record numbers). If this privilege is turned off for a user, that user would still be able to remove patients from any list they currently have access to (it could be shared to them from another user). |
|
Allows user to view snippets from an All Patient Search. These snippets contain the search terms as well as surrounding text from the clinical notes. These snippets are also called Summaries. |
|
Allows user to move a set of patients found from running a search across All Patients to a Temporary Patient list. Access to the Temporary Patient List would give the user access to the patient names, clinical notes, etc, and allows them to search the notes in more details. |
|
Allows user to export a patient list to a password protected Excel file |
As a baseline configuration, EMERSE ships with a ROLE_CODE called DEFAULT_USER and every user that will be using EMERSE should be given that role. This is because that role is defined via the Spring Security Profile (usually located in /tomcat/webapps/emerse/WEB_INF/classes/ in a file called security-ldap.xml or security-noldap.xml). This role is needed to login to EMERSE even if that user has no additional privileges within the application. For example, in the security.xml files you may see lines such as:
<security:intercept-url pattern="/admin.html" access="ROLE_ADMIN" />
<security:intercept-url pattern="/springmvc/admin/**" access="ROLE_ADMIN" />
<security:intercept-url pattern="/springmvc/admin2" access="IS_AUTHENTICATED_ANONYMOUSLY" />
<security:intercept-url pattern="/springmvc/**" access="ROLE_DEFAULT_USER" />
<security:intercept-url pattern="/downloads/**" access="ROLE_DEFAULT_USER" />
The ADMIN and API_USER users who will not (or should not) be using the main EMERSE application do not need to be assigned the DEFAULT_USER role, but they will still need to be assigned either the ADMIN or API_USER roles when creating their account. The ADMIN and API_USER privileges are not defined in the EMERSE privileges tables but rather are only defined in the Spring configuration. Thus, an ADMIN user who does not also have the DEFAULT_USER role would be able to access the admin page after logging in but would not be able to access the main EMERSE application.
|
The default configuration for the EMERSE system is that the DEFAULT_USER has all of the possible standard privileges allowed for that type of user (but does not have the ADMIN or API_USER access). If these standard privileges are not desirable for the typical user of EMERSE, then one can simply remove all of the currently set privileges from the ROLE_PRIVILEGES table by deleting any row that has a privilege associated with the ROLE_CODE for the DEFAULT_USER. Then a new ROLE_CODE can be created with the desired privileges added. (Note, however, that the user must still be associated with the DEFAULT_USER role in the USER_ROLES table in order to login.)
For example, to create a limited access role (which we will name limit_access for this example) where a user is not allowed to create any new patients lists (or add a patient to an existing list), but is allowed to view the text snippets (i.e., Summaries) from an All Patient Search, one can do the following to the baseline configuration:
-
Create a role in the
USER_ROLE_DESCtable calledlimit_accesswith a description such as "Only able to view the All Patient Results Summaries". -
In the
ROLE_PRIVILEGEStable, create a new row withPRIVILEGE_NAMEset toVIEW_ALL_PT_SNIPPETSand a correspondingROLE_CODEset tolimit_access. -
Make sure that any rows in the
ROLE_PRIVILEGEStable related toDEFAULT_USERare deleted (otherwise the user would get those privileges as well). -
Login as an admin, then add a new user and select two roles for the user:
-
Basic role all users must have to access EMERSE
-
Only able to view the All Patient Results Summaries
-
Privilege |
Implication |
|
User can identify a set of patients with an All Patient Search and can see the text Summaries ( |
|
User can identify a set of patients with an All Patient Search and can see the text Summaries ( |
|
User can find a set of patients with an All Patient Search, but will not be able to see the text Summaries ( |
Synonyms
EMERSE supports a type of query expansion we call Synonyms. These are system-suggested concepts that help users conduct a more thorough search. Synonyms can include alternative phrasings, acronyms and abbreviations, misspellings, stemming, related concepts, and more. These system-wide synonyms can be accessed by users but can only be updated by an administrator. There is no need to make your own Synonyms dataset since we can provide one: Details about the Synonyms Collection can be found on the main EMERSE website. On the website you will also find other data sets that have been formatted for importing into EMERSE, including Enesmbl gene names and associated diseases, the Human Phenotype Ontology, and others. You can download these datasets and upload them into EMERSE on the Admin page using the directions below. The directions below also describe how you can make your own Synonyms file, which may be useful if you want to supplement our Synonyms Collection with localized suggestions.
Users can make their own collection of terms by building a Term Bundle, and can incorporate system-suggested Synonyms into their bundles. User-created concepts can be made available to other users through shared Term Bundles but they will not automatically become a part of the system-suggested Synonyms unless they are added by an administrator.
Preparing a synonyms file
To prepare a synonyms file for importing into EMERSE, you simply need to structure the file as a three-column CSV file.
Column 1: A key value that links related concepts together. This can be anything but should be unique for each grouping of concepts.
Column 2: The concept itself. If the concept contains a comma it should be wrapped in double quotes.
Column 3: The Concept Type, of which there are 3:
1 = Regular Synonym
2 = Related Term
3 = Spelling Alternative (which could represent an actual spelling error or a spelling variation).
These three Concept Types are used for categorizing how the suggestions are displayed to users and also how the terms will be matched.
An example Synonyms import file would look like:
1994,endocervical type adenocarcinomas,1
1994,endocervical type adenocarcinoma,1
1994,endocervical adenocarcinomas,1
1994,endocervical adenocarcinoma,1
1994,"adenocarcinoma, endocervical type",1
1994,adenocarcinoma,1
2030,adenomatoid,1
2030,adenomatous polyps,1
2030,adenomatous polyp,1
2030,adenomatous,1
2030,adenomata,1
2030,adenomas,1
2030,adenoma,1
2030,polyps,2
2030,adeomas,3
2030,adeoma,3
2030,ademoa,3
2030,ademoma,3
2030,ademona,3
In the example above, there are two groups of concepts (group 1994, and group 2030). Group 1994 shows that one of the concepts is in double quotes since it contains a comma. Group 2030 also has mix of all three concept types: seven regular Synonyms (Concept Type = 1), one Related Term (Concept Type = 2), and five Spelling Alternatives (Concept Type = 3).
When a user enters a term, EMERSE does the following to determine which synonyms to display:
-
The user-entered term is matched to all Regular synonyms (Concept Type = 1)
-
For all matches, the key values are obtained (a concept may belong to more than one grouping and thus may have more than one key value).
-
All other terms related to the key value(s) are obtained
-
Duplicates are removed
-
The final set is displayed to the user, organized by the three Concept Types, as shown in the figure below

This organizational scheme of three Concept Types allows for some terms to be suggested based on a user-entered term, but supports the ability to have a one-way match to reduce extraneous matching when desired. For example, if the terms entered is 'adenomatous', the term 'polyps' will be displayed as a Related Term (see figure above). However, since in that grouping (group 2030 in the above example) the term 'polyps' is not a Regular concept type (i.e., it is not Concept Type 1 but rather Concept Type 2) then it means that a user-entered search term of 'polyps' will not match to anything in that 2030 grouping. This can be seen in the figure, below, where none of the terms in group 2030 are displayed to the user when 'polyps' is entered as a search term.

Uploading a Synonyms File
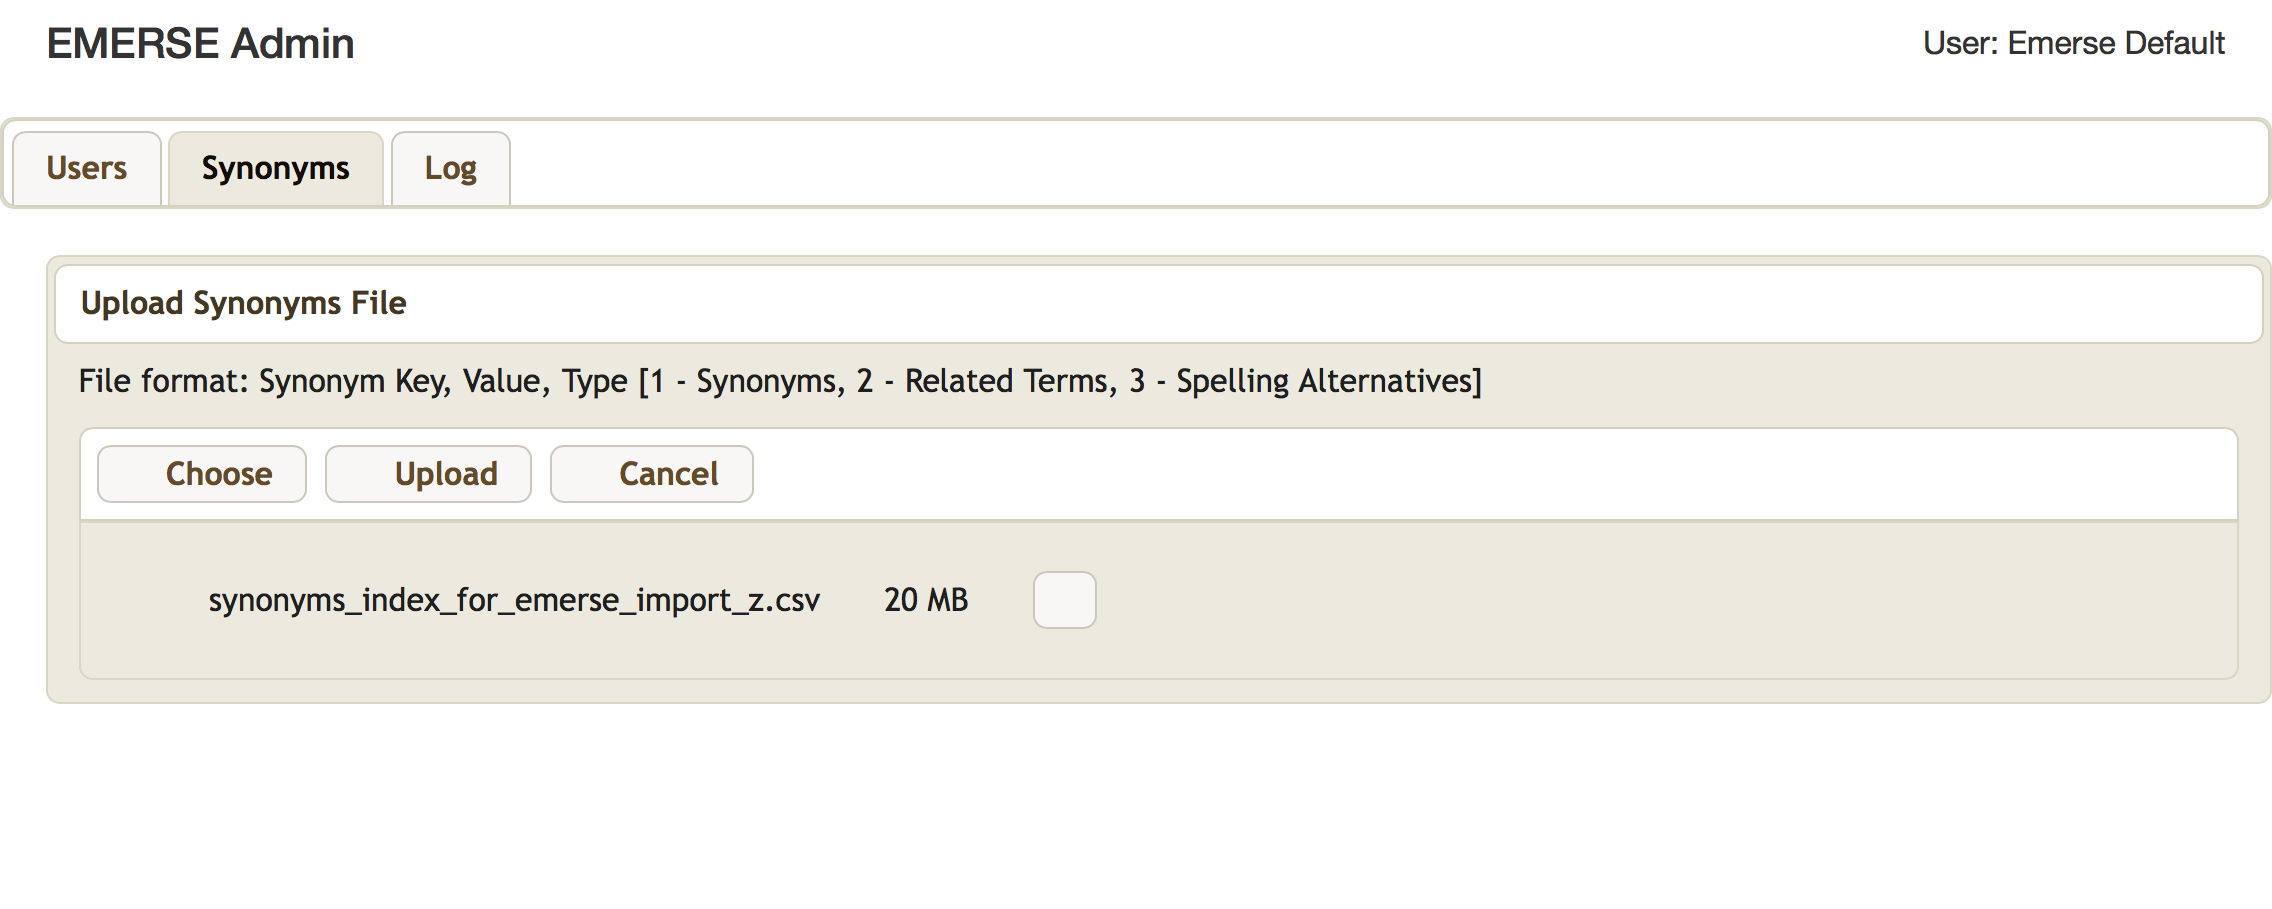
A Synonyms file should be prepared as a 3 'column' CSV file as described above. To upload the file, simply login to the administrator page and choose the Synonyms tab. Then click on the Choose button to select the CSV file. After the file is selected press Upload.

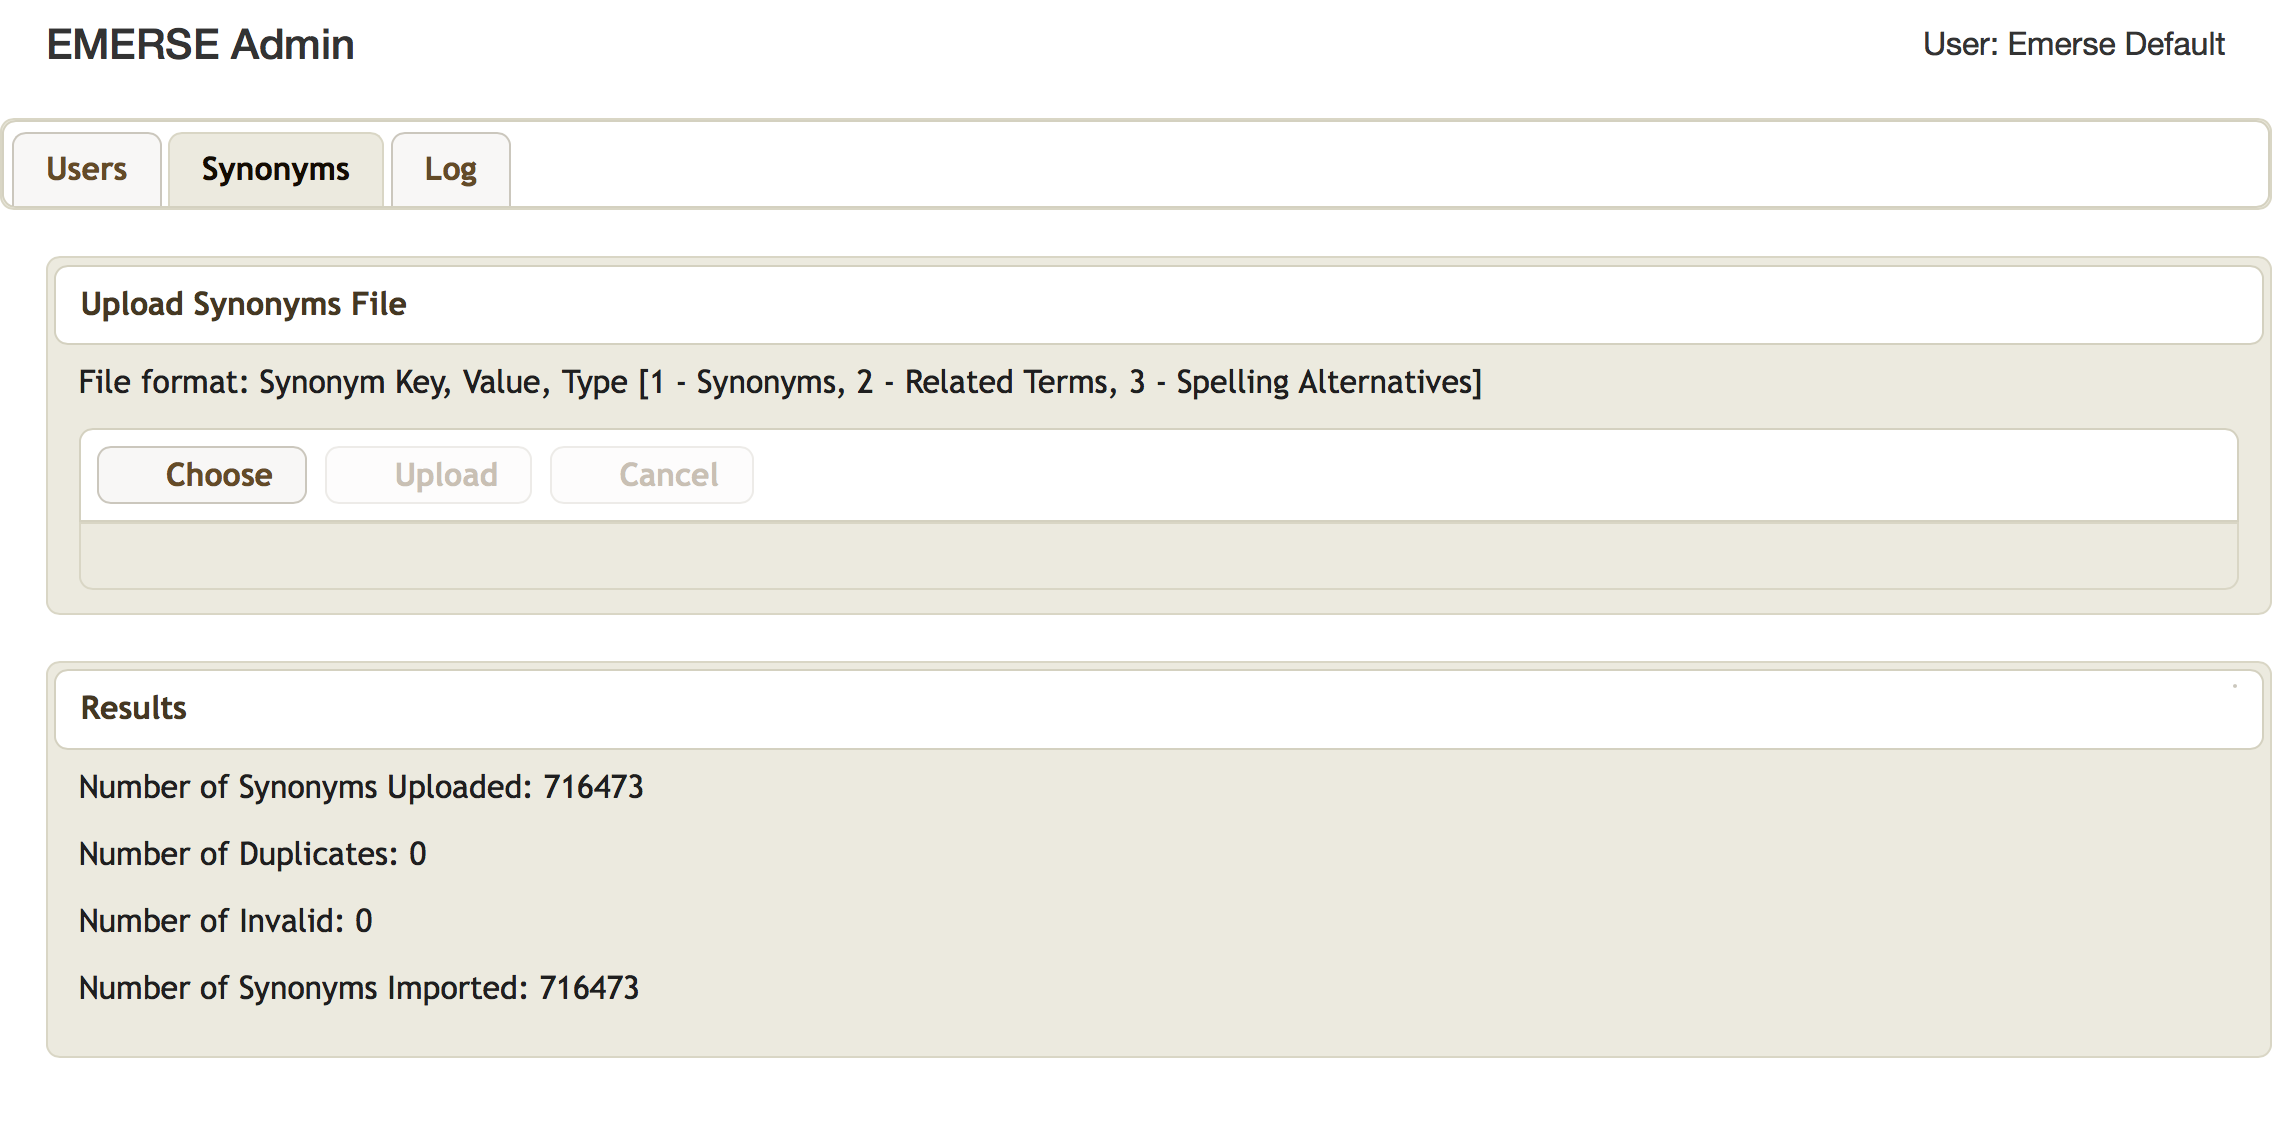
No feedback is provided while the file is loaded, but when it is complete a Results page will be shown, which will report on the total number of rows entered and any errors found, as can be seen in the figure below.

| EMERSE is currently designed to replace all of the synonyms data when uploading a file. There is no append function. |
Software component versions
The EMERSE team tries to keep up with the latest versions of software components, as this is seen as a good approach to ensure security. While some components are installed by each site (e.g., Tomcat, Solr), other components come pre-installed with the EMERSE distribution. One way to check for the versions of these additional components is shown below for Spring and Hibernate:
unzip -l emerse2-4.3.war | grep '/spring.*jar'
unzip -l emerse2-4.3.war | grep '/hibernate.*jar'
Note that the specific version numbers of the war file may change based on the current version of the EMERSE distribution.
