
Admin page
Basic system administrator functions can be found on the admin page (which is actually a separate application). The administrator page provides mechanisms for adding users, making them active/inactive, adding system-wide synonyms, etc. The Admin page page also contains a way to view some of the EMERSE log files, which can be useful for troubleshooting, especially during initial installation. More details about this feature can be found in the Troubleshooting Guide.
The admin page can be accessed after logging into EMERSE and completing the attestation. Then, in the main EMERSE application it can be accessed via the EMERSE menu in the upper right portion of the screen. The Admin option will only appear in the drop down menu if the logged in user has admin privileges.
The admin page can also be accessed directly at the URL below as long as the user has admin privileges.
http://host:port/emerse/admin2/
Adding Users
Users should generally be added to the system via the interface on the Admin page.
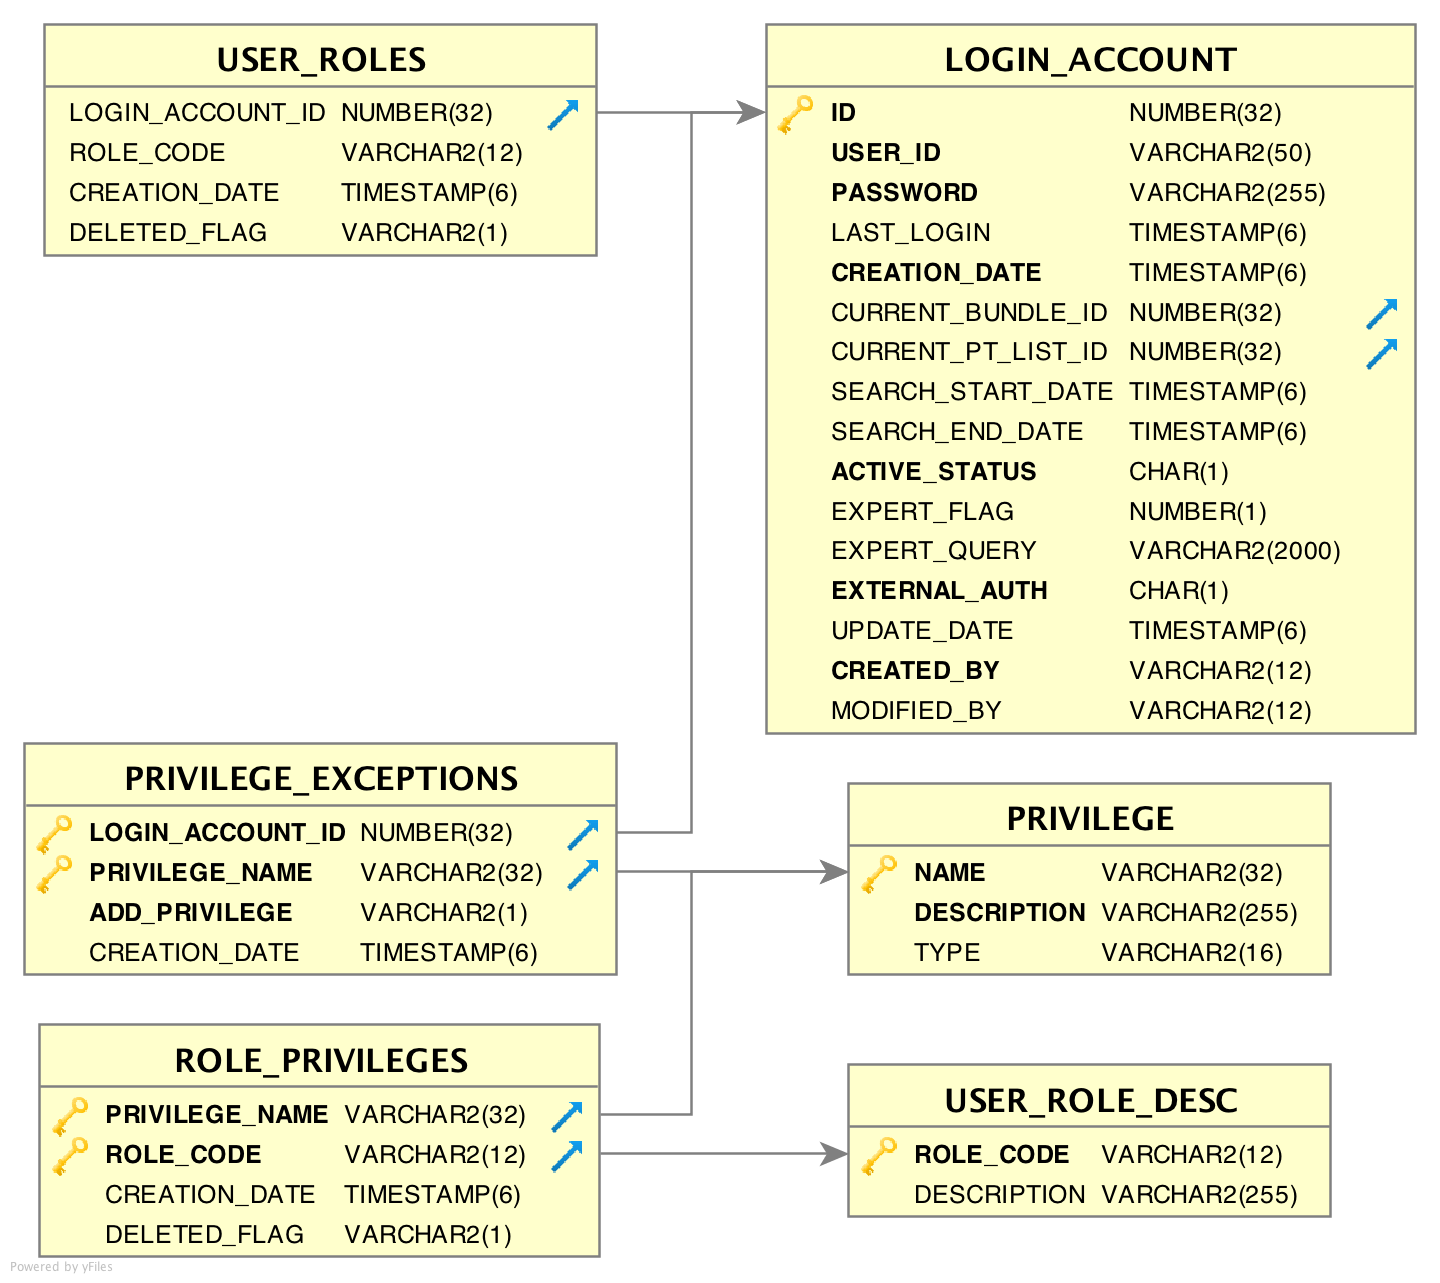
It is also possbile to add users by adding them to the database tables (via a script, for example), but we don’t encourage that since multiple tables need to be updated correctly. For those who want to add users via the tables, the relevant tables are PERSON, PARTY, LOGIN_ACCOUNT, and the associated roles/privilege tables. Users are rows in the PERSON table which must have matching rows in the PARTY and LOGIN_ACCOUNT tables (on PARTY.ID = `PERSON.ID and on PERSON.LOGIN_ACCOUNT_ID = LOGIN_ACCOUNT_ID respectively). The latter table is also how privileges are associated to the users, since it has foreign key in the USER_ROLES table.
If you’re going to programmatically insert rows into those tables, you should use the right sequences for those tables so the app doesn’t try to use the same id you inserted into the table. They are generally the table name followed by _SEQ, such as LOGIN_ACCOUNT_SEQ or PARTY_SEQ. PERSON doesn’t have its own sequence since it has the same ids as the PARTY table so it uses the PARTY_SEQ.
User Announcements
EMERSE provides for the capability to have an announcement displayed to users after login (and after completing the Attestation page). This may be helpful if there is a need to communicate something to all users, such as a planned system shutdown, or an announcement about an updgrade. More than one announcement can be shown, and each announcement will be shown to every user until either the user clicks on the Don’t Show Again button, the administrator clears the announcement, or the announcement "expires". If more than one announcement is entered for users, each will be shown in succession (not all together on the same announcement window).
This feature is now easily accessible in the Admin app under the Alerts section. You can add the text of the alert, as well as the start and stop dates for when the alert should be shown. Basic HTML (line breaks, links, etc) can be included and should be interpreted correctly when displayed to the user. x`
Changing a user ID
There may be rare cases in which a user’s User ID has to be changed (for example, someone’s last name has changed leading to a change in the User ID). Such changes can be made from the Administrator page.
| As an admin you can change any User ID other than your own when you are logged in under that specific User ID. |
Internal vs External Authorization
Users can be authenticated via two mechanisms:
-
An internal encrypted password stored in the
LOGIN_ACCOUNTtable -
LDAP authentication external to EMERSE
This can be set, and later changed, on the Administrator page by choosing either Active or Inactive for the switch that allows for "External Authentication (Ldap, etc)".
This result is stored in the EXTERNAL_AUTH column (1, 0) in the LOGIN_ACCOUNT table, and it tells the application what authentication to prefer.
When EMERSE is configured to use LDAP as an authentication source (see the Configuration Guide for how to do this), it is still possible that a user can login if their password matches the encrypted credentials in the password field of the LOGIN_ACCOUNT table. If the EXTERNAL_AUTH flag is set to true (EXTERNAL_AUTH=1), however, the application won’t try to match the user’s credentials against the LOGIN_ACCOUNT table. In other words, when this flag is set to 1, the password field has no impact for the user, and only the external authentication mechanism is used.
Roles and Privileges
The visibility/accessibility of some user interface elements or features within EMERSE are controlled directly by a user’s set of privileges. Privileges are determined mainly through the users’ roles that are set up in the USER_ROLES table. Each role is mapped system-wide to a set of privileges. The ROLE_PRIVILEGES table contains a full list of possible actions/components/features that are assigned to a specific role in the application.
| Table Name | Purpose/Description |
|---|---|
|
System-defined privileges that give access to certain features or displays of information within EMERSE (e.g., ability to export patient lists). This table should never change. |
|
Lists the roles that exist in the system along with a description of what that role is, used for display on the admin page when selecting the roles a new user will have |
|
Lists the privileges granted to each role. |
|
Lists privileges granted to or revoked from individual users. These "exceptions" are consulted first before a user’s roles are consulted. |
|
Lists the roles of each user in the system. |
Currently EMERSE has only one role where this is implemented, the “DEFAULT_USER” role. The ROLE_PRIVILEGE table contains a mapping of roles to privileges. For example, the "DEFAULT_USER" role has privileges:
-
EDIT_PT_LIST -
EXPORT_PT_LIST -
NEW_PT_LIST -
SAVE_ALL_PT_LIST -
VIEW_ALL_PT_COUNT -
VIEW_ALL_PT_CHARTS -
VIEW_ALL_PT_SNIPPETS -
VIEW_ALL_PT_TRENDS -
ACCESS_EMERSE
An example of what can be done using this primary "DEFAULT_USER" role is that one could disable all users’ access (assuming no other roles have the same privilege) to exporting patient lists by removing EXPORT_PT_LIST privilege from the ROLE_PRIVILEGE table.
Privileges can also be granted to or revoked from a specific user by adding rows to the PRIVILEGE_EXCEPTIONS table. The ADD_PRIVILEGE column determines whether the privilege will be granted to the user (Y), or revoked from the user (N), essentially acting as a blacklist and whitelist. This table is consulted first, and only if there is no entry for the specific user and privilege will the roles be considered. So, if a privilege is revoked here, the user will not have it, even if they have a role that grants it to them.
LOGIN_ACCOUNT_ID |
PRIVILEGE_NAME |
ADD_PRIVILEGE |
CREATION_DATE |
100 |
EXPORT_PT_LIST |
N |
sysdate |
NAME |
DESCRIPTION |
|
Allows user to create a Saved Patient list. This would be a blank Saved Patient List unless the user then added patients to the list. The privilege to add patients to the list is defined by the |
|
Allows user to edit a patient list, which essentially means being able to add new patients to the list (by pasting in a set of medical record numbers or uploading a file of medical record numbers). If this privilege is turned off for a user, that user would still be able to remove patients from any list they currently have access to (it could be shared to them from another user). |
|
Allows users to do an all-patient search. If this privilege is not granted, the entire all-patient search feature is disabled, with a message stating the user does not have permission to search all patients. |
|
Allows the user to view snippets from an All Patient Search. These snippets contain the search terms as well as surrounding text from the clinical notes. These snippets are also called Summaries. |
|
Allows the user to view the demographic charts of an all-patient search. |
|
Allows the user to view the trend chart of an all-patient search. |
|
Allows the user to move a set of patients found from running a search across All Patients to a Temporary Patient list. Access to the Temporary Patient List would give the user access to the patient names, clinical notes, etc, and allows them to search the notes in more details. |
|
Allows the user to export a patient list to a password protected Excel file |
|
Allows the user to access the EMERSE web application itself. If access is not granted, they could still access the admin app or the API (based on other permissions). |
|
Allows the user to access the admininstration application of EMERSE. |
|
Allows the user to access the server API, |
|
Will enable a user to search the network when this feature is complete and released. |
The default configuration for the EMERSE system is that the DEFAULT_USER has all privileges except access to the admin app and the server API. If these standard privileges are not desirable for the typical user of EMERSE, then one can simply remove the undesired privileges from the ROLE_PRIVILEGES table.
Alternately, you can create a new role by adding a row to the USER_ROLE_DESC table, and associate the wanted privileges with that role by adding rows to the ROLE_PRIVILEGES table. You can then assign users that role in the admin app. To do so, navigate to the users tab, find the user by name in the table, and click edit. This will bring you to a page that has a few checkboxes whose text matches the description of the role in the USER_ROLE_DESC table. Select the checkboxes for the roles you want the user to have. You can also add or remove roles to users in the database directly by changing the USER_ROLES table.
Granted privileges |
Implication |
|
User can identify a set of patients with an All Patient Search and can see the text Summaries ( |
|
User can identify a set of patients with an All Patient Search and can see the text Summaries ( |
|
User can find a set of patients with an All Patient Search, but will not be able to see the text Summaries ( |
|
The user can only search patient lists they are given permission to. This is the most locked-down role. |
|
This configures an administer role. Administrators can add and edit users and roles, and assign roles to users. Users with a role with such permissions cannot access EMERSE itself (so they cannot do any kind of search with EMERSE, but being an administrator, they can give themselves that permission). |
|
This configures a service role. Users in this role can access the server endpoints under |
Role Page
Inside the admin app there is now a role page, which allows administrators to create and edit roles. This makes it much easier to set up roles for a new installation of EMERSE, or when a new use-case comes along. Privilege exceptions are not able to be configured in this page however.
In the role page, you see a table whose rows are the roles. The columns are the privileges. Since there are a lot of privileges, this table will probably need to be scrolled horizontally on most screens. A check in a cell indicates the role of that row is granted the privilege of the column. You can freely check and uncheck the checkboxes in the table to alter the permissions of the roles. These are saved automatically.
Other than the privileges assigned to a role, a role consists of two parts: a code, and a description. The description is shown in the page for editing a user, and the code is shown in the table of this page (since it is shorter). Currently, the name of a role cannot be changed, and roles cannot be deleted. However, the description of a role can be changed. To edit the dsecription of a role, click on the dots in the first column of a row, then the "Edit" item that pops up. In the future, we may implement deletion of roles, or editing the name of a role, so more options may appear in that pop-up menu.
New roles can be created by clicking the "Add Role" button.
You can still edit roles by directly changing the database tables (including deleting roles are changing the code), but this interface was added to make it easier to understand permissions associated with roles, and to make it easy to craft new roles.
Synonyms
EMERSE supports a type of query expansion we call Synonyms. These are system-suggested concepts that help users conduct a more thorough search. Synonyms can include alternative phrasings, acronyms and abbreviations, misspellings, stemming, related concepts, and more. These system-wide synonyms can be accessed by users but can only be updated by an administrator. There is no need to make your own Synonyms dataset since we can provide one: Details about the Synonyms Collection can be found on the main EMERSE website. On the website you will also find other data sets that have been formatted for importing into EMERSE, including Enesmbl gene names and associated diseases, the Human Phenotype Ontology, and others. You can download these datasets and upload them into EMERSE on the Admin page using the directions below. The directions below also describe how you can make your own Synonyms file, which may be useful if you want to supplement or replace our Synonyms Collection with localized suggestions.
Users can make their own collection of terms using the Saved Terms feature (previously called a Term Bundle), and can incorporate system-suggested Synonyms into their bundles. User-created concepts can be made available to other users through the Saved Terms sharing feature but they will not automatically become a part of the system-suggested Synonyms unless they are added by an administrator.
Preparing a synonyms file
To prepare a synonyms file for importing into EMERSE, you simply need to structure the file as a three-column CSV file.
Column 1: A key value that links related concepts together. This can be anything but should be unique for each grouping of concepts.
Column 2: The concept itself. If the concept or phrase contains a comma the entire concept/phrase should be wrapped in double quotes.
Column 3: The Concept Type, of which there are 3:
-
Regular Synonym
-
Related Term
-
Spelling Alternative (which could represent an actual spelling error or a spelling variation)
These three Concept Types are used for categorizing how the suggestions are displayed to users and also how the terms will be matched.
| The maximum length of each synonym entry is 255 characters, not including the key value or the concept type. This constraint is set by the database, so to go beyond that limit the database would need to be modified. |
An example Synonyms import file would look like:
1994,endocervical type adenocarcinomas,1
1994,endocervical type adenocarcinoma,1
1994,endocervical adenocarcinomas,1
1994,endocervical adenocarcinoma,1
1994,"adenocarcinoma, endocervical type",1
1994,adenocarcinoma,1
2030,adenomatoid,1
2030,adenomatous polyps,1
2030,adenomatous polyp,1
2030,adenomatous,1
2030,adenomata,1
2030,adenomas,1
2030,adenoma,1
2030,polyps,2
2030,adeomas,3
2030,adeoma,3
2030,ademoa,3
2030,ademoma,3
2030,ademona,3
In the example above, there are two groups of concepts (group 1994, and group 2030). Group 1994 shows that one of the concepts is in double quotes since it contains a comma. Group 2030 also has mix of all three concept types: seven regular Synonyms (Concept Type = 1), one Related Term (Concept Type = 2), and five Spelling Alternatives (Concept Type = 3).
When a user enters a term, EMERSE does the following to determine which synonyms to display:
-
The user-entered term is matched to all Regular synonyms (Concept Type = 1)
-
For all matches, the key values are obtained (a concept may belong to more than one grouping and thus may have more than one key value).
-
All other terms related to the key value(s) are obtained
-
Duplicates are removed
-
The final set is displayed to the user, organized by the three Concept Types, as shown in the figure below
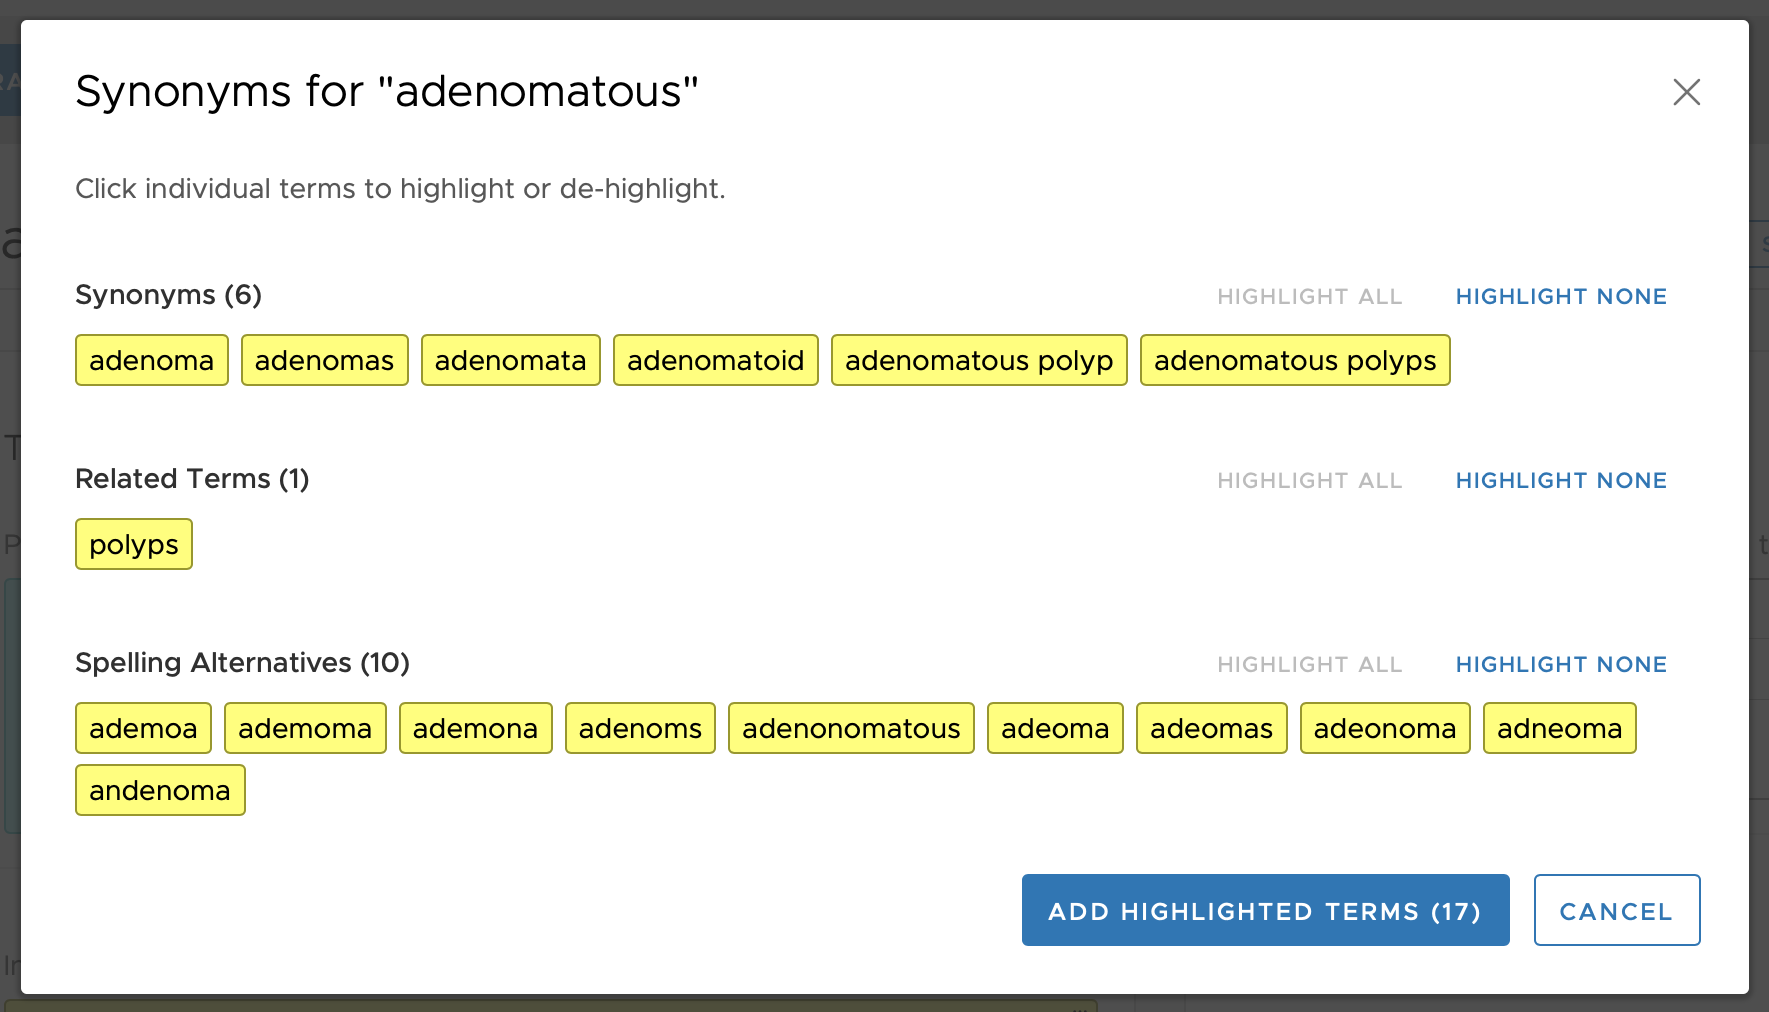
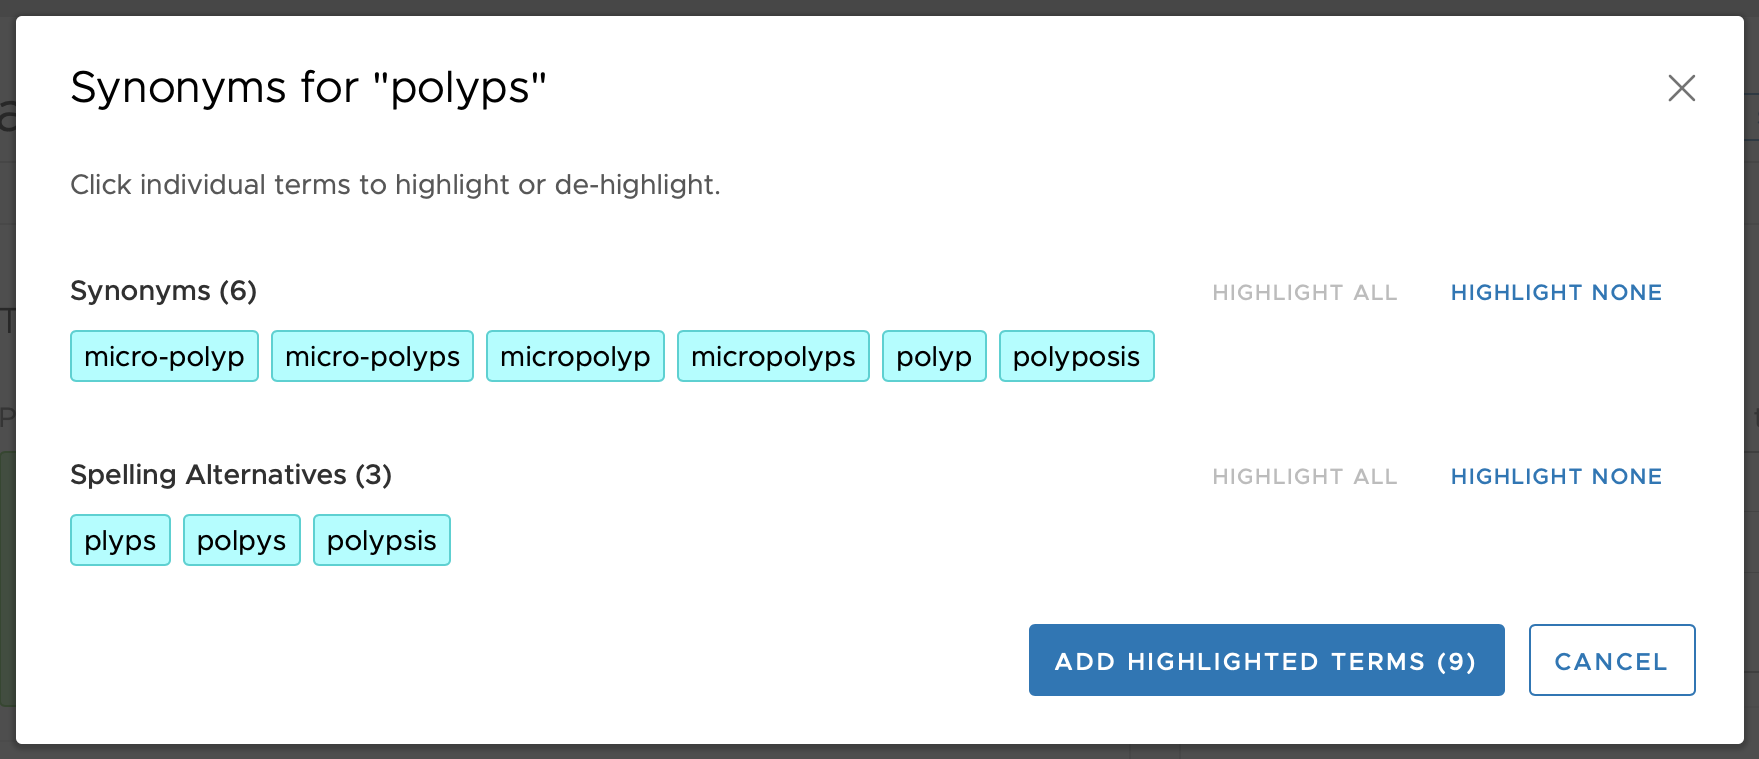
This organizational scheme of three Concept Types allows for some terms to be suggested based on a user-entered term, but supports the ability to have a one-way match to reduce extraneous matching when desired. For example, if the terms entered is 'adenomatous', the term 'polyps' will be displayed as a Related Term (see figure above). However, since in that grouping (group 2030 in the above example) the term 'polyps' is not a Regular concept type (i.e., it is not Concept Type 1 but rather Concept Type 2) then it means that a user-entered search term of 'polyps' will not match to anything in that 2030 grouping. This can be seen in the figure, below, where none of the terms in group 2030 are displayed to the user when 'polyps' is entered as a search term.
Uploading a Synonyms File
A Synonyms file should be prepared as a 3 'column' CSV file as described above. To upload the file, simply login to the administrator page and choose the Synonyms tab. Then click on the Choose button to select the CSV file. After the file is selected press Upload.
No feedback is provided while the file is loaded and verified, but when it is complete a Results page will be shown, which will report on the total number of rows entered and any errors found, as can be seen in the figure below.
EMERSE is currently designed to replace all of the synonyms data when uploading a file. There is no append function.
| The feedback for problems with uploading the synonyms file is limited. If feedback is provided that the CSV file is invalid, it may be because the file is invalid but it may also be because there were problems with the database (such as no space left). |
System error logs
The Log tab in the EMERSE admin page is a good place to look if you are running into problems. It will show any recent errors that are appearing in the system logs (which are different from the audit logs stored in the database). More details about troubleshooting can be found in the Troubleshooting Guide.
System Synchronization
The System tab in the admin app provides a feature to help synchronize components of the system. In general this should not be needed since synchronization automatically occurs once per night. However, when installing the system or troubleshooting it may be useful to force these events to occur immediately so that changes can be verified. To invoke this, simply click on the Synchronize button. Some of these actions may take time, though.
The Synchronize action will:
-
Copy the
Patienttable from the database to the masterpatientSolr index -
Replicate the master
patientSolr index to thepatient-slaveSolr index -
Update document statistics as they are displayed in the UI, such as the number of patients and the date range of the documents. Note that the number of patients displayed in the UI is the number of distinct patients with at least one document in the Solr
documentsindex, not the number of patients in the Patient table.
Additional details about how to check the progress of these synchronization steps can be found in the Troubleshooting Guide.
System Caches
The Caches page under the System tab allows you to force EMERSE to refresh its caches of certain database tables. This is normally done periodically on a "cron job" (see the link:config_guide.html), howveer, during installation, it may be helpful to force it if you made significant changes to the database, but don’t want to restart EMERSE.
Heatmap Statistics Page
The Heatmap Statistics page under the System tab contains some statistics about the performance of EMERSE to run queries from the "Overview Page" in the EMERSE application. These can be especially slow to run since the queries can be complex and numerous, in addition to the fact that it’s one of the most used parts of EMERSE.
The statistics are split up into a few sections. The only statistics collected are simple minimum, maximum, and average. Some statistics are point-in-time snapshots, but most are cumulative, and can be reset to zero with the "Reset Stats" button. The "Reload Stats" button allows you to update the statistics displayed; they are not live. Reloading the whole page would do the same, but the button is much faster.
The Fair Heatmap Query Scheduler Algorithm
To understand many of the statistics, it’s best to explain the internal scheduling mechanism used to run heatmap queries.
When a user views a page of patients in the Overview table, this triggers the backend to add a batch of overview-table rows to a data structure we call the fair batch heap. All of the rows of a page of the table go into the same batch.
There are then a configurable number of threads that each pull a row from the highest-priority batch in the fair batch heap, and run queries to fill out that row. If there are N columns in the table (ie, N sources), then there are 2N queries done to produce simple counts of matching documents, or N + NC queries done for the mosaic view, where C is the number of colors in the term bundle.
After filling out the row, the thread sends the row to the browser, goes back to the fair batch heap, and re-proirities the batch based on the amount of time it took to fill out the row. It then starts again, pulling a row from the highest-priority batch.
The prioritization of batches is determined by a priority number maintained on the batch. Batches start with zero priority. If a row from a batch takes M milliseconds to fill out, and there are N other batches in the fair batch heap, then the batch that contained the processed row is docked MN priority, and every other batch is given M more priority. If a batch completes but has non-zero priority, it’s remaining priority is distributed evenly between the remaining batches in the fair batch heap. This ensures there is no "drift" from zero of the avarage priority of a batch in the heap. (In the code, this is actually phrased with "penality" which is just negative priority.)
The Statistics
- Batch Heat Statistics
-
These statistics are a point-in-time snapshot of the number of rows in the batches in the heap. In particular, this lets you know how many pages of the overview are being processed concurrently.
- Row Query Time Statistics
-
These statistics are cumulative since the last reset. Each data point is the duration needed to fill out a row. The unit is milliseconds.
- Intra-Batch Service Delay Statistics
-
These statistics are cumulative since the last reset. Since batches are processed in a changing priority order, if there are lot of batches, and if a batch is slow to process, it may be a rather long time before even one row is taken from the batch to be processed. The data points of these statistics are the durations from one row being taken from a batch to the next row being taken from the same batch. Generally, the minimum duration is very low, since at some point multiple threads will grab a row from the same batch roughly simultaneously, especially on the first batch in the heap, when all threads are inactive and grab from the one and only batch in the heap.
- Cancelled Batch Jobs
-
These statistics are cumulative since the last reset. This tracks the number of rows remaining in a batch that was cancelled. It’s mainly here to ensure the cancel mechanism is working, and to show how much work is saved by employing a cancel mechanism. A batch is cancelled if a user changes the search, or after a minute of inactivity from the browser, in the case they closed their browser tab that initiated the search.
- Batch Computation Stats
-
These statistics are a point-in-time snapshot. This section is actually a list of Row Query Time Statistics, but specific to each batch currently in the fair batch heap. The data points are the number of milliseconds it took to process a row from the given batch. If you suspect a single very long-running query is slowing down the system, you should be able to see that from the statistics here.
Software component versions
The EMERSE team tries to keep up with the latest versions of software components, as this is seen as a good approach to ensure security. While some components are installed by each site (e.g., Tomcat, Solr), other components come pre-installed with the EMERSE distribution. One way to check for the versions of these additional components is shown below for Spring and Hibernate:
unzip -l emerse2-4.3.war | grep '/spring.*jar'
unzip -l emerse2-4.3.war | grep '/hibernate.*jar'
Note that the specific version numbers of the war file may change based on the current version of the EMERSE distribution.
Index Optimization
EMERSE uses Apache Solr for indexing documents. Over time the index can become more fragmented and less efficient. This issue can be addressed by optimizing the index periodically. Index optimization is time- and space-intensive, so we recommend doing this about once every 3-4 months. Additional details can be found in the Configuration and Optimization Guide.
Audit logs
EMERSE maintains persistent audit logs of user activities, including logins, attestations (reasons for use with each session), patients/notes viewed, and search terms, among other actions. While reports are not currently built into the interface, you can access these logs via the database. We have several prebuilt SQL queries that can be found in the Reporting and Auditing Guide.
Each user’s set of search terms is captured in the audit logs, and these are the actual terms used. In other words, the terms are not referenced back to original sources (such as the Synonyms suggestions), which means that updating or changing the system-wide Synonyms will not affect the ability to retrieve or interpret existing search terms in the audit logs.
Some items are not captured in the audit logs, including any comments or tags (used for annotating the patients lists) affiliated with a Saved Patient List.
Analytics/Activity Tracking
As of version 4.8.1, EMERSE tracks user activity behind the scenes, which can help with determining what features are being used most, which are not being used, and the order in which users are moving through the system. These activities are recorded using two tables: USER_ACTION and USER_ACTION_LOG. The former (USER_ACTION) describes the 'actions' that a user can make, and the second (USER_ACTION_LOG) captures the actions for each user with time stamps.
The following information is logged:
-
User Action
-
User ID
-
HTTP_SESSION_KEY
-
ACTION_DATE
-
Name
-
Action
-
Feature
-
CONTEXT
-
SUBCONTEXT