
Overview
This guide contains additional considerations that one might want to address regarding the ongoing operation of EMERSE. A few considerations regarding deployment are covered as well.
Determining how much data to load
One important consideration for EMERSE is how much data should be loaded into the system, or how far back in time the data should be loaded. This will depend entirely on the institutional requirements for its use, but a few things should be considered. First, EMERSE can organize data by source systems, so if you have older, legacy data, then those data can be loaded as its own source. Second, because it is a search engine, adding more data is easy because EMERSE should have no problem searching through the extra data—in fact, that is what a search engine is meant to do. Because it is hard to predict future data needs, and because of the small incremental effort for loading additional data, unless there are reasons not to load all of the available data, it would be a good idea to make it all available for the users.
Determining how much data for an initial pilot
Several sites have asked about how much data should be loaded for an initial pilot of EMERSE. For a variety of reasons, sites may not want to load all of the data at first, especially when including just a small subset of users to try out the system. In such a situation it may be important to first determine who those users might be and what their data needs are. For example, should all data for a small subset of patients be loaded into the system? Or should 1 or 2 years of data for all patients be loaded into the system? One important consideration if choosing the latter option is what the implications might be if older data are not loaded for a patient. In such a case, it might be problematic if a user searched a patient, found nothing, and then assumed the disease or condition didn’t exist for the patient because the older documents mentioning the condition were not loaded. Whatever decision is made, it should be made clear to the users what the implications are based on the type, volume, and time frame of the data that were loaded (versus what was intentionally left out).
Including document metadata or structured data
EMERSE is meant to search the free text from documents. With the Advanced Terms feature it may be possible to search additional metadata if the data are loaded properly into the Solr indexes. However, for many users it may be even more valuable to append additional metadata or structured data to the document itself, making those elements searchable even if those data were not initially created to be a part of the original document. For example, it might be useful to append the current medication list or problem list to the document before it is sent to Solr for indexing. It might also be useful to provide billing codes, the name of the clinician who authored the note, etc. By doing so this additional information becomes a searchable part of the document and thus easy for users to find with standard EMERSE searches.
For example, in the text below all of the text preceding "Clinical Text:" could have come from structured data and just appended (pre-pended) to the beginning of the note to provide additional searchable text about the clinical encounter. Such choices will have to be institution-specific but additional data will likely be of great value to users.
Clinician: John A Doe
Document Type: Outpatient Progress Note

Current Medication List:
1. acetaminophen 200 mg every six hours
2. atorvastatin 20 mg every day
3. fluoxetine 40 mg daily in the morning

Current Problem List:
1. Hypertension
2. Hyperlipidemia
3. Depression
4. Back pain, chronic

Billing codes for this visit:
1. G89.29  (Other chronic pain)
2. E78.5: (Hyperlipidemia, unspecified)

Clinical Text:

John Doe is a 57 year old male with a history of hypertension, back pain, depression, and high cholesterol.  He came to clinic today to discuss his back pain that has been getting worse over the last two weeks...
Signed/completed documents
An important decision to make regarding adding documents for indexing relates to whether or not incomplete, or unsigned, documents should be included. Generally, once a document is signed it can no longer be changed, although it can be addended. Unsigned, or incomplete, documents can be provisional and may require further editing or review by the clinician to make corrections or to include additional information. Including unsigned/incomplete documents means that they might be available to EMERSE users faster than their signed/completed counterparts, but the trade-off is that the users may be looking at provisional notes that could contain inaccuracies that would later be corrected before the clinician finalized and signed the document. While there are no specific guidelines about the best approach, these trade-off should be considered carefully when making the decision on what notes to include or exclude. At Michigan Medicine, only signed documents are included within EMERSE.
Index update frequency
Users often want to know how quickly a document will be available in EMERSE once it has been created within the EHR. This will depend partly on your process for moving documents from the EHR to EMERSE, or from the EHR to an intermediate data repository, and then from the repository to EMERSE. At Michigan Medicine we update the index once each day, around 3 AM. This means that a document that arrives in our document repository shortly after the indexing process is complete might sit unindexed for almost a day before it was available within EMERSE. For some users this delay might not matter, but it will be important to make sure users are aware of possible delays in document availability within EMERSE, and to make sure that such delays are acceptable for the intended uses. There is nothing to prevent more frequent, incremental indexing from occurring, but it will be important to make sure that the hardware available can handle indexing updates and concurrent use during the day.
There is no separate command to index a document once its been sent to Solr. There is a concept of "commit" such that updates may not happen immediately unless a commit is added to the update. Generally Solr decides when enough data or updates have been sent that it is worth a commit.
Merges/Splits
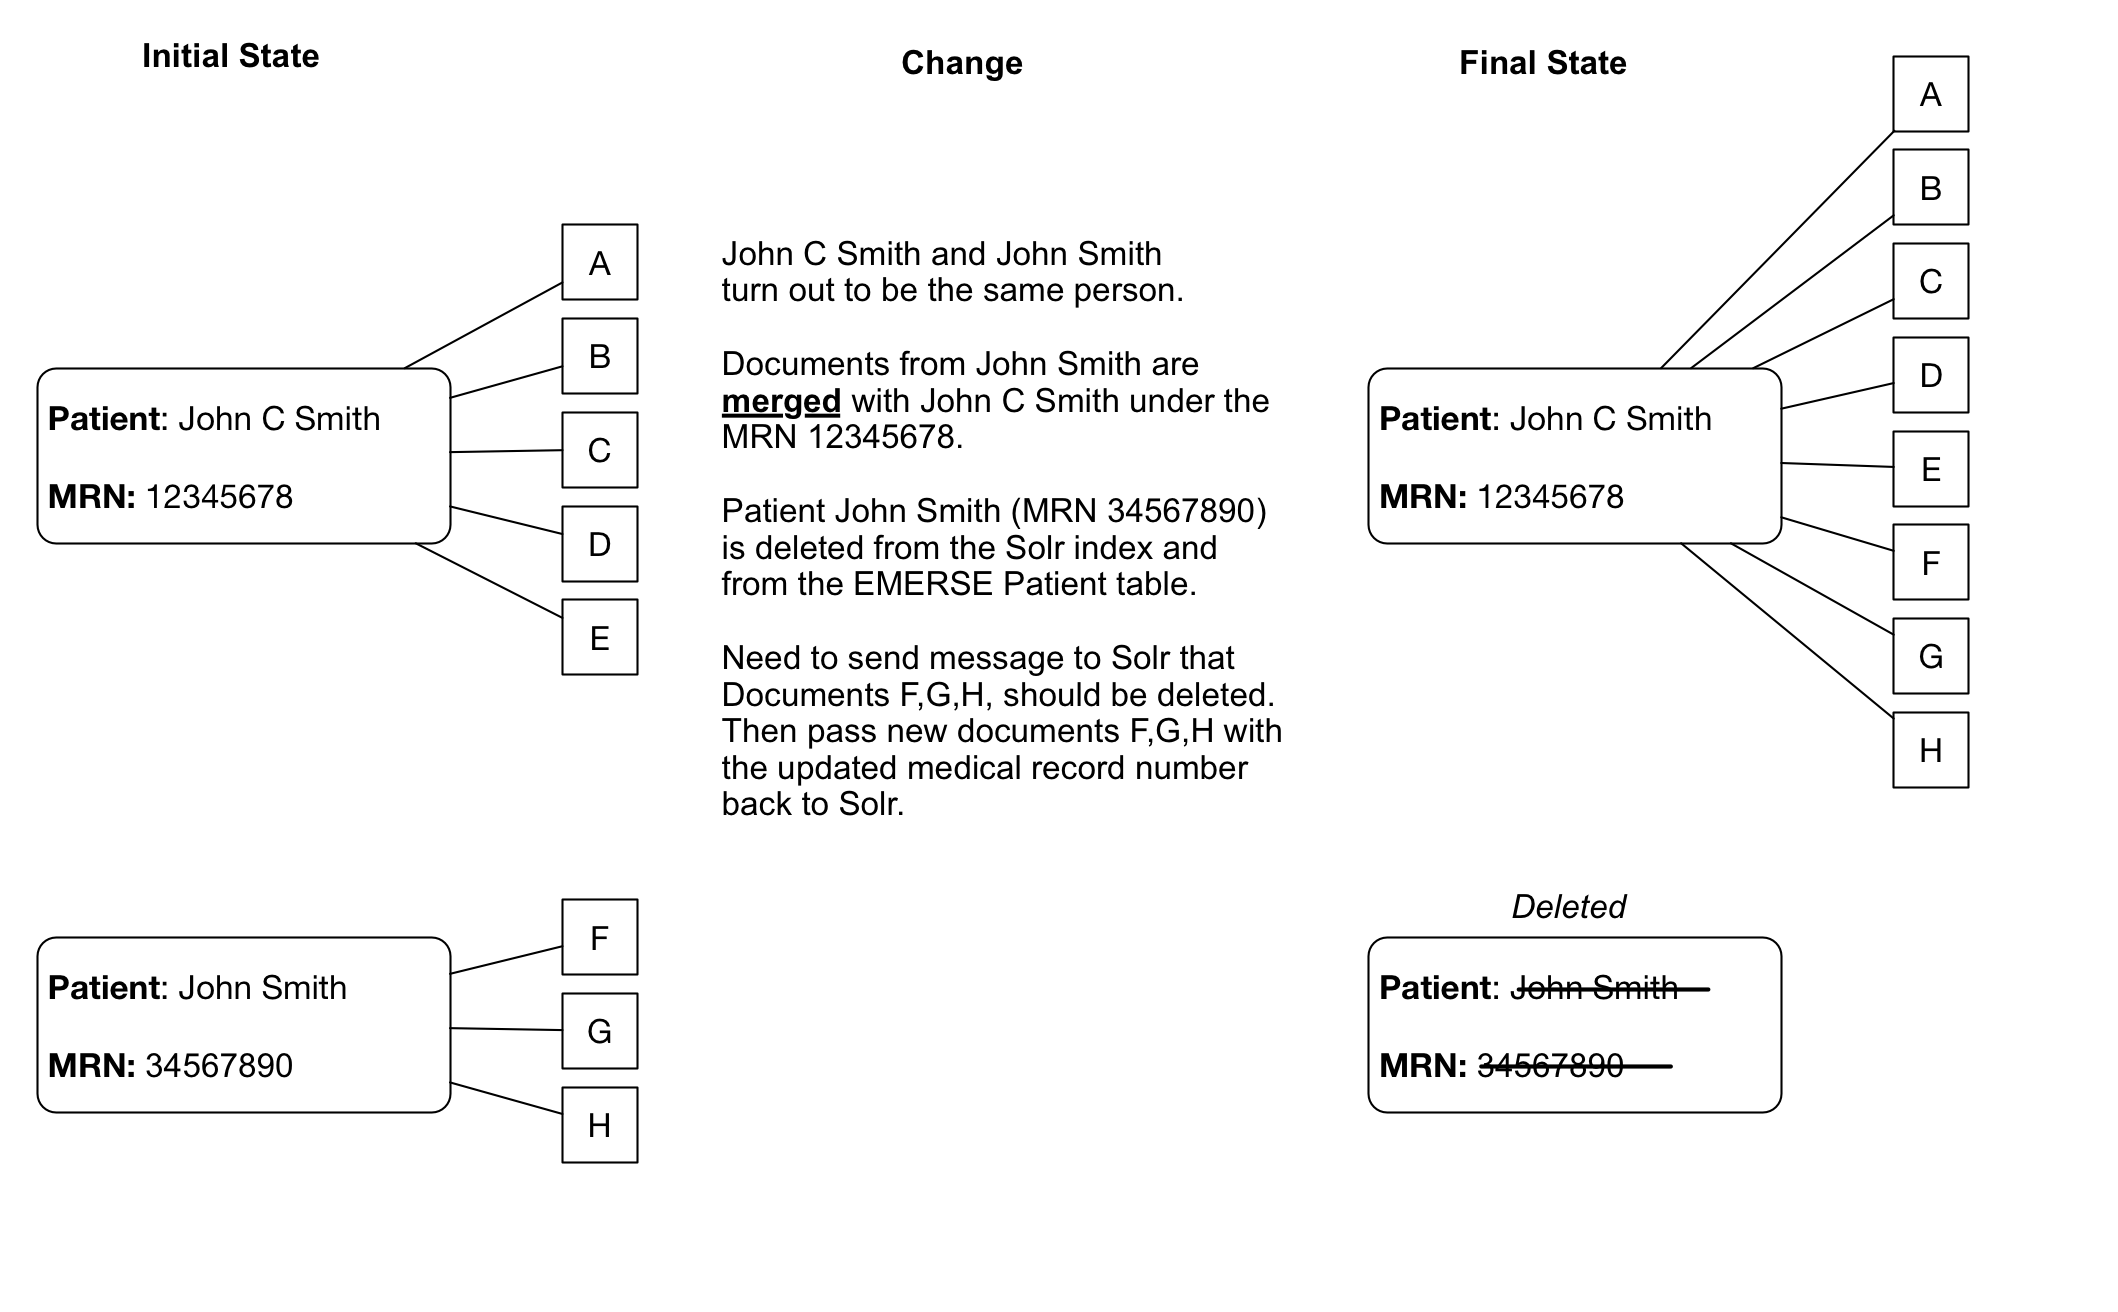
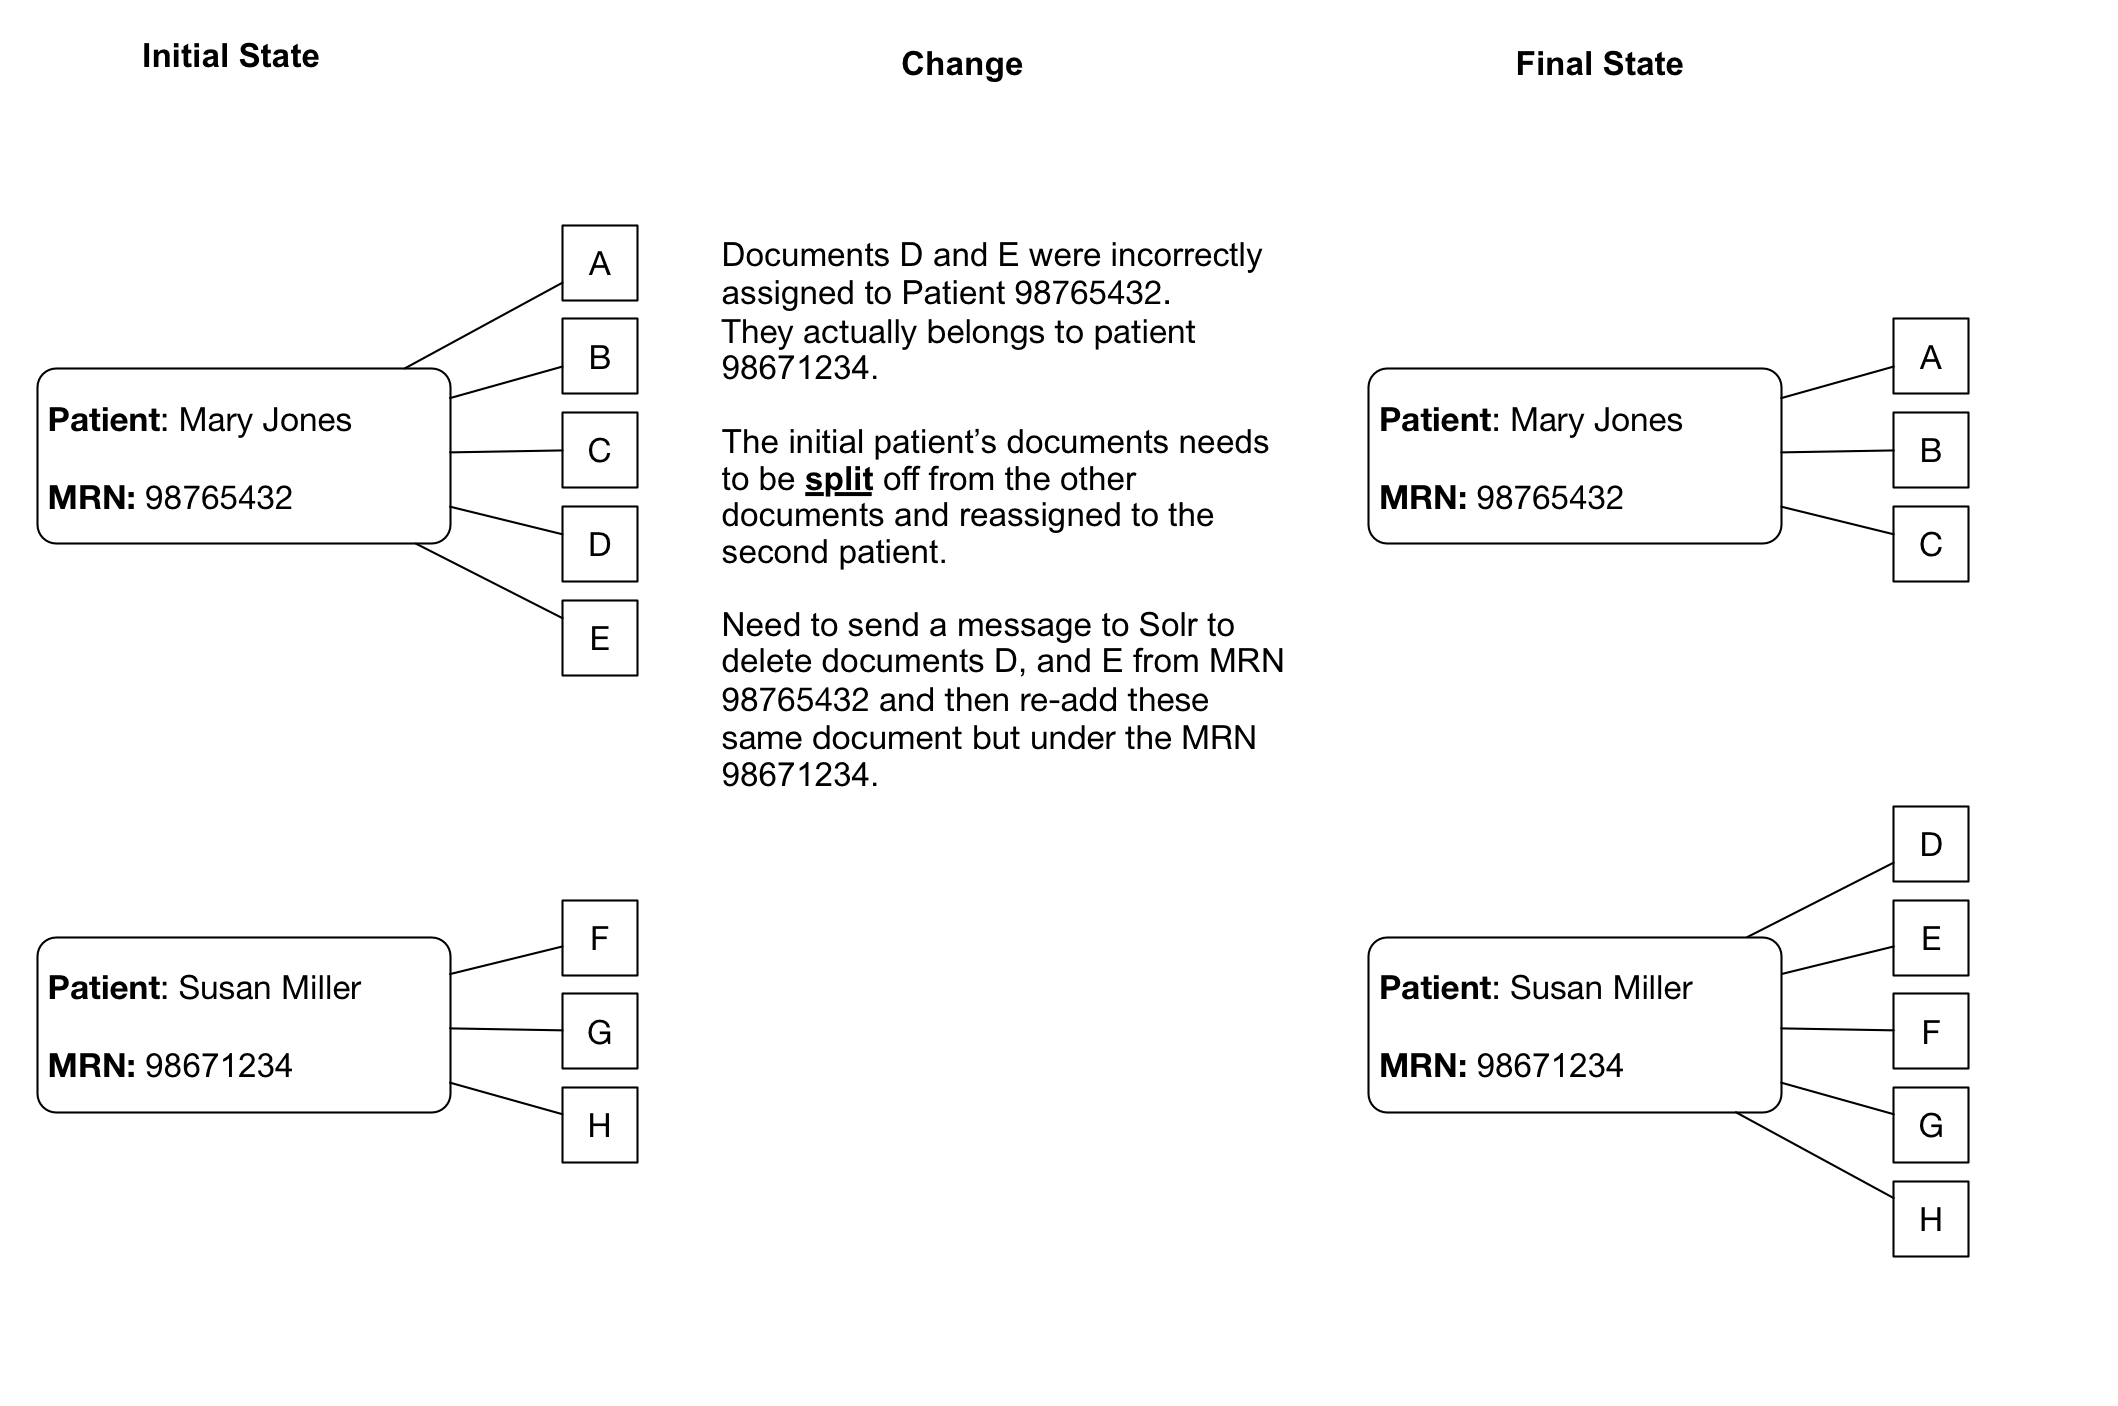
Patient/Document merges and splits occur routinely within medical record systems. Both involve re-assigning documents to a new (corrected) medical record number. A merge occurs when a patient has been assigned more than one medical record number, and thus the documents may be listed under more than one medical record number. To remedy this, the medical record numbers are merged into a single MRN and the documents then get reassigned to the single MRN. A split occurs when it turns out that a set of documuments for a single patient have been incorrectly assigned and actually belong to more than one patient. In this case the documents have to be re-assigned to the correct patient MRN, which can potentially be to more than one person.
|
In the world of Health information management, these concepts are sometimes referred to as Duplicates, Overlaps, and Overlays, especially as they related to a Master Patient Index (MPI). Duplicate: One patient can have more than one MRN at the same facility. Overlap: One patient can have more than one MRN between facilities that are part of the same overall organization. Overlay: More than one patient shares the same MRN. Source: AHIMA MPI Task Force. “Building an Enterprise Master Person Index.” Journal of AHIMA 75, no. 1 (Jan. 2004): 56A–D. |
There are several implication of merges/splits for EMERSE, and it means that these merges/splits have to be tracked in some manner to ensure that any changes to documents within the EHR get reflected back into EMERSE. For example, if a document repository is maintained for providing documents to EMERSE, that repository will need to keep track of these changes and subsequently submit these changes to Solr for re-indexing. From a very practical perspective, the following are some activities that will likely need to be considered for long-term operational maintenance of EMERSE:
-
Existing documents with outdated MRNs will either have to be deleted from the Solr index or, more likely, replaced with the same document using the new MRN (essentially submitting the document to Solr again with the same unique identifier but an updated MRN).
-
Patients for which a new medical record number has been assigned should be marked with the deleted_flag in the
Patientdatabase table, and then a new row added to the table with the patient details as well as the new medical record number. This would allow for users to be warned about Obsolete Medical Record Numbers in existing patients lists.
This also has implications for sites that want to include older documents from a legacy medical record system, since those documents should also be subjects to splits/merges if the patients are still active within the newer electronic health record system and documents or MRNs are incorrectly assigned with respect to data in the legacy EHR.
Dealing with splits/merges from an operational perspective will take some planning. With a large set of Solr documents, re-indexing all the documents regularly will not be practical.
When indexing documents incrementally, depending on the mechanism used to detect changed documents, it may not be possible to detect that there are documents whose patient MRNs have been modified. To overcome this challenge at Michigan Medicine, we have a Pentaho Data Integration (PDI) job that runs regularly to read the history of all MRN merges/combines, and updates any documents in the Solr index that exist on the patient’s prior MRN. Michigan Medicine can share the PDI job that does this upon request, but the main points are:
-
Finding a source for MRN merge history
-
Finding documents in Solr for a specific MRN
-
Using the update API in Solr to update each document found
In Epic’s Clarity datastore, the following SQL can be used to generate a list of MRN’s that have changed:
select mrn_hx.pat_id, mrn_hx as prior_hx, mrn_hx.mrn_hx_change_inst as merge_datetime, mrn_hx.mrn_hx_pat_name as patnamehx, mrnid.identity_id as MRN, oldid.identity_new_id as PRIOR_MRN , pt.pat_first_name, pt.pat_last_name, pt.pat_middle_name
from pat_mrn_hx mrn_hx
inner join patient pt on mrn_hx.pat_id=pt.pat_id
inner join identity_id mrnid on pt.pat_id=mrnid.pat_id and identity_type_id=14
inner join identity_id_hx oldid on mrn_hx.mrn_hx=oldid.old_pat_id and id_type_hx=14
Note that the identity_id type for an MRN may not be 14 at your organization.
|
Finding documents in Solr for a specific MRN:
http://solrhost:solrport/documents/select?q=MRN:med_rec_num&fl=ID,MRN,RPT_ID,SOURCE&wt=json&rows=10000
Where documents is the name of the main Solr index and med_rec_num should be replaced with an actual medical record number.
Updating a document in Solr
To update a specific document, send an HTTP post to this URL:
http://solrhost:solrport/documents/update?commit=true
Post body:
[{
  "ID":  "document_primary_key",
  "MRN": {"set":"NEW_MRN"}
}]
The update statement will cause Solr to internally re-index the document with the new MRN value. The original document’s text and other fields will be preserved. In this example document_primary_key should be replaced with the actual document ID retrieved in the prior query, above ("Finding documents in Solr for a specific MRN").
| Solr is protected by basic auth, so credentials are not in the URL |
Deleting a document in Solr
Similar to updating an MRN, if you need to completely delete a document in Solr, you can do so by POSTing to the same URL, but with a post body of:
{"delete": "document_primary_key"}Or multiple ids at once:
{"delete": ["document_primary_key", "pk2", "pk3"]}See the official Solr documentation for more information.
Images in documents
EMERSE does not currently support displaying images within documents. This should be taken into consideration when indexing documents from sources in which images are routinely embedded within a a document. Heavily impacted specialties may include dermatology (e.g., photos of skin lesions), or ophthalmology (e.g., drawings and retinal photos).
Although we have not tried this, it should theoretically be possible to include such images, but this would likely require storing the images in a known location and then embedding a hyperlink to those images within the document being indexed. As far as we know, Solr itself would not store the images within its own data atore.
Documents not in TXT or HTML formats
Many sites have documents from outside sources, or potentially from internal sources, that are not in either a plain text (.txt) or standard web-based (.html) format which are the main two document formats that Solr can natively handle. In such cases there are ways to extract the text and import it into EMERSE. Examples of these files types include Adobe PDF or Microsoft Word (.docx) documents. For these cases, additional components and steps may be required to extract the text. Apache Tika is a tool that can help with this task.
Documents that are scanned images present additional challenges, and this is addressed in the section below on Optical Character Recognition.
Document formatting
Unlike some natural language processing systems, EMERSE shows the original clinical documents to users, with the terms of interest highlighted. Thus, it is highly recommended to use formatted documents within EMERSE. EHRs such as Epic allow users to create formatted notes (tables, bold text, italics, etc) and this additional formatting can help to convey information and can help users interpret the data in the proper context. Without such formatting, the original meaning can be difficult to interpret. For example, the two figures below show an example of the same note, first unformatted and then formatted.
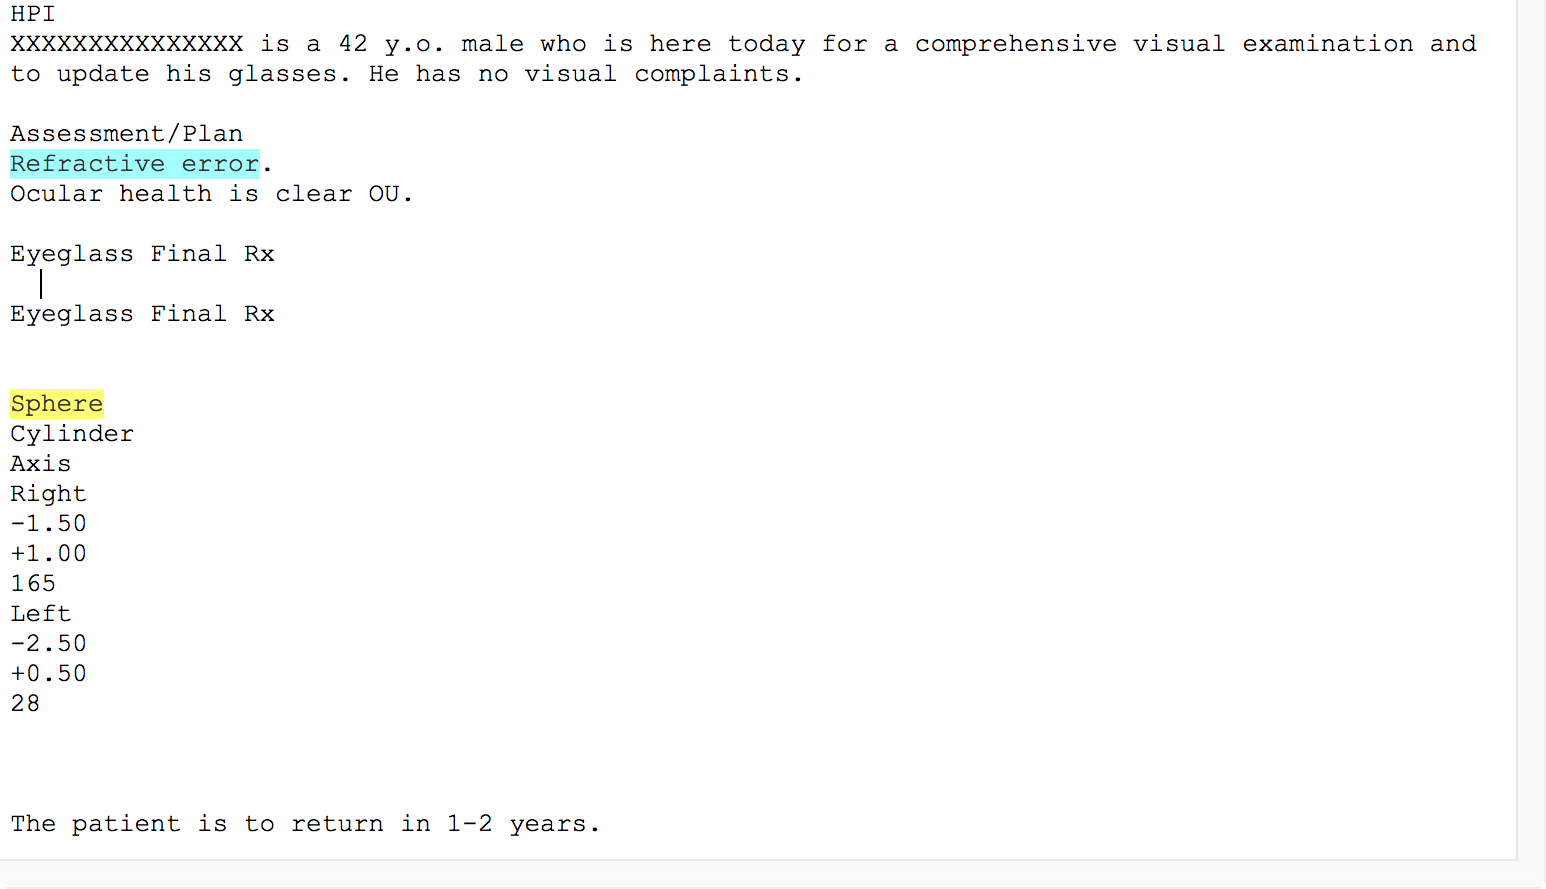
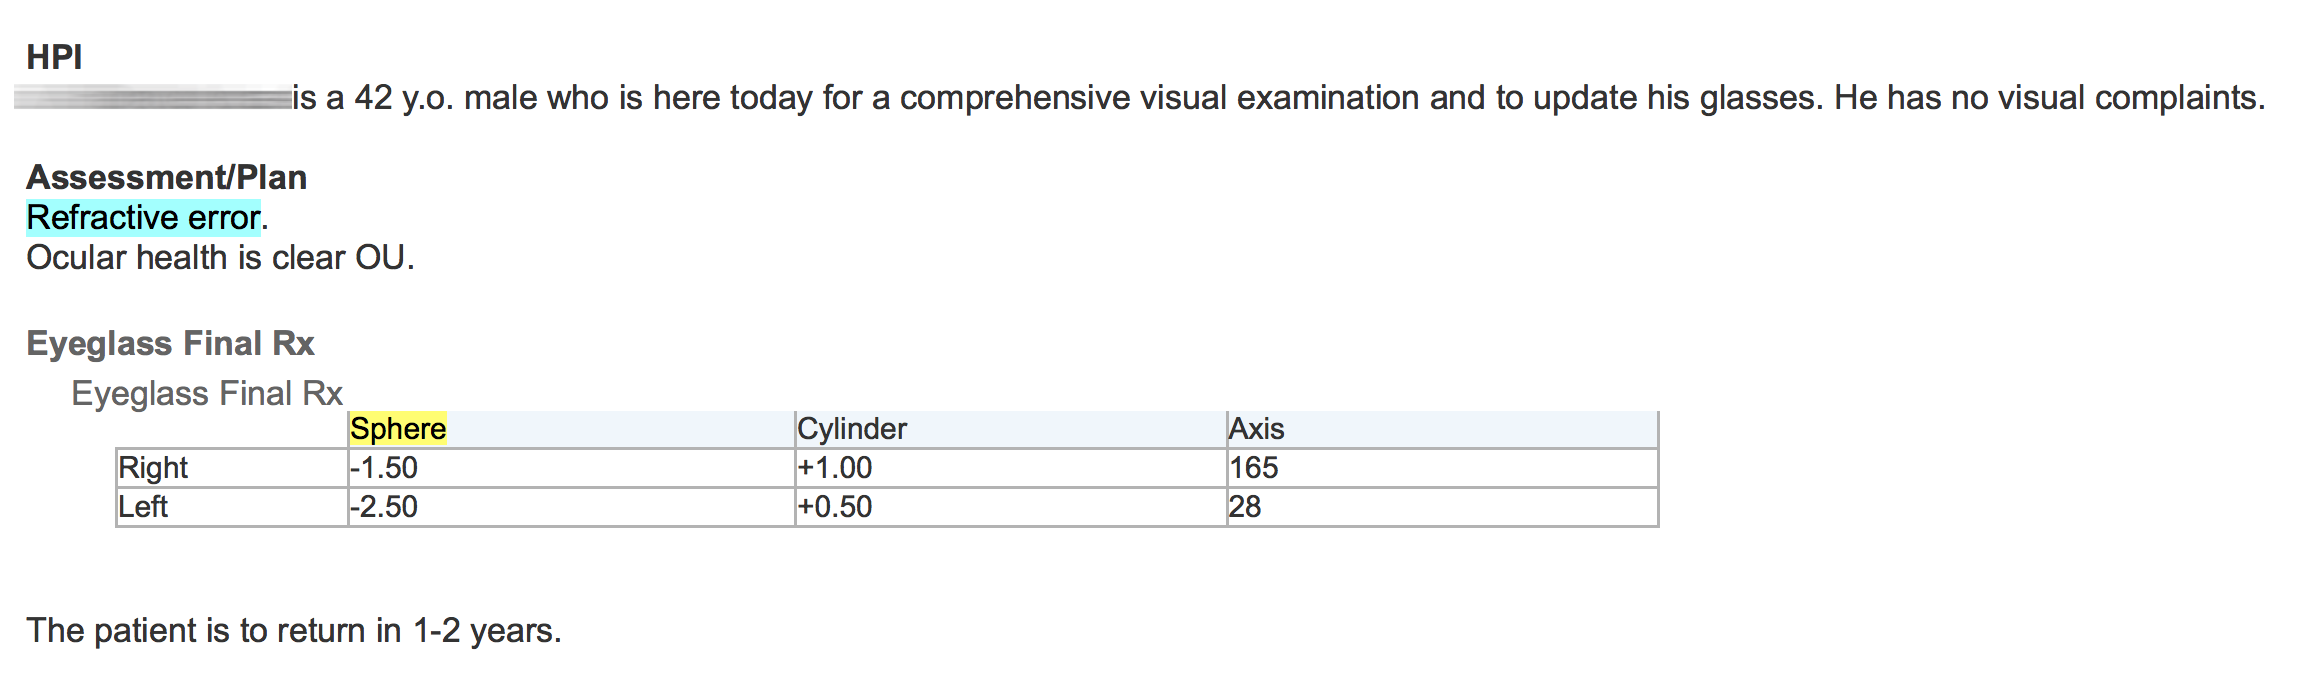
Unfortunately, many document repositories, including Epic Clarity, often contain documents stripped of all formatting (with the exception of line feeds). It is worth spending the time to identify approaches for retrieving the original, formatted version of the notes. EMERSE can natively handle plain text documents, but it can also handle HTML documents. These HTML documents can preserve the formatting that can make the notes much more readable. Details about how to obtain formatted Epic documents can be found in our Integration Guide. Epic natively stores documents in RTF format, and directions for converting RTF to HTML can be found below.
RTF to HTML file conversion
Many EHR documents are stored natively using the rich text file (RTF) format. Solr does not natively handle RTF files, so it will be necessary to first convert them to either plain text (TXT) or, preferably, HTML since HTML will preserve a lot of the formatting of the original document. There are multiple approaches for converting RTF to HTML format, a few of which are described below. It may be worth trying various options on your actual documents since the output between converters can differ.
Aspose Words
Aspose Words is commercial software used by Michigan Medicine for converting RTF documents within Epic to HTML. Information on Aspose can be found at https://products.aspose.com/words/java. The Aspose converter stores style inline within the HTML document so that when displayed to the user the original styles will be preserved rather than taking on the default style of the EMERSE application itself. This is useful for ensuring that the rendered document looks very similar to the original document.
textutil
MacOS has a powerful, built in command-line file converter tool called textutil. This tool can also convert Microsoft Word Documents (.doc, .docx) into HTML.
An example of how textutil can be used to convert RTF file to HTML is:
textutil -convert html /path/to/rtf_files/*.rtf
For more details about this tool, simply go to the Terminal application and type:
man textutil
LibreOffice
LibreOffice is freely available software based on the OpenOffice project. The software can be found at https://www.libreoffice.org/. LibreOffice comes with a full user-interface but also includes a command line tool called soffice that can be used on a variety of platforms (Mac, Windows, Linux). An example of how this can be used on MacOS is below:
First, locate the soffice converter tool:
cd /Applications/LibreOffice.app/Contents/MacOS/
Then, run the application, pointing to where the files are. A different output directory can also be defined, as shown in the example below:
./soffice --headless --convert-to html --outdir /output/path/name/ /path/to/rtf_files/*.rtf
For additional details about soffice go to the Terminal application and type:
./soffice -help
Optical Character Recognition (OCR)
Documents that are images present a challenge for incorporating the text into EMERSE. A PDF file, for example, might contain actual text within the document structure, or it may contain an image of a document that has text, but that scanned/photographed/imaged text cannot be not readily extracted. These images could arrive at a clinic through a variety of means (e.g., hand-delivered by patients, faxed, etc.), but if the long-term storage strategy for storing the documents is scanning and archiving the images, then the text will not be readily extractable. For example, our strategy at Michigan Medicine is to scan a paper document and then store the scanned image within an institutional document repository using Hyland OnBase. The paper version is then destroyed.
Optical Character Recognition (OCR) provides a means for essentially conducting image analysis on a document, and recognizing and extracting the text to make it capable of being indexed in a system such as EMERSE. While EMERSE itself does not have built-in OCR capabilities, OCR could be used as part of a document-processing pipeline that identifies and extracts texts prior to submitting the documents to EMERSE for indexing. We have conducted various proof-of-concepts to show that this is possible, and some scanned/OCR’d documents can be found in our online demonstration system. We have had experience using both commercial (e.g., Nuance) and open source (e.g., Tesseract) OCR options.
Most OCR software will recognize printed text, but will not recognize hand-written text. Nevertheless, we have found that OCR can still be useful in cases where the main item of interest may be hand-written, but a search for related text in a document header can still rapidly bring the user to the right page among hundreds or thousands of potential documents.
Our experience with Tesseract has shown that it generally works well, but it performance depends heavily on the quality of the original document image, including how fuzzy the images its, its horizontal orientation, or other extraneous marks (such as handwriting) covering the text. A few examples of images and corresponding extracted text are provided below.

| Most of the text is extracted correctly, but there is no space between "If" and "you" (i.e., "Ifyou"): |
Voluntary Participation/Refusal to Sign:
Participating in this research project is completely voluntary. Ifyou decide not to participate, or ifyou decide to withdraw (end your participation), you will not suffer any penalty or loss of benefits to which you otherwise would be entitled. Your treatment at the University of Michigan will not be affected by your willingness or refusal to participate.

Duration of Study and Expiration Date or Event:
Unless you revoke your authorization, your permission for us to use your tissue and related information will not expire. This study is expected to continue indefinitely.

| The number 1 is circled, but the OCR software did not recognize that components as a number. |
2.Frequency
Over the past month, how often have you had to urinate again less than two hours after you finished urinating?

0 (L 2 3 4 5
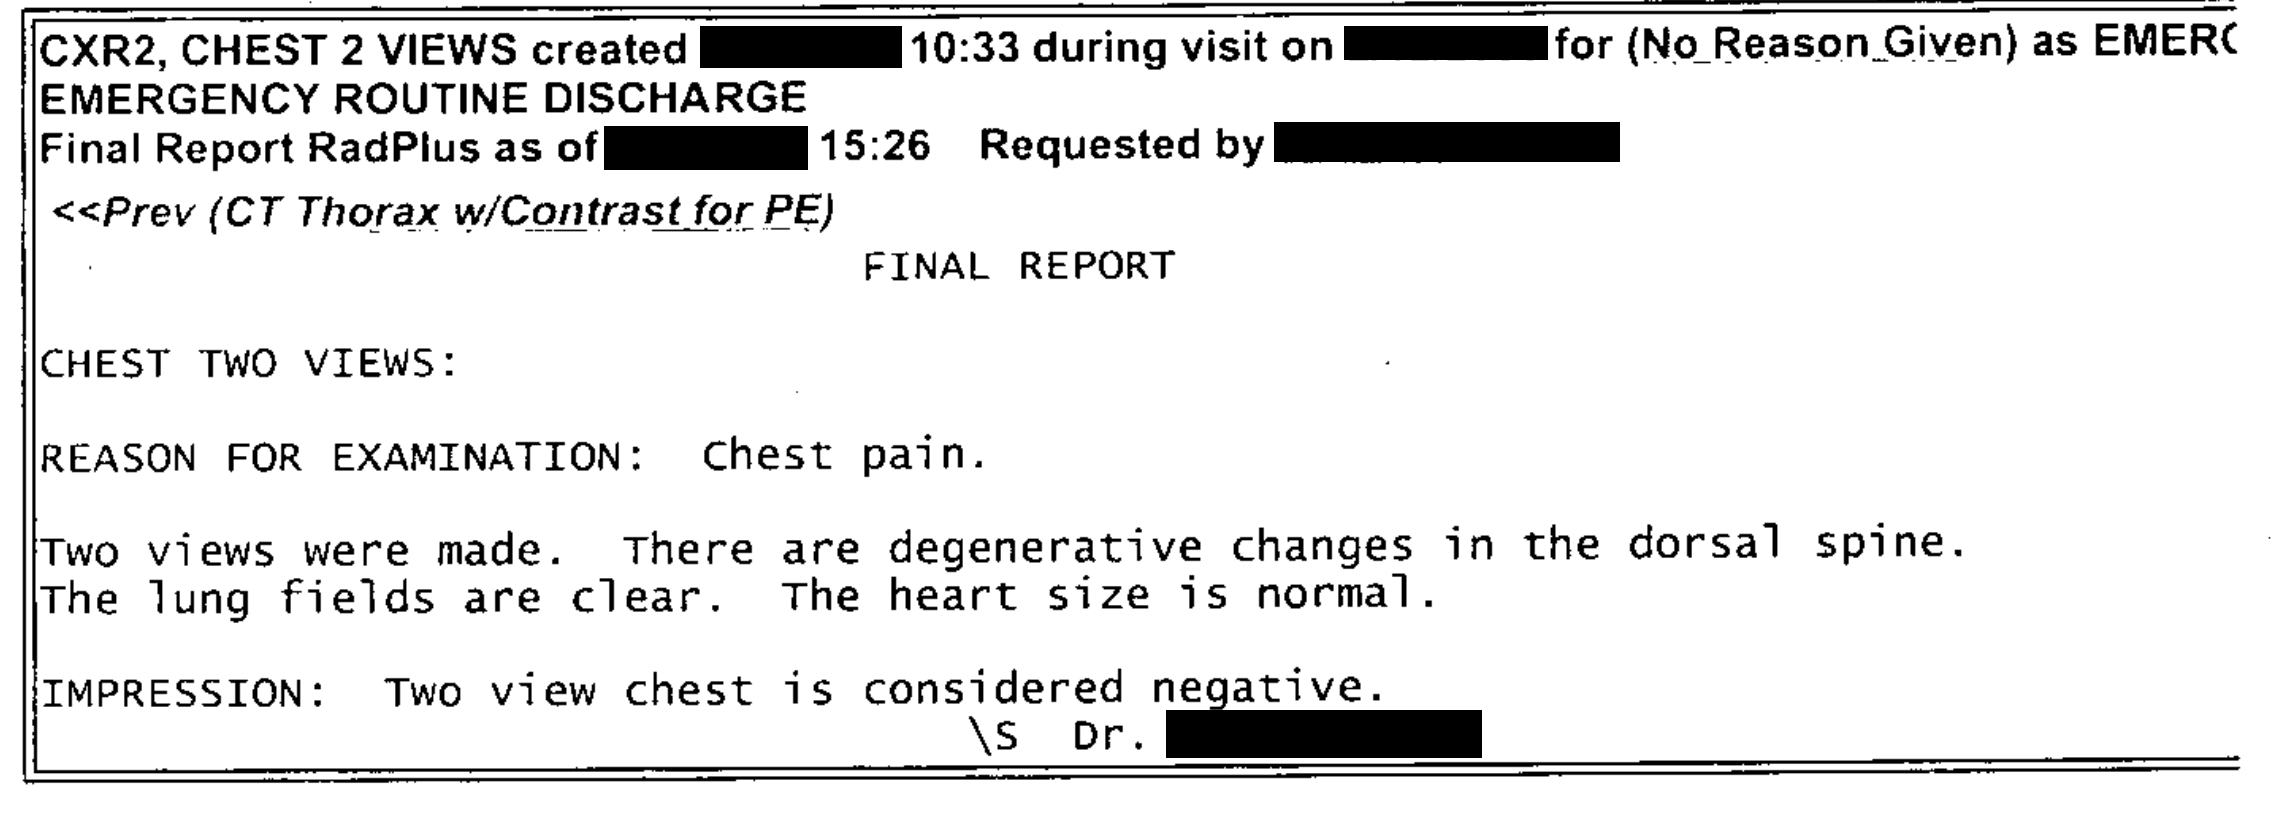
| This text was extracted reasonably well. (Some components have been manually de-identified.). Some spaces are missing between words, which would affect the ability to find them due to the tokenization of terms within Solr. |
CXR2, CHEST 2 VIEWS created X/XX/XXXX 10:33 during visit on X/XX/XXXX for (NoReason Given) as EMERC
EMERGENCY ROUTINE DISCHARGE
Final Report RadPlus as of X/XX/XXXX 15:26   RequestedbyXXXXX,XXXXX
<<Prev(CTThoraxw/ContrastforPE)

FINAL REPORT

CHEST TWO VIEWS:
REASON FOR EXAMINATION: Chest pain.
Two views were made. There are degenerative changes in the dorsal spine. The lung fields are clear. The heart size is normal.
IMPRESSION: Two view chest is considered negative.
\s Dr. XXXXX XXXXX
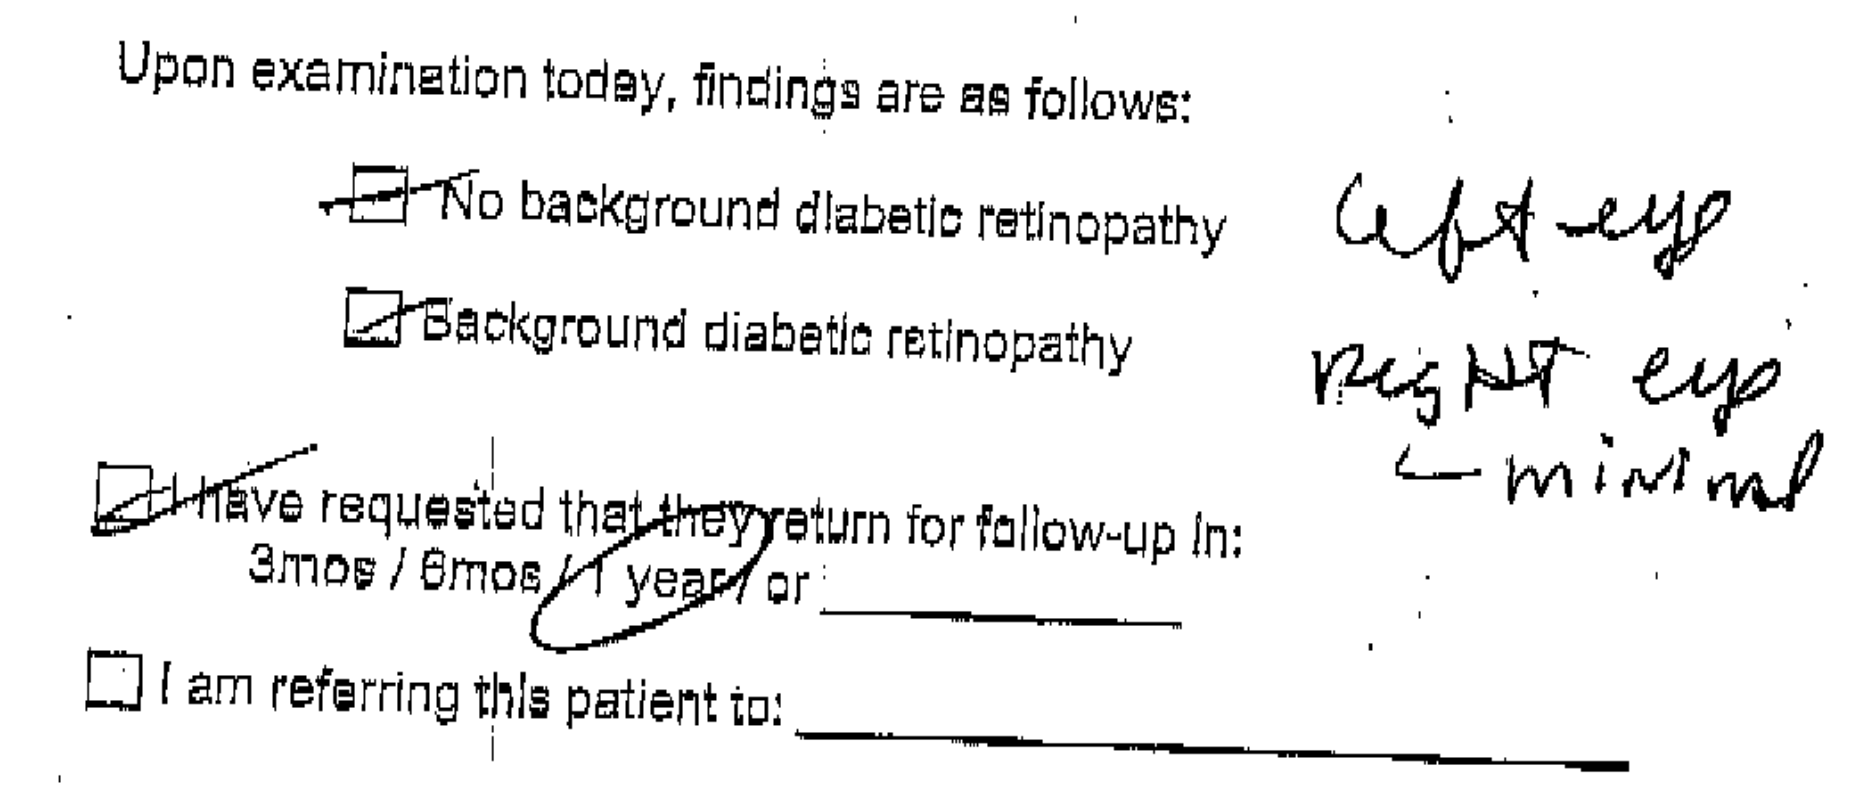
| This image shows text at an angle, with some hand-written text to the right and other writing over some of the printed text. Much of the text was not identified correctly, including spacing between words. |
Upon examination today, findings are as follows:

L-Backgrounddiabeticretinopathy eogBq~tip t&-fmindaa
I requested thalthepysetum for fallow-up In: amos/ yeast sr

C] Iam referringthispatientto:
How to use the Tesseract OCR engine
Tesseract is optical character recognition (OCR) software that has had a long history of development, but recently has mostly been supported by Google. It is free to use and open source. Tesseract was designed to work with printed characters and not handwriting. It can accept multiple input image formats including PNG, JPG, and TIFF and can output to a variety of formats including plain text as well as a PDF with the text embedded as an invisible layer behind the original document. Tesseract cannot handle PDF files as input, but this can be overcome by first converting the PDF to a TIFF (or multi-page TIFF).
There are many ways in which Tesseract can be run, and it can also be installed on multiple operating systems. The following details describe how Tesseract can be installed and run on MacOS. Not every step will be necessary depending on your current configuration and what you have already installed on your machine.
First, install a package manager that will be used to install the Tesseract package. A good one is homebrew. The homebrew website provides simple installation instructions. In the MacOS Terminal application, simply type:
/usr/bin/ruby -e "$(curl -fsSL https://raw.githubusercontent.com/Homebrew/install/master/install)"
Second, install the Tesseract binaries, as described on the Tesseract site. In Terminal, type:
brew install tesseract
The files should be installed in the /usr/local/Cellar directory.
That should be all that is necessary to get Tesseract running. However, to be able to process PDFs, a few additional programs should be installed. ImageMagick is an open source command line tool that converts between image formats. GhostScript is needed for PDF manipulation, including converting PDFs to images such as multi-page TIFFs. GhostScript is freely available but not truly 'open source' so it is worth checking the licensing restrictions on their web page.
To install ImageMagick:
brew install imagemagick
To install GhostScript:
brew install ghostscript
Once these three components are installed (Tesseract, ImageMagick, and GhostScript), it should be possible to build a pipeline to process scanned documents and extract the text or to create PDFs with embedded text. It is worth noting that if the original PDF had printed text in an extractable format, it is still possible to convert the document to images and then run the OCR to re-embed the text layer. While there is a chance that some text might become garbled in the process, it would also help to ensure that any non-embedded text in the original document (such as from a printed document header) could also be extracted.
If the original document sources are in a format Tesseract can already read in natively (e.g., JPG, PNG), there should be no need to do any conversions before passing them to Tesseract. If the scanned document is a PDF, then the following workflow probably would be ideal:
-
Convert the PDF to a multi-page TIFF
-
Run OCR on the multi-page TIFF with the output as a new PDF document.
ImageMagick comes with a small program called convert. There are several things you probably want to do during the conversion process from PDF to TIFF, includinging using LZW compression, ensuring that the background color is white, and that there is no alpha channel. The following settings seem to work well for such conversions
convert -density 300 -depth 8 -compress lzw -strip -background white -alpha off input_file_name1.pdf output_file_name2.tiff
Running Tesseract’s OCR engine on the TIFF file would be done using:
tesseract output_file_name2.tiff output_file_name3 pdf
Using Tesseract on a simple image file is similar:
tesseract file_name.png output_file_name pdf
It is also possible to create both a plain text extract of the text as well as the PDF version at the same time. This can be useful if you want to send the plain text to Solr for indexing but preserve the PDF file with the embedded components for viewing by the user within EMERSE. To do this, simply specify both output file formats, such as:
tesseract file_name.png output_file_name pdf txt
To bulk process documents with Tesseract, assuming that they are already in the proper format for OCR processing, you can try:
for i in *JPG *jpg; do b=`basename "$i" .jpg`; tesseract "$i" "$b" pdf txt; done
Note that the file extension is case-sensitive so it may be necessary to provide various permutations (the *JPG and *jpg as seen above). The command above will read in a set of documents with the JPG file extension, and output both a PDF and TXT version to the same directory using the same filename (but with the new file extensions).
Batch processing documents with the Tesseract OCR engine
All of the OCR components described above can be wrapped together to make a more automatic process. The following bash shell script was written to show an example of how to batch process documents and run them through the Tesseract OCR engine. This will also convert PDFs to TIFFs so that they can be run through Tesseract, before converting them back to PDFs again, with the text embedded.
#!/bin/bash
#
# To make this script executable: chmod u+x script_name.sh
# To run: ./tesseract_ocr_batch_shell_script.sh
#
# This script was written to process files for OCR.  It uses several components to work including:
#   1. Tesseract OCR software
#   2. ImageMagick to convert between image formats
#   3. GhostScript to handle PDF documents
#
# The script can handle various image formats including PNG, JPG, and TIFF (including multi-page TIFFs).
# It can also handle PDF documents that may have images embedded in them, by converting them to TIFFs and
# then running the OCR engine on them.  If the original PDF already had text embedded in it, that text would
# also be converted to an image (TIFF) and then OCR'd again.  Just keep that in mind.
#
# This script was written for MacOS bash shell, but may work on other Unix environments.
#
# Four directories must be set up to run, and those are defined below.  Nothing else in the script should need to be changed
# The script reads in all of the files from the input directory and outputs the OCR'd output into the output directory.
# The output directory will have two files for each input file:
#   1. The PDF version with searchable text embedded in a hidden layer behind the original document
#   2. A plain text file with the text already extracted, so that it can be loaded into Solr or used elsewhere
# The original files are not otherwise touched/deleted
# The temporary directory is used to hold a temporary TIFF file that is used when converting from PDF to something that
# Tesseract can use. The temporary directory also stores the output of the run with a summary for each file as a tab-delimited
# text file. This might be useful for looking at the time required, or any documents that might have no words, or too few words
# identified, suggesting a potential problem.
#
# Written by David Hanauer
# hanauer@umich.edu
# Originally written 2018-12-05
# Updated 2018-12-07


############### EDIT THE PATH NAMES BELOW ###############

inputDirectoryFilePath='/Users/dhanauer/Desktop/tesseract_input/'			# directory that will hold all of the input files
outputDirectoryFilePathPDF='/Users/dhanauer/Desktop/tesseract_output_pdf/'	# directory that will contain all of the output files (pdf and txt, txt will then be moved)
outputDirectoryFilePathTXT='/Users/dhanauer/Desktop/tesseract_output_txt/'	# directory that will contain all of the output files (txt, moved from pdf)
temporaryDirectoryFilePath='/Users/dhanauer/Desktop/tesseract_temporary/'	# directory that will hold the temporary tiffs converted from pdf
																			# as well as the summary stats in a tab delimited text file
############### NO NEED TO EDIT ANYTHING BELOW THIS LINE ###############


# set up some initial variables to be used

# set the field separator so it is not a space (default), otherwise filenames with spaces will fail
IFS="
"

# some variables to keep track of things
i=0 							# to keep track of total number of documents to process
overallNumberOfPages=0			# to keep track of total pages processed overall
overallNumberofPDFpages=0		# to keep track of total PDF pages processed overall (ones that were originally in PDF format)
overallStartTime=$(date +'%s')	# to keep track of overall elapsed time
overallTimeForPDFdocuments=0	# to keep track of overall elapsed time for documents original in PDF format
overallNumberOfInvalidFiles=0	# to keep track of invalid files in the directory

txtFileExtension='.txt'				# used to help rebuild file names later on
pdfFileExtension='.pdf' 			# used to help rebuild file names later on
temporaryFileName='tempFile.tiff' 	# the temporary tiff file that is used when converting from PDF
ouputSummaryFile="outputSummaryFile.txt" # to store the output from the run
outputSummaryFileDescription="outputSummaryFileDescription.txt"	# to store the header information for the file

# write out to the temp directory a text file that can serve as the column headers for the other output text file summarizing the documents processed
echo "file type	file name	time per document (seconds)	total pages	total words extracted	valid/invalid file type" > $temporaryDirectoryFilePath$outputSummaryFileDescription


# start the program

overallStartDate=$(date)
printf "\n"
printf "\n"
printf "\n"
printf "Start time: $overallStartDate"
printf "\n"


filescontent=(`ls -1 $inputDirectoryFilePath`) 						# load the list containing the files to be OCR'd
totalFiles=$( ls -1 $inputDirectoryFilePath | wc -l | tr -d ' ') 	# get the count of total files in the directory


printf "\n"
printf "Attempting OCR on $totalFiles files..."
printf "\n"
printf "\n"


for u in ${filescontent[@]}
	do
	i=(`expr $i + 1`)	# used to count where we are in the list

	printf "**************************************************"
	printf "\n"
	printf "\n"
	printf "Working on file $i of $totalFiles..."
	printf "\n"


	fileExtension=$(echo ${u} | awk -F . '{print $NF}' |  tr '[:upper:]' '[:lower:]') 	# determine the file extension and make it lower case
	filenameWithoutExtention=$(echo ${u} | sed 's/\.[^.]*$//') 							# determine the file name (without the extension) so I can write the output file with the same name


	# look for valid image file formats as input
	if [[ ($fileExtension == 'jpg') ||  ($fileExtension == 'jpeg') ||  ($fileExtension == 'png') || ($fileExtension == 'tif') || ($fileExtension == 'tiff') || ($fileExtension == 'pdf') ]]
		then

		printf "File type: $fileExtension"
		printf "\n"
		printf "Filename: ${u}"
		printf "\n"


		# keep track of the elapsed time
		startTime1=$(date +'%s')

		#set the default path/filename to OCR
		filenameToOCR=$inputDirectoryFilePath${u}

		if [ $fileExtension == 'pdf' ] 			#if the file is a PDF, need to first convert it to a TIFF/multi-page TIFF
			then
				# first convert the PDF to a temporary TIFF and write to output directory
				printf "Converting PDF to a temporary TIFF..."
				printf "\n"
				convert -density 300 -depth 8 -compress lzw -strip -background white -alpha off $inputDirectoryFilePath${u} $temporaryDirectoryFilePath$temporaryFileName

				#change the filename to OCR to the temporaryTIFF file
				filenameToOCR=$temporaryDirectoryFilePath$temporaryFileName
		fi


		# now run the OCR
		# output the files to the output dir using the same name, and output to PDF and TXT
		printf "Running Tesseract OCR..."
		printf "\n"
		tesseract $filenameToOCR $outputDirectoryFilePathPDF$filenameWithoutExtention pdf txt


		if [ $fileExtension == 'pdf' ]
			then
				# delete the temporary TIFF file that is in the output directory
				printf "Deleting the temporary TIFF..."
				printf "\n"
				rm $temporaryDirectoryFilePath$temporaryFileName
		fi


		# determine elapsed time for this document
		endTime1=$(date +'%s')

		# determine total number of pages in the PDF that was created
		tempTotalNumberOfPDFpages=$( gs -q -dNODISPLAY -c "($outputDirectoryFilePathPDF$filenameWithoutExtention$pdfFileExtension) (r) file runpdfbegin pdfpagecount = quit"; )
		printf "Total pages in final PDF: $tempTotalNumberOfPDFpages"
		printf "\n"
		overallNumberOfPages=(`expr $overallNumberOfPages + $tempTotalNumberOfPDFpages`)		# keep track of total number of pages processed overall

		if [ $fileExtension == 'pdf' ]
			then
				overallNumberofPDFpages=(`expr $overallNumberofPDFpages + $tempTotalNumberOfPDFpages`)	# keep track of total number of PDF pages processed overall
		fi


		# report number of words extracted
		totalWordsExtracted=$( wc -w $outputDirectoryFilePathPDF$filenameWithoutExtention$txtFileExtension | awk {'print $1'} )
		printf "Total words extracted: $totalWordsExtracted"
		printf "\n"


		# move the txt file to a new directory
		mv $outputDirectoryFilePathPDF$filenameWithoutExtention$txtFileExtension $outputDirectoryFilePathTXT$filenameWithoutExtention$txtFileExtension


		# report elapsed time
		documentLevelelapsedTime=$(($endTime1 - $startTime1))
		printf "Elapsed time: $documentLevelelapsedTime seconds"
		printf "\n"
		printf "\n"

		# record overall time for just the PDF documents (the ones in original PDF format)
		if [ $fileExtension == 'pdf' ]
			then
			overallTimeForPDFdocuments=(`expr $overallTimeForPDFdocuments + $endTime1 - $startTime1`)
		fi

		#write a summary of the file to the temporary directory as a tab-delimited text file
		echo "$fileExtension	${u}	$documentLevelelapsedTime	$tempTotalNumberOfPDFpages	$totalWordsExtracted	valid" >> $temporaryDirectoryFilePath$ouputSummaryFile


	else
		printf "Invalid file type"
		printf "\n"
		printf "Filename: ${u}"
		printf "\n"
		overallNumberOfInvalidFiles=(`expr $overallNumberOfInvalidFiles + 1`) # keep track of invalid files
		echo "$fileExtension	${u}	N/A	N/A	N/A	invalid" >> $temporaryDirectoryFilePath$ouputSummaryFile

	fi # this is the end of the if-then statement looking for valid file types as input

	done # end of the do loop


	printf "**************************************************"
	printf "\n"
	printf "\n"


# to keep track of overall elapsed time
overallEndTime=$(date +'%s')


# write out the end time for the script
overallEndDate=$(date)
printf "\n"
printf "End time: $overallEndDate"
printf "\n"


# report on some metrics here
overallElapsedTimeForAllDocuments=$(($overallEndTime - $overallStartTime))

averageTimePerPDFDocument="N/A"
if [ $overallNumberofPDFpages -gt 0 ]
	then
	averageTimePerPDFDocument=$(awk -v a=$overallTimeForPDFdocuments -v b=$overallNumberofPDFpages 'BEGIN {print (a/b)}')
	else
	overallTimeForPDFdocuments="N/A"
fi

averageTimePerDocumentsOverall="N/A"
if [ $overallNumberOfPages -gt 0 ]
	then
	averageTimePerDocumentsOverall=$(awk -v a=$overallElapsedTimeForAllDocuments -v b=$overallNumberOfPages 'BEGIN {print (a/b)}')
	else
	overallTimeForPDFdocuments="N/A"
fi

totalNumberOfDocumentsProcessed=$(($i - $overallNumberOfInvalidFiles))

printf "\n"
printf "\n"
printf "RUN METRICS"
printf "\n"
printf "Total number of documents processed: $totalNumberOfDocumentsProcessed"
printf "\n"
printf "Overall elapsed time for all documents: $overallElapsedTimeForAllDocuments seconds"
printf "\n"
printf "Overall elapsed time for just the PDF documents: $overallTimeForPDFdocuments seconds"
printf "\n"
printf "Total number of pages processed: $overallNumberOfPages pages"
printf "\n"
printf "Total number of PDF-original pages processed: $overallNumberofPDFpages pages "
printf "\n"
printf "Average time per page (seconds) for all documents: $averageTimePerDocumentsOverall seconds/page"
printf "\n"
printf "Average time per page (seconds) for PDF-original documents:  $averageTimePerPDFDocument seconds/PDF page"
printf "\n"
printf "Total number of invalid files in the input directory: $overallNumberOfInvalidFiles"
printf "\n"
printf "\n"
printf "Other summary details can be found in: $temporaryDirectoryFilePath$ouputSummaryFile"
printf "\n"
printf "\n"
Integration within an EHR
At Michigan Medicine, EMERSE users can access the system via two primary routes. The first is logging directly into EMERSE, once an account has been created for the user. A second option has also been made available to users in order to streamline the process for conducting a search after reviewing a patient within the electronic health record (EHR), which is Epic at Michigan Medicine. In this latter case, a user must first open a patient tab (workspace) within Epic, which will reveal a set of options from a button in the workspace. At Michigan Medicine this button is named "More" and provides access to many other options within Epic itself but also links to outside systems such as EMERSE. We have a submenu set up called "Other Clinical Systems", and one of these systems is EMERSE.
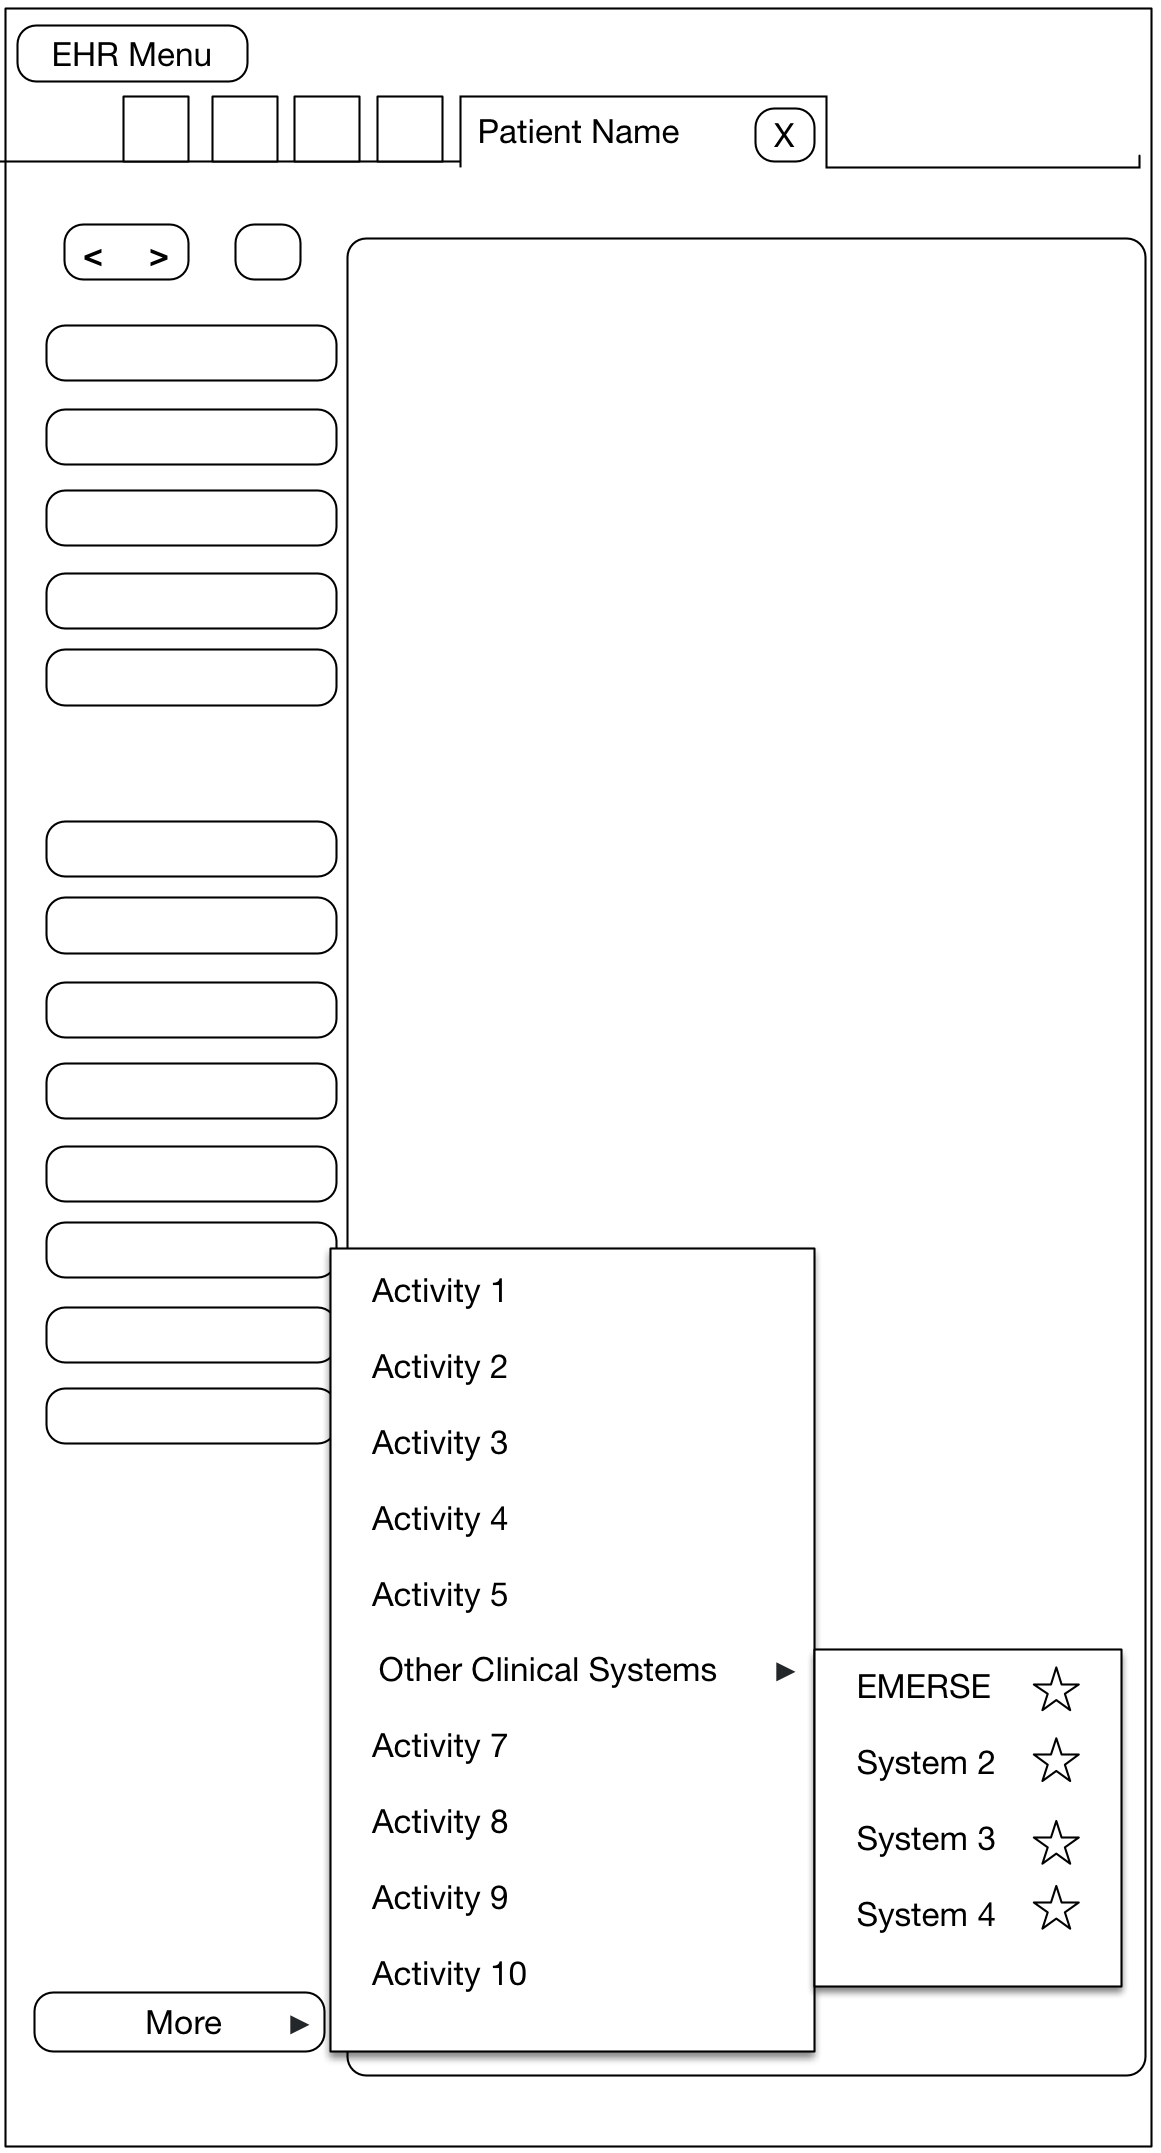
When a user chooses EMERSE from this Epic Menu, a browser is automatically opened and the Epic user will automatically be logged into EMERSE and they will land at the Attestation page, which is where the user specifies the intended use of EMERSE for that session. Further, we have provided default text in the EMERSE Attestation text box for this specific scenario which essentially says "search from Epic". The user could change this Attestation reason, or just submit the default answer. Once the Attestation is completed, the user will move to the main work area of EMERSE, and the patient that was opened in Epic will also be loaded within EMERSE. This means that a search can be conducted on that patient right away. In other words, from the user’s perspective the steps from the EHR would be:
-
Open a patient in the EHR
-
Choose
More→Other Clinical Systems→EMERSE -
Complete the EMERSE attestation
-
Enter search terms for the pre-loaded patient
| If a user does not have an EMERSE account and uses this option, an account is automatically created within EMERSE for that user. The logic behind this decision was that if the user already had access to the patient information within the EHR, then they should also have access to the same information with EMERSE. |
Security details about how the data and user’s credentials are passed from Epic to EMERSE will vary for each institution. However, the documentation on the Epic site regarding "Integrating External Web Applications into Epic" is an ideal place to start learning about how to do such integrations. There may be other ways to provide such integration, but we describe our current setup to illustrate how this could be done.
Error logging
EMERSE system errors are logged, which may be helpful in tracking down issues. These EMERSE system errors can be found in the tomcat_install_dir/logs directory. They will be in a file called catalina.out as well as a file called emerse.log. Logging is controlled by a log4j2.xml file which can be found inside of the expanded emerse.war file.
Some of the logs can be accessed through the EMERSE Administrator application or the diagnostics.html page. For more information about these options, please see the Troubleshooting Guide.
Guidelines for providing users access
Each site will have to determine their own local rules and guidelines for who should be permitted to gain access to EMERSE, especially since patient information can be viewed. At Michigan Medicine the following guidelines were implemented:
-
Users who already have access to the electronic health record can have access to EMERSE through a secure link from the EHR to EMERSE, and this link can only be accessed by logging into the EHR. (See Integration within an EHR, above). Nevertheless, users must always complete the EMERSE Attestation page at login, and if EMERSE is used for research the specific IRB-approved study must be selected at the time of login.
-
A user who has EMERSE access because of EHR access will automatically have their EMERSE account revoked if the EHR access is revoked. This is done through a batch job that checks the EHR for any user who has had their access revoked.
-
If a user does not have access to the EHR, EMERSE access can be granted via an EMERSE administrator after reviewing the user’s IRB application to verify that access is permitted by the IRB, and after other privacy training has been completed and documented.
-
Periodic reviews are conduced of users granted access for research-only purposes to ensure that a user’s account is revoked when access is no longer required.
-
Users who have been granted administrator roles in EMERSE do not have their access revoked via a batch process. This is done manually by other EMERSE administrators.
-
It should be noted that any user who has had their general health system credentials revoked (by removing them from LDAP) will not be able to access EMERSE since LDAP authentication is used in addition to local user table data within EMERSE.
Index Optimization
EMERSE uses Apache Solr for indexing documents. Over time the index can become more fragmented and less efficient. This issue can be addressed by optimizing the index periodically. Index optimization is time- and space-intensive, so we recommend doing this about once every 3-4 months. Additional details can be found in the Configuration and Optimization Guide.
Source code storage
The EMERSE source code is stored in a private Github repository, and access is available upon request. Since this is an application that interacts with protected health information, we will only provide the source code to 'trusted' collaborators. We ask that anyone who has the source code stores it in a repository where access can be restricted to trusted individuals. Providing unrestricted code online could invite someone with ill-conceived intentions to look for ways to hack the system, and our goal is to reduce this risk as much as possible. Additionally, it is important for us to be able to track installations of the system since such metrics are important to our funders.
Using Apache Httpd or Nginx as the Reverse Proxy for EMERSE
In a production environment, EMERSE, as a web application running inside the Tomcat application server, usually requires a reverse proxy server on top of Tomcat so the traffic can be redirected through HTTP on port 80 or HTTPS on port 443.
Apache
Apache Httpd, the most popular web server, can be configured to work with EMERSE in Tomcat.
In httpd.conf or a configuration file specified in httpd.conf, only three lines are needed inside the VirtualHost tag:
<VirtualHost 127.0.0.1:443>
    ……
    ProxyTimeout 1200
    ProxyRequests off
    # note, there is SSL on tomcat as well
    ProxyPassReverse /emerse https://localhost:8453/emerse
    ……
</VirtualHost>
In production environment, it’s recommended to override the default value of ProxyTimeout, which allows to process EMERSE queries that may take longer than usual to complete. Without a proper value, Apache httpd will report a 503 error to the browser.
It’s also recommended to turn off ProxyRequests. This will prevent Apache httpd functioning as a forward proxy server. In a typical reverse proxy configuration, this option should be set to off.
If the EMERSE is prior to 6.0, the following URL rewrite rules are needed for appropriately establishing and maintaining the WebSocket connection.
    RewriteEngine on
    RewriteCond %{HTTP:Upgrade} =websocket [NC]
    RewriteRule /(.*) wss://emerse2.med.umich.edu:8453/$1 [P,L]
    RewriteCond %{HTTP:Upgrade} !=websocket [NC]
    RewriteRule /emerse(.*) https://emerse2.med.umich.edu:8453/emerse$1 [P,L]
EMERSE 6.0 and onward will no longer support WebSocket.
Nginx
Nginx, another popular web server, can also be configured to work with EMERSE in Tomcat.
In the nginx.conf file, inside a server block, EMERSE can be setup as a location:
location /emerse {
            proxy_set_header X-Forwarded-For $proxy_add_x_forwarded_for;
            proxy_set_header Host $http_host;
            proxy_set_header X-Forwarded-Proto https;
            proxy_redirect off;
            proxy_connect_timeout      240;
            proxy_send_timeout         240;
            proxy_read_timeout         1200;
            proxy_buffer_size 128k;
            proxy_buffers 8 128k;
            # note, there is not SSL here! plain HTTP is used
            proxy_pass http://127.0.0.1:8080;
        }
If the EMERSE is prior to 6.0, the following 3 lines are necessary for appropriately establishing and maintaining the WebSocket connection:
proxy_http_version 1.1;
proxy_set_header Upgrade $http_upgrade;
proxy_set_header Connection "upgrade";
EMERSE 6.0 and onward will no longer support WebSocket.
On any EMERSE installation with a heavy load, it’s recommended to override the default value of proxy_read_timeout, which defines the timeout for reading a response from EMERSE. This is important because some EMERSE queries may take more than 60 seconds, which is the default value for proxy_read_timeout.
In some enterprise environments, the Nginx worker process might not be able to run under default user nginx. For example, in nginx.conf:
user nobody;
This specifies the effective user for Nginx worker process is nobody. The caveat of this setting is nobody will not be able to access Nginx temp files, which include cached data for Tomcat. Without correcting this, EMERSE will not work properly and in the browser, one may expect to get a net::ERR_HTTP2_PROTOCOL_ERROR 200
On Redhat Enterprise Linux 7/8, these temp files are stored at tmp folder rooted at:
/var/lib/nginx/
By default, the permissions on the root folder are:
Drwxrwx--- nginx root 4096 Oct 2 11:18 nginx
One workaround is to reassign the owner on the root folder in a recursive way:
# sudo chown -R nobody /var/lib/nginx
Drwxrwx---   nobody root 4096 Oct  2 11:18 nginx