
Overview
This guide describes the various feature of EMERSE and how they can be used. The guide is directed towards regular EMERSE users. For technical details about implementing and running the system from an administrative perspective, please see our other guides.
What’s new
Those that have used older versions of EMERSE may note that the user interface has undergone a substantial overhaul. The new interface is meant to be more visually appealing, easier to understand, and easier to navigate. While the overall core functionality and layout is similar to prior verions, you may note that a few things have changed:
-
The Dates feature is now a Filters feature which includes dates as well as other elements that you can now filter on including demographics and document sources.
-
Some items have been renamed to make them clearer and more consistent.
-
Quick Terms has been renamed to Temporary Terms
-
Term Bundles have been partially renamed to Saved Terms
-
All Patient Search has been renamed to Find Patients
-
Merge Lists has been renamed to Compare Patient Lists
-
-
A few interface elements have been changed/removed.
-
The older 'tab' style has been replaced with a new style
-
The free text entry box for Quick Terms has been replaced with a data entry field for terms that is more consistent with the Saved Terms and less confusing with the Advanced Terms
-
A few other new features added:
-
There is now a Network feature to allow you to search across a network of EMERSE sites. This is still in the early phases and may not be available at all EMERSE installations.
-
A new Synonyms Preference feature that provides granular control over multiple potential datasets, if your administrator has loaded them in to use.
There are multiple other "under the hood" technical changes that should make the system more responsive and more powerful.
What is EMERSE?
EMERSE is a search engine, sometimes referred to as an information retrieval system, for identifying terms and concepts in free text clinical notes from electronic health records. It is similar to a natural language processing (NLP) system, but EMERSE was designed mostly to be a simple, quick system to help people find the information they need, and to require minimal training to use.
EMERSE was not designed to automatically "code" information. In other words, it was not designed to find a concept, assign it a code, and then build up a spreadsheet of the concepts. Rather, it will help you find the information but it will still be up to you to decide if the context is correct, and how the concept should be coded.
EMERSE is a mature, feature rich application that has been in development since 2005. EMERSE should be considered to be a 'tool' in a toolbox of multiple software applications to support the data needs of users. It can work well in environments with other existing and commonly used tools. For example, EMERSE (which focuses on free text) complements systems such as i2b2 Workbench (which focuses on the coded, structure data). It also works well in environments that have tools such as REDCap, which is commonly used for electronic data capture. Of course, EMERSE can be used standalone as well, without other software tools.
An example of a typical workflow might include identifying an initial cohort based on structured data within i2b2 (ICD-10 codes, lab values, etc) and then searching that cohort within EMERSE. Data abstracted from EMERSE would then be stored within REDCap. However, many other software tools can be used in conjunction with EMERSE, depending on local needs and workflows.
Citing EMERSE
The EMERSE team is proud to be able to provide high-quality research software at no cost. But to be able to maintain our team’s funding it is vital for us to demonstrate the value EMERSE has provided—value often measured in the form of peer-reviewed publications that have used EMERSE. If you use EMERSE in any way (cohort identification, data abstraction, or other tasks) please consider citing us in your paper:
Hanauer DA, Mei Q, Law J, Khanna R, Zheng K. Supporting information retrieval from electronic health records: A report of University of Michigan's nine-year experience in developing and using the Electronic Medical Record Search Engine (EMERSE). J Biomed Inform. 2015 Jun;55:290-300. doi: 10.1016/j.jbi.2015.05.003. Epub 2015 May 13. PMID: 25979153; PMCID: PMC4527540.
This paper is also available from Pubmed
A full list of papers that have used EMERSE can be found at https://project-emerse.org/publications.html.
EHR systems that work with EMERSE
EMERSE was designed to be vendor "agnostic" with respect to electronic health record (EHR) systems. That is, EMERSE is not directly coupled to any specific EHR. If there is a way to get data our of your EHR it should be possible to get it into EMERSE.
How can EMERSE be obtained?
EMERSE is available free of charge with open source licensing. However, it does require a technical team to install it, move data into it, and then manage the system including ensuring security, provisioning accounts, etc. Our other guides provide substantial detail on the processes required to install and operate EMERSE.
Who should use EMERSE?
Anyone who has a need to find data "buried" within clinical notes could benefit from using EMERSE. EMERSE can be used for a wide variety of clinical and translational research tasks, as well as non-research tasks. A few examples are described below. On the project-emerse website there are brief use case videos of real users describing how EMERSE has benefited their work. Further examples of research supported by EMERSE are provided in a list of peer-reviewed publications.
Research Use Case Examples
-
Reviews preparatory to research: EMERSE is great for a review preparatory to research, where you want to estimate the number of patients available for a study in order to determine whether a study is feasible or not.
-
Rare diseases: EMERSE can quickly find mentions of rare disease in the notes, which is especially helpful when billing codes are too broad or used incorrectly. For example, there is only once ICD-10 code to represent all 13 types of Ehlers-Danlos syndrome. To find the specific type of interest, you would need to search the free text.
-
Eligibility determination: For studies in which eligibility determination is complex and may rely on data only captured within the free text portion of documents, EMERSE can be a rapid way to check for mentions of inclusion/exclusion criteria.
-
Data abstraction: For patients already on a study, EMERSE can be used to identify data for abstraction. These could include treatment courses, side effects, adverse events, or anything about the patient that requires a chart review.
Operational Use Case Examples
-
Quality Improvement (QI): EMERSE can be used for QI activities such as infection control monitoring. For example: Informatics and the American College of Surgeons National Surgical Quality Improvement Program: automated processes could replace manual record review.
-
Risk Management: Such tasks could include identifying falls or finding patients with device/implant recalls.
-
Health Information Management (HIM): HIM teams can use EMERSE for a wide variety of tasks including support for outside records, identifying unapproved abbreviations, contact moves, historical inpatients/outpatient volume searching, and even consents.
-
Billing/Coding: The billing/coding teams can use EMERSE to help identify supporting information, or verify that necessary details are actually mentioned in the notes. Using EMERSE can help save an institution hundreds of thousands of dollars each year!
-
Cancer Registries: Cancer Registrars can use EMERSE for a wide variety of data abstraction tasks including difficult-to-find information such as genetic and biomarker testing.
Clinical Use Case Examples
-
Clinical Chart Review: EMERSE can be used to help find details about a patient rapidly, even during a clinical visit. For example, if a patient mentions that a certain medication helped their migraine 3 years ago but can’t remember the name of the medication, just search the chart for 'migraine' and find that note within seconds.
-
Prior authorizations: Often an insurance company won’t approve a specific drug unless documentation can be provided that cheaper alternatives were used without success. EMERSE can be used to find mentions of those ineffective alternatives very quickly.
| EMERSE was designed to work with patient data. Therefore, access will be almost certainly be limited, and each site will have policies in place about who can or cannot have access to the system, and under what circumstances that access can be granted or revoked. In general, institutional review board (IRB) approval will always be required for EMERSE access when research is being conducted, whereas other types of requirements/approvals will need to be in place for other access types such as clinical care, operations, quality improvement, education, etc. |
Guide Conventions
There are a few conventions used throughout the guide to ensure consistency and ease of understanding of the concepts discussed.
Italicized phrase
Most of the time an italicized phrase will refer to a specific component of EMERSE that a user can access or utilize.
Navigation and action elements
EMERSE provides multiple approaches for moving around within the system or selecting an action for the system to do. This can sometimes be a button, or a clickable icon, or other options. In this guide these elements will be highlighted with a box around it.
Terms
Terms, sometimes called Search Terms or Keywords, will usually be shown in a monospace font to help them stand out from the rest of the text in this guide. They will also sometimes be shown with a colored background to show how they might be highlighted by the system.
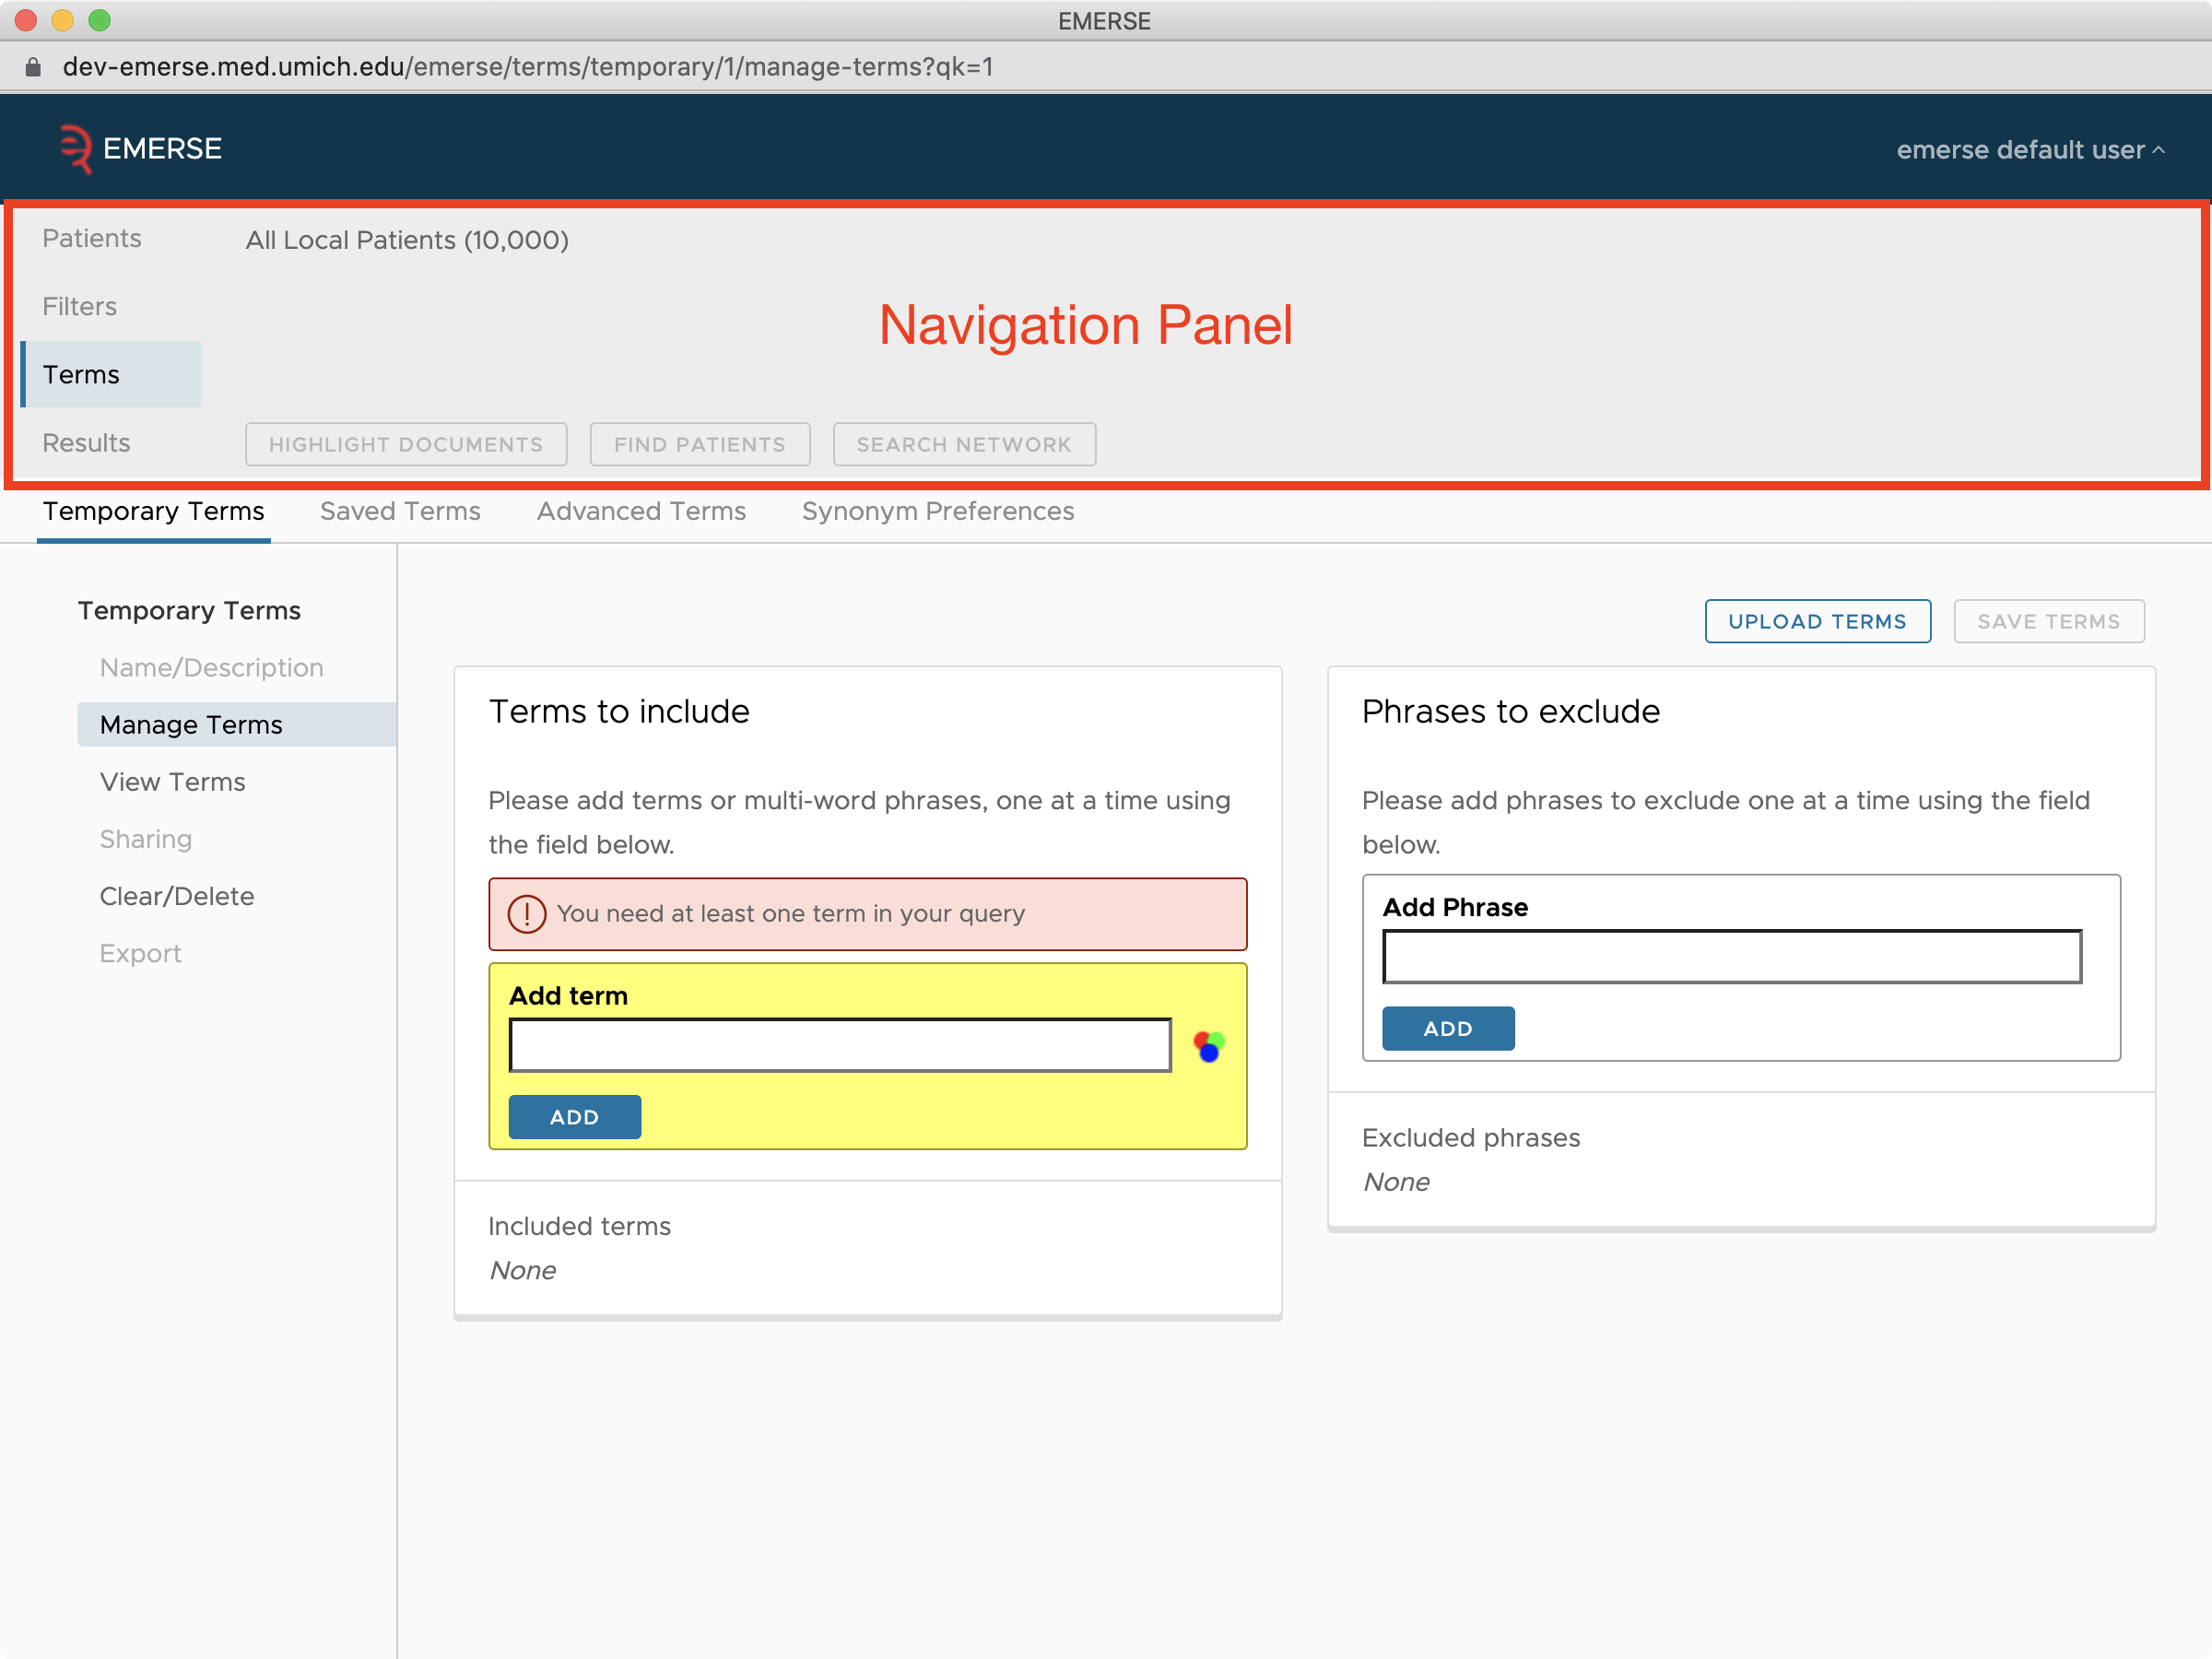
The Navigation Panel is the area at the top of EMERSE that contains many of the navigation elements (buttons) in the system, as well as other information that can be useful to users such as the currently select patients and search terms.
When "Documents" are mentioned, this means clinical documents generated by a clinician about a patient. These documents are also commonly referred to as "Notes" or even "Reports" and often these terms are used interchangeably.
How to Get Help
There are various ways to get help or learn more about EMERSE. This guide is a good place to start. Also consider asking a colleague. Another place to look are the online videos. If you need more help, please ask your local EMERSE site administrator, especially if it deals with account and access information. If all else fails, you can contact the EMERSE team at the University of Michigan, which is where EMERSE was originally developed.
Moving Around Within EMERSE
EMERSE was designed as a "single-page application". This means that new screens within EMERSE are actually loaded within the same web page. You should generally avoid using the browser’s back button to go to previous pages. Rather, use only the buttons presented within the EMERSE application to navigate around. In other words, if you want to go "back" to a certain page, navigate back to that page by using the buttons that EMERSE displays.
Many things are clickable in EMERSE, even if they are not highlighted as such. It is safe to click around and try things out. You can’t ruin anything or change the original documents.
Most of the tables can be sorted. To sort a specific column in a table, click on the text in the column header of interest. Columns that are sorted should have small arrow pointing in the sort direction (up or down). To sort in the opposite direction, just click on the column header again.
EMERSE supports roles/privileges which are configured locally at each site. Depending on your specific role, some parts of EMERSE may not be accessible to you. If you think this is a problem, contact your local EMERSE administrator.
Getting Started and Logging In
To get started with EMERSE you will need an account. Because EMERSE contains protected health information, access will be limited. Access will be provided by your local institution, and requirements for access may vary. You will need institutional review board (IRB) approval for research. Additional training may also be required, especially as it related to human subjects research. You will likely need other reviews and approvals for non-research use (quality improvement work, operational work, etc.), which will be determined based on local policies.
Attestation Page
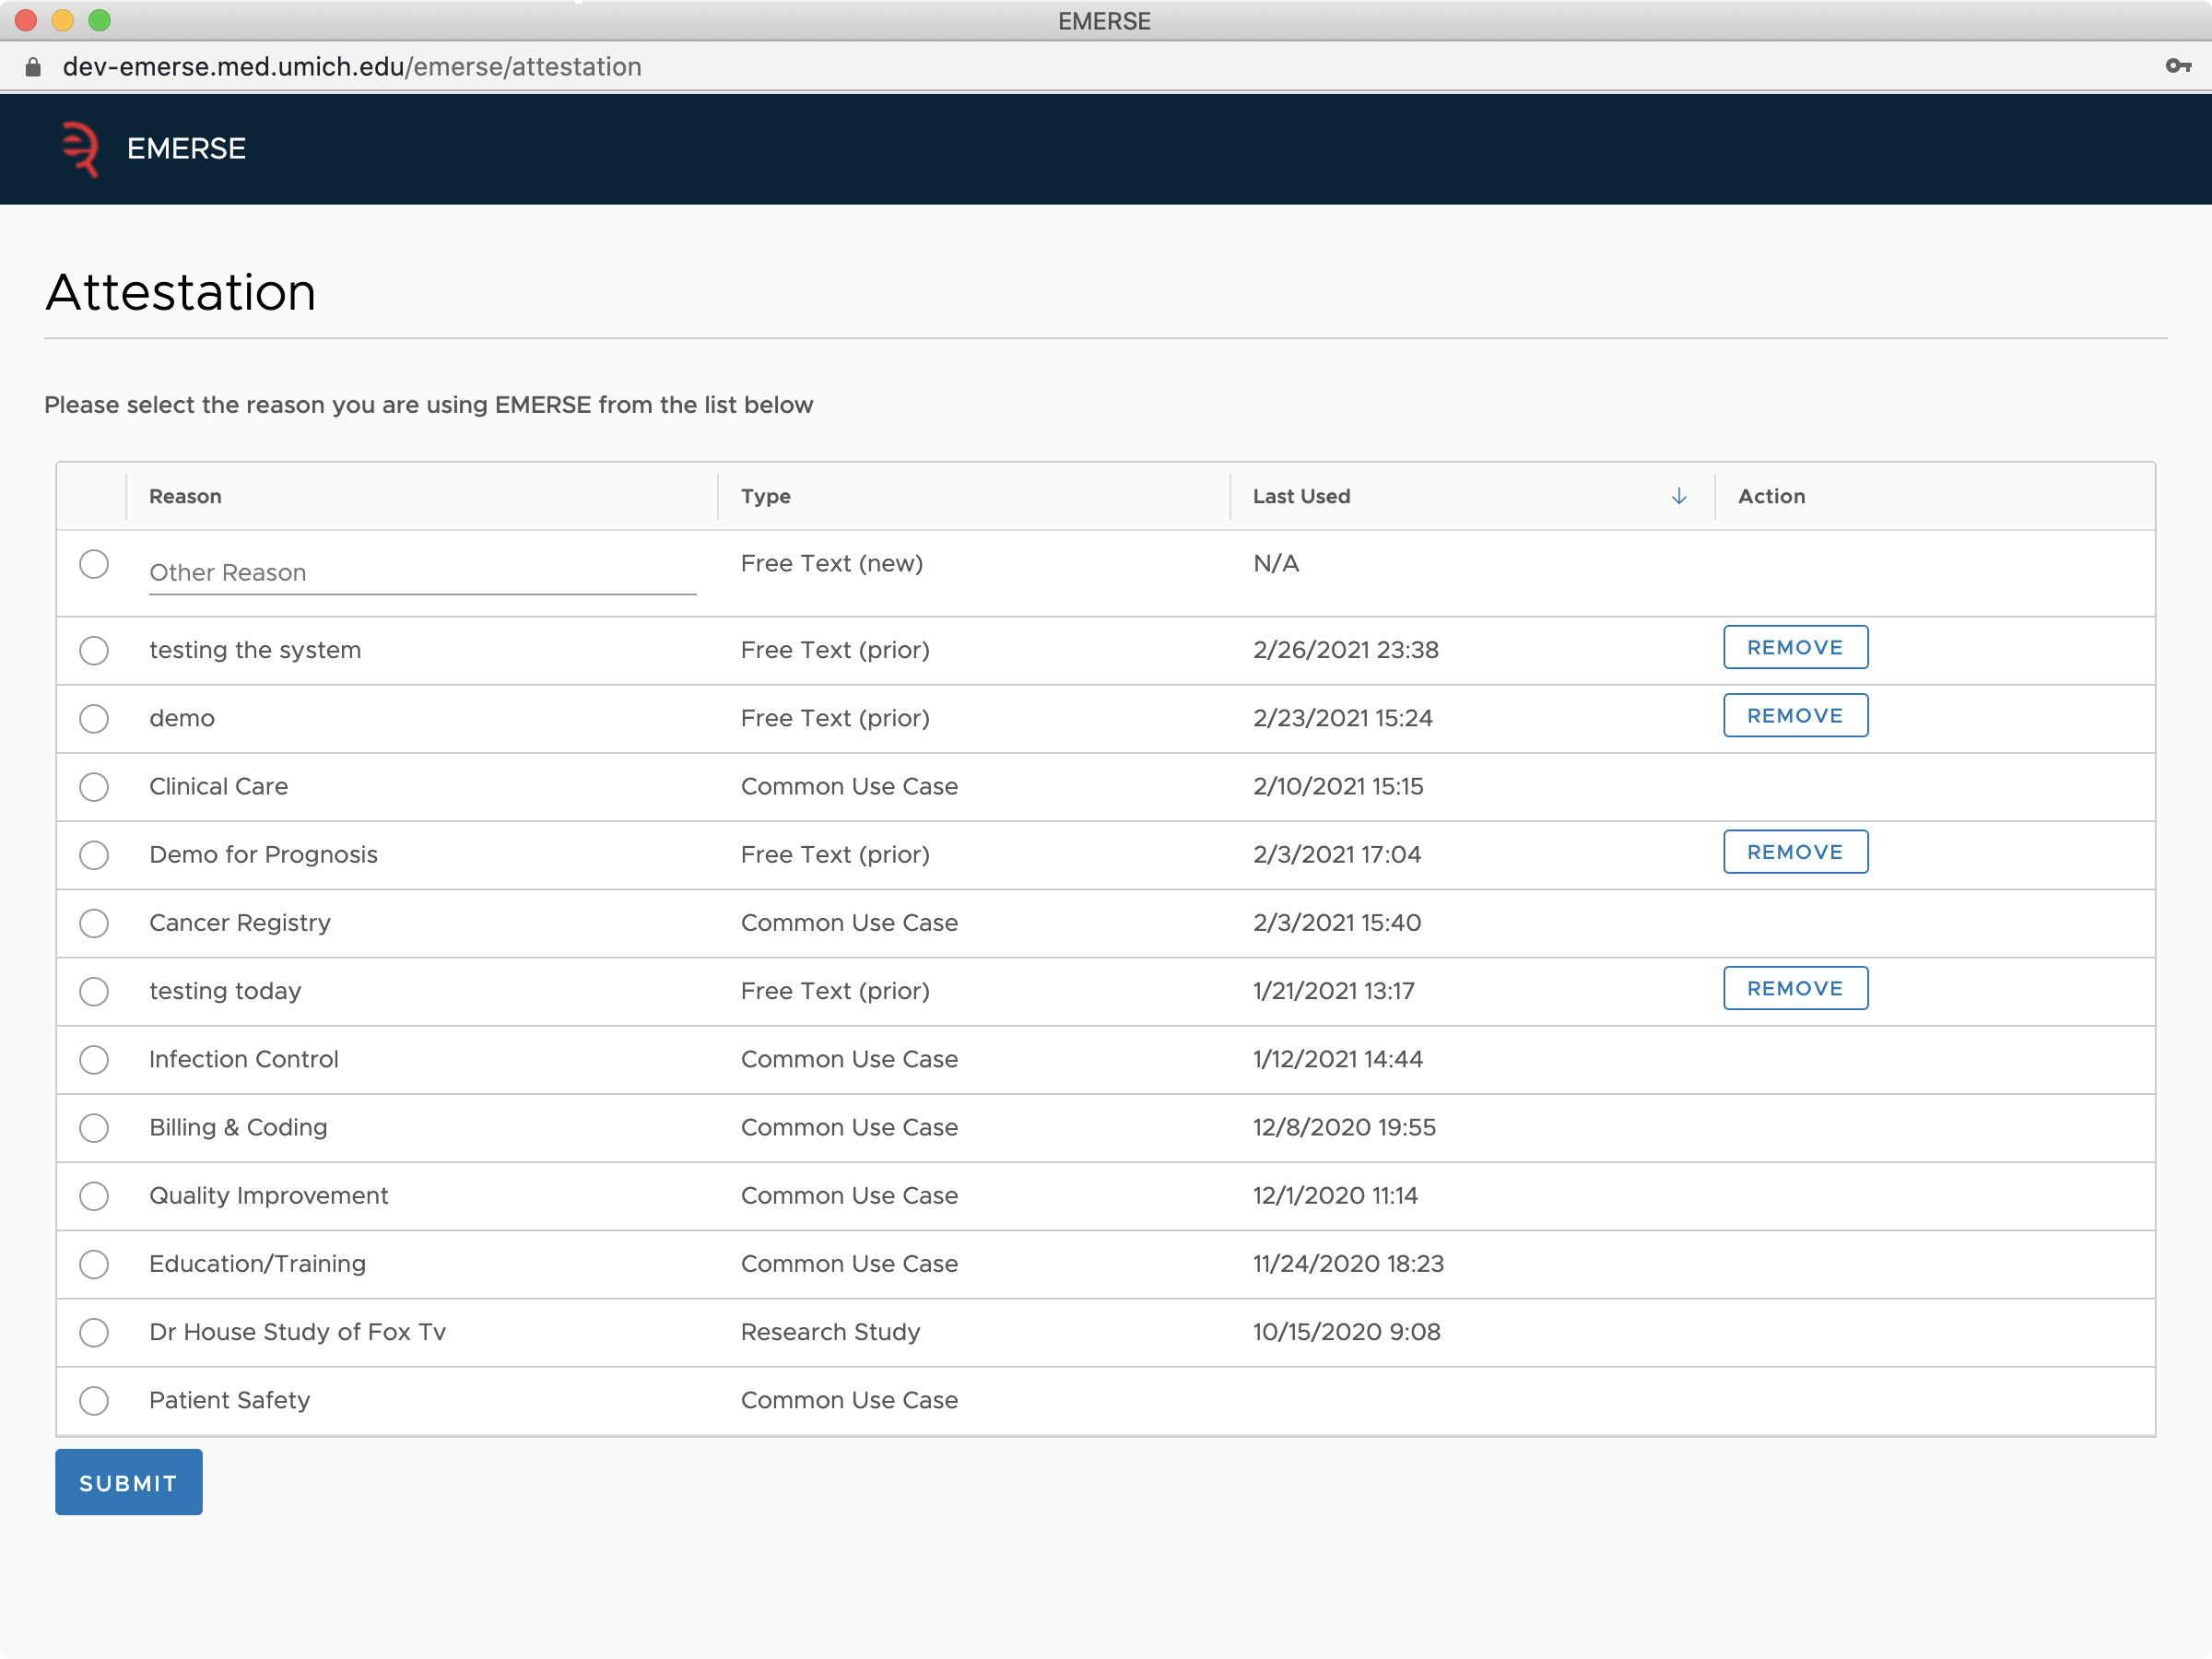
The Attestation Page is the first page you will land on after logging in to EMERSE. It is the page on which you define your specific reason for using EMERSE for that particular login session. This information is stored in the logs (audit trails) to capture specific use cases when looking up patient information. There is currently no way to change your Attestation selection once you have logged into EMERSE for a specific user-session. If you need to change it, log out of EMERSE and then log back in again. You can view your currently selected Attestation within EMERSE by clicking on the menu in the upper right section of the Navigation Panel.
| The entries/selections on this page get recorded in the official audit trails which may be reviewed periodically to ensure that reasons for access are valid. |
| There are three high-level Types of options on the Attestation Page that may or may not be available to you, depending on how EMERSE has been configured at your institution, described below. |
Common Use Case
Common Use Cases (e.g., "Quality Improvement", "Clinical Care", etc) are set by your local site’s system administrators, and your system administrators can add or remove options to best fit the most common use cases at your site. Clicking the option will record that reason in the log files.
Research Study
Research Studies should display valid IRB-approved studies for which you are involved. How these studies get populated from their source systems (such as an electronic IRB tracking system) will differ for each EMERSE installation, but note that sometimes there can be delays between the time a study is approved and the time that it shows up in the Attestation table.
The Table on the Attestation Page displays two types of entries. Non-research entries are prior reasons for using EMERSE that have been typed into the Free Text Box (see above).
Free Text (Other Reason)
This provide a free text option to enter your reason for using EMERSE. You can type in anything, but it should ideally be brief and should sufficiently describe why you are using the system. This free text box should really only be used as a last resort, in cases where you are unable to find any other options that match your reason for using EMERSE. Once you submit your response, it will be listed in the Table as a Free Text entry during future logins. These can be removed from the table at any time by clicking on the Remove button.
Patients
There are three overall approaches for searching with EMERSE, based on whether you are:
-
Searching across All Local Patients without pre-defining a patient list (in which case you are likely identifying a cohort). The term Local is used here to emphasize that those are all the patients in the local EMERSE system you are using.
-
Working with a Patient List of known patients, in which case you are likely conducting a chart review. The Patient Lists are themselves divided into two categories: Temporary and Saved. Each is described below.
-
Searching across the Network of EMERSE sites, in which case you can get approximate counts from other sites but will not be able to view any notes or protected health information (PHI) from those other sites.
| An important distinction to understand is that the way EMERSE searches differs depending on whether it is an All Local Patients search or a search across a pre-defined Patient List. These differences are described in detail in the section discussing the Terms. A Network search behaves similar to an All Local Patients search. |
When first logging into EMERSE, after completing the Attestion Page you will always land on a page where All Local Patients are selected. This is to ensure that you will be able to complete a search even if you do not know the patients you want to search. If you want to search a known set of patients instead, this can be changed with just a few button clicks.
All Local Patients
All Local Patients (sometimes referred to as All Patients, or even simply All) is the default setting after logging into EMERSE. As the name implies, this setting will search across all of the patients in the local EMERSE system. To select All Local Patients any other time, simply click on Patients → All Local Patients and then click on the single row in the table to choose "All patients in the EMERSE system". When this is selected, the system will show the phrase "All Local Patients" next to the Patients button in the upper-left of the Navigation Panel, as well as the total patient count in parentheses. After choosing All Local Patients, navigate to the Terms to enter your search terms, then click on the Find Patients button to identify the patient set.
When searching across All Local Patients you will be able to see an overall patient count that matches the search criteria, a subset of up to 100 text snippets (Summaries) to quickly review the context of what was found, a summary of the Demographics of the patients that were found, and a graph of the frequency of the patients containing the term(s) of interest over time (Trends).
| A Summary in EMERSE is a small snippet of text that shows the keyword or phrase of interest (the search term) highlighted with additional text (about 20-30 characters or 5-6 words) on either side to show the term in its original context. This is to enable rapidly skimming the results and a better understanding of the results in context. |
To review patients found through an All Patient search in more detail, the patients first have to be moved to a Patient List, described below.
Patient Lists
Patient lists are based on medical record numbers (MRNs). Each patient list can contain anywhere from a single patient up to 100,000 patients per list. Patient lists can be created through a search across All Local Patients (using Find Patients ), or by entering a set of medical record numbers. You can also apply Find Patients to an existing patient list to reduce it further based on the presence of additional search terms.
Depending on your local configuration, it may also be possible to have a patient list automatically submitted to EMERSE from another system (such as i2b2), which would then appear as a Saved Patient List, described below.
There are two basic types of patient lists: Temporary and Saved and there are difference between the two types regarding what you can do with them and when you should use them. The following table provides a high level overview of these differences, with additional details following.
Feature |
Temporary Patient List |
Saved Patient List |
Maximum number of patients per list |
100,000 |
100,000 |
Maximum number of lists per user |
1 |
Unlimited |
Ideal for "Reviews Preparatory To Research" |
Yes |
No |
Ideal for teams working together from the same list |
No |
Yes |
Supports sharing with other users |
No |
Yes |
Saved between sessions |
No |
Yes |
Supports Tags |
No |
Yes |
Supports Comments |
No |
Yes |
Supports Exporting/Saving to Excel |
No |
Yes |
Can be used with the Compare Patient Lists feature |
No |
Yes |
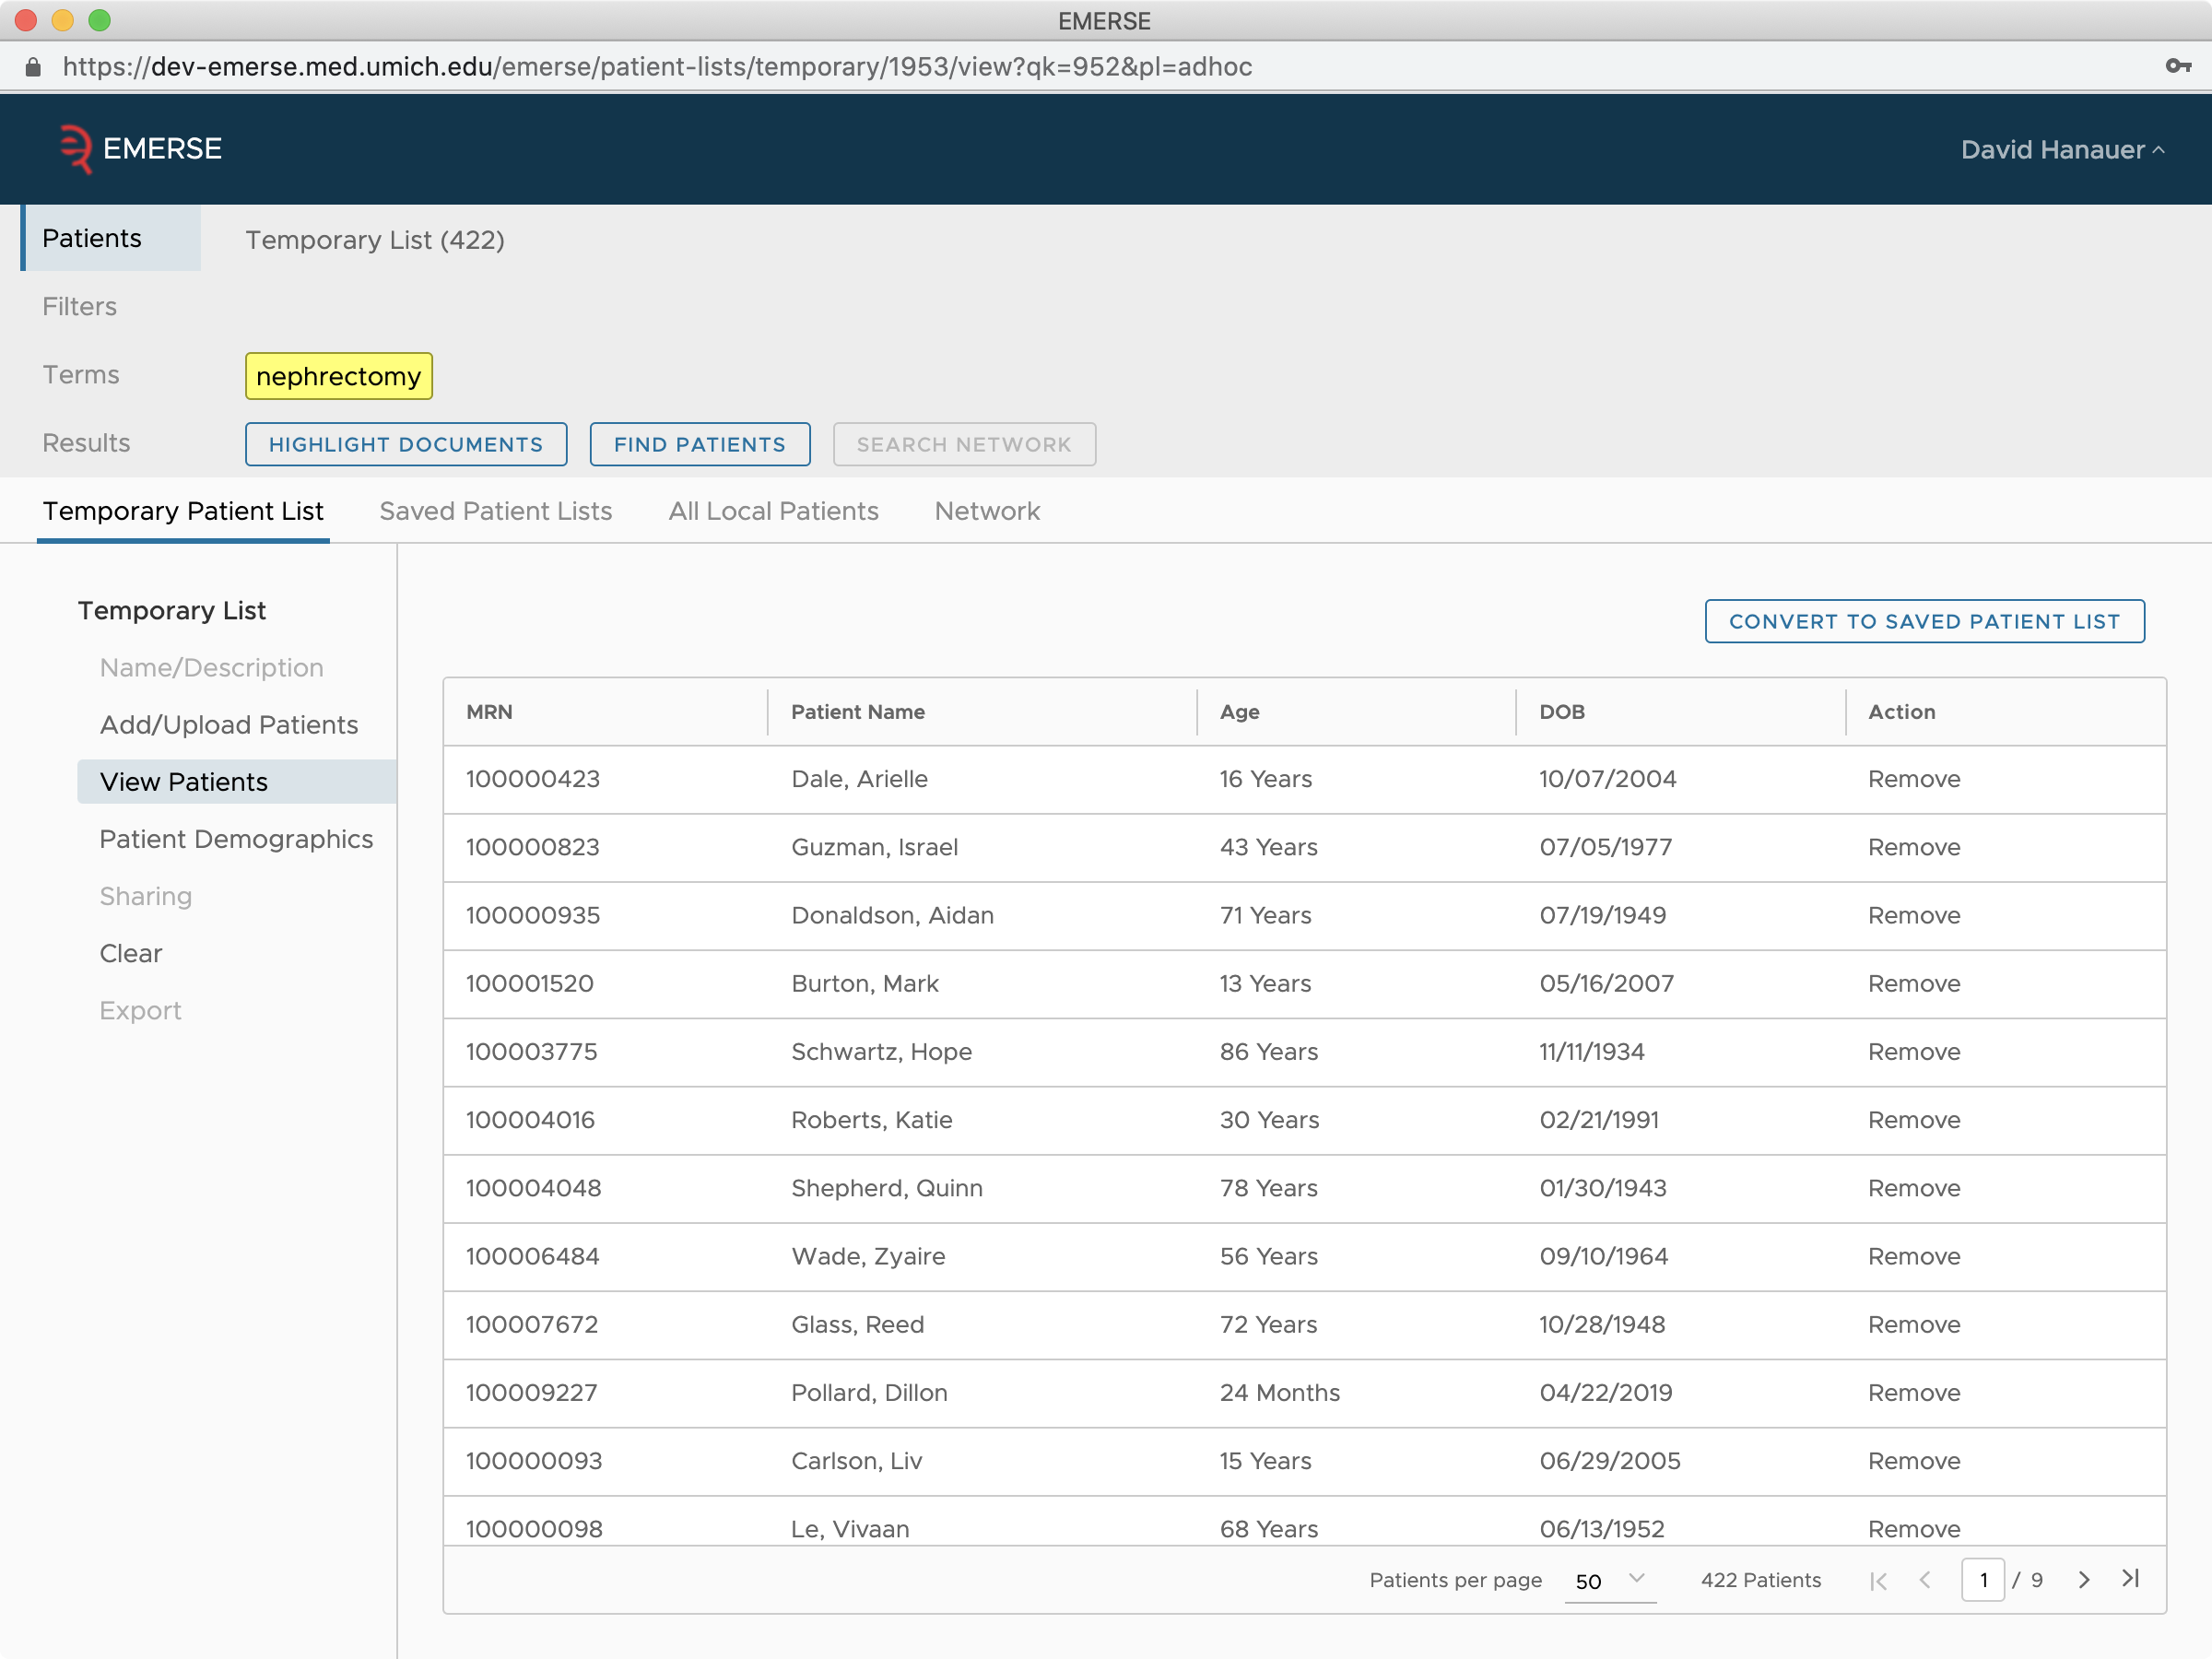
Temporary Patient List
A Temporary Patient List is a list that a user can make and use during a single user session but will not be saved between sessions unless it is converted to a Saved Patient List. That is, it can be used for a single session but is erased when the user logs out. Such a list is useful in cases where a patient, or set of patients, needs to be reviewed but there is no need to save the list of patients for another time. A "review preparatory to research" should utilize this Temporary Patient List since such a list should not be saved during this type of research review activity.
A Temporary Patient List is meant to be fast and simple, and has a limited set of features. By contrast, a Saved Patient List (see next section) provides more features. For example, with a Temporary Patient List it is not possible to share the list with other users, nor is it possible to annotate the list with Comments or Tags, both of which are only possible with a Saved Patient List.
Converting to a Saved Patient List
A Temporary Patient List can be converted to a Saved Patient List by clicking on the Convert to Saved Patient List button, which can be found on the View Patients screen.
Adding Patients to a Temporary Patient List
Patient can be added to a Temporary Patient List by selecting the Add/Upload Option. Among these options, you can copy-paste in a column or medical record numbers (MRNS) (from an Excel file, for example), or even upload a plain text file with each MRN on each line.

Removing Patients from a Temporary Patient List
To remove a single patient from a Temporary Patient List simply click on View Patients and then the Remove link associated with the patient. Or, to remove all of them from the list at once, choose the Clear element for the Temporary Patient List and then select the Clear All Patients option.
Saved Patient Lists
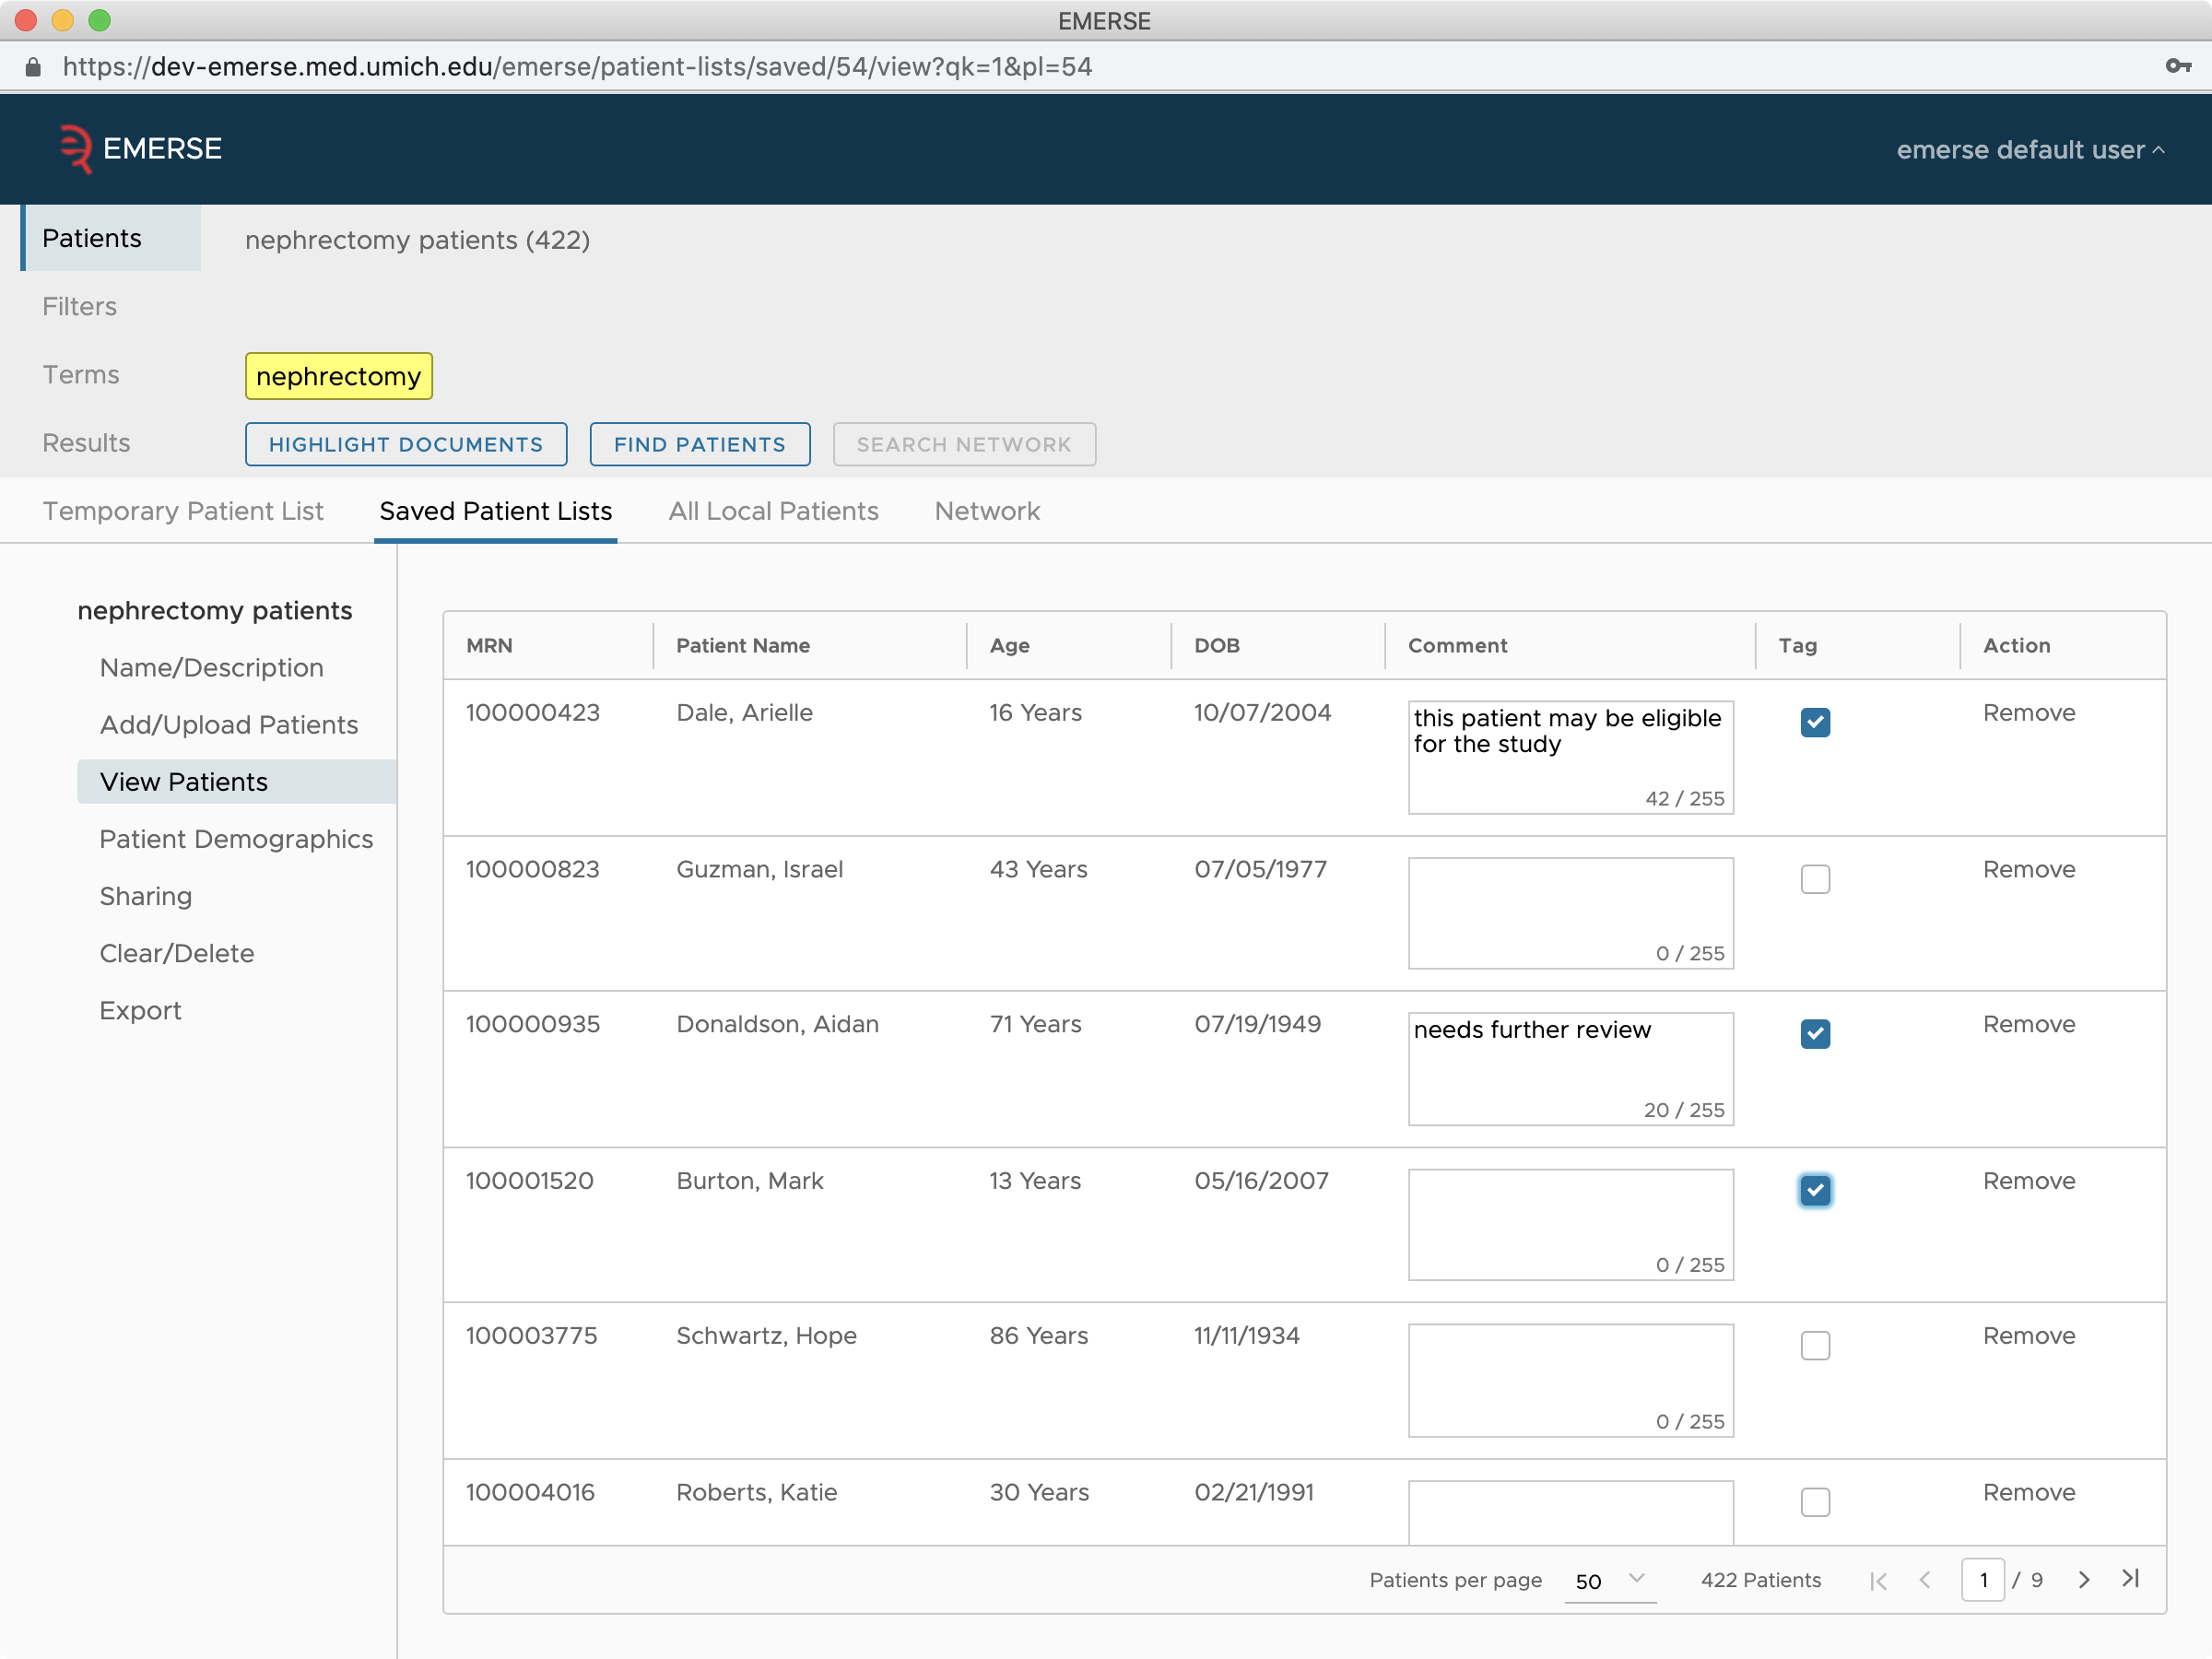
A Saved Patient List is a list that a user can make and save between sessions. There is no limit to the number of Saved Patient Lists that a user can have, and each list can contain between 1 and 100,000 patients. Because these lists are saved, each list should be given a name and a description, available under Name/Description. A Saved Patient List is very similar to a Temporary Patient List but there are several notable advantages when using the Saved Patient List.
Sharing Saved Patient Lists
These Saved Patient Lists can be shared with other EMERSE users. To share them, first make sure the list has been selected, click on Sharing and enter the user IDs of those who should have access to the list. These other users will be able to view the list, but because they are not the "owner" of the list they will not be able to add new patients or remove existing patients. However, these users will be able to add/edit the Comments and Tags, both of which are described below. These Comments and Tags belong to the list and are shared and available to all users who have access to the list. Thus, among teams sharing a Saved Patient List, it is important to establish a protocol for changing these Comments and Tags since one user could modify (or delete) a Comment or Tag entered by another user. Further details about Comments and Tags can be found below.
Comments
A Comment is a short bit of text that can be entered by users who are reviewing patients in a Saved Patient List. These Comments can be used for any purpose but could be useful for recording notes about the patients as the reviews occurring. For example, if a study coordinator/data abstractor has a question about a patient that needs additional review by the study team, the Comment section would be a good place to enter that. It could be also used for some simple/basic data abstraction. Comments (and Tags) can be exported to an Excel file. Exporting Saved Patient Lists is described in a separate section. Comments are saved immediately when a user clicks out of, or removes focus from, a Comment field.
| EMERSE is not intended to be a full-fledged electronic data capture system. For storing data as you are reviewing records in EMERSE you may need an additional system running in tandem with EMERSE, such as REDCap. |
Tags
Tags are a simple, yet powerful, way to help manage the patient lists. While just a simple checkbox, Tags can be used in multiple ways. For example, Tags are useful when reviewing patients in a Saved Patient List to mark patients of interest. Similar to Comments, it is up to each user (or team sharing the list) to determine how the Tag should be used, but a common use would be to mark certain patients as being eligible for a study. The Tags belong to the patient list and all users who have access to the Saved Patient List will see the Tag and be able to change it. Tags are saved immediately upon clicking on the checkbox (either checked or unchecked). Another use for Tags is to mark patients based on a Find Patients search. For example, you can enter a search term, and select Find Patients to identify all the patients in the list with that term. Then you can choose the option to Tag Patients in List which will add a Tag to each of the patients in the list that has the term (or terms) of interest. From there, you could then navigate to the patient list itself and clear all of the untagged patients to reduce the list to only those with the term of interest (see the next section on Removing Patients).
Removing Patients from a Saved Patient List
It is possible to individually remove patients from a Saved Patient List by simply clicking on View Patients tab and then the Remove link next to each patient’s name. Or, to remove all of them from the list at once, choose the Clear/Delete option for that list and then click on Clear All Patients . Clearing (but not deleting) the list could be advantageous in cases where you want to preserve the sharing settings for a group of users but want to work with a new set of patients in the list.
You can also remove patients that are tagged, or those that are untagged, depending on your specific use case. Tags can be applied automatically after using the Find Patients feature applied to the list (see prior section on Tags).
Deleting A Saved Patient List
It is also possible to delete the entire list by pressing the Delete Patient List button under the Clear/Delete option. Be careful because once it is deleted there is no undo option.
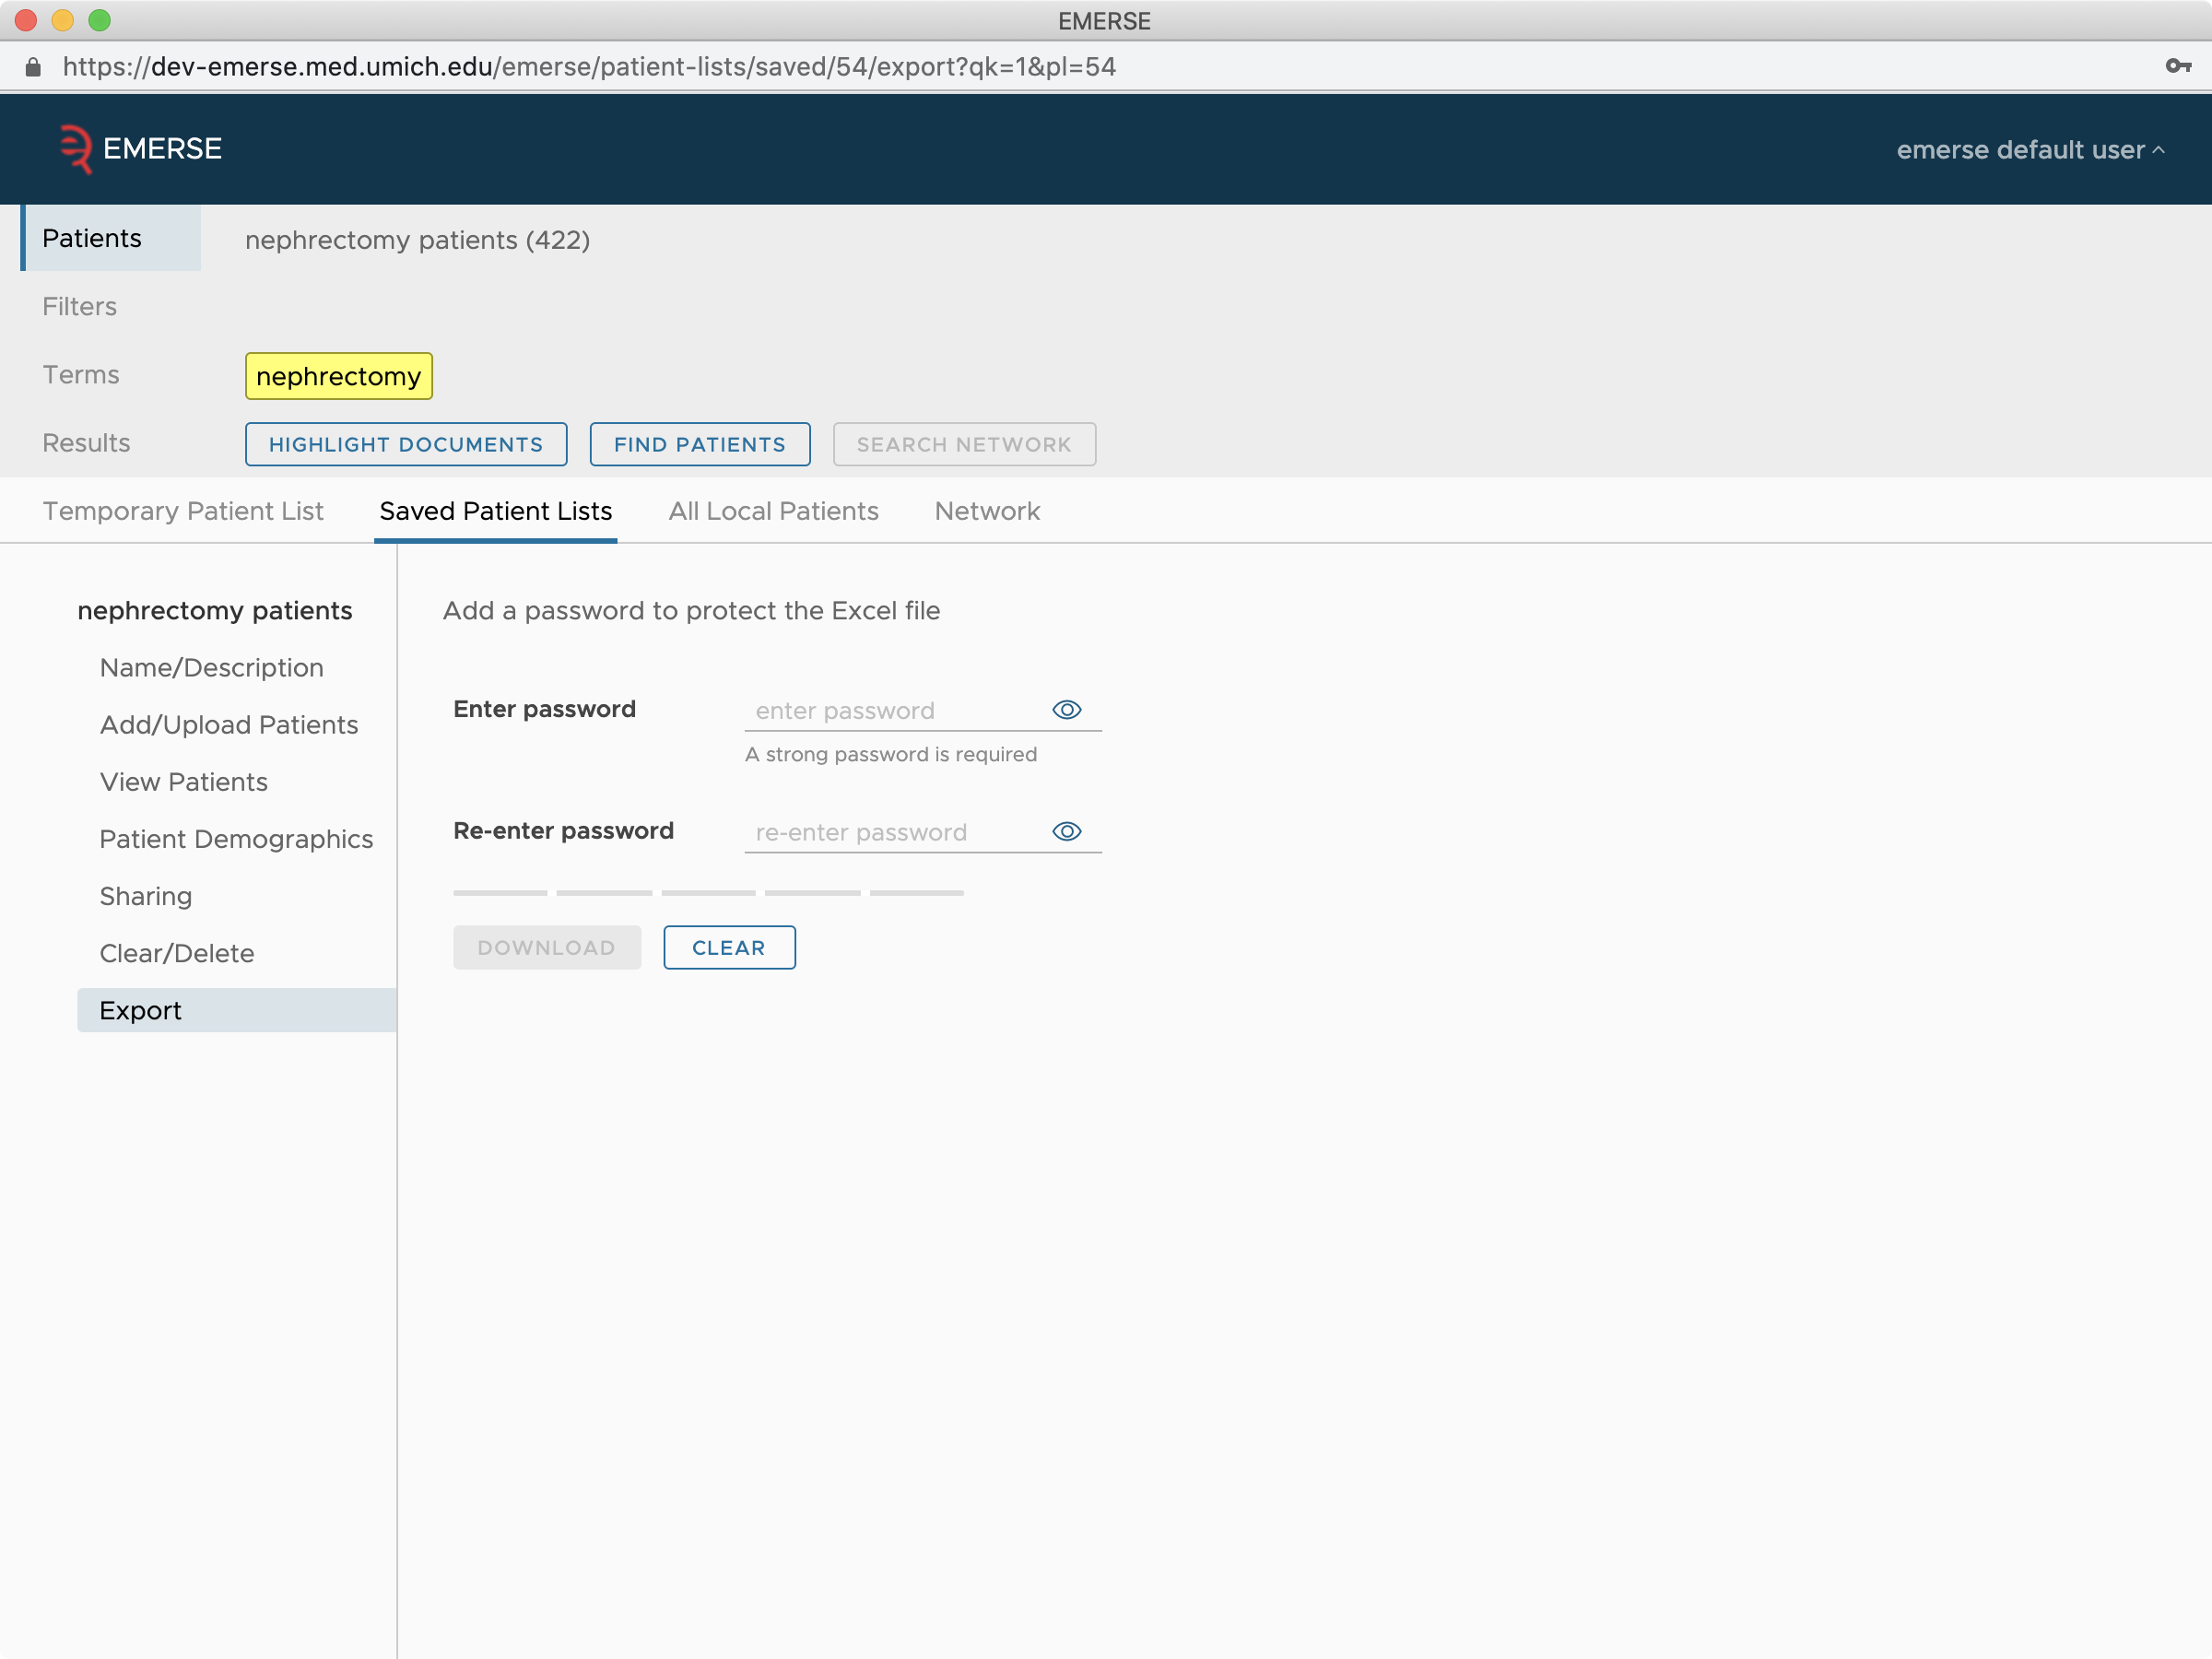
Exporting a Saved Patient List
Saved Patient Lists can be exported/saved as an Excel spreadsheet. The file requires a password which must be added at the time of saving it. The exported spreadsheet will contain each patient’s name, medical record number, date of birth, current age, other demographics, and any Comments or Tags that were added. This can be useful for a variety of reasons, including importing the list into another system such as REDCap.
Moving Patients to a Patient List
Patients identified using the Find Patients feature can be moved to a Temporary Patient List for more detailed searching and viewing of their notes. Once the Find Patients search is completed, simply click on the button called Move to Temporary Patient List. This will transfer the set of patients identified from a Find Patients search to a Temporary Patient List, which is not saved between sessions. Once that move occurs, the list of patients will be shown. To then change that Temporary Patient List to a Saved Patient List (the latter of which is saved between sessions), simply click on the button called Convert to Saved Patient List.
Adding Patients to a Patient List
In addition to moving patients to a list from a Find Patients search, patients can also be added to a list (either an existing list or a new list). This process is the same regardless of whether you are using a Temporary Patient List or a Saved Patient List. Entering patients is done via the Add/Upload Patients option for the patient lists. To enter new patients, you can type each MRN one-by-one into the MRN text entry box, or you can paste an entire set of MRNs at once. For example, you can copy and paste an entire column of MRNs from an Excel spreadsheet and paste them into the MRN text entry box to create a patient list. You can also upload a set of MRNs from a plain text file, with one MRN on each line. If there are already patients in a patient list, adding new MRNs will append them to the end of the existing list, up to the maximum number allowed.
Any time an MRN is entered, that MRN is checked against the complete set of patients within EMERSE. If an MRN is not found, a warning to the user will be provided. Similarly, if a duplicate MRN is entered for a list, the duplicates will be removed automatically and the user will be alerted.
Compare Patient Lists
The Compare Patients Lists feature allows for two Saved Patient Lists to be compared to each other with respect to the patients contained within each list. This feature can be accessed via the Compare Patient Lists button which can be found above the table displaying the Saved Patient Lists.
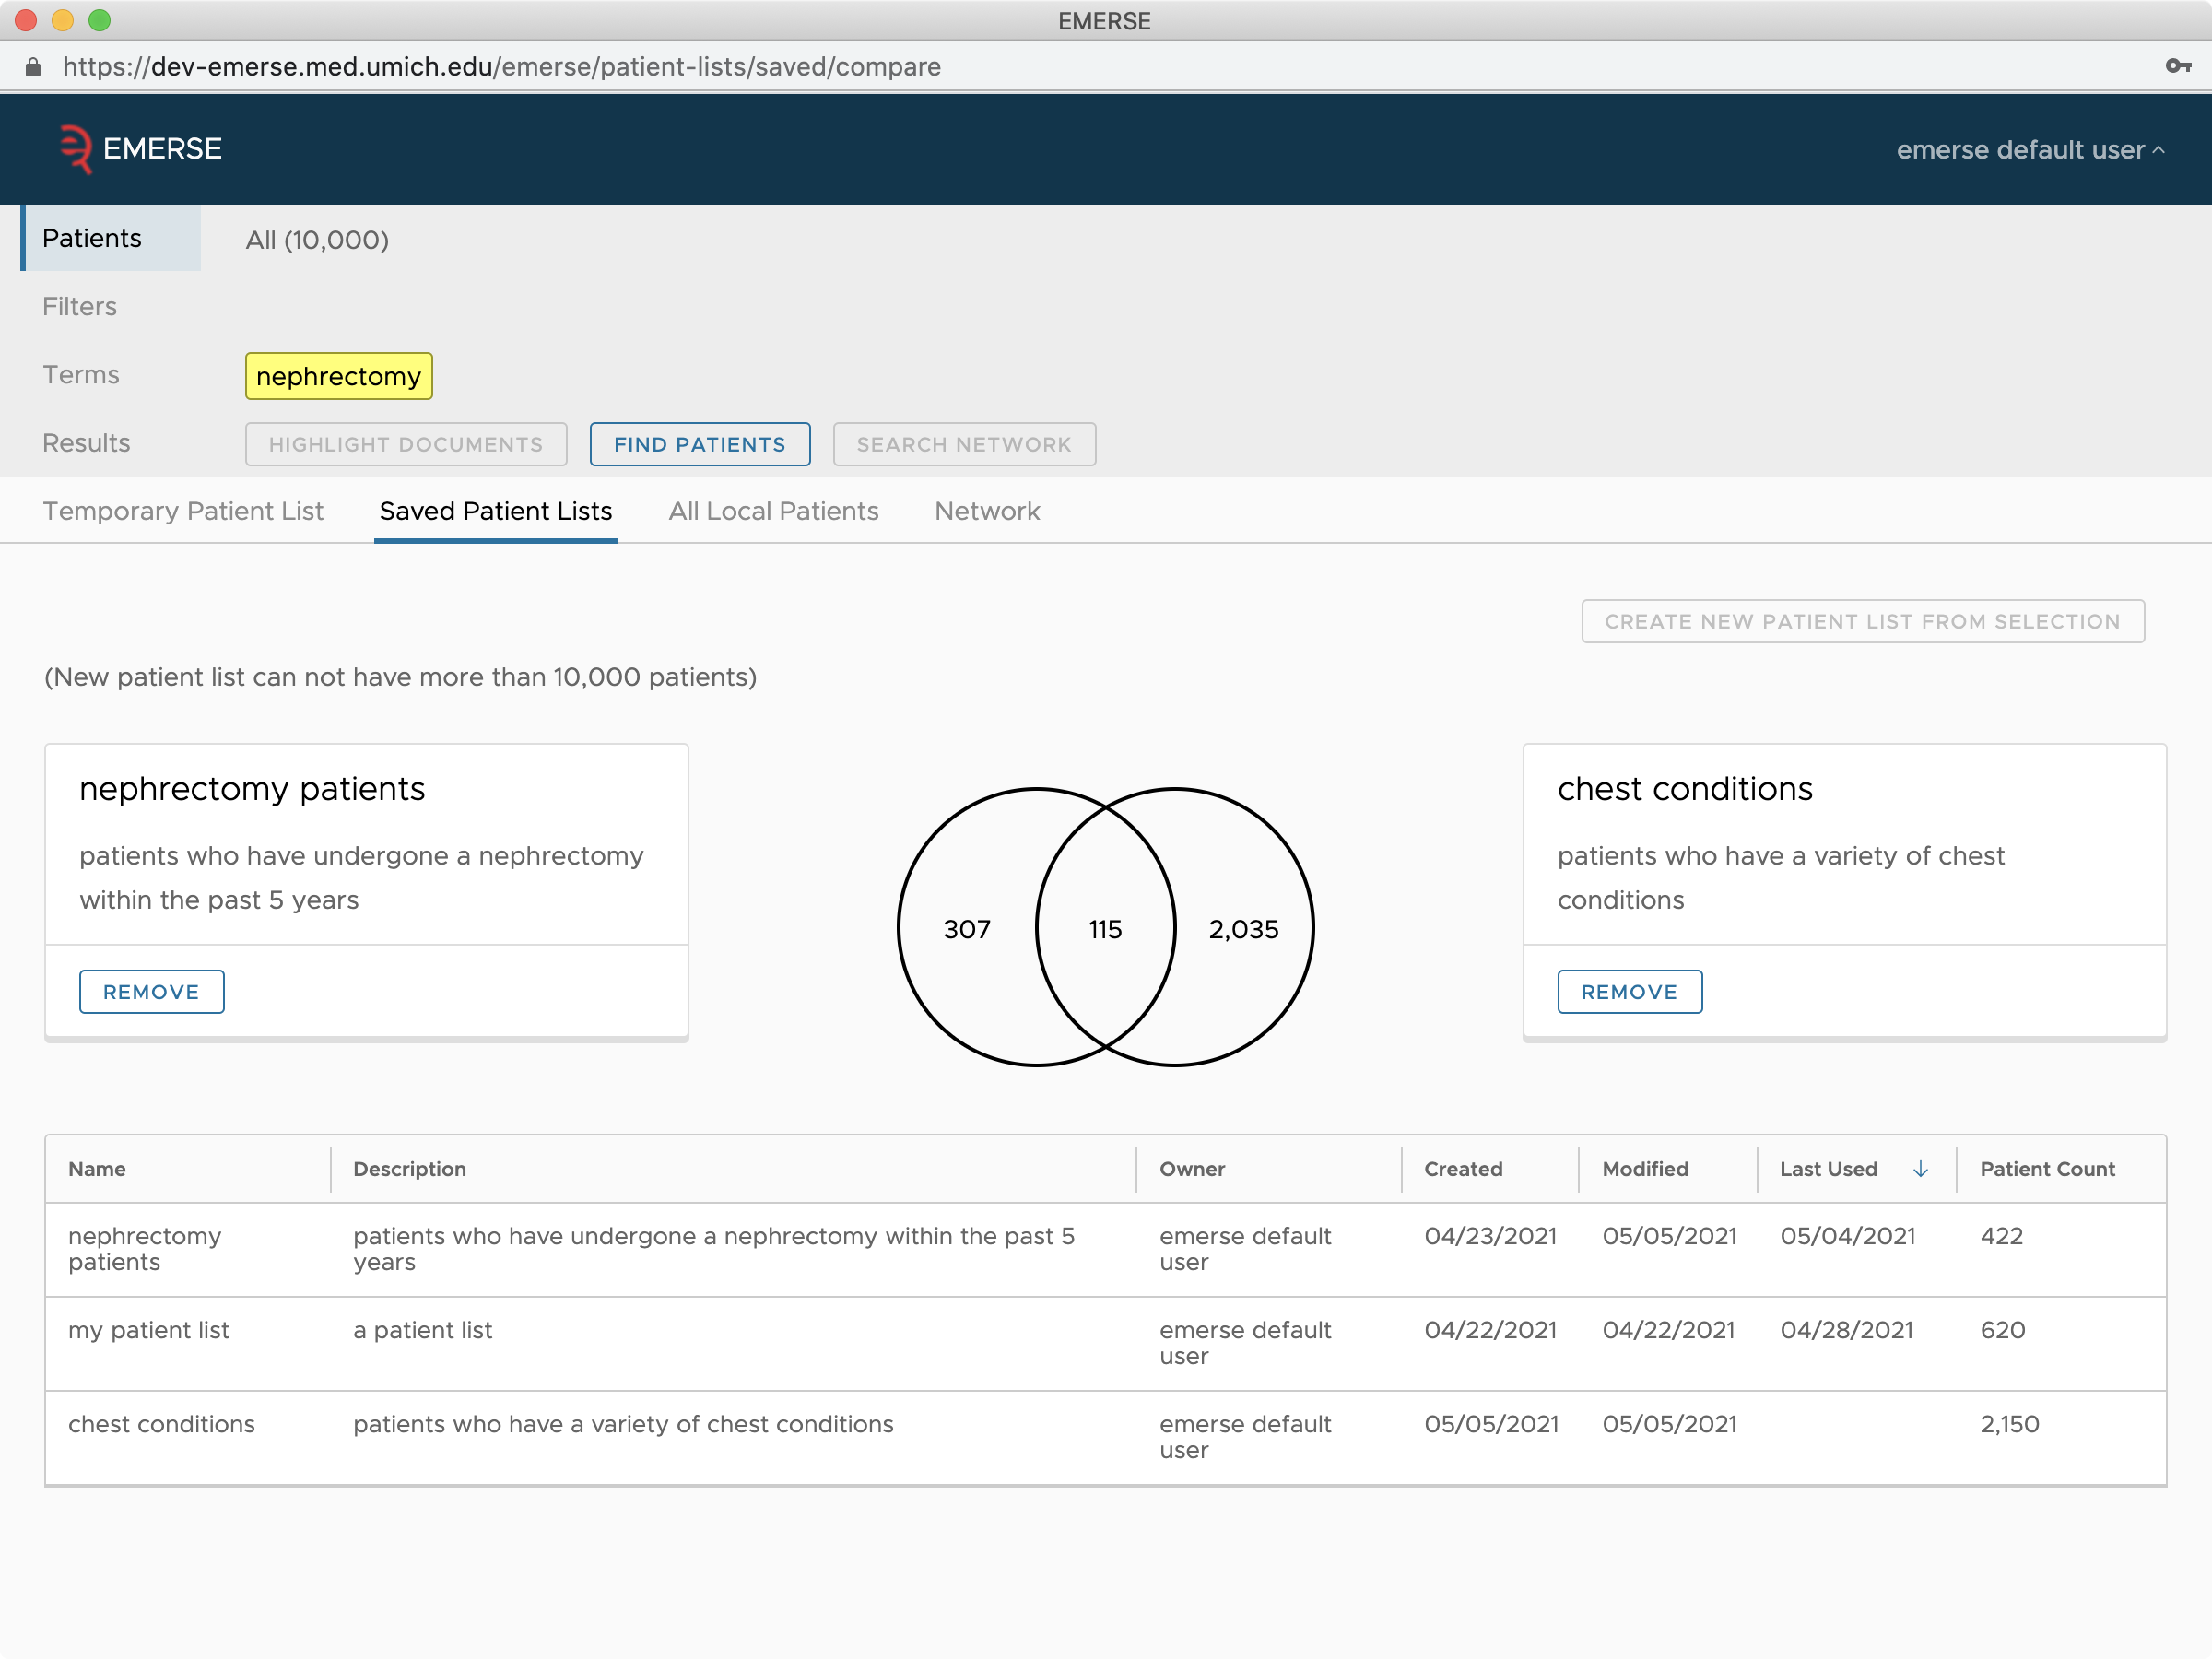
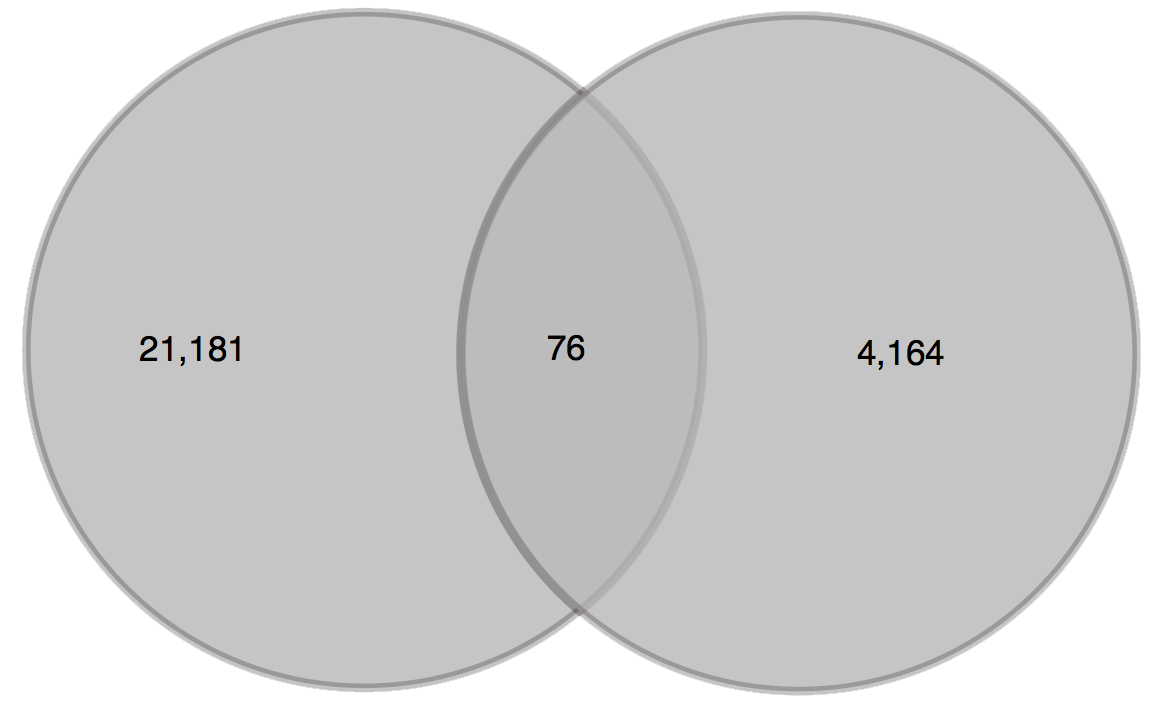
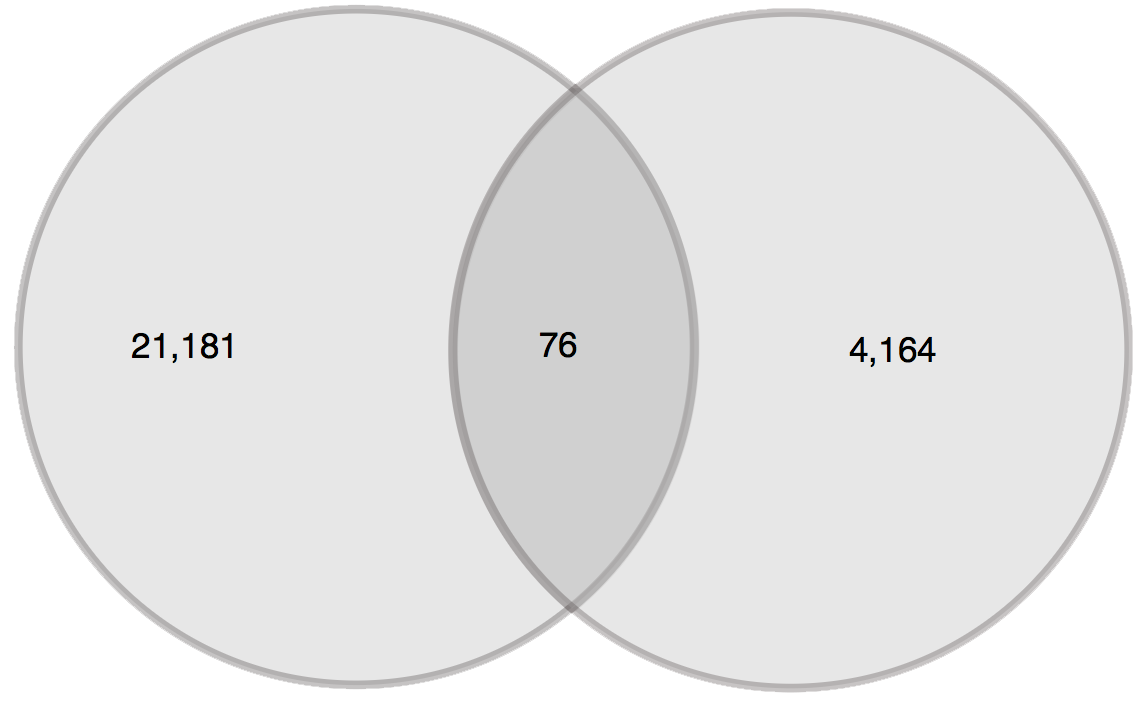
Compare Patients Lists provides functionality that can be useful for separating out only those patients of interest that may be found among two lists. This feature essentially builds a Venn diagram showing the overlap of patients between any two Saved Patient Lists. You can then select any part of the diagram you are interested in simply by clicking on the appropriate section of the diagram. Once your selection is finalized, click on the Create New Patient List From Selection button and you will then have a new Saved Patient List based on your selection (you will have to provide a Name and Description for the new list). Note that when lists are merged, duplicates will be removed automatically. The original lists used for the comparison will not be modified.
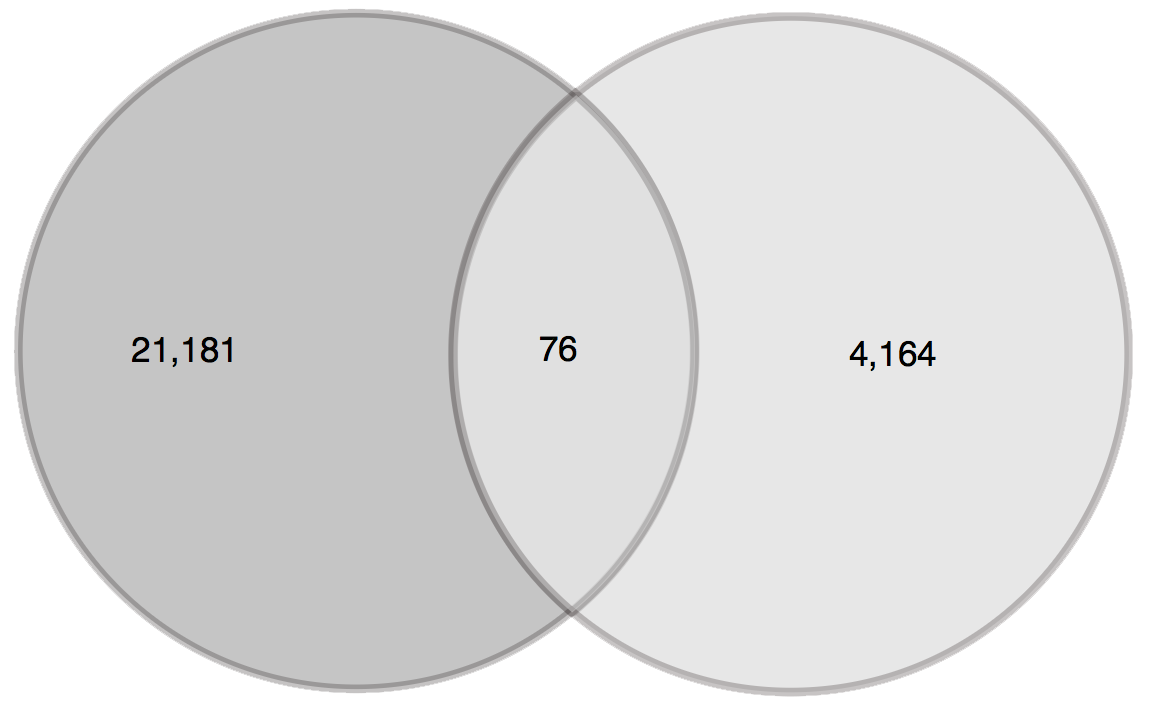
All patients in List 1 that are not in List 2 |
|
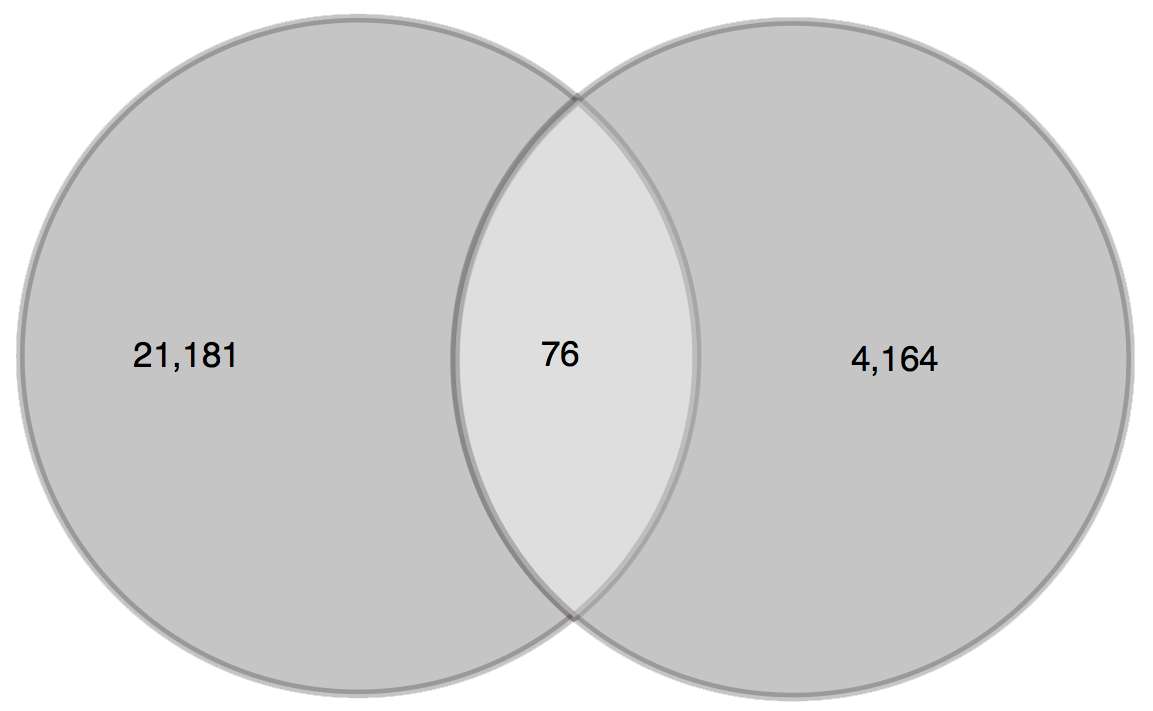
Only those patients from List 1 and List 2 that are not already in both lists |
|
All patients from Lists 1 and 2 (an actual merge) |
|
All patients in List 2 that are not in List 1 |
|
Only those patients that were originally in both List 1 and List 2 |
|

It may be useful to use the Compare Patient Lists feature when you want to compare patients found through different approaches for obtaining the patient lists. For example, suppose you find a set of patients who had "back pain" and a separate set of patients who had "acupuncture". Using the Compare Patient Lists feature you can find the set of all patients who had both concepts mentioned in their notes at least once, even if the mentions were in completely separate notes or sections of the EHR.
Or, suppose you have a set of patients with a diagnosis of "amyotrophic lateral sclerosis" (List 1) and now you want to exclude any patients with a mention of "packs per year" (List 2). You can make two separate lists, one based on each search. Then using the Compare Patients Lists feature, you can select out the list of patients from List 1 that did not also appear in List 2.
Finally, some have used this feature to reduce a list obtained from an external source to make it more relevant. For example, suppose you have a list of 10,000 patients from a registry and now you want to know which ones mention a certain drug, paclitaxel. You can upload the list of patients from the registry (List 1). Separately you can run a Find Patients search for the word paclitaxel (List 2) and then use the Compare Patient Lists feature to identify only those patients that appeared in both lists. As of EMERSE version 6.1, this same kind of result can also be achieved by using the Find Patients feature applied to the original patient list, followed by Tagging the patients of interest and then clearing the Untagged patients.
Network Patients
As of EMERSE version 6.3, searching across a network of EMERSE sites is now possible. The decision to participate in this network depends on the leadership/administrators at your local site.
If available, you can select the Network Patients option, and then select thes sites you want to include in your search. For now, there are limitations to this feature which still remains somewhat experimental.
When searching across the EMERSE Network, only patient counts can be obtained. With the network functionality it is not possible to save a patient list, or see any details about the patients, since the counts can come not only from your local EMERSE system, but from other systems at research centers across the country.
Many more details are described in the overall section on the Network.
Obsolete medical record numbers (MRNs)
It is not uncommon for a single patient to be assigned more than one medical record number (MRN) over time. This can happen, for example, when a patient has an existing MRN but then comes to the emergency room and is assigned a new MRN when the clerical staff are not aware of the existing one. Over time, it may become evident that the patient has two or more MRNs and then a workflow is implemented in the electronic health record system to merge the MRNs, and move all of a patient’s documents to a single MRN.
For EMERSE, this can mean that some MRNs in a saved patient list (especially an older list) can have obsolete MRNs, as some of the MRNs in the list may have been re-assigned to newer MRNs. If this is the case, EMERSE will display a warning to the user when a Saved Patient List is opened. The list will automatically be sorted so that the Obsolete patient MRNs are at the top of the list, and a new column (called Obsolete) will appear to the right to help notify the user which MRNs are no longer valid. You can then easily remove the patient(s) from the list if you are the list owner. A similar message will appear in the Overview section of EMERSE, to warn about the obsolete MRNs. A few additional visual reminders will be invoked, such as line through the name/MRN to help you identify which ones are obsolete: For example: Jane Doe 100346543.
EMERSE does not currently have the capability of telling you what the new, correct MRN is, and it is not able to automatically assign the obsolete patient MRN to the new MRN. However, it will be important for you to be aware of the changes so that you can also check for consistency of MRNs across other research systems where the older, obsolete MRN may be entered, such as a clinical data capture system (e.g., REDCap). Because EMERSE is not able to report on what the new MRN is, you will have to identify the updated MRN in the original source system which is likely to be your electronic health record (EHR) system.
| This Obsolete MRN feature will only be enabled if your local system administrators are updating the patient database within EMERSE regarding MRNs that have been made obsolete. Additional technical descriptions about patient merges can be found here. |
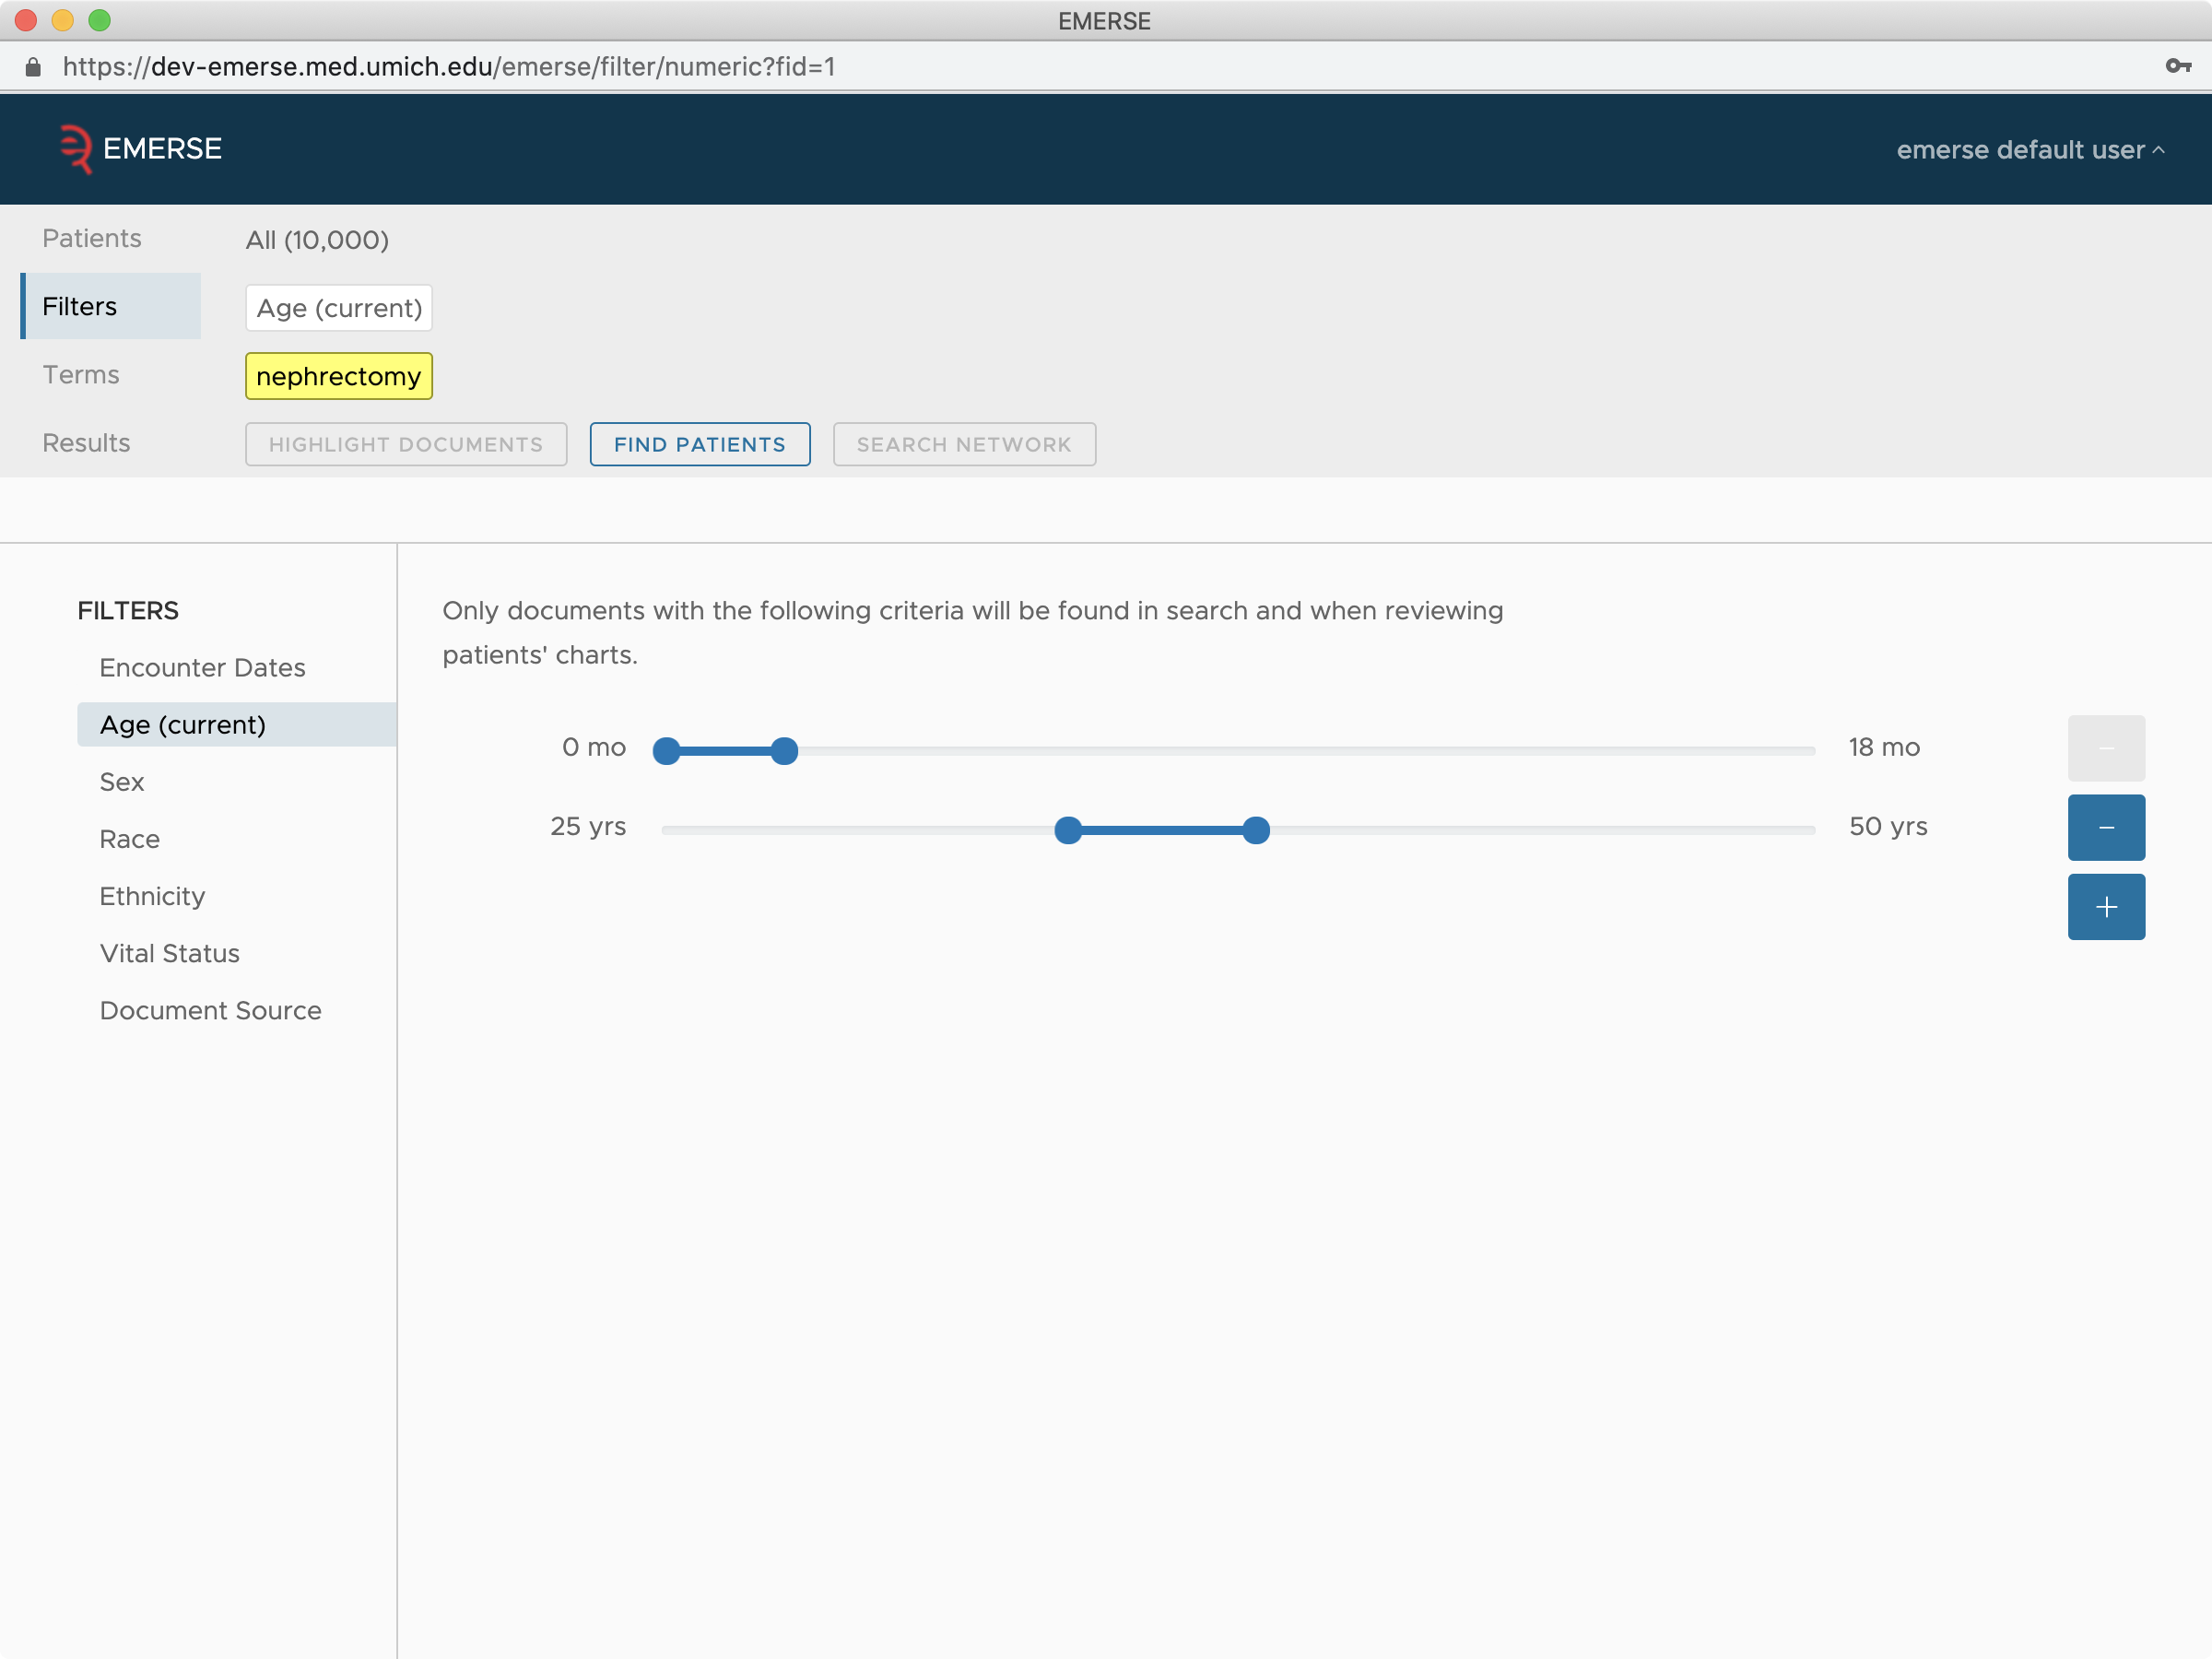
Filters
Filters are a way to reduce/limit the search results based on Filter criteria. The Filters should generally be straighforward to use, but there are a few details about how they work that are worth knowing. Some filters work at the level of the documents (e.g., Encounter Dates and Document Source) and other Filters work at the level of the patient (e.g., Sex, Race, Current Age, etc.).
| Using Filters means that EMERSE has to check for additional criteria to make sure that the patients or documents meets the filter criteria. As a result you will generally notice that a search using Filters will take longer than a search without using Filters. However, this wait time should be offset with more relevant results that will take less time to look through. |
EMERSE generally has two major types of search modes, described in the section on Searching: Highlight Documents and Find Patients. Filters work a bit differently depending on these two modes.
Filters using Find Patients
With Find Patients the Filters will reduce the entire patient list returned, since the system will Filter at the patient level. If a patient has at least one document that matches the criteria and the patient also matches the filter criteria, they will be counted in the results.
Filters using Highlight Documents
With Highlight Documents each patient will still be shown in the Overview table regardless of matching at the patient level. However, the results displayed for that patient will depend on what matches the filter criteria. Only documents that match the criteria will be displayed. Futher, if the patient overall does not match the criteria, then no documents will be displayed for that patient even if some of the search terms matched. That is, the row for that patient will have no results, and no documents will be shown for that patient.
Terms
Terms are the words and phrases you specify in your searches. EMERSE provides a lot of flexibility in what you can do with terms. There are three ways to enter terms (Temporary Terms, Saved Terms--also called Term Bundles, and Advanced Terms), each of which is described in detail below.
Before getting into the details, there are several aspects about EMERSE that are worth pointing out:
-
All searches, by default, are case-insensitive. This means that you will get the same result whether you search for
HELLP syndromeorhellp syndrome(though it is possible to enable a case-sensitive search when necessary). -
"Stemming" is not turned on with the default configuration of EMERSE. This means that if you search for
echoyou will only find that exact word. You will not automatically find variations such asechoing,echoed, etc. and thus if you want those variations you will need to add them yourself. This was intentional to allow users maximum control over the terms found. For example, if you are looking forechocardigram, which is often abbreviatedecho, you would not want to find terms such asechoing. EMERSE does provide various options, described elsewhere, for expanding your search to capture these kinds of variations, including the use of wildcards and Synonyms. -
Terms can be highlighted in one of 18 colors. In fact, the reason that that EMERSE interface uses so few colors is to help the colorful Terms stand out.
-
The way EMERSE uses terms for searching depends on the searching context, and this context differs whether you are searching across all of the patient in the system (All Local Patients) or among an existing patients list (either a Temporary Patient List or a Saved Patient List). This distinction is important, and it is described in more detail in the section about Searching.
-
Many non-alphanumeric characters are ignored by EMERSE, so there is no advantage to including them in your search terms. Alphanumeric characters include the the letters
A-Zand the digits0-9. Examples of non-alphanumeric characters normally ignored by EMERSE include, but are not limited to:! ? . > < + - #This is important because there may be some things you will not be able to definitively find using EMERSE. For example, if you are looking for
HIV+patients, the+is ignored and thus from the perspective of a search you would be able to findHIVbut EMERSE cannot distinguish betweenHIV+andHIV-. (However, you could find phrases likeHIV positiveandHIV pos.) EMERSE will generally warn you when you enter Terms with those characters and will force you to remove them as a way to remind you that they aren’t included in the search itself. -
EMERSE indexes words based on what are known as "tokens". A token is usually a term separated by white space (such as a space, tab, or linefeed), or by some of the non-alphanumeric characters that are ignored (e.g.,
! ? . -etc). Thus, if you are looking forechocardiogramyou will not findecho-cardiogram(since the latter is considered two separate words when it is tokenized) unless you specifically search for that specific of variation as well (e.g.,echo cardiogram). Note that many of these variations can still be found by leveraging the Synonyms that EMERSE offers. -
EMERSE will look for problems with your Temporary Terms and your Saved Terms and provide feedback about how to fix them if they are entered with problems, with the option of fixing the problems. For example, it will look for a variety of syntax errors, most notably removing characters which are not indexed and therefore do not contribute to your search. For instance, a search of
echo-cardiogramwill be corrected toecho cardiogramsince the dash character is not indexed. Another example would be"diagnosed with ^ALL"which corrects to^"diagnosed with ALL"since case-insensitive search is not supported on words inside a phrase query. (See below for an explanation of search syntax.) -
The maximum length of any individual term/phrase is 255 characters, including spaces. However, it would be very unusual to have any single search term/phrase that long.
There are three basic types of terms you can work with: Temporary Terms, Saved Terms and Advanced Terms. Each of these are described in detail below. Additionally, the following table provides a high level overview of the differences:
| Feature | Temporary Terms | Saved Terms | Advanced Terms |
|---|---|---|---|
Maximum number of terms per list |
no limit 1 |
no limit 1 |
no limit 1 |
Supports 18 colors for terms |
Yes |
Yes |
No |
Full control over the choice of colors for terms |
Yes |
Yes |
No |
Ideal for teams working together |
No |
Yes |
No |
Supports sharing with other users |
No |
Yes |
No |
Saved between sessions |
No |
Yes |
No |
Has a Term Upload feature |
Yes |
Yes |
No |
Can take advantage of Synonym suggestions |
Yes |
Yes |
No |
Spell Checking of Terms |
Yes |
Yes |
No |
Supports the ability to search for terms in a case-sensitive manner |
Yes |
Yes |
Yes |
Supports advanced search features including customizable proximity searches, fuzzy searches, Boolean searches (AND, OR NOT), and regular expressions |
No |
No |
Yes |
1 While there is no limit on the number of terms, a large number (more than 100) will cause the system to run quite slow.
Temporary Terms and Saved Terms
Temporary Terms and Saved Terms are collections of search terms that can provide a lot of power and flexibility with searching. Temporary Terms and Saved Terms are almost identical in their functionality. The main differences is that Temporary Terms disappear after logging out and cannot be shared with other users, whereas Saved Terms are saved between sessions and can be shared with (and discovered by) other users. This sharing/reusing of search terms is important because it can help ensure reproducibility. Some research terms have even included their Saved Terms as an Appendix with their peer-reviewed publication. Another useful feature about Bundles is that you have control over the specific color for each term. This means that you can color-code concepts. For example you could make all pain medications in green, all side effects in orange, and all diagnoses of interest in blue. This can make it very efficient to visually identify concepts of interest when rapidly reviewing clinical notes.
| The phrases Saved Terms and Term Bundles are used somewhat interchangeably throughout this guide and in the application itself. To be precise, a Term Bundle is a single collection of search terms that a user can create and share, whereas Saved Terms is the overall collection of Term Bundles. |
Manage Terms
Terms should be entered in the section called Manage Terms, specifically into the small text box where it says "Add Term". These can be single words (chemotherapy) or multi-word phrases (acute lymphoblastic leukemia). One term or phrase should be entered at a time. This is so that the system can help provide suggestions about what has been entered and to help with selecting the desired colors for each term.
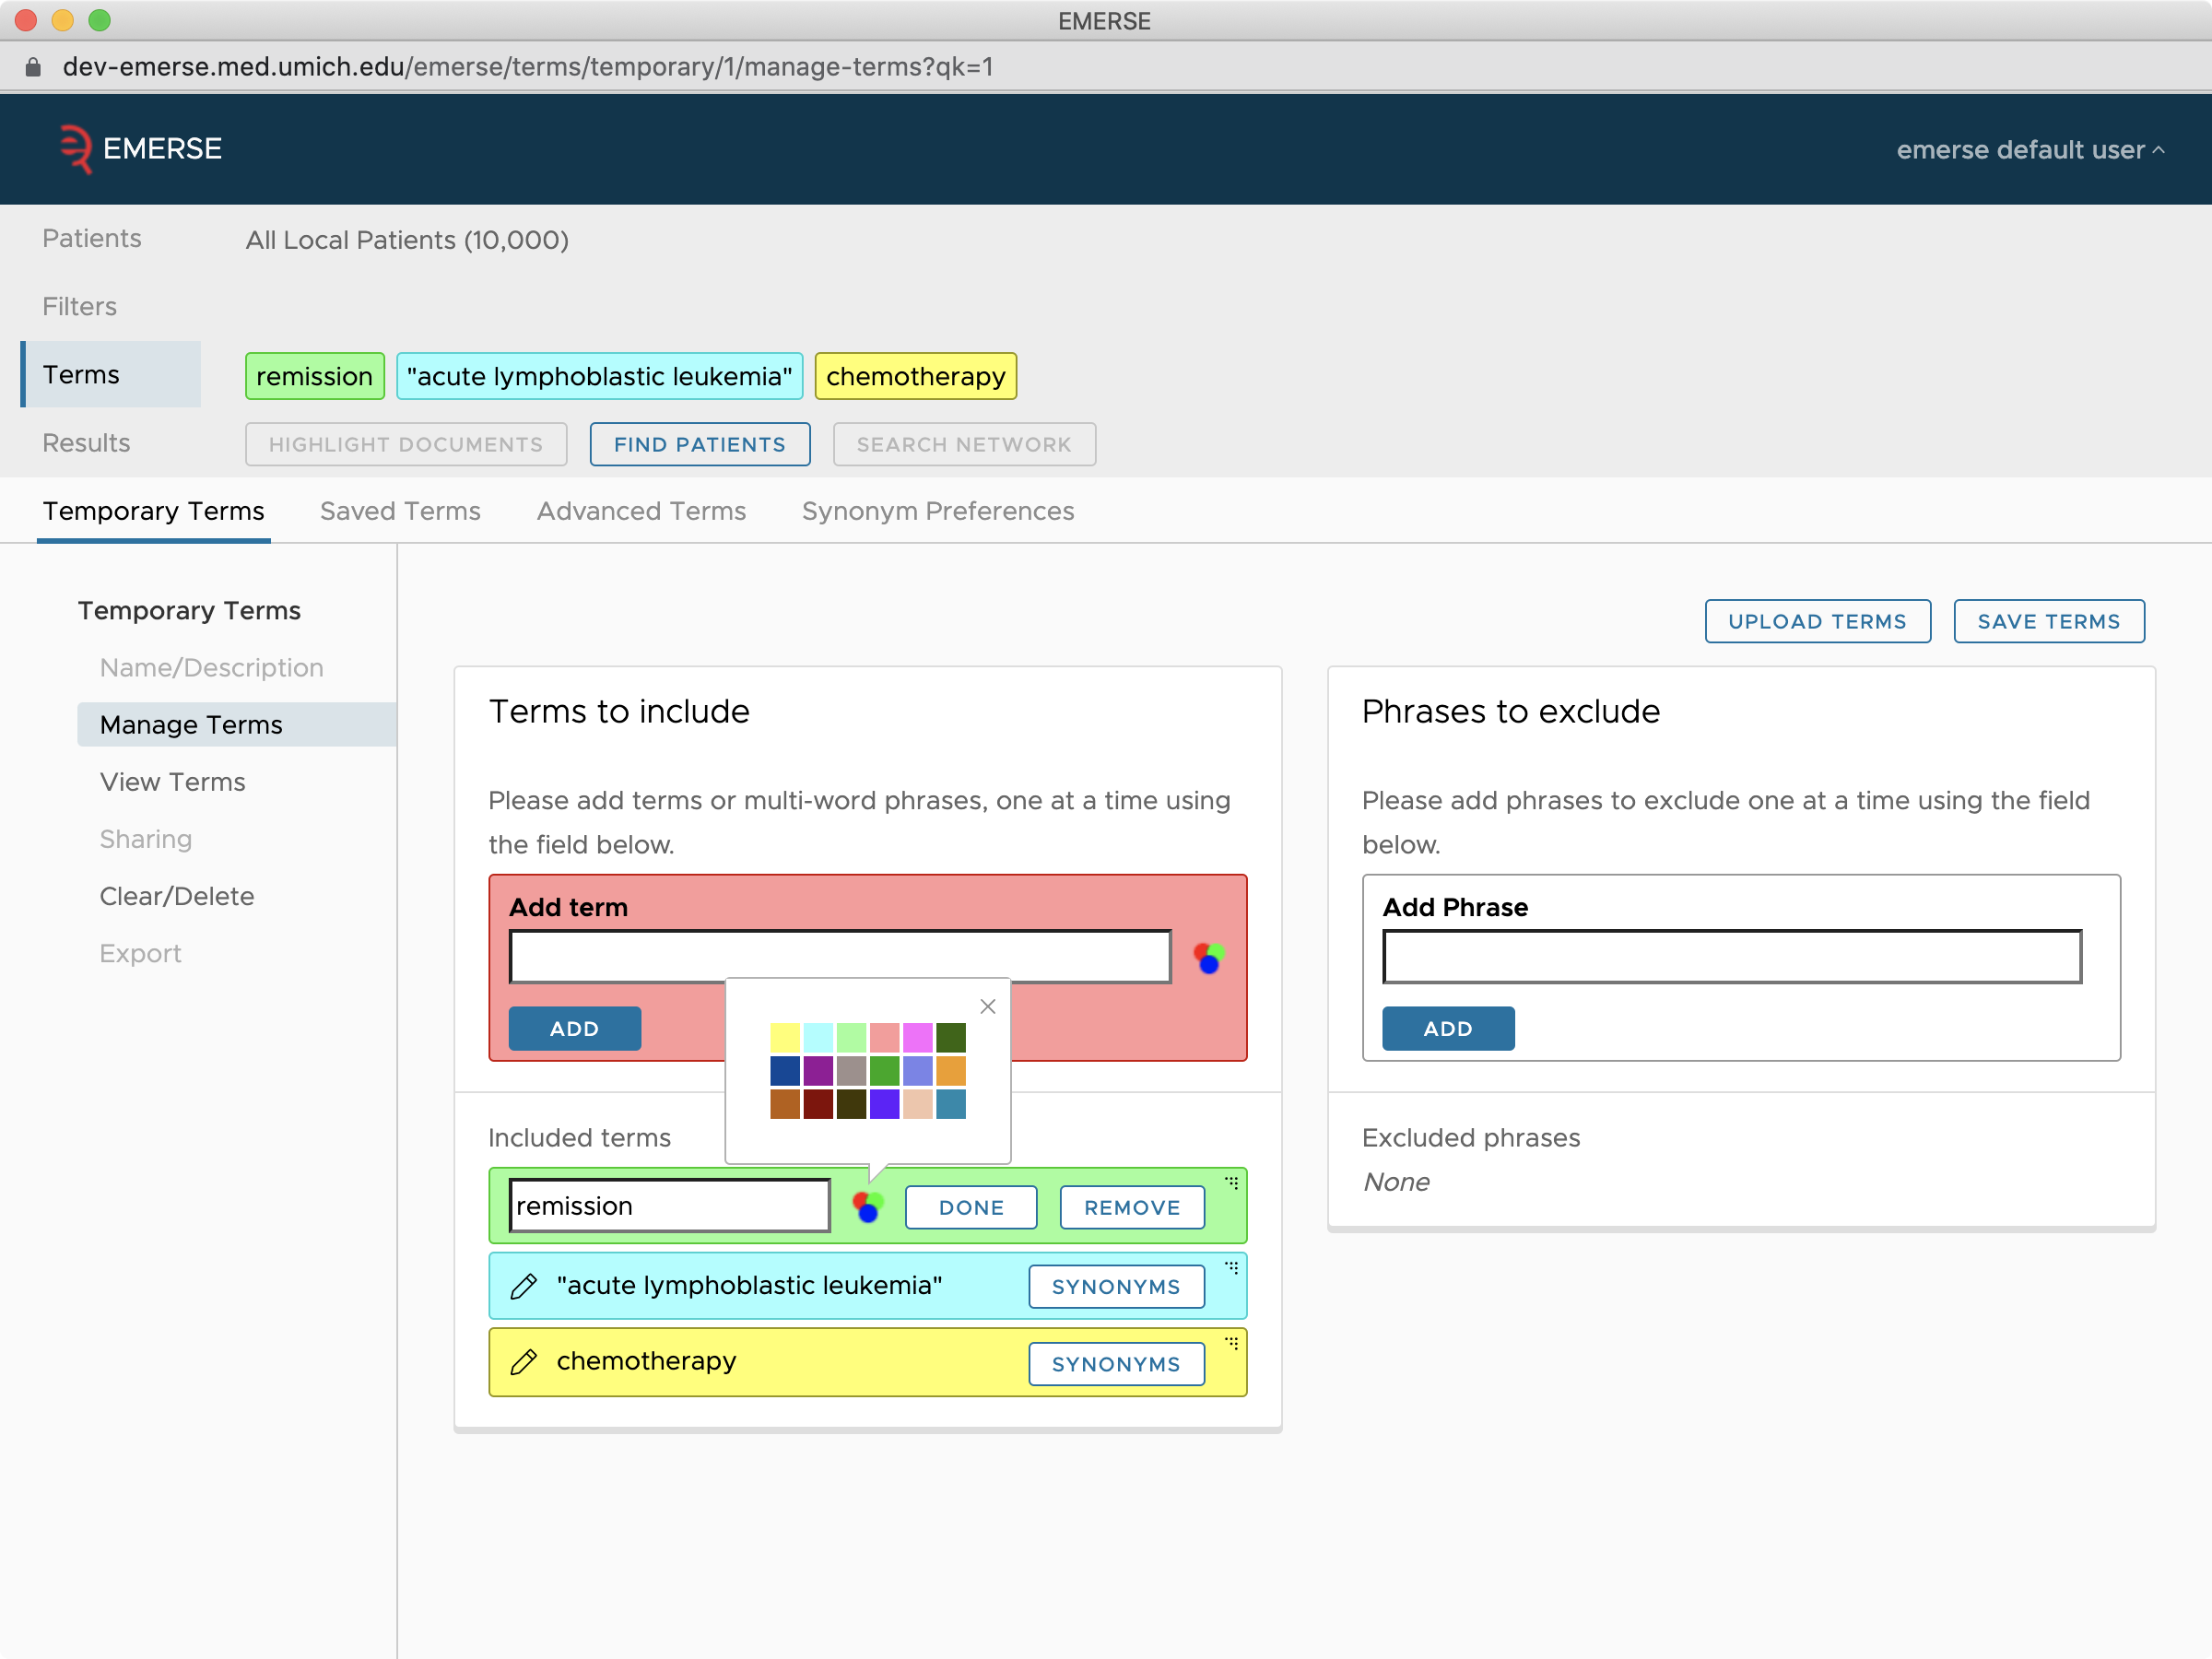
Adding New Terms
Adding terms can be done within the Manage Terms tab. Enter your terms or phrases one-by-one, with each term or phrase within its own colorful "bubble".
As you enter the term the system will assign it a color, but you can change the color to one of the 18 possible choices by clicking on the small color palette icon (three overlapping colored circles) and then selecting a different color. You can always change this color later by editing the Term.
Upload Terms
You can add many terms at once by pasting them into the Upload Terms text entry box. This can be accessed in the same way that Synonyms are accessed. That is, by clicking on any of the terms in the Navigation Panel. Then click on the Manage Terms option, and then the Upload Terms button. Inside the box that appears simply type or paste in the list of terms or phrases, one term or phrase per line. Then press the Upload button. EMERSE will assign the colors to the terms, but you can change them later (see the "Editing Terms" section in this guide).
Terms that should be excluded (see Phrases to Exclude) can also be added via the Upload Terms box. Simply add a minus sign in front of the term or quoted phrase. In the example below, the first two terms would be normal search terms and the last three would be Phrases to Exclude.
"chest pain"
pneumonia
-"no evidence of chest pain"
-"denies pneumonia"
-"no pneumonia"
Editing Terms
Editing terms can be done within the Manage Terms tab. Terms can be edited if you are the owner of the Term Bundle (for Temporary Terms there is no concept of ownership since it is only a temporary list that you create yourself). If you are not the owner you will not be able to make any changes. To edit an existing term, just click on the pencil icon inside of its "bubble" and an editing box should appear. This is also how you would change the color of a term, by choosing the color palette icon to change the color.
Removing Terms
To remove a term from a Bundle, go to the Manage Terms tab, click on the pencil icon next to the term, and then click on the Remove button.
| You can also remove terms by dragging them out of the area where the term "bubbles" are listed. |
If you want to remove all terms from a Bundle at once, click on the Clear/Delete tab and then click on the Clear All Terms button. This will remove all of the terms but preserve any sharing preferences that you may have used with the bundle. To delete a Term Bundle, choose the Delete Term Bundle button. This will completely remove the Term Bundle, but be careful because there is no undo option once it has been deleted.
Search Option: Case sensitive searches
Some medical acronyms are identical to common English words, including NO (nitric oxide), ALL (acute lymphblasic leukemia) and RICE (rest, ice, compression, elevation). Because EMERSE, by default, searches for all terms in a case-insensitive manner, you can end up with a lot of false positives for these otherwise commons words. To help reduce the number of false positives, you can specify a term to be case-sensitive by adding a carat (^) symbol in front of the term. For example, to search for a case-sensitive capitalized ALL, enter ^ALL as the search term, with the carat symbol (^) directly in front of the term. This well help reduce false positives by not returning the common word all as a hit.
You can mix case-insensitive terms and case sensitive terms as long as they are separate terms.
chemotherapy
diagnosed on
^ALL
…will find documents with chemotherapy (case-insensitive), diagnosed on (case-insensitive), and ALL (case-sensitive)
However, if you have a multi-word phrase in double quotes, you cannot have just a single word in that phrase be case-sensitive. The case-sensitive symbol must go in front of the entire phrase, and the entire phrase would be case sensitive. For example, the query term…
^"diagnosed with ALL"
…would match: diagnosed with ALL but would not match Diagnosed with ALL or the phrase diagnosed with all since the case does not exactly match the query which specifies that diagnosed and with should be lower-case and ALL should be all upper-case.
And, as described above, the following query is not permitted since a single word in a multi-word phrase can’t be case-sensitive. It is essentially an all or nothing choice where the entire phrase is case-sensitive, or the entire phrase is case-insensitive. The following query is not allowed and will not work: "diagnosed with ^ALL". Thus, for searches that require terms to be case-sensitive, in general it is best to just have a single term be case-sensitive and not an entire phrase.
| Case-sensitive searches can be done within the Advanced Terms feature. However, the process for conducting a case-sensitive search with Advanced Terms feature differs from the Temporary Terms and Saved Terms features. Details about how this is done can be found in the section on Case Sensitive Searches in Advanced Terms. |
Search Option: Wildcards
Wildcards help with finding concepts where you may not be able to specify the exact details/phrasing/spelling of the terms.
For example, sometimes you may want to look for a term where the ending of the word may be variable. Suppose you want to look for terms related to hypertension. If you just search for hypertension you may miss other variations. Using the wildcard symbol, the asterisk (*), you can overcome this problem. Simply type in something like hyperten* and you will be able to match terms such as hypertension, hypertensive, hypertensives, etc. This would also match potential misspellings such as hypertenion.
In addition to adding a wildcard to the end of a word, you can also add it to the middle of a word. If you search for hyper*ia you will match terms such as hypercapnia, hypernatremia, and others. In this example, the search term with the embedded wildcard will look for words that start with hyper and end with ia.
There are few caveats with using wildcards:
-
You cannot use a wildcard at the beginning of a term. In other words,
*omais not allowed. -
You must have at least three characters in a word before using the wildcard. Thus,
hyp*is allowed, buthy*is not allowed. -
If your wildcard search ends up matching > 1024 distinct terms, the search will likely fail.
Search Option: Proximity Searches
Placing an asterisk (*) between two words will make EMERSE look for those two words in any order with up to 5 additional words between them. For example, "pain * leg" will match pain shooting down her right leg as well as leg with severe pain.
Note that you must put a space an either side of the asterisk. If you don’t put any space between the asterisk and the two words, your search wil likely fail since it will be trying to match it as a single word (see Wildcards, above). For example, if you are looking for the phrase car was driven by Ted, the correct way to enter the search phrase would be car * ted. If instead you enter car*ted you will find the word carpeted but not the original phrase.
Phrases to Exclude
EMERSE supports a concept of excluding phrases with a search. This is similar to the idea of "negation" but works a bit differently. Essentially, this is a way of ignoring certain phrases so that you can find the terms of interest in the appropriate context, and remove potential false positives.
For example, if you are searching for complication or complications in the context of a surgical complication, you may want to simply look through operative notes for the terms complication or complications. However, you don’t want to find negated forms of this such as no complications or without complications (this would be traditional "negation"). Additionally, you may not want to find the terms in other contexts that are not necessarily negated but are still the wrong context (e.g., complications from diabetes).
Another common use case would be to ignore words within phrases that might be included in templated/boilerplate text. For example, a note may say we discussed the risks for surgical complications which has nothing to do with the actual patient, so you could exclude that entire phrase and then still search for surgical complications in other contexts.
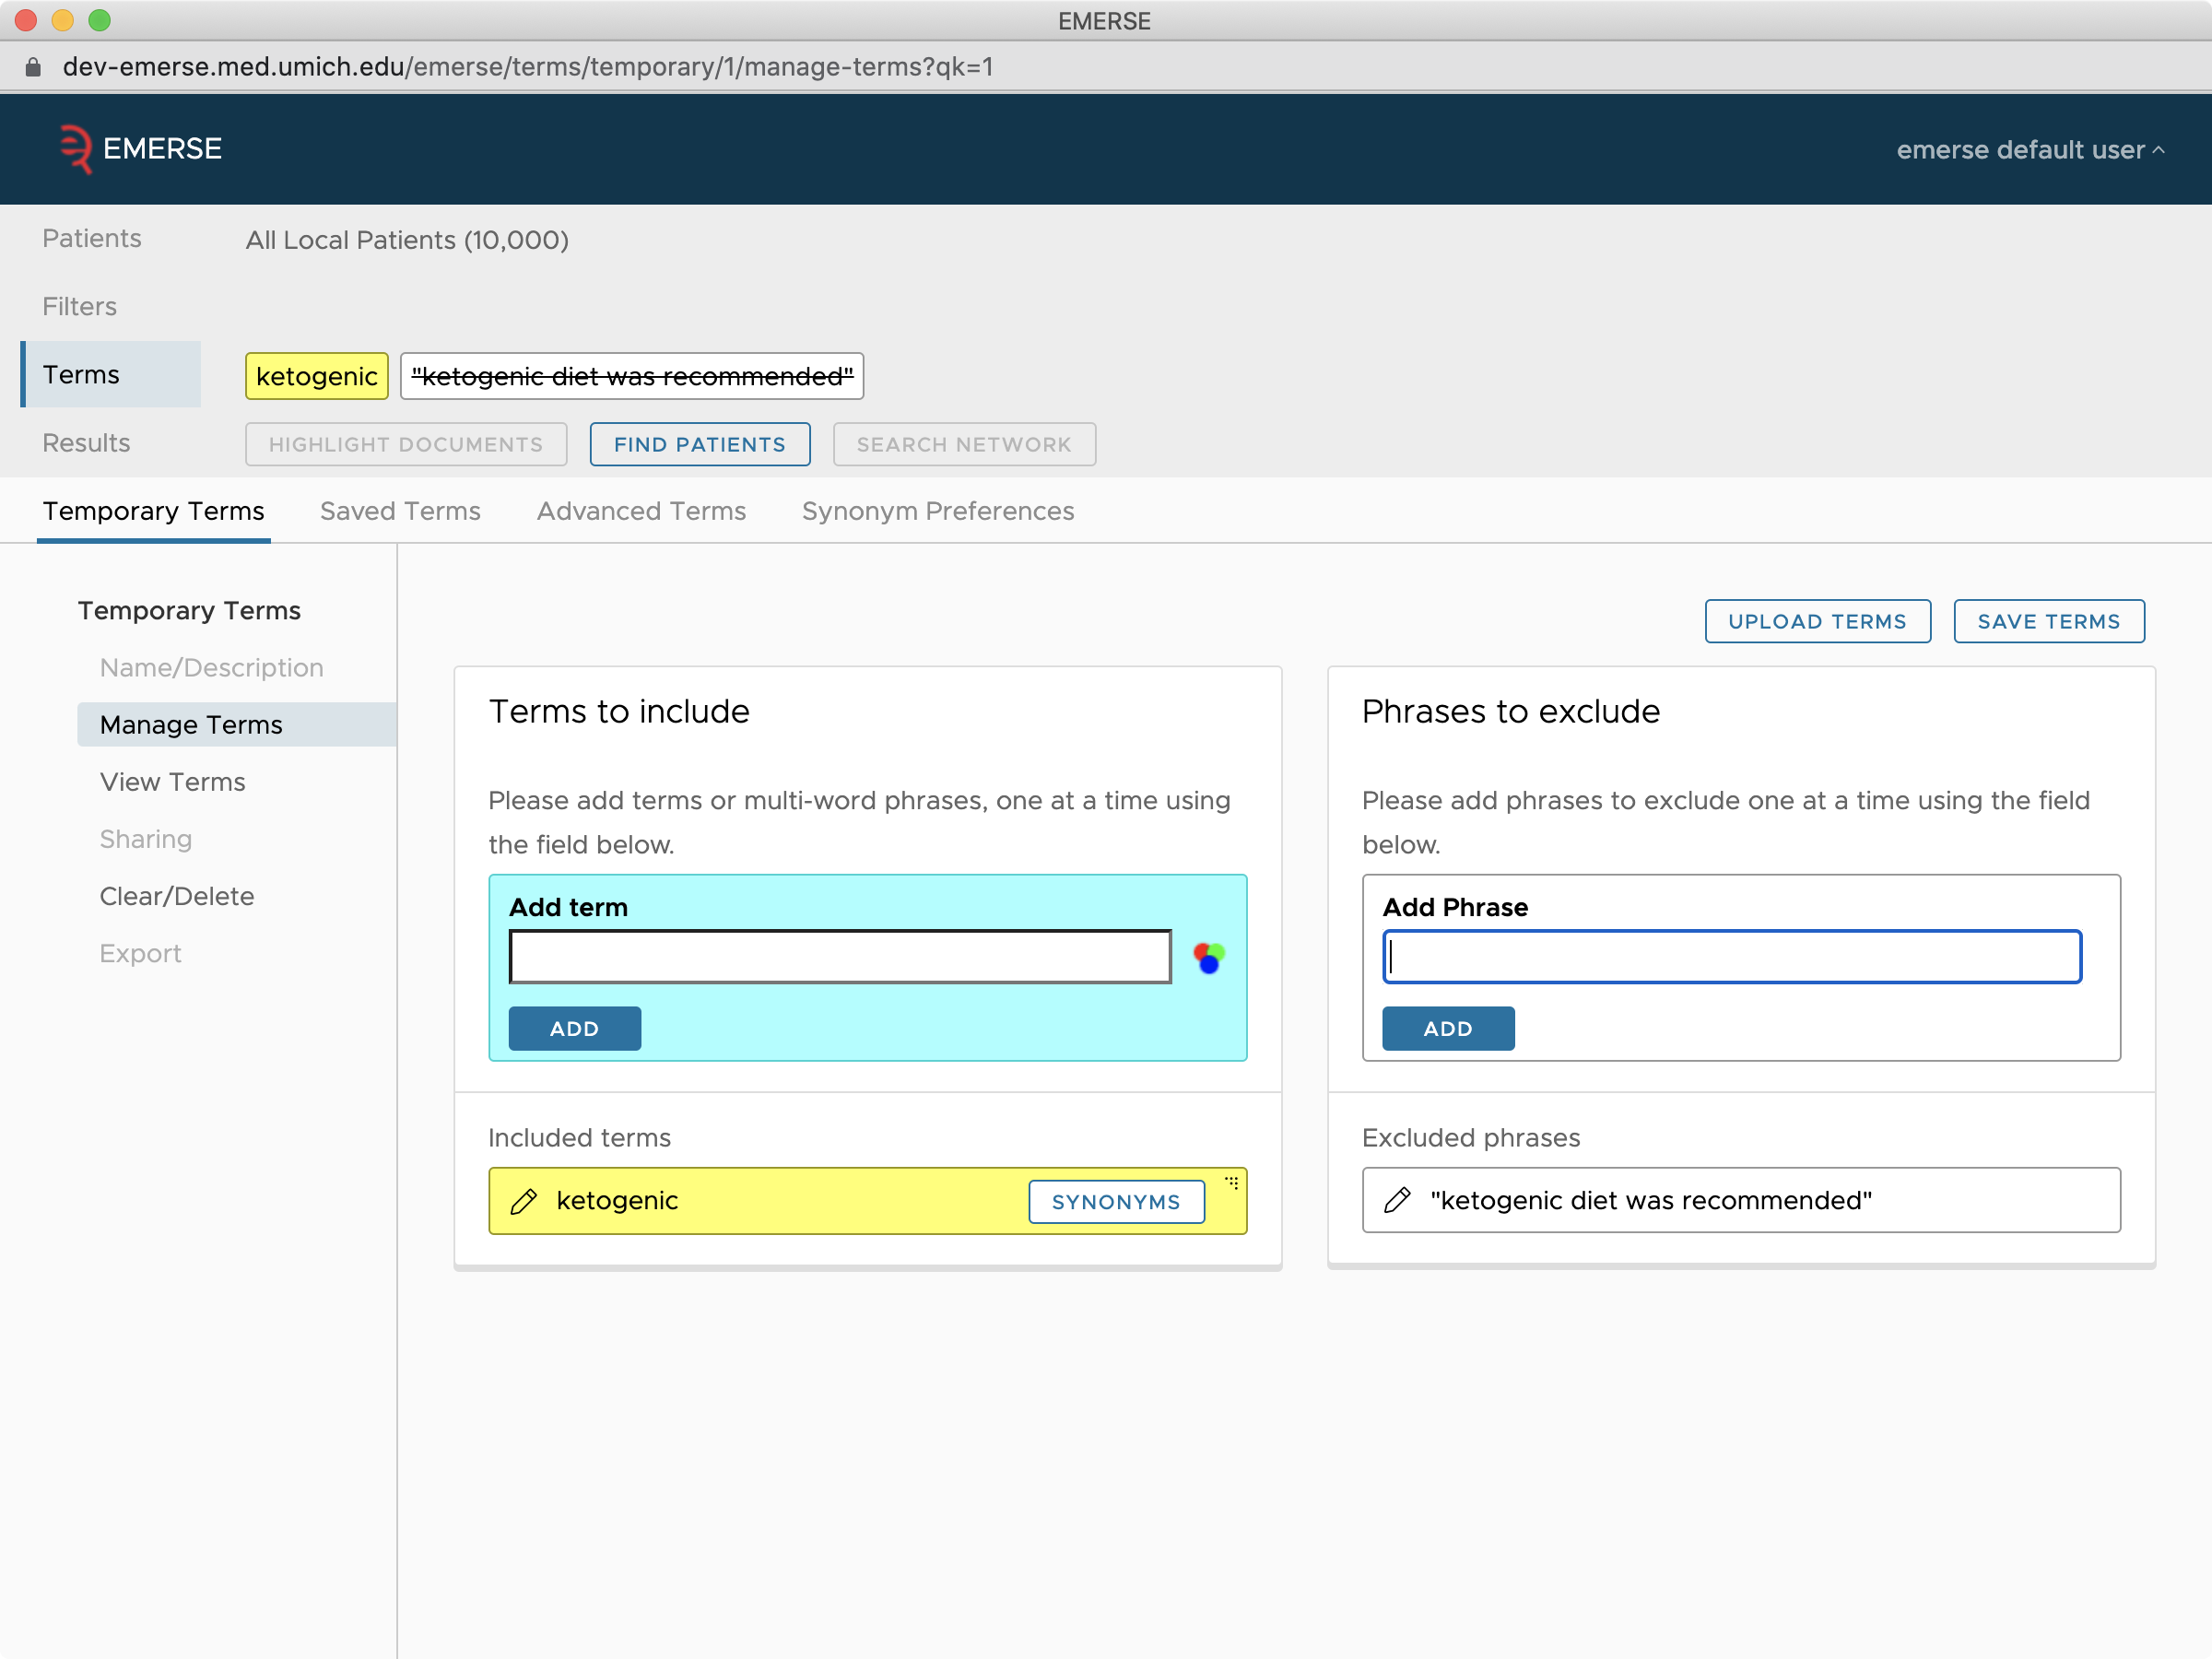
To ignore/exclude these phrases using either the Temporary Terms or Saved Terms feature, add them to the Phrases to exclude under Manage Terms.
When the phrases are displayed to the user in the Navigation Panel, the excluded phrases will be shown with strikethrough text, to emphasize that they are being excluded from the search. For example:
complications "no complications" "without complications" "complications from diabetes"
These Phrases to Exclude can also be uploaded via the Upload Terms feature, described below.
It is worth pointing out that a Phrase to Exclude will only be effective if the excluded phrase contains a term that you are interested in looking for. This feature does not exclude documents that contain the term, it only excludes that phrase when highlighting the term of interest in other contexts found within the document. (You can exclude documents with certain words and phrases using the Boolean NOT operator with an Advanced Terms search).
Spell checking
EMERSE will check the spelling of terms entered. While typing the term spelling suggestions will displayed under the Terms text entry box in bold, preceded by "Did you mean". For example, if you enter your terms as word misspeling you will see:
Did you mean "word misspelling"?
To correct the spelling you can simply click on the spelling suggestion and the misspelled words will be replaced with the corrected version. Of course, sometimes you may want to search for misspellings, in which case just leave those spelling errors as-is.
Synonyms
Synonyms are a very powerful feature of EMERSE, and are described in detail in a separate section.
Saving the Temporary Terms
A set of Temporary Terms can be saved which will allow you to keep and re-use the set of search terms permanently and share it with other users. To perform this conversion, navigate to either Manage Terms or View Terms and then click on the Save Terms. You will be asked to provide a Name and Description and then that list of terms will be saved as a Favorite within your list of _Saved Terms, which are described in detail below.
Additional Options with Saved Terms
Saved Terms are grouped into two categories: Favorites and All Available. The Favorites is a smaller subset of all potential Saved Terms (also called Term Bundles) that are available to you, so that you can have a smaller list to work with. All Term Bundles that you make yourself will automatically be in your Favorites. Otherwise, to make a Term Bundles that is not yours into a Favorite simply click on the Favorite checkbox.
Using a Term Bundle is simple: just click on the row in the table with the Term Bundle of interest, and EMERSE will display the contents of the Term Bundle. Then, just click on either Highlight Documents or Find Patients.
Making a new Term Bundle is also very easy—just click on the Create Term Bundle button and give the Term Bundle a Name and a Description. A few other features of a Term Bundle are described below.
All Term Bundles have a concept of "ownership". That means that only the "owner" (the person who created the Term Bundle) can manage it, such as adding/editing terms and choosing how the Term Bundle should be shared. Others can use it with the right Sharing privileges but they cannot modify it.
Filtering Term Bundles
If you have trouble finding the right Term Bundle, you can try to use the Search feature, which can be found in a small text box above the list of Saved Terms. Just start typing what you are looking for and those matching what you type will remain and everything else will be hidden. Search looks across the Name, Description and terms within the Term Bundle. You can not search for the Owner of a bundle, but you can sort the list of all available Saved Terms/Term Bundles based on owner.
Copying a Term Bundle
If you are not the owner of a Term Bundle but wish to make edits, you can make your own copy and become the "owner" of this new Term Bundle. To access this feature, click on the View Terms tab of the Bundle and then click on the Copy Term Bundle button. This new Term Bundle will then be yours to modify and control, but it is important to know that any changes to the original Term Bundle will no longer be reflected in your new Term Bundle, as they have essentially been split off from one another. You can also make a copy of your own Bundle if you want to make some changes but leave the original one intact.
| Copying a Bundle (even one of your own) only copies the terms but does not copy any sharing preferences that you have set with the original bundle. |
| When you copy another user’s Bundle, the copied Bundle is available only to you by default. |
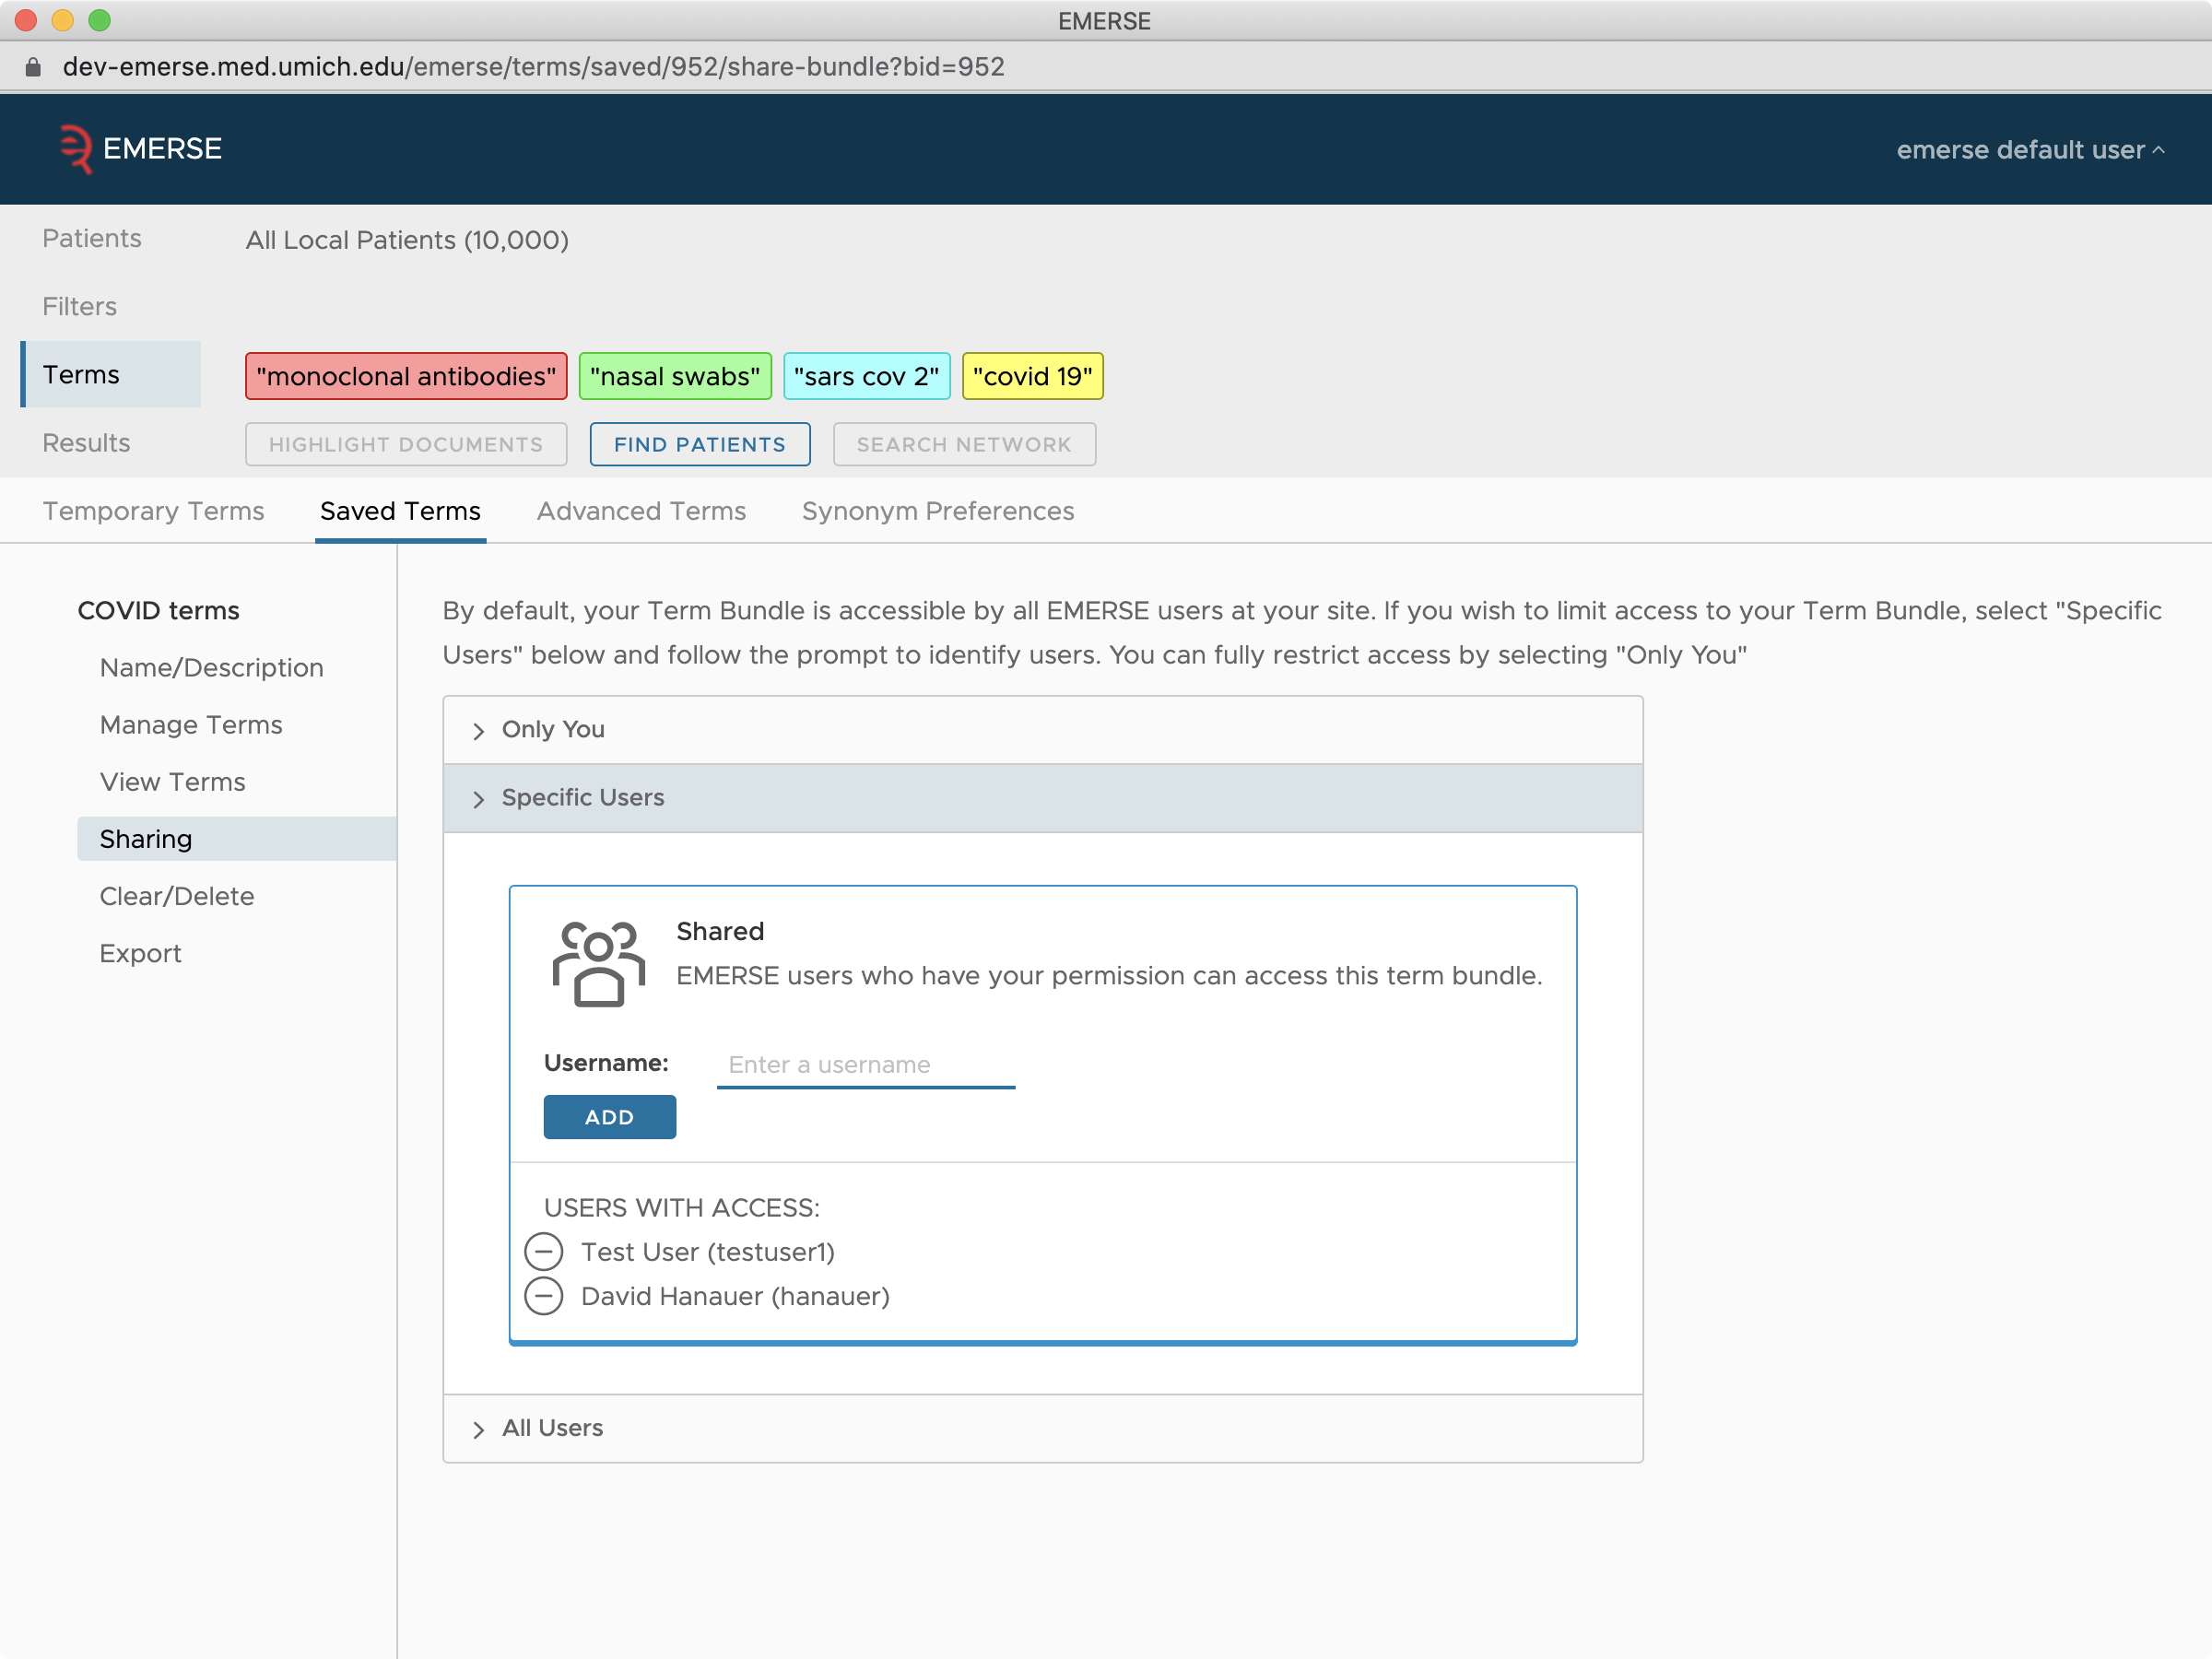
Sharing a Term Bundle
Similar to Patient Lists, Term Bundles can be shared with other users. In fact, to encourage sharing, any new Term Bundle is automatically made publicly available to everyone unless you specifically choose for it to not be, with the exception of Bundles that are copied. To access this Sharing feature click on the Sharing tab. You can make the Bundle private to only you, share it with others on your team (by entering their EMERSE usernames), or make it available to everyone who uses EMERSE.
Advanced Terms
The Advanced Terms feature is meant to be used by "power users" or those who need more flexibility and control in their searches. This feature leverages the underlying core of EMERSE which is Apache Solr. Solr is a highly regarded, and very powerful, open source search engine which has its own query syntax. In fact, all queries in EMERSE utilize Solr, but the other two ways to search (Temporary Terms and Saved Terms) utilize a simplified approach for searching. With Advanced Terms you can take advantage of the full power of the Solr search syntax. Complete details about the Solr search syntax can be found on the Solr Query Parser Syntax page.
It’s important to keep in mind that searches using Advanced Terms are really conducted at the level of a single document. So you if you are looking for two terms that occur together, those terms must exist in the same document. Additionally, since Advanced Search leverages the standard Solr search apparatus, you will not have access to multiple color highlighting or the use of Synonyms from this page. Terms will only be highlighted in yellow.
Examples of what can be done with Advanced Terms is summarized in the Feature Comparison Table above, and explained in additional detail below.
Boolean searches
Boolean searches use the operators AND, OR, and NOT. They must be capitalized or they will be considered as regular terms; that is, it will search for the words and, or, and not if they are lower-case. NOT in this context means that a document should not be identified/returned if it contains that term. For example:
chest AND xray NOT abdomen
The query above would identify documents that have the words chest and xray in the same document (anywhere in the document), but if the word abdomen was also in the document it would not be considered a hit (i.e., would not be returned) even if the first two words (chest and xray) were there.
You can also group booleans together using parentheses, for example:
(chest AND pneumonia AND headache) OR (kidneys AND reflux AND "back pain")
This query will return documents that have the terms chest, pneumonia and headache all together in the same document in any order, or documents that have kidneys, reflux, and back pain all together in the same document in any order.
Boolean operators can only be used as described above with the Advanced Terms feature. The other two search features (Quick Terms and Term Bundles) have a type of implicit Boolean operator assigned to terms based on whether one is searching among a Patient List ( Highlight Documents ) where the OR operator is assumed, or among All Local Patients ( Find Patients ) where the AND operator is assumed if the colors of the terms different and the OR operator is assumed if the colors of the terms are the same. This is explained in more detail in the section about Search.
|
Wildcard searches
Two basic types of wildcards are supported (? and *). Wildcards can only be applied to single words, and cannot be applied to phrases.
? is used to match a single character. For example:
bea?
Would match words like beam, beat, bear, bean, bead, etc.
* is used to match zero or more characters:
hyperten*
Would match terms like hypertension and hypertensive, as well as just hyperten.
Fuzzy Searches
A fuzzy search allows you to search for terms that are similar to the term of interest. This can be way to look for possible misspellings. A fuzzy search can only be applied to a single word at a time. To use a fuzzy search, append the term of interest with a tilde (~) followed by a number between 0 and 2. These numbers represent the number of potential character substitutions that would have to occur to match the new term.
For example:
beast~1
Would match beats as well as the word breast, since both of those terms can be created from the word beast by changing just one character. (Note that the original term beast would also be highlighted in this example).
Proximity Searches
A proximity search looks for two words within a certain maximum distance from one another, regardless of their order. Separate the two words by a space and wrap them in double quotes, then add a tilde (~) followed by a number representing the maximum distance in words that they can be separated.
For example:
"ct mass"~10
Would match phrases like
…a CT scan showed a mass in his left…
as well as …a 12x12x8 cm mass in her L upper lung found on CT….
and even simply mass CT
Regular Expressions
A Regular Expression is powerful way to match text using complex patterns. Regular Expressions are commonly used by computer programmers, and it is expected that only those with a certain level of technical expertise would ever use this feature. The syntax for creating Regular Expressions can be complex and difficult to understand, and can vary between programming languages. To create a Regular Expression with EMERSE follow the guidelines for Java regular expressions.
Regular Expressions within EMERSE can be created for single words/tokens only (not multi-word phrases). Nevertheless, there may not be much advantage to using this featured compared to simple wildcard matching. Wrap the regular expression within a forward slash at the beginning and end to tell the query parse that it is a regular expression. For example,
/[0-9]{3}mg/
Would match 100mg, 150mg, 400mg, 650mg, etc.
By default EMERSE will use the case-insensitive index when identifying a regular expression. That means even if you specify a mix of uppercase or lowercase letters, they will all be treated as lowercase for the search. It is possible to specify that the regular expression search is Case-sensitive. Details on how to do this can be found in the section on Case Sensitive Searches, below.
Case Sensitive Searches
By default, all searches using the Advanced Terms feature are case-insensitive. However, it is possible to specify that a term be Case-sensitive using the Advanced Terms feature. This is done by using the case-sensitive index instead. Add RPT_TEXT_NOIC: in front of the term and that term will be searched in a case-sensitive manner that exactly matches the case of the term entered. For example,
RPT_TEXT_NOIC:ALL
Would match ALL but not All or all
You can also use Regular Expressions (see above) with Case-sensitive searches. For example,
RPT_TEXT_NOIC:/E[ck]G/
Would find either EcG or EkG but not ECG, EKG, ecg, ekg, etc., since the Regular Expression specifies that the first and last letters are upper-case and the middle character is lower-case.
One more example using the the Boolean feature along with a Case-Sensitive search:
RPT_TEXT_NOIC:SAM AND mitral NOT RPT_TEXT_NOIC:Sam NOT "sam-e"
This search looks for the case-sensitive SAM as well as the case-insensitive term mitral in the same document. SAM is an acronym for 'systolic anterior motion' which can refer to the mitral valve. The query also excludes documents that contain the case-sensitive Sam which could refer to someone’s name, and excludes the case-insensitive "sam-e" which can be the name of a supplement some people may be taking.
Filtering by Metadata
Metadata are additional pieces of data about a document that can potentially be used to help with searching. Examples of metadata might be the source of the document (e.g. the main EHR, radiology, pathology, etc), the type of test (e.g., MRI report, CT report, plain film report, etc), the clinical service (e.g., nephrology, cardiology, rheumatology, etc) and others. While it is possible to search based on metadata, the specific types of metadata and names of the possible elements will vary from one installation/site to another and will depend completely on how the system was configured locally, what data have been loaded, etc. Therefore, if you are interested in this option you will likely need to contact your local EMERSE administrators to get more information. Below is simply an example of the type of query that could be run if specific metadata elements were captured and stored within EMERSE:
RPT_TEXT:"motor vehicle accident" AND SOURCE:"EHR" AND DEPT:"ADULT EMERGENCY"
The query above will search for the phrase motor vehicle accident and it will limit the search to a locally named source that is called EHR and a locally named department called ADULT EMERGENCY. As mentioned above, the specific names of sources, departments, and other metdata will be unique to each installation, so it is not possible to provide specific details on what options will be available at each site.
| As of EMERSE version 6, the "SOURCE" should now be available as a Filter option in the main user interface and would not need to be added into a query like the one above. |
Date Ranges and Date Math
Searches can be limited by date ranges using the Advanced Terms feature. Currently, due to technical constraints for how EMERSE was designed, this date feature can only be used when searching across All Local Patients using the Find Patients function. It will not work when searching across a Patient List with the Highlight Documents function. At some point the system may be re-designed to allow these Advanced Terms date ranges to be used everywhere.
It is worth pointing out that there may be no real need to use a date range within an Advanced Search query, since a date range can already be applied to any search (even searches using Advanced Terms) by using the Dates button available in the Navigation Panel, in the upper left corner of the screen. However, if using dates in the query is desirable, they should be in the standard Solr date syntax, which can be somewhat complex to use. It is also worth pointing out that if you set a specific date range using the Dates button in the Navigation Panel AND you also set a custom date in your Advanced Terms query, an error will occur and 0 patients will be returned. In other words, if you want to use the date options within an Advanced Terms query, you need to leave the standard EMERSE date fields blank.
A basic example of how a date range can be included in a search is below. This query will search for the term trabeculotomy and it will limit the search to the date range January 20, 2015 through May 20, 2015.
RPT_TEXT:"trabeculotomy" AND RPT_DATE:[2015-01-20T00:00:00Z TO 2015-05-20T23:59:59Z]
The following query is similar to the one above, but shows how some basic date math can be used. In this query the same date is used for both the initial and final dates (2015-01-20), but the second instance of the date is followed by +4MONTHS which essentially adds 4 months to the date, and thus is equivalent to the previously shown query that includes the date range of January 20, 2015 through May 20, 2015.
RPT_TEXT:"trabeculotomy" AND RPT_DATE:[2015-01-20T00:00:00Z TO 2015-01-20T23:59:59Z+4MONTHS]
A few more examples, using the special NOW option are below.
Search for trabeculotomy between January 20, 2015 and the current date:
RPT_TEXT:"trabeculotomy" AND RPT_DATE:[2015-01-20T00:00:00Z TO NOW]
Search for trabeculotomy between 12 months prior to the current date and the current date:
RPT_TEXT:"trabeculotomy" AND RPT_DATE:[NOW-12MONTHS TO NOW]
Search for trabeculotomy between 30 days prior to the current date and the current date:
RPT_TEXT:"trabeculotomy" AND RPT_DATE:[NOW-30DAYS TO NOW]
Search for trabeculotomy between 60 days prior to the current date and 30 days prior to the current date:
RPT_TEXT:"trabeculotomy" AND RPT_DATE:[NOW-60DAYS TO NOW-30DAYS]
Synonyms
The Synonyms feature in EMERSE can help you conduct more thorough searches by providing suggestions for additional terms or phrases that are related to the terms you entered. This is sometimes referred to as "query expansion". An important aspect of the Synonyms is that you have full control over what is included in your search. Synonyms are essentially system-provided suggestions about additional words or phrases that you may want to include in your searches, based on the words/phrases you have already entered. You can incorporate the suggestions into your own search terms, either with the Quick Terms feature or the Save Terms feature. Because these are system-wide suggestions, these terms are available to all users in the system. The term Synonym is used loosely here. In fact, these can include many types of related terms that might be useful for a search.
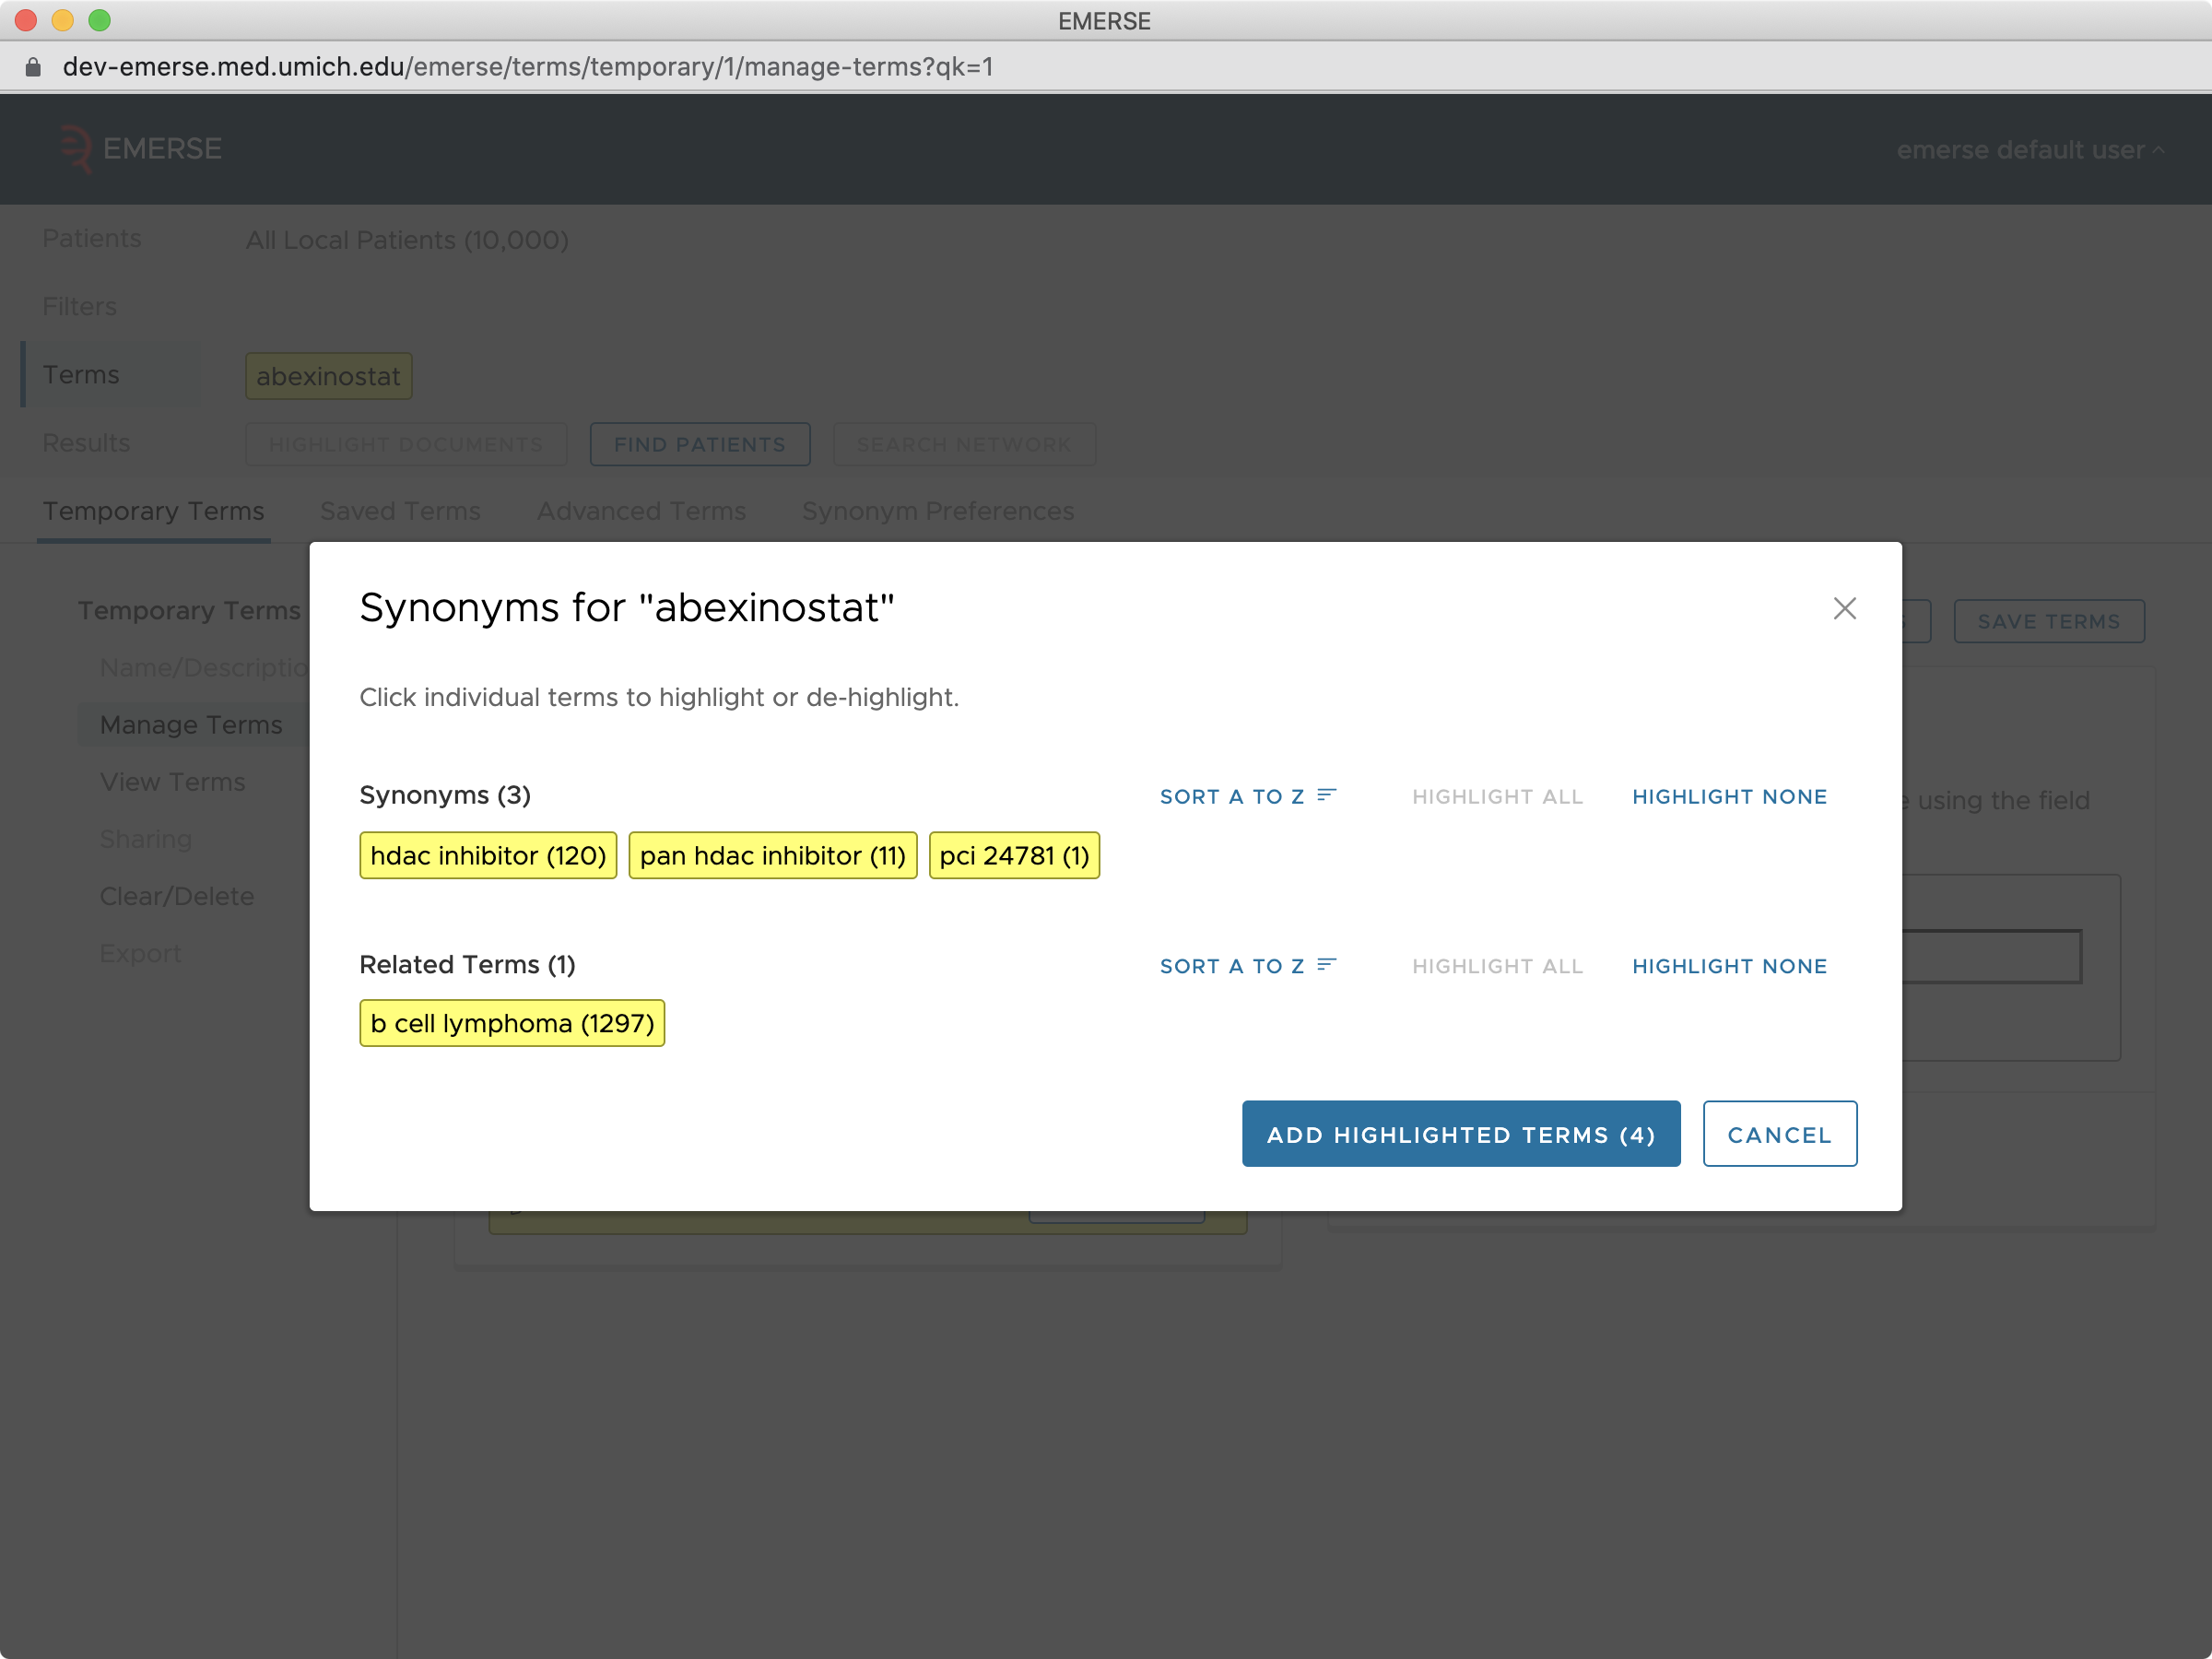
Accessing the Synonyms feature is easy. In the Manage Terms section, each term/phrase will be shown in a colored bubble. If a synonym exists for that term, a Synonyms button will appear in the bubble. Once the Synonyms button is clicked, a small pop-up window appears that displays the terms in three categories.
-
Synonyms: These are the "standard" synonyms suggestions
-
Related Terms: These are terms related to the synonyms but considered different enough from the original term that it should not be included in the former category. For example, a Related Term of
acalabrutinibismantle cell lymphomasinceacalabrutinibis meant to treatmantle cell lymphona. The two terms are related, but not really the same. Sometimes, however, other related terms may seem more related but were placed in that category to prevent too many matches from being displayed for an initial term that was very generic. -
Spelling Alternatives: These are generally misspellings of the terms of interest. They are not always actually misspelled words, as these can include correctly spelled words that are not the right ones. For example
beastinstead ofbreast.
In the Synonyms pop-up window each term will be highlighted with the same color as the original term that prompted the Synonym suggestion. If the term is highlighted it means that it is already selected and ready to be added into the list of search terms to be used. It is possible to click on each individual term to highlight or de-highlight the term to be added (highlighted) or not added (not highlighted). Or, one can use the provided buttons to Highlight All or Highlight None. For example, if a large list of terms is provided but you only want to include a single suggestion, first click on the Highlight None button, and then click on the single term of interest to highlight it. Once the selection is complete, click on the Add Highlighted Terms button to add those selected (highlighted) terms.
| The ability to control the colors of the added Synonyms has important implications when conducting a search across All Local Patients, since the colors of the terms are used to define how the search is conducted (Details can be found in the section on Searching). |
Once additional terms are added via the Synonyms feature, it may be worth checking if those newly added terms also have Synonym suggestions. For example, if the word fruit is originally entered by a user, then the Synonyms feature might suggest apple as an additional term. Once apple is added, then apple cider might be suggested, and so on.
Users are not able to add new terms to the system-provided Synonym suggestions, but users are always free to add as many terms as needed to their own term lists (Saved Terms or Temporary Terms). Only system administrators can add additional terms to the system-wide Synonym suggestions, so please contact your local EMERSE system administrator for terms that you think are missing but should be included.
It is also worth noting that other datasets can be imported into EMERSE that can add to the list of available Synonym suggestions. Examples of such datasets can be found here, and directions for formatting a Synonyms dataset for importing into EMERSE can be found in our Administrator Guide.
Synonym Preferences
As of version 6.3, EMERSE now supports the ability to load in multiple Synonym Datasets. As mentioned above, these datasets can only be added by a system administrator, but once they are added they can be available to all users. The Synonym Preferences page allows users to have granular control over these Synonyms including the ability to include or exclude them from the suggestions.
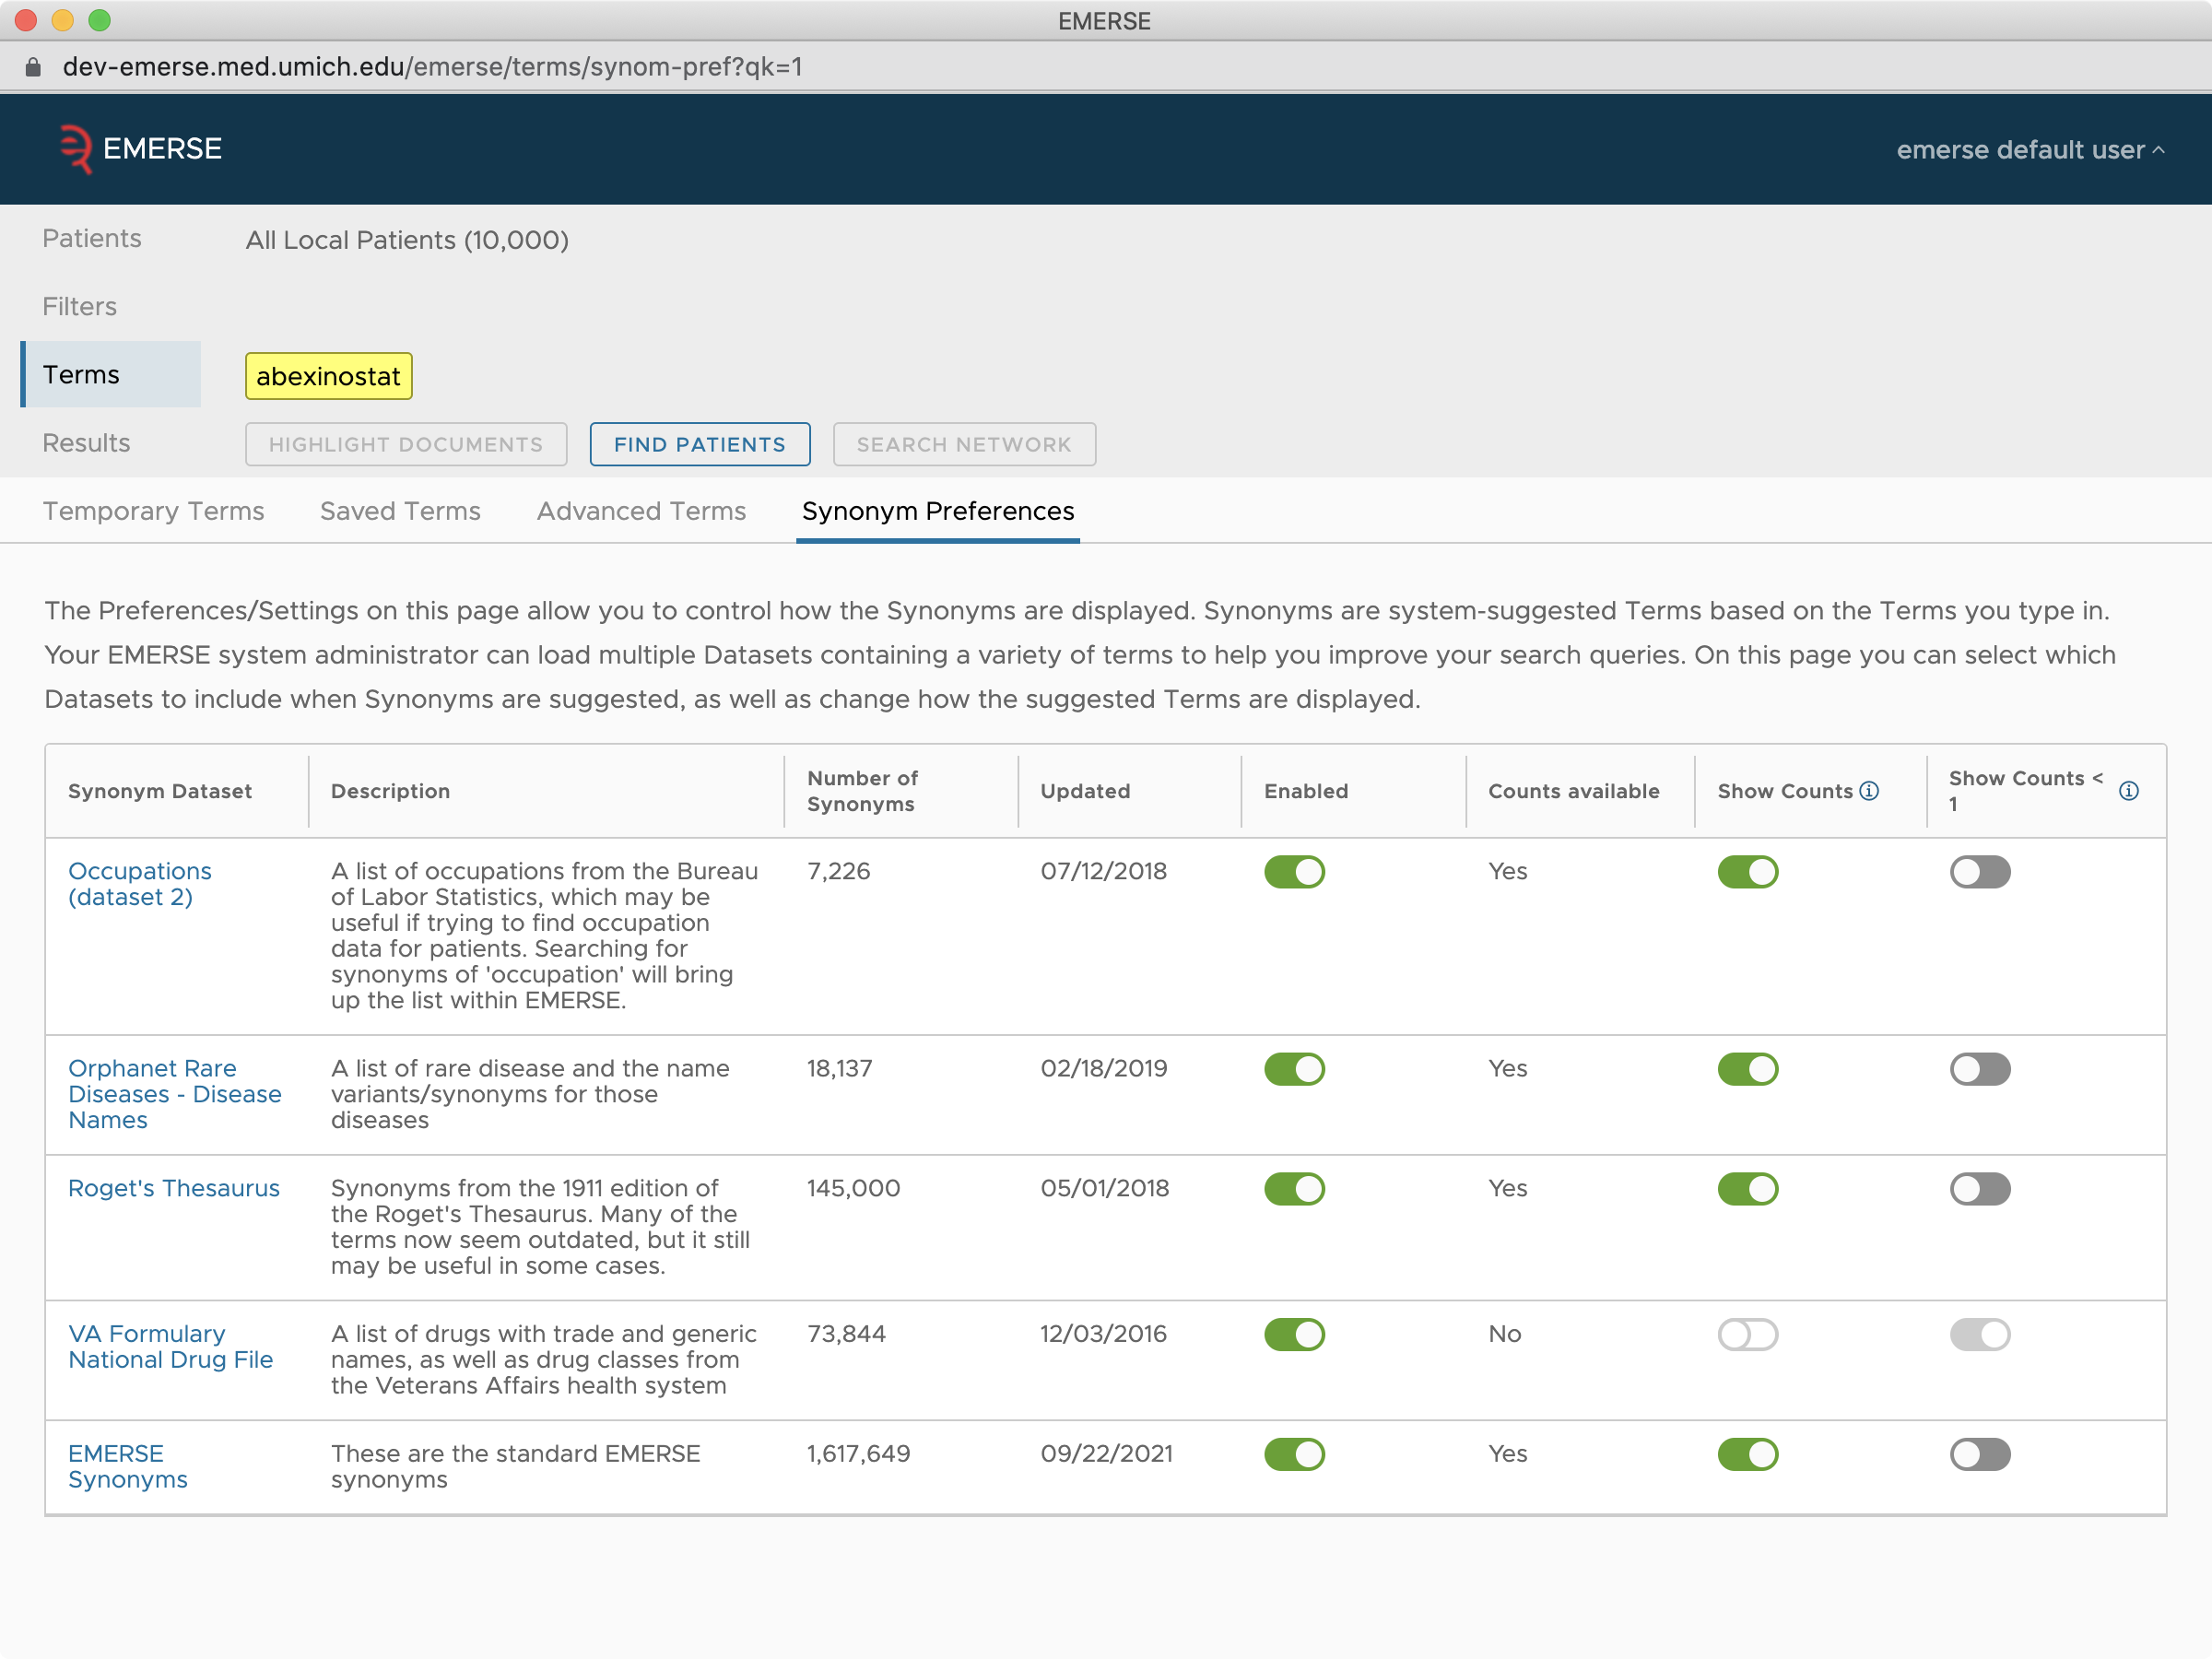
There are several options available to users from the Synonym Preferences screen:
Enabled: When this is on, the synonyms will be available to the user and will be included in any suggestions if matches are found.
Counts available: If counts are available, they will be shown in parentheses next to suggested the term itself. Counts represent how many documents these terms appear in across the entire corpus of documents that EMERSE has indexed. These counts can be useful to help determine which terms might be most valuable in the search. For example, terms with counts of 0 are not in the full index of all documents and won’t yield any results, so they do not need to be included. Note that counts are not updated daily, so if new documents are added the counts will not change unless the EMERSE administrators starts the counting process again (which can take days to run). Additionally, if counts are available they can be sorted by frequency when the Synonyms suggestions are shown.
Show Counts: Turning this on will show the counts if they are avaiable, and turning it off will suppress the display of counts.
Show Counts < 1: If counts are available, then keeping this option off will prevent the system from suggesting terms that have a count of 0. There is really no reason to show terms with counts of 0 other than to see the wide range of potential terms available. Turning this on will show all terms, even if they have a count of 0.
Searching
Searching is really the core of what EMERSE does. But conducting an effective search can be complex and depends on more than just the search terms used. Searching in EMERSE is an action invoked by clicking Highlight Documents Find Patients or Search Network. A search cannot be carried out until required parameters have been set, including the patients to be searched (All Local Patients, a Patient List, or patients from other EMERSE systems in the Network) and the Terms. Filters are optional, and most are not supported with Network searches at this time.
Find Patients Search Mode
The Find Patients search mode is used to identify a set of patients, that may warrant further exploration, or that you may want to save as a Patient List. When searching across All Local Patients this approach can identify a set of patients among all the patients in the system that meet the search criteria. When Find Patients is applied to an existing patient list, it will limit the search to only the patients in that list. It’s the equivalent of trying to identify a cohort based on search terms.
Data displayed with the Find Patients mode
When in the Find Patients mode, EMERSE will provide the following results in different sections:
| Patient count |
Total number of patients meeting the search criteria. |
| Text snippets |
Brief Text Snippets from the 100 top-ranked documents. This is to provide some context for what was found to help ensure that the search retrieved what you were looking for. |
| Demographics charts |
Charts showing the demographic breakdown of the patients, such as sex, race, ethnicity, and current age. |
| Trends |
A chart that shows how the number of patients matching the search has changed over time. Trends uses the date range within EMERSE to define the range and will automatically adjust the time intervals based on that range (years, months, etc). Note that for trends, a distinct count of patients per time interval is displayed. If a patient has notes with the term(s) of interest over multiple time periods, they will be counted for each time period in which a note with the term(s) appears. At this time the counts are absolute counts and are not normalized for the volume of patients seen within a given time period. |
If you are satisfied with the search results, you can then explore the list of patients in more detail, or save the list for later use by clicking on the button Move to Temporary Patient List. Note that to actually save the list for use in future sessions you would then need to click on the Convert to Saved Patient List button after converting it to a Temporary Patient List. Once the patients have been moved to a Temporary Patient List, you can also search through their documents using the Highlight Documents button, because at this point you have switched from the Find Patients mode to the Highlight Documents mode by selecting a subset of patients in the system to look through.
If you used Find Patients against a Patient List you will also see an option to Tag Patients in List. This will add a Tag to each patient that was in the result from the current search. More details can be found in the section on Tags.
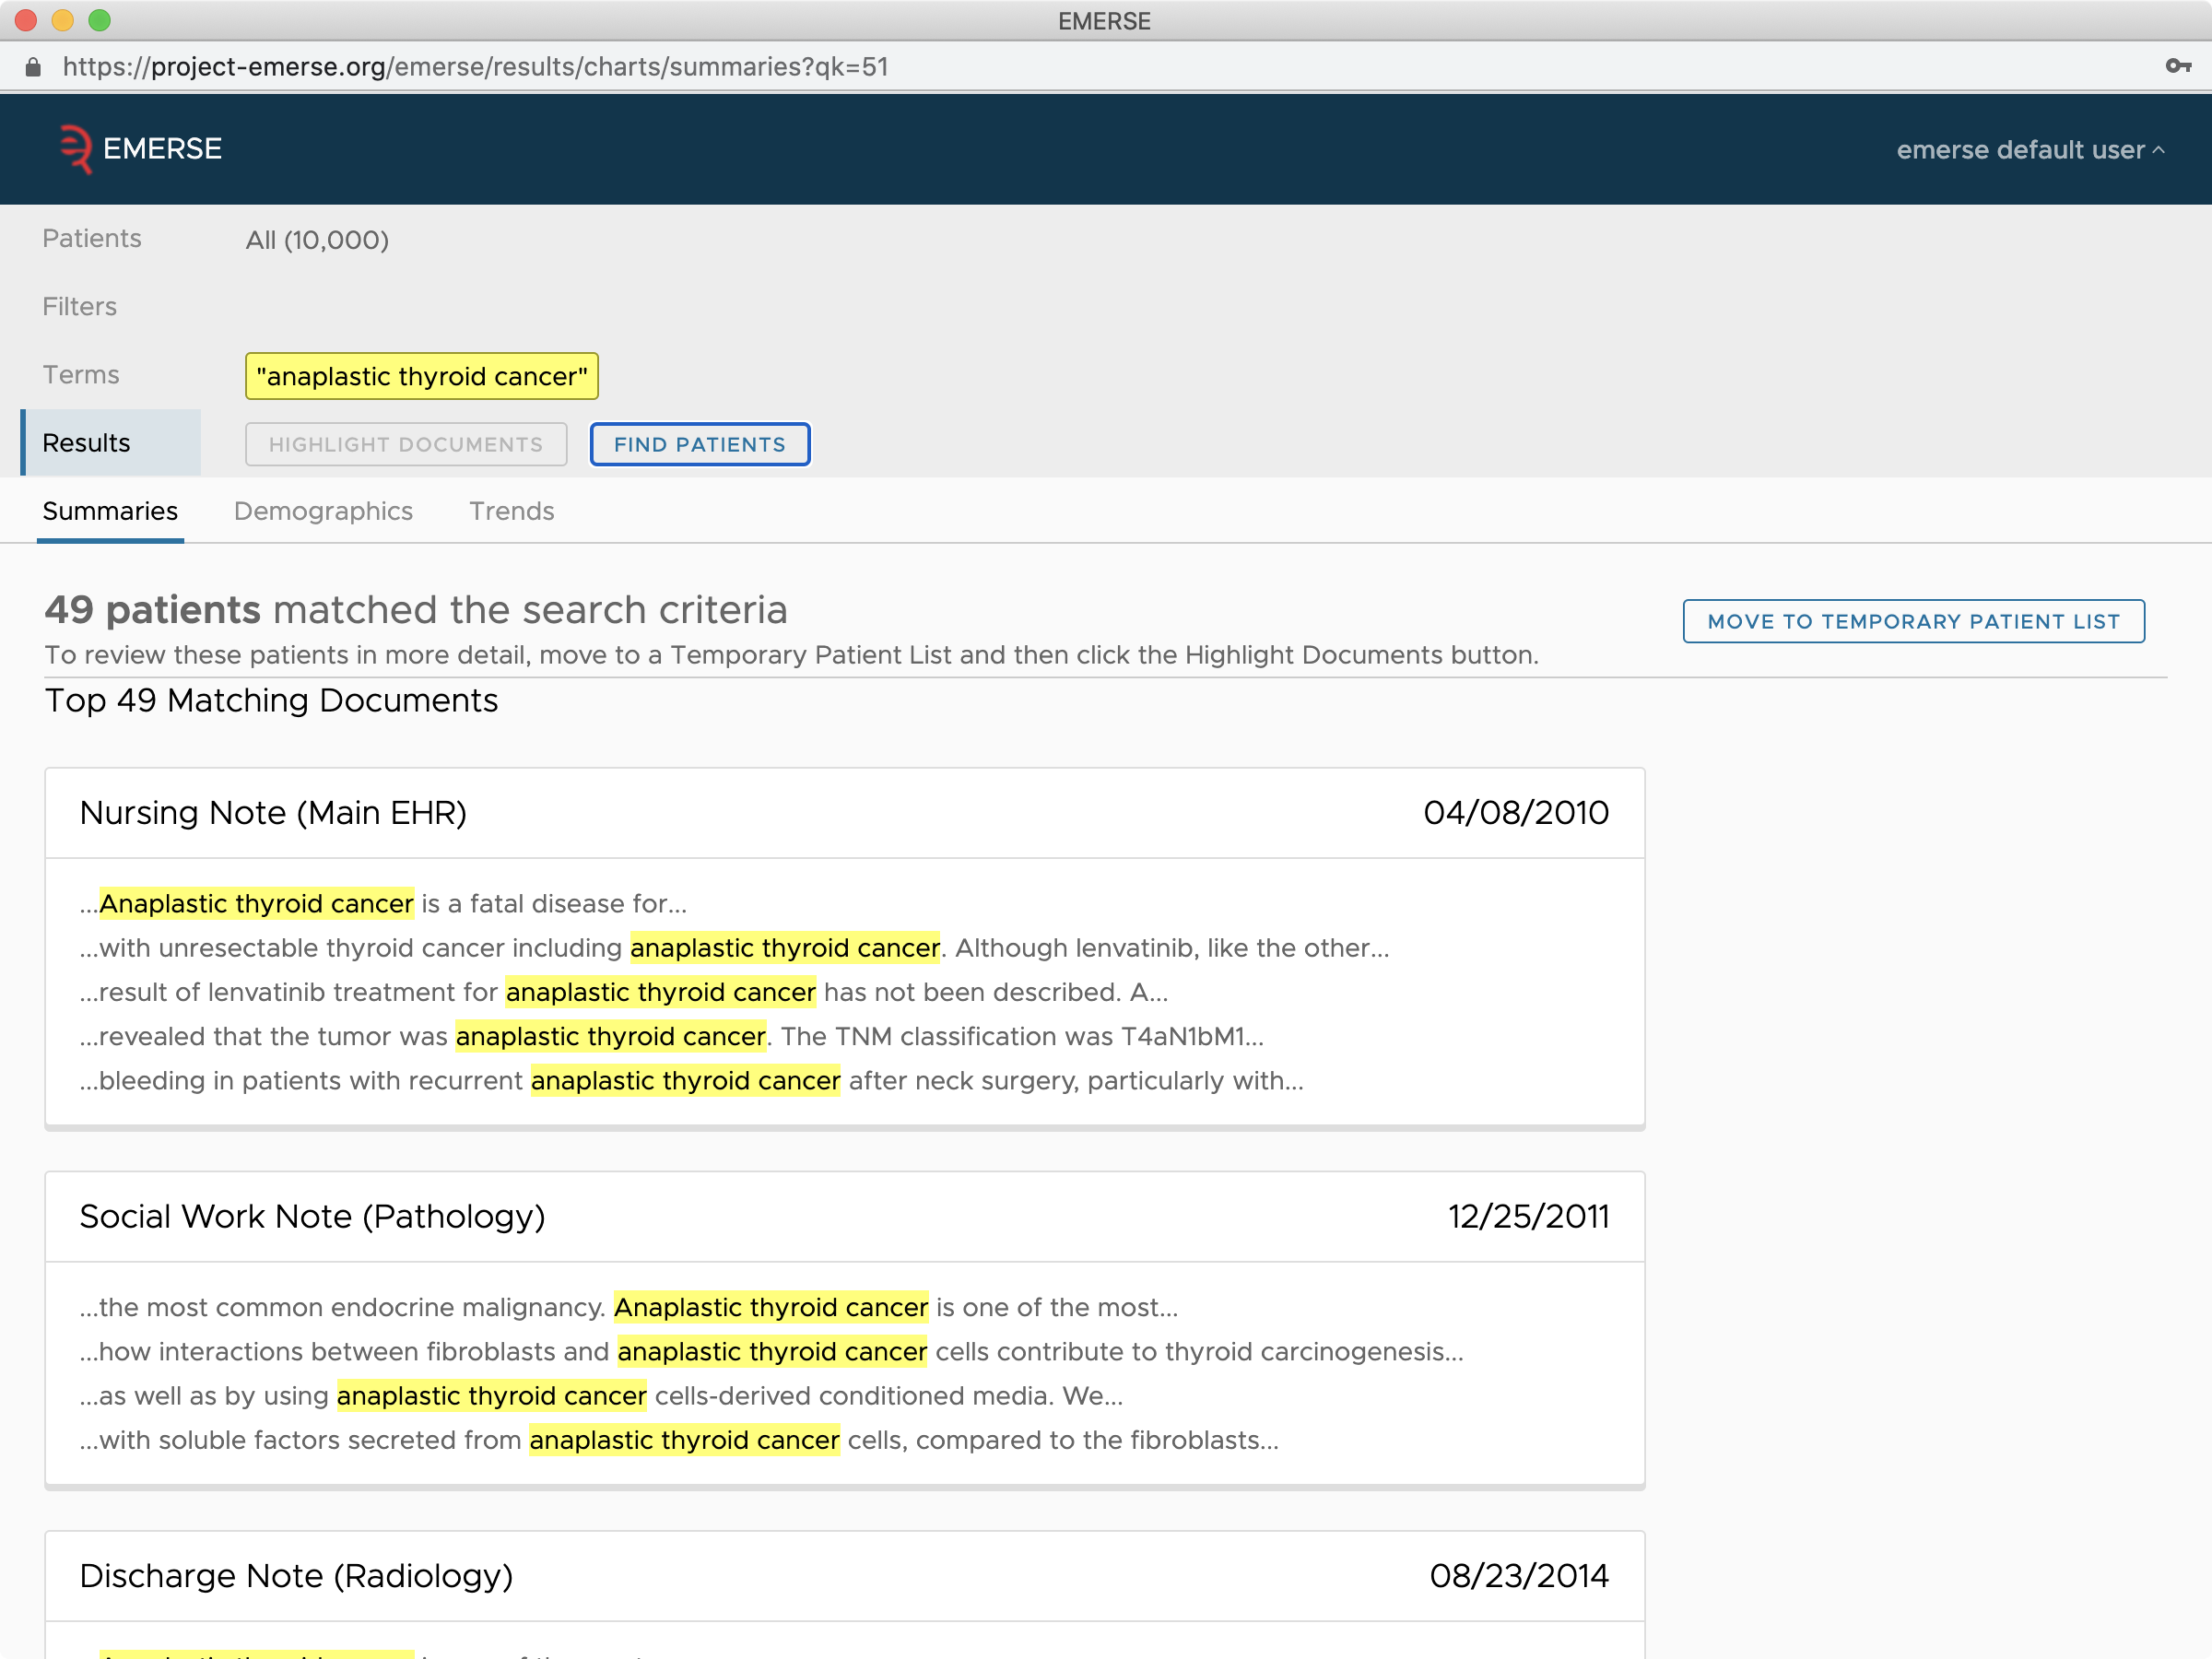
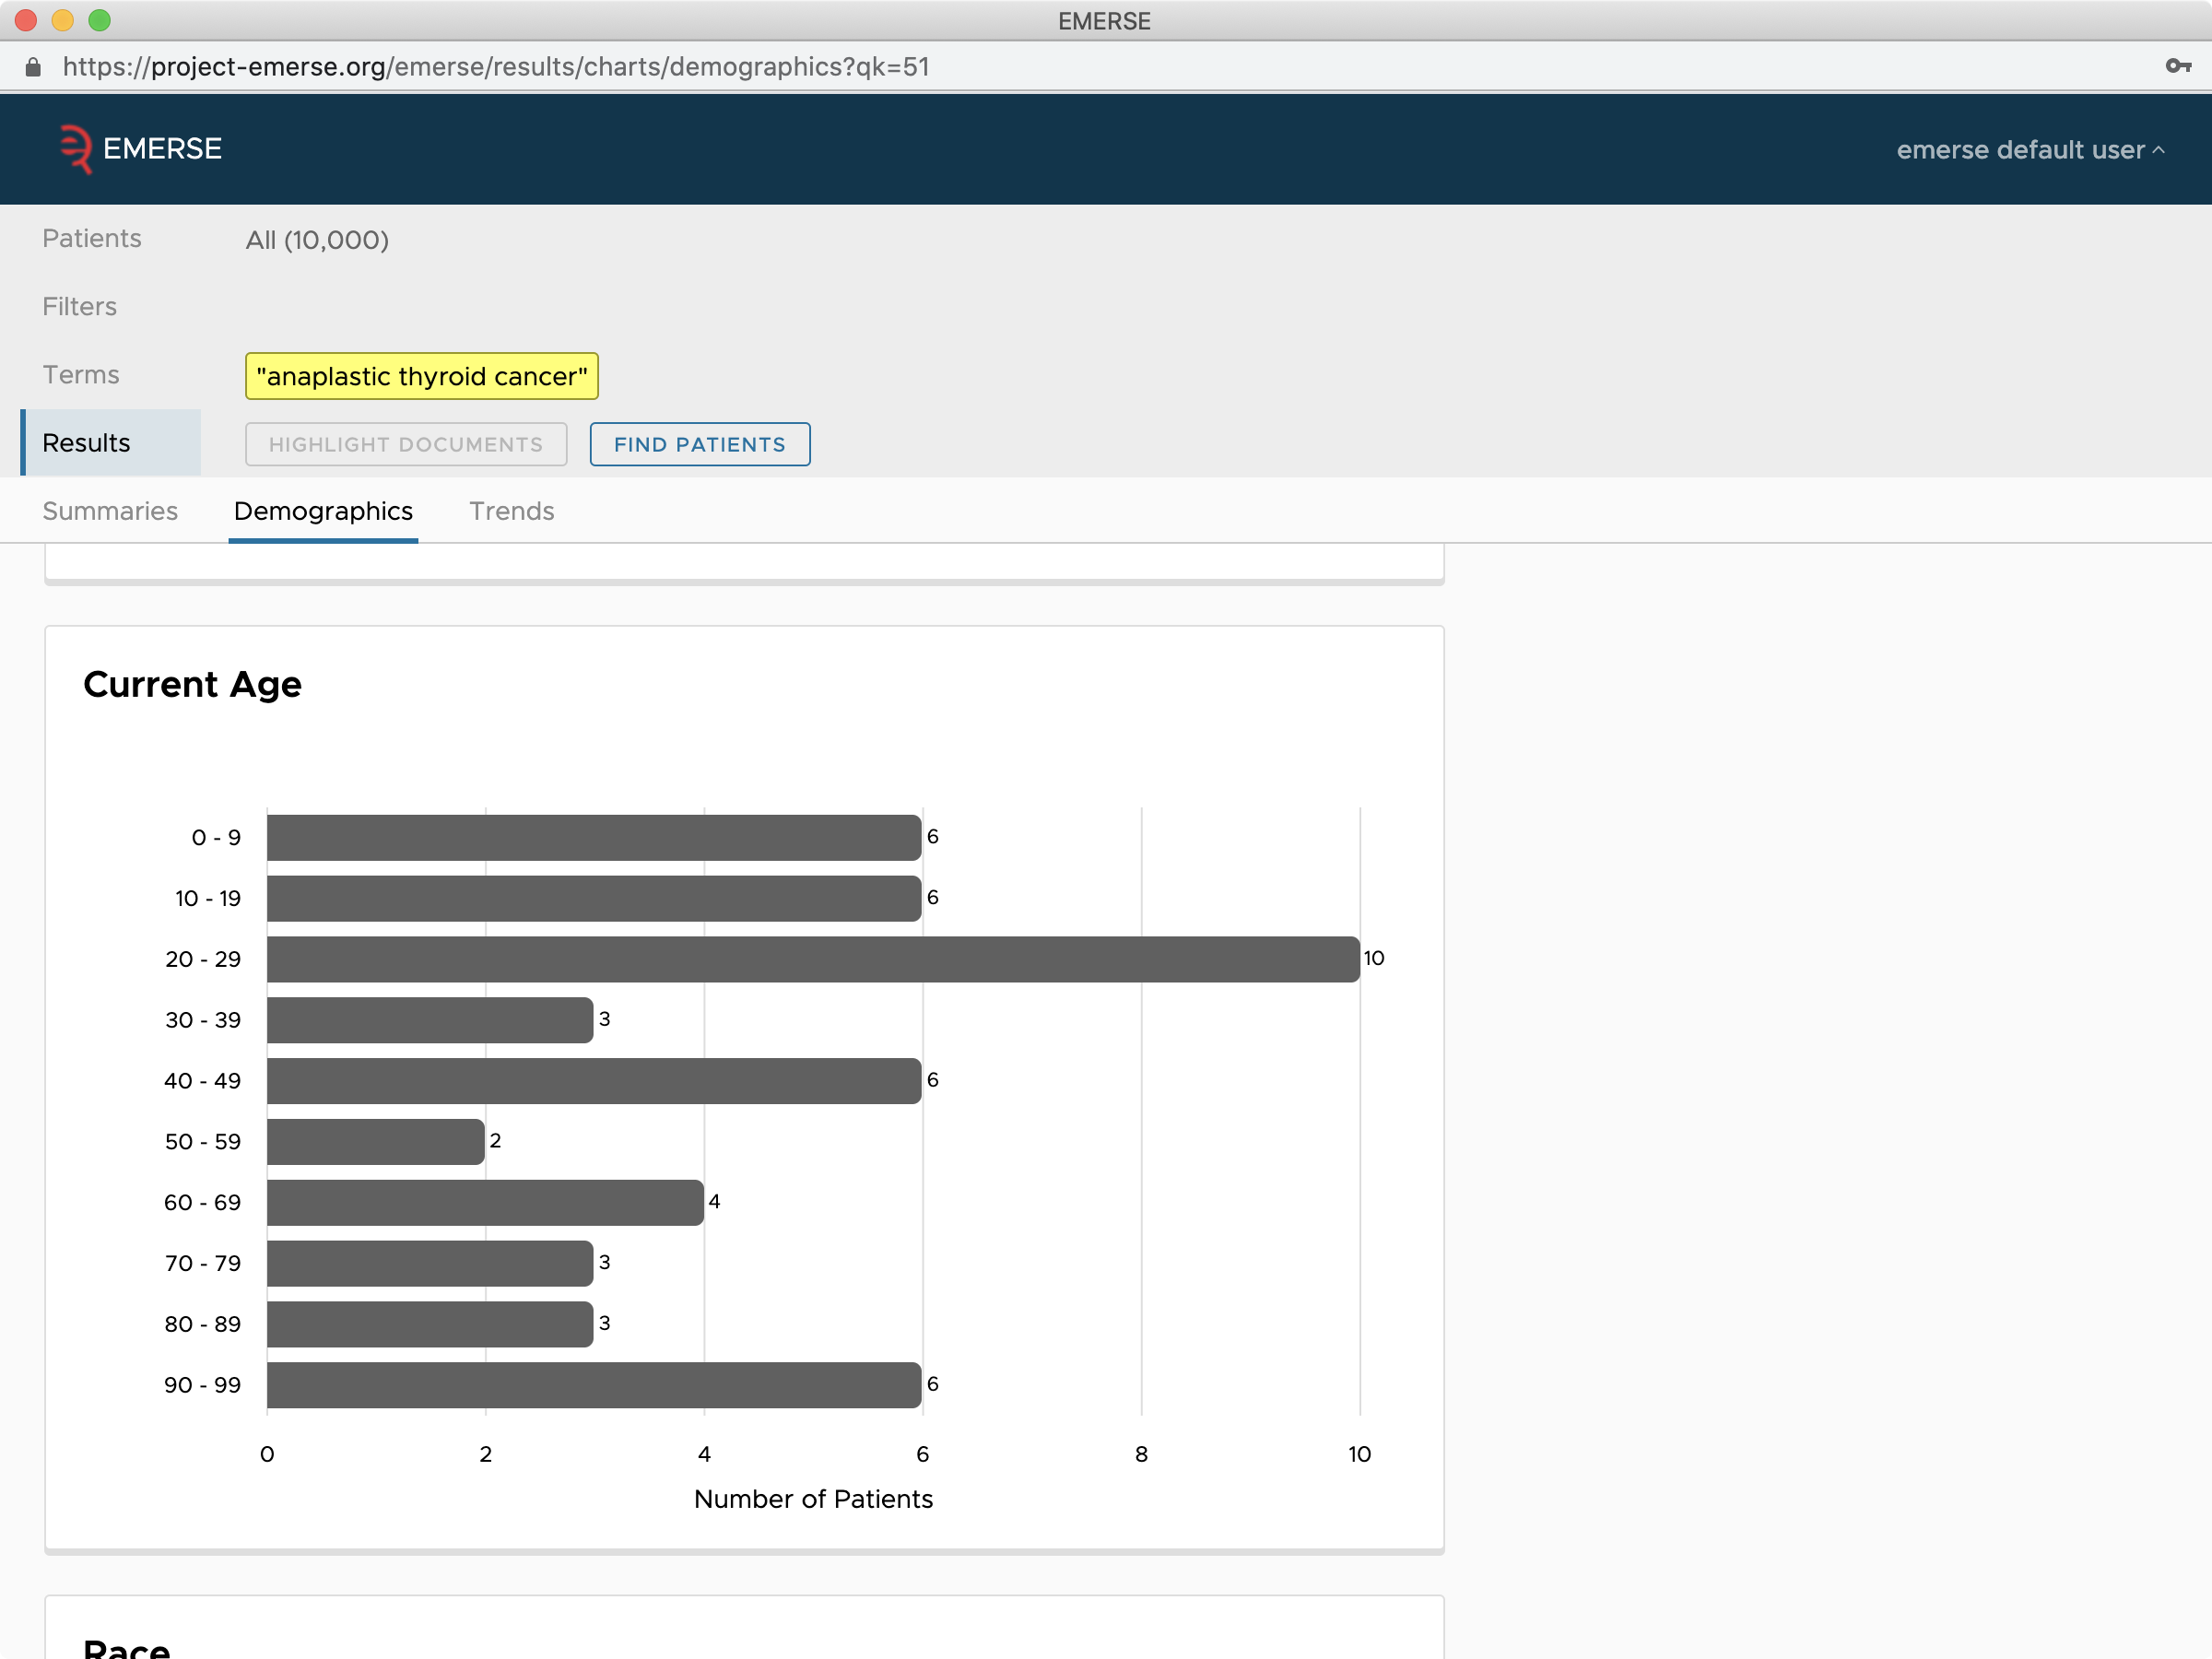
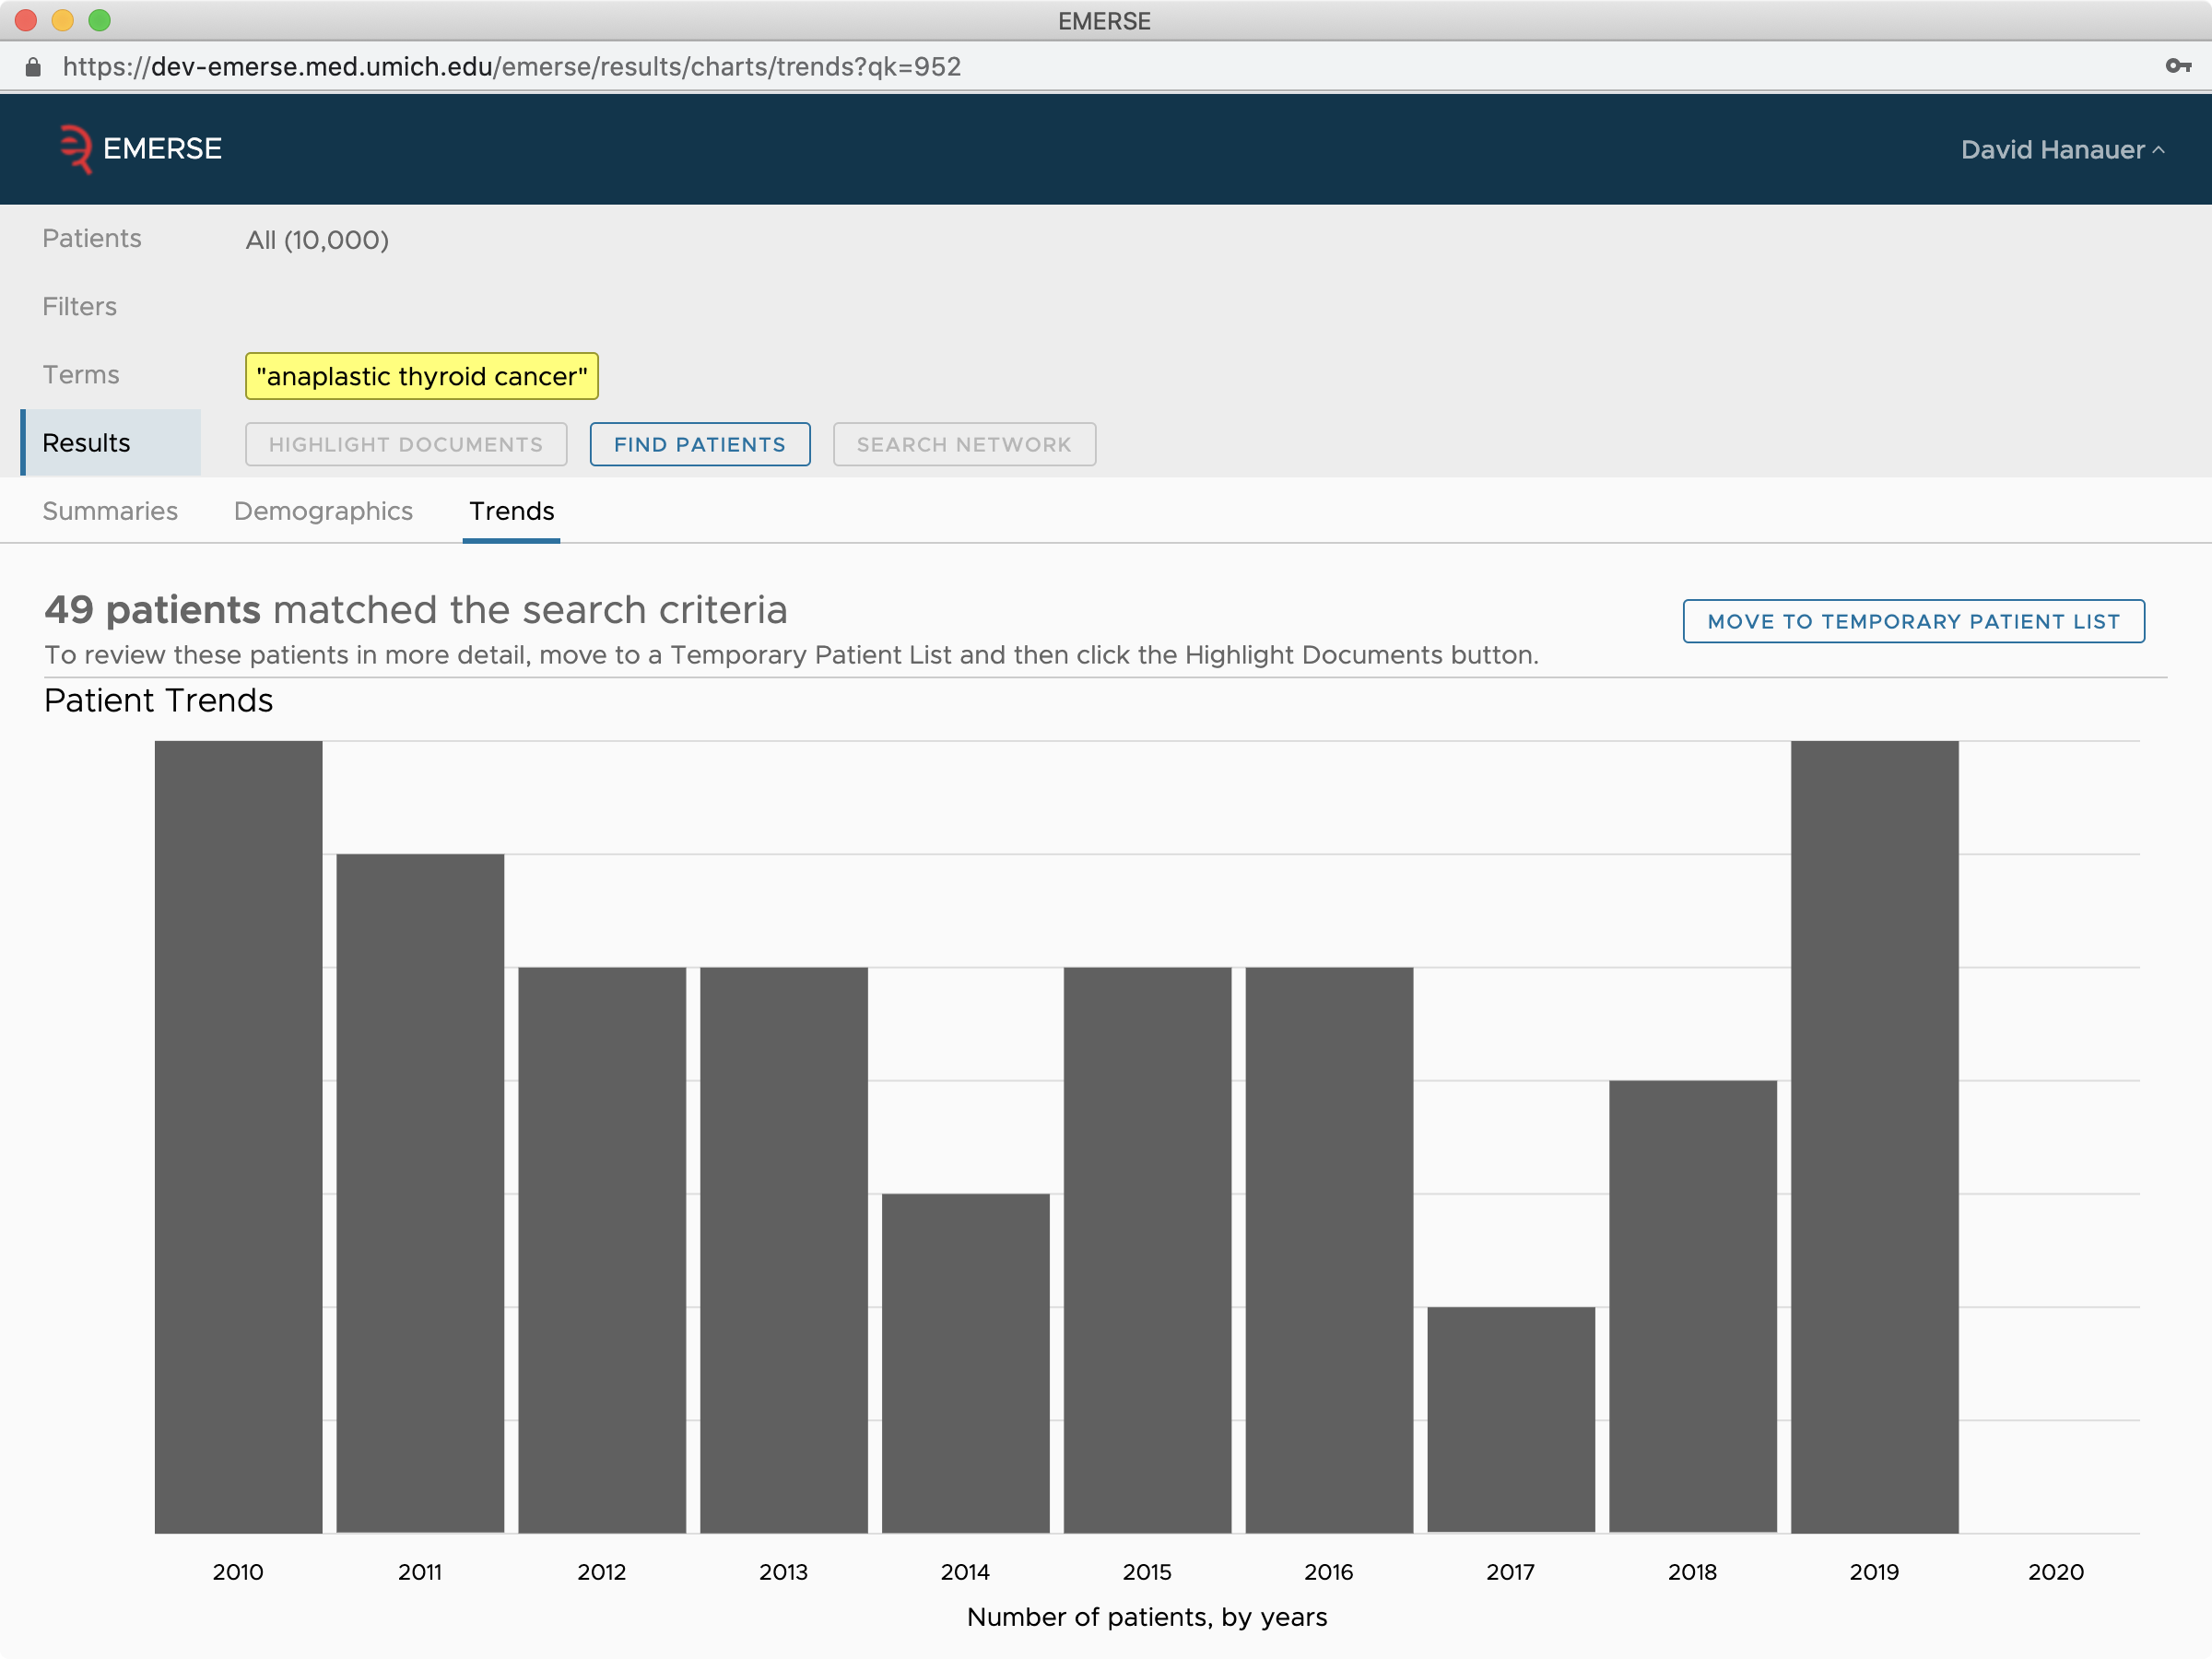
Searching with the Find Patients mode
With Find Patients, a patient will be included in the results if any of their documents match the search criteria. The way the search runs is different depending on whether it is run against All Local Patients in the system, or against an existing Patient List.
-
All Local Patients: A document matches the search if it contains at least one term of distinct each color in the search. That is, terms with different colors are considered to be separated by
ANDwhereas terms with the same color are considered to be separated byOR. -
Patients Lists: A document matches the search if any term appears in the document, regardless of the color. That is, terms with different colors are not treated distinctly and are all considered to be separated by
OR.
For example, if you search for heart and "chest pain" across All Local Patients, then a document must contain both the word "heart" and the phrase "chest pain" to match, and a patient must have at least one document that matches those terms since the terms are different colors. If a patient merely has a document containing the word "heart" and another different document containing the phrase "chest pain", the patient would not match because the requirement is that the terms appear together in the same document.
If the same search for heart and "chest pain" os done within a Patient List, then a document matches if it contains either the word "heart" or the phrase "chest pain"; the document does not have to contain both. For example, a patient will match the query when they have a document that contains the word "heart" even if they have no document that contains the phrase "chest pain".
Document matches for Advanced Terms operate a bit differently: the results are based only on the search syntax used, not the highlight color; all advanced searches are highlighted in yellow. Terms in advanced search not separated by a boolean operator are searched as if they were separated by the OR operator. Parentheses should be used to make grouping clear.
Advanced term search can do things that have no analogy in Temporary Terms or Saved Terms, such as (heart AND "chest pain") OR "chest tightness" which matches documents that either contain both "heart" AND "chest pain" OR just contains the phrase "chest tightness". In this example, a document containing the phrase "chest tightness" is enough to match, but a document containing the phrase "chest pain" without the word "heart" is not enough to make a match.
Search Strategies with the Find Patients Mode
Because of how searches are conducted, and how patients are identified when a search using Find Patients is applied to All Local Patients, it is best to ensure that true synonyms for a concept are highlighted in the same color. Additionally, be careful about adding too many terms especially if a term is a different color from the others, since it means that the additional term must also be in the document for the document to be retrieved. Adding an extraneous term that isn’t very important for identifying the right patient population has the potential to result in no patients being found. For example, if the following query is used with a search across All Local Patients, the query will only find patients that have at least one document with all three of those terms in the same document:
heart
chest pain
chest tightness
Thus, it is better to use only those terms that are absolutely necessary to find the right patients, or to use a Term Bundle and set the color of the terms more strategically, such as:
heart
chest pain
chest tightness
In this case, the above query will look for documents that contain heart AND either chest pain OR chest tightness, but chest pain and chest tightness do not have to both be present, only one of them.
Highlight Documents Search Mode
The Highlight Documents search mode is used when searching across a known set of patients, using either a Temporary Patient List or a Saved Patient List. This mode is equivalent to a chart review where you want to highlight all of the terms of interest, because you already know what patients you are interested in looking through.
Data displayed with the Highlight Documents mode
When in the Highlight Documents mode, EMERSE will provide results including:
Overview
The Overview is a table where every patient is shown in a row and the document sources are shown in the columns. This Overview provides a high level view of what was found for each patient, with each cell providing specifics about what was found on a per-patient, per-source basis. There are several viewing options for the Overview table.
Numbers
Numbers are displayed in cells that have search "hits". (In search jargon, a "hit" means that the search query matched a document in the system). The numbers represent the total number of documents with at least one hit and the total number of documents for that specific patient and document source. For example, if a cell says "21 of 92" it means that the patient has 21 documents containing a search hit out of a total of 92 documents for that source. Cells that are blank have no hits (but those cells might still contain documents without any hits). Clicking on the Numbers icon will toggle between showing the numbers for cells that have hits and numbers for all of the cells, even those that do not have a hit. This can be useful if you are interested in knowing if a patient has any documents for a specific source, even if there are no hits for that source. For example, a cell might say "0 of 12" (0 notes out of 12 notes had a hit) or even "0 of 0" (there were 0 notes for that particular patient and document source). Noe that the numbers shown in these cells will vary depending on how the Filters are set. More restrictive Filters will results in fewer hits and potentially fewer documents. If a patient does not match the Filter criteria at all, they will have 0 documents displayed in the Overview table.
Grayscale
The Grayscale option will shade a cell in a gray color, with darker colors representing more documents with a hit. This provides a rapid visual overview similar to a "heat map" which is commonly used in some bioinformatics disciplines. Darker shades may help point out areas in which to focus, since they have more documents and thus more mentions of the terms of interest. The general rule of thumb is that cells with no hits are white, cells with 1-5 document hits are a light gray, 6-10 hits a slightly darker gray, and so on. The Grayscale option can be toggled on or off by clicking on the icon, and it can be used in conjunction with the Numbers option and the Mosaic Option, described below.
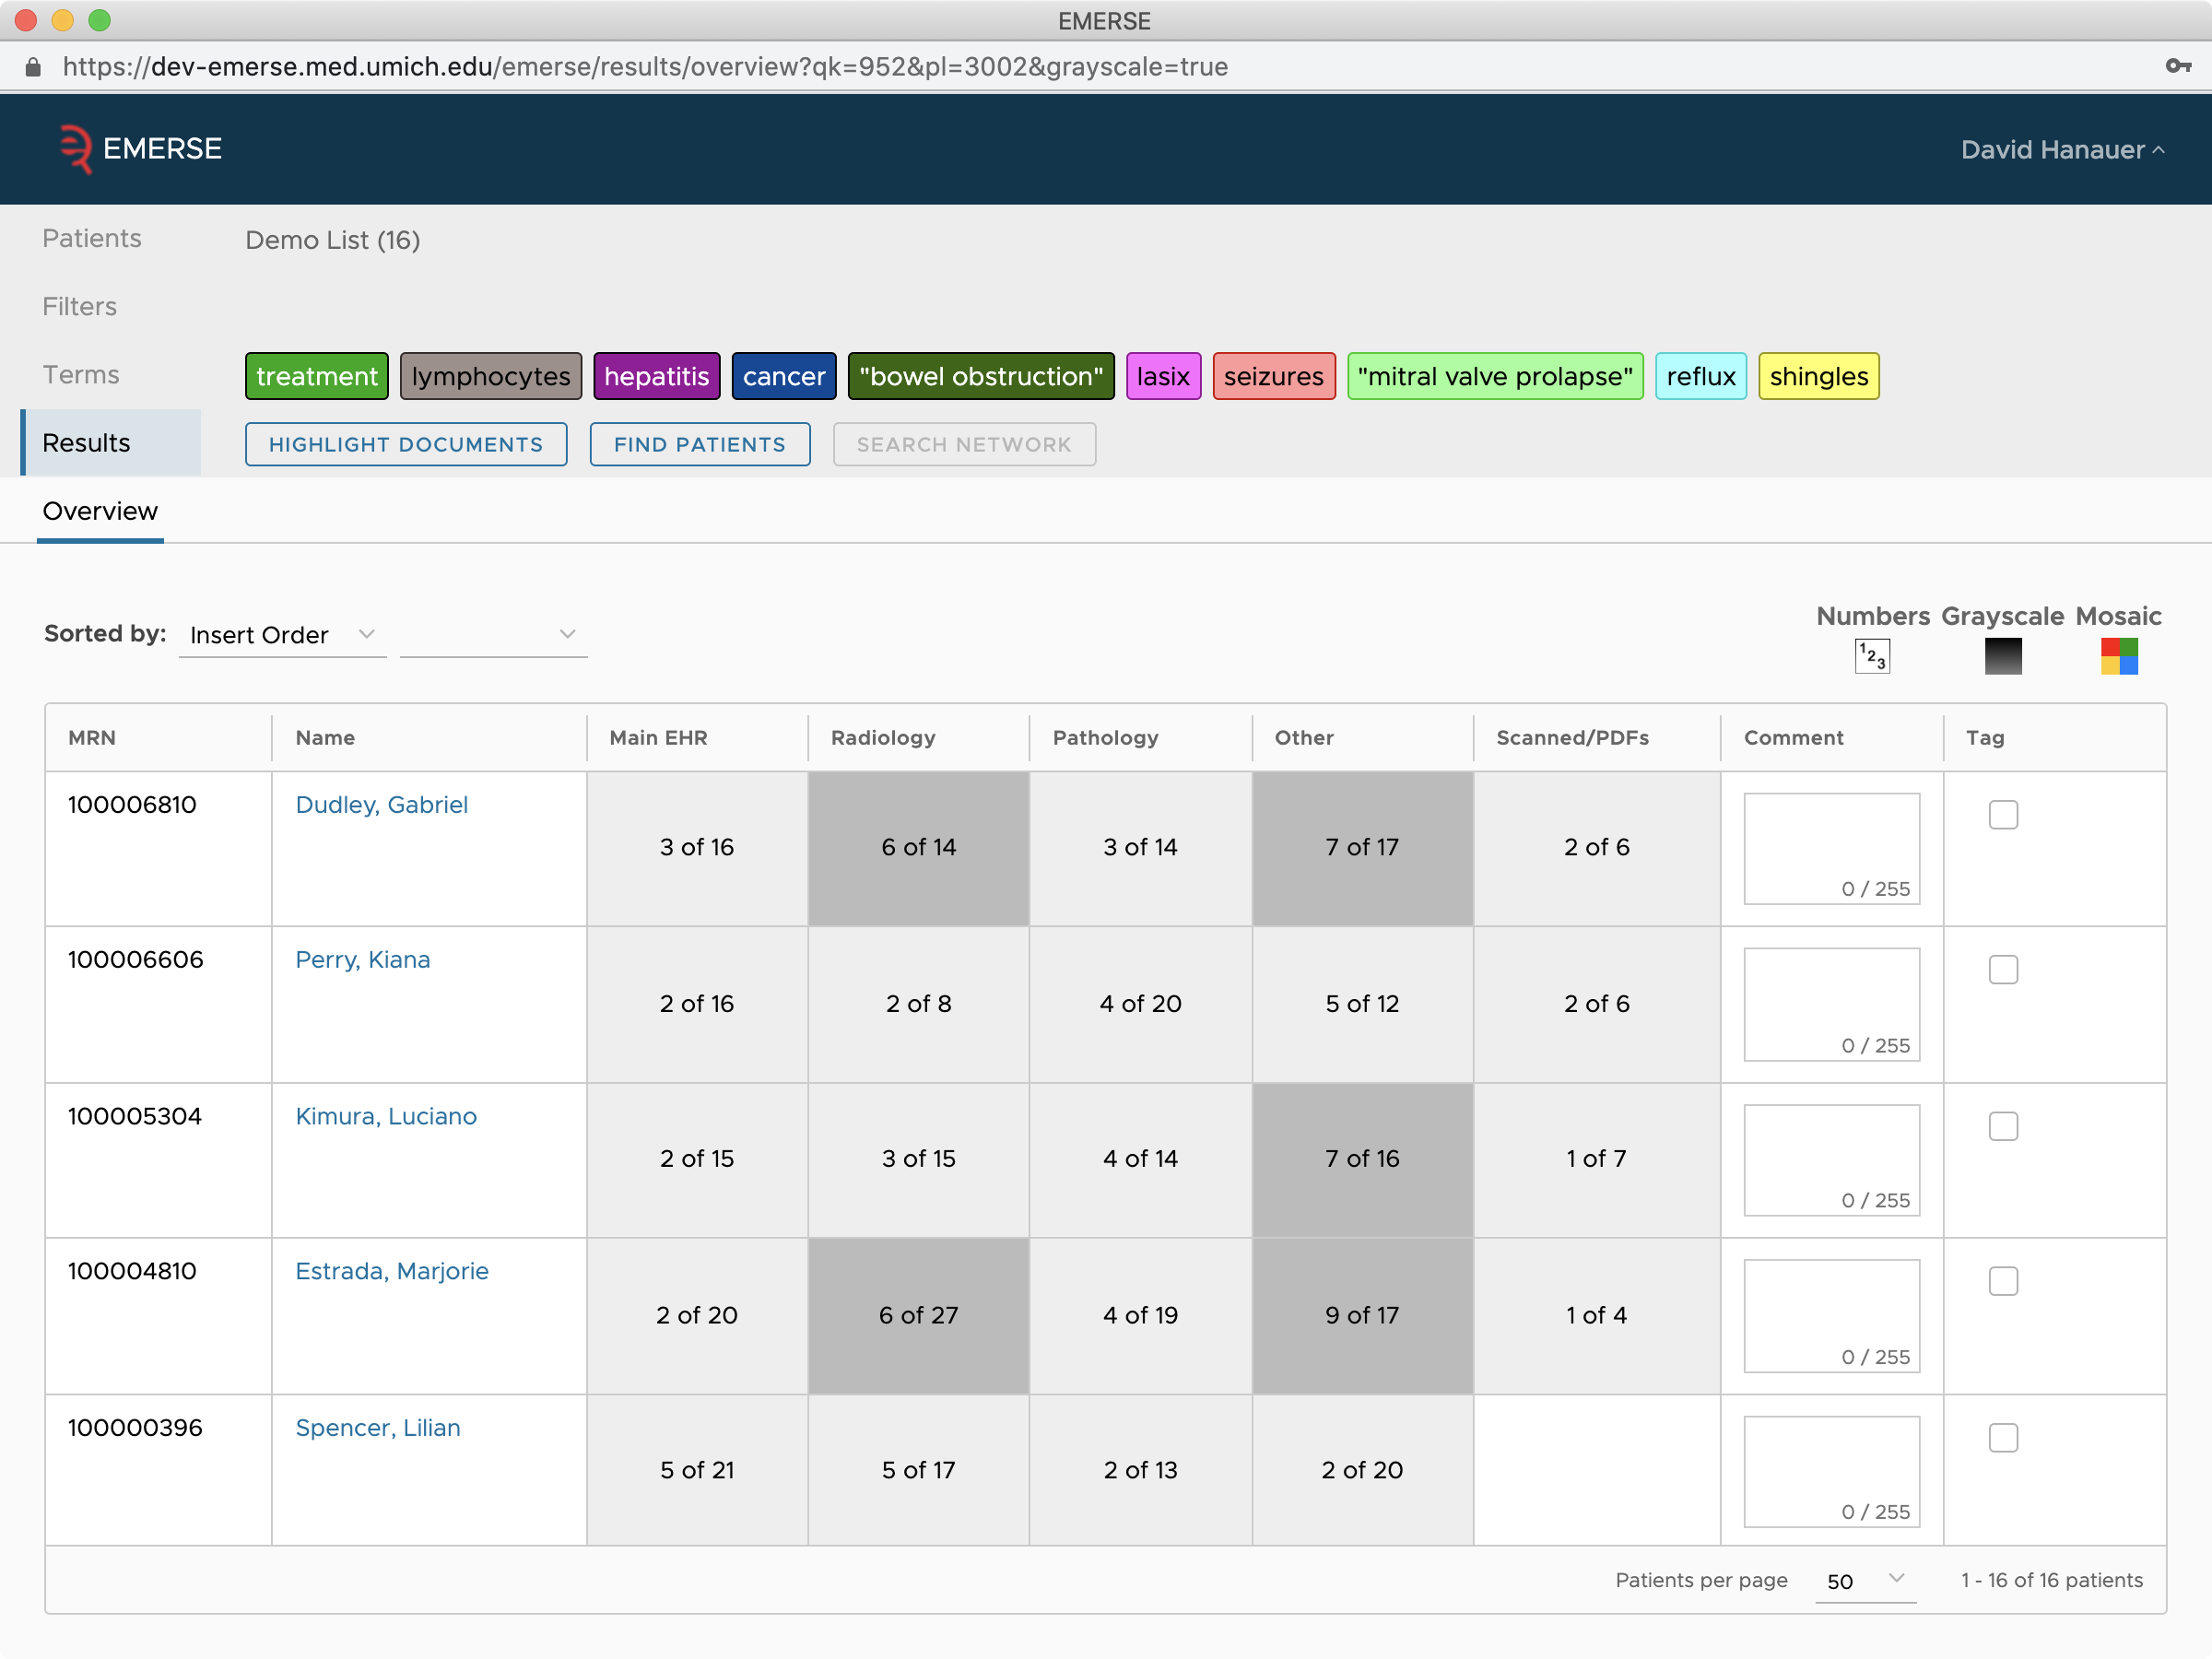
Mosaic
The Mosaic option provides another way to view the data at a high level. It displays a color-coded grid representing the terms found for each patient based on document source, where the colors are shown in specific locations within a 6 x 3 grid (because there are 18 possible colors for terms). Each color corresponds to the color that was assigned to the term. Because the colors appear in the same location in the grid every time, even those with trouble distinguishing between colors should still be able to make use of this feature based on the location of the shading.
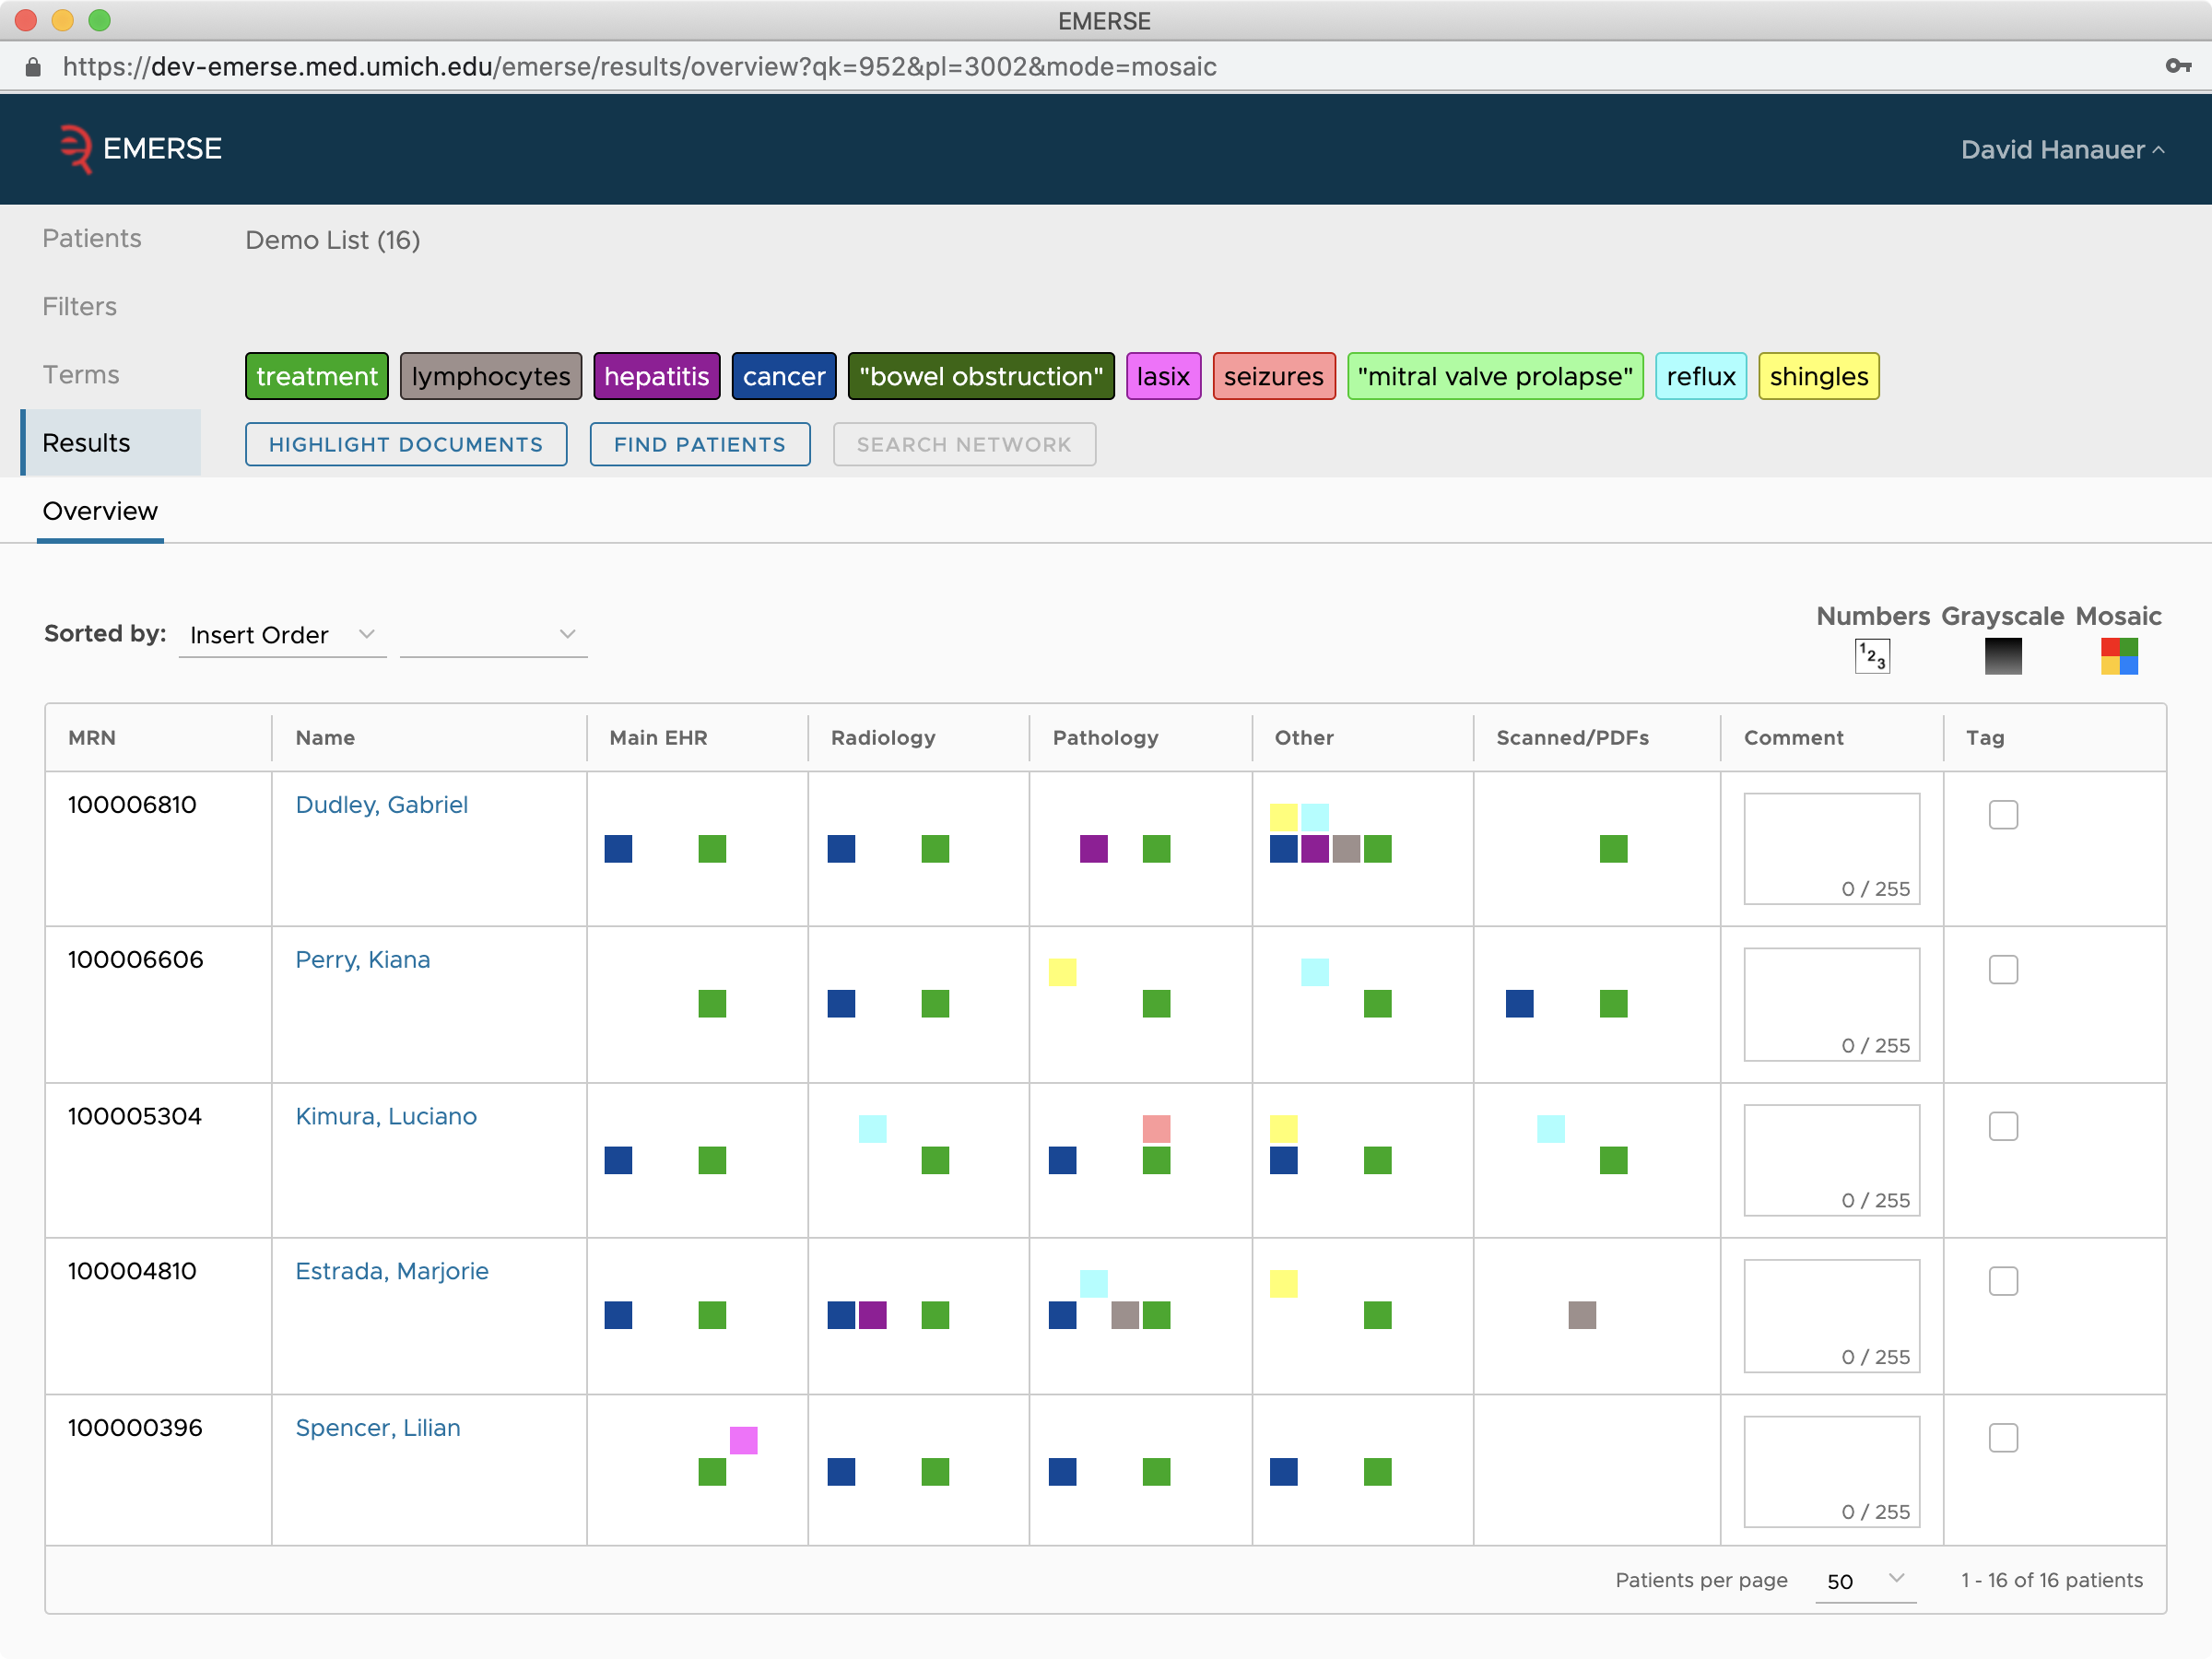
Summaries
Clicking on a specific cell on the Overview page will take you to a drill-down view of a list of documents for that specific user and document source. This is known as the Summaries page, since it displays the high level summaries, or text snippets, of what was found based on the search. Each row in the Summaries view represents a document for that patient. By default only the documents that contain at least on search term are displayed. To show all of the documents, even those with no terms, click on the Display All Notes checkbox. The documents listed on this screen are sorted in reverse chronological, with the most recent documents on top, but the table is sortable in both directions by clicking on the header column of interest. A row that is blank means that there were no hits for that document, whereas a row that is not blank will show a snippet, or Summary, of what was found for that document with the search terms of interest. This allows for rapidly skimming the notes at a high level to see if it is worth drilling down further to open the actual note for more details. A hidden shortcut in the Summaries section: pressing the left and right arrow keys will skip to the prior (left arrow) or next (right arrow) patient in the list.
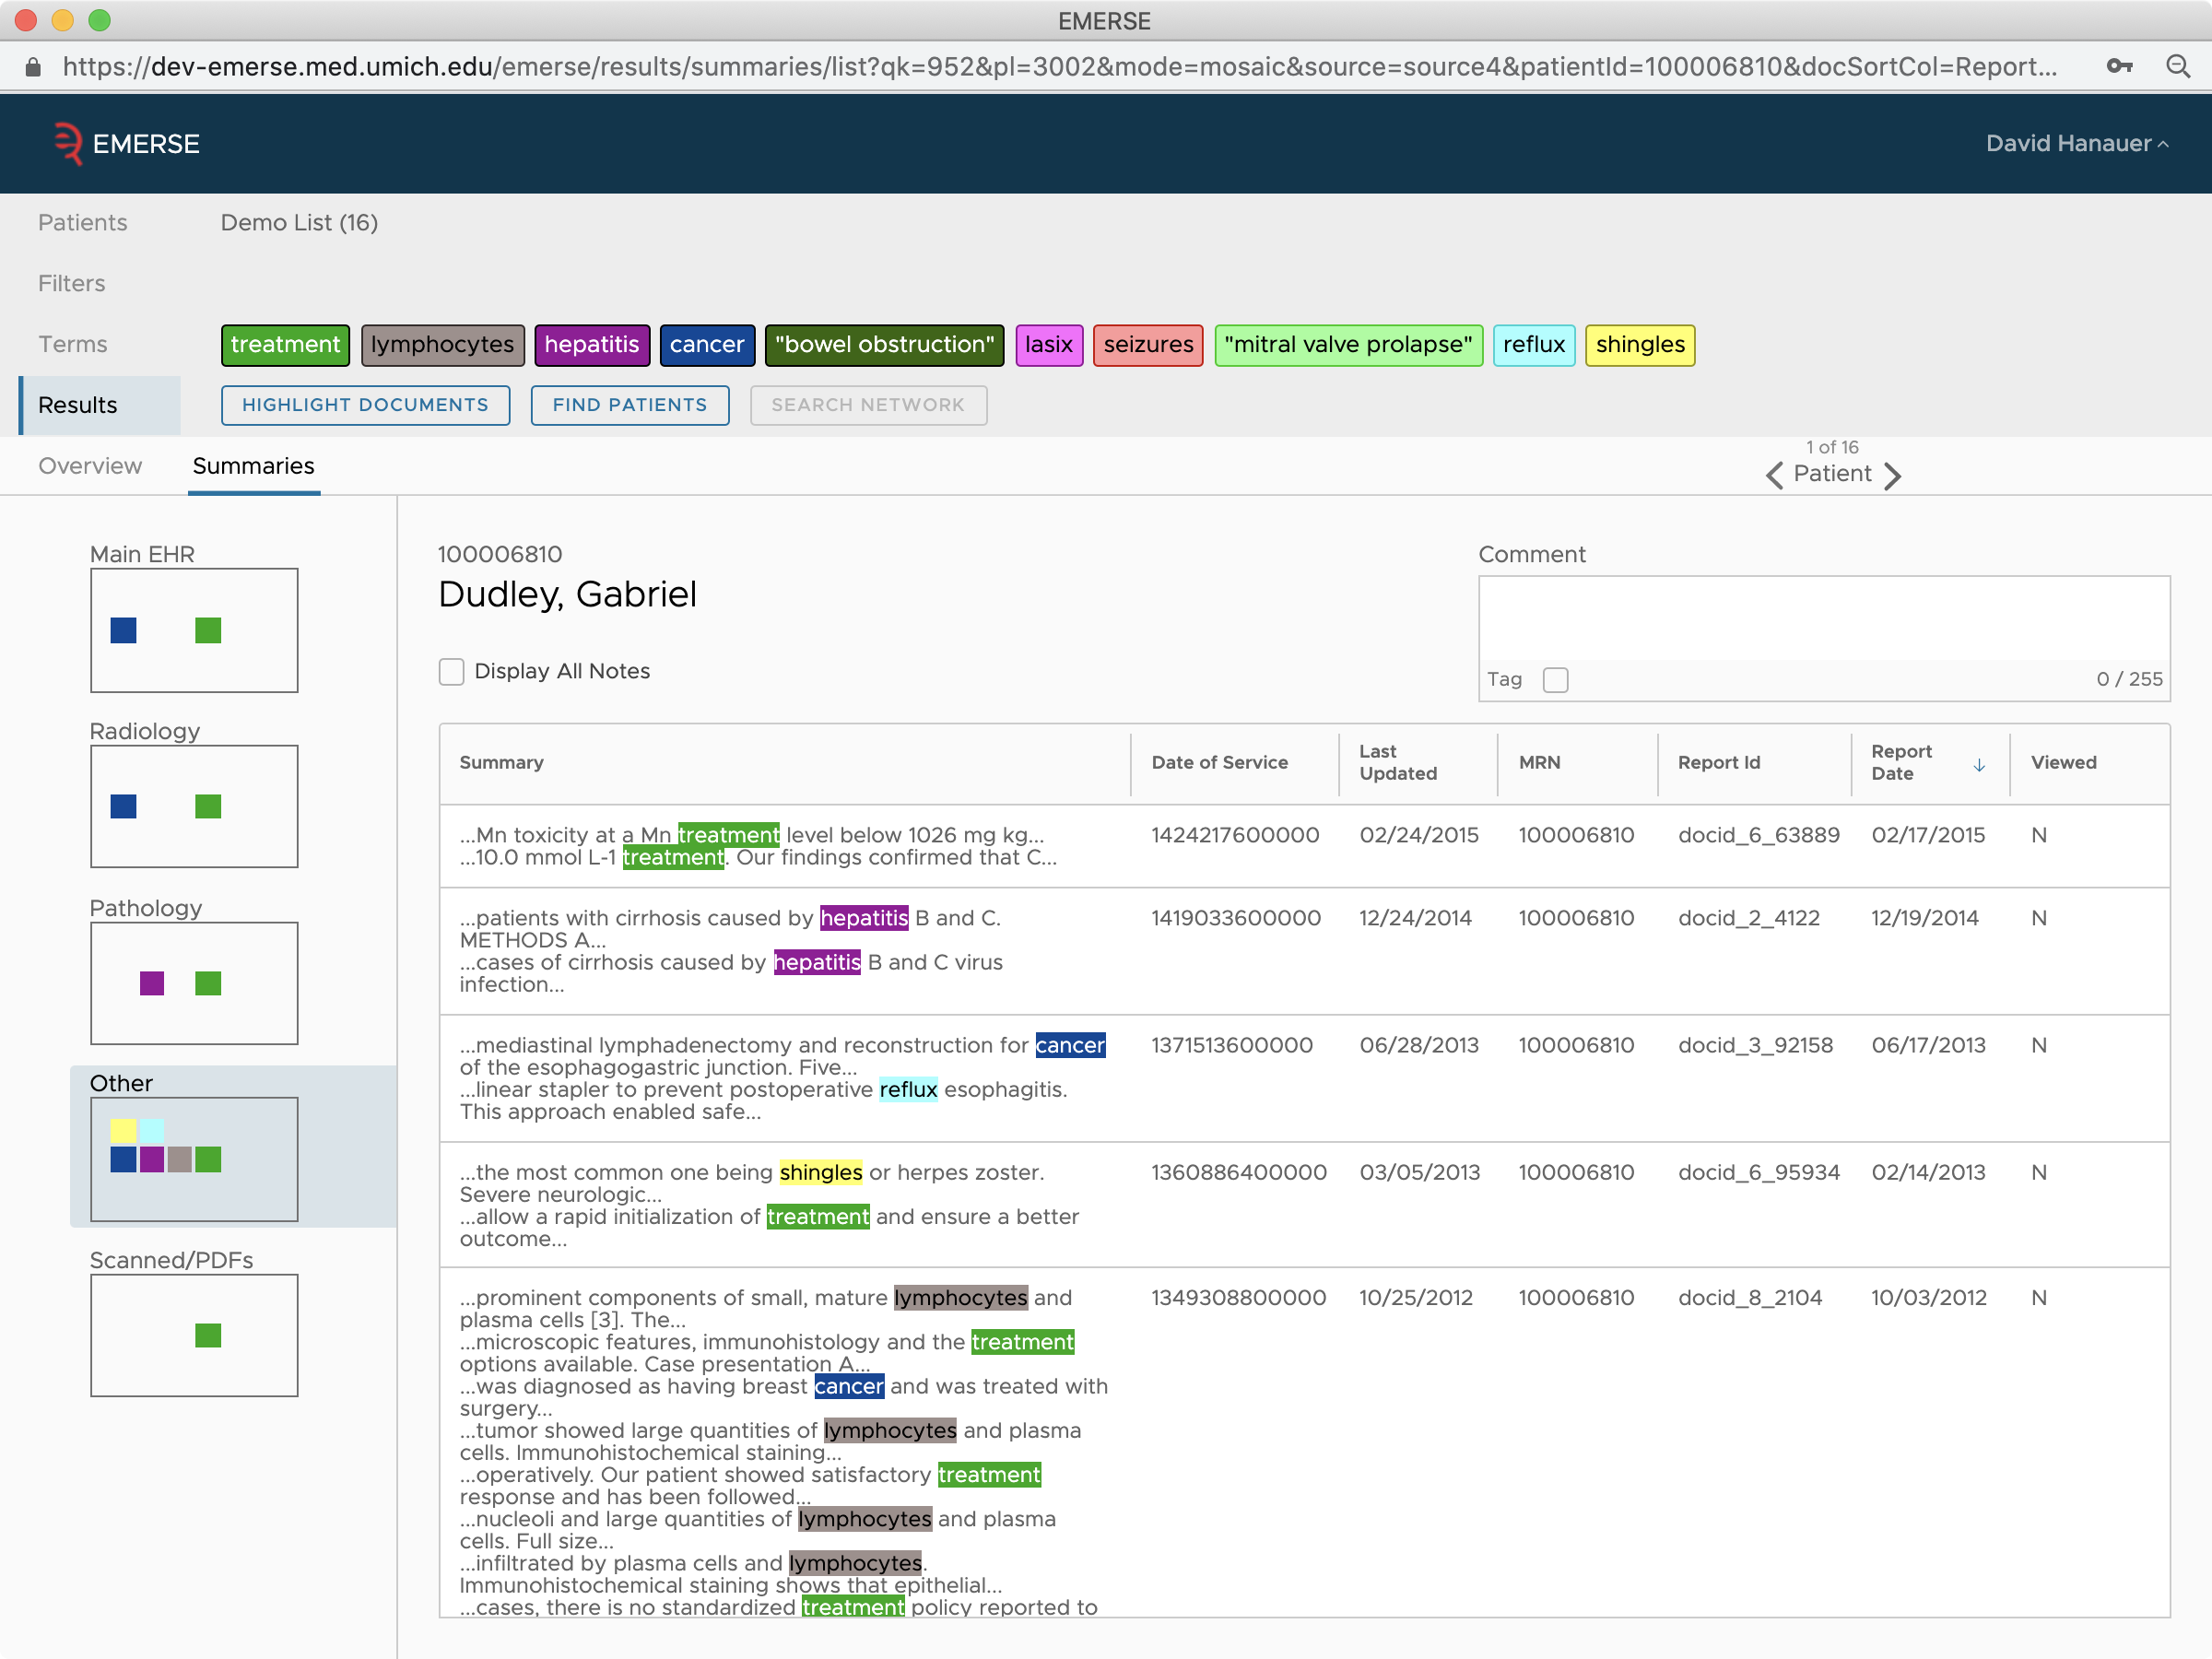
Documents
Clicking on a specific row on the Summaries page will take you to a drill-down view of the actual document. The entire document will be shown, with the terms of interest highlighted in the document. Above the document two smaller tables are shown. One is a table of metadata, which is information about the document. This information might include a unique document ID, the clinical service, the authoring clinician, etc. but it will differ depending on the local configuration of EMERSE. The other table shows the Summaries for that document, with the terms highlighted within a short snippet of text. This is to provide another way to quickly skim the results for anything of interest. It is also worth noting that clicking on any of the highlighted terms in this table will take you to that specific place in the document, which is a hidden shortcut (there are benefits to reading the user guide). The Documents page has various navigation options to skip to the next document, or next patient. There is no way to save the document—however, it can always be accessed again at a later time by going back to EMERSE. A hidden shortcut in the Documents section: the < and > keys on the keyboard switch between the prior (<) and next (>) documents. You can also switch between patients using the left and right arrow keys.
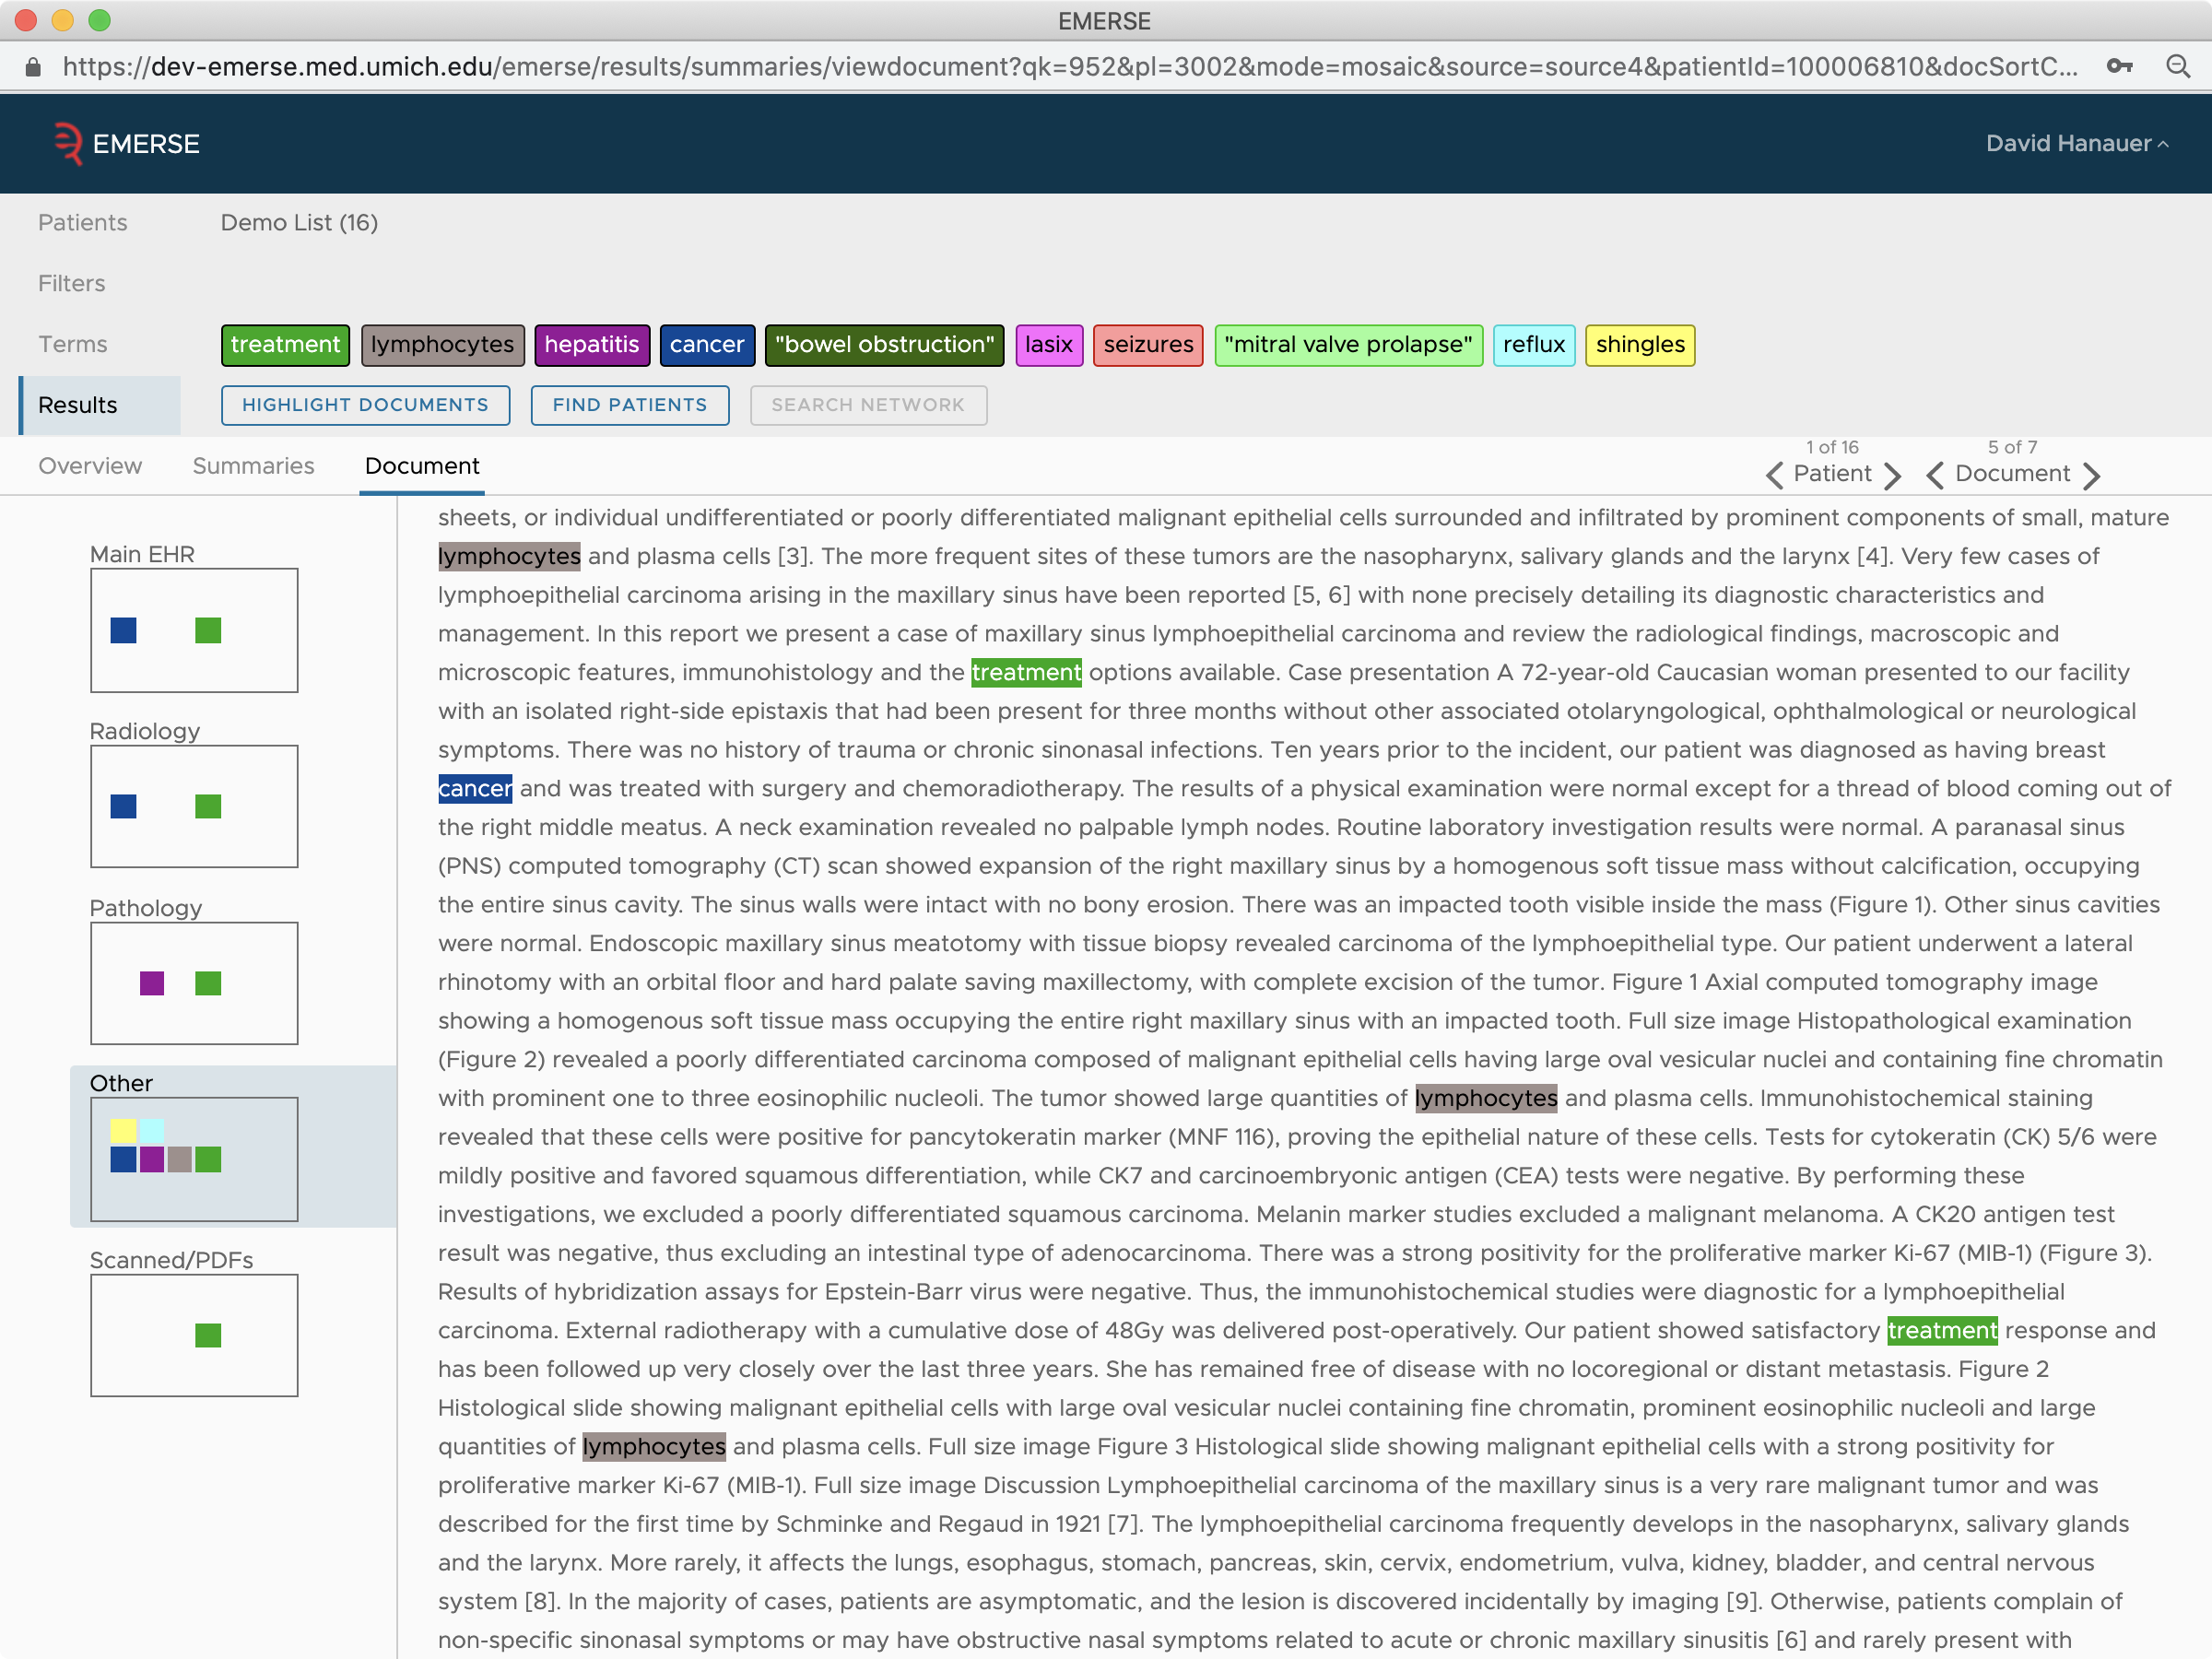
Searching with the Highlight Documents mode
The Highlight Documents mode is simpler than the Find Patients mode. This is because all terms are treated as being separated by the OR operator, regardless of the color in which the terms are highlighted (unless otherwise specified using actual Boolean operators with the Advanced Terms). The general idea is that since the patients of interest have already been identified, the goal with Highlight Documents is to simply highlight any terms of interest anywhere in the documents to support a rapid, efficient chart review process. As a result, there is no harm (other than speed/performance) in including additional terms even if they are not present anywhere in the documents, since their absence will not affect the highlighting of the other terms.
Search Strategies with the Highlight Documents Mode
In general, no specific search strategies are needed when searching in the Highlight Documents mode. Even so, it may still be advantageous to group terms with similar meaning by the same color to aid in more rapid chart reviews. In other words, if you are searching for a list of narcotic medications and the resulting constipation that the medications might cause, it may be useful to set all of the narcotic medications to be green, all of the constipation terms to be orange, and all of the stool softeners/laxatives to be purple. Then, someone reviewing the charts would only have to recognize one of three colors to know what kind of concept was being highlighted.
| Some elements with the Advanced Terms will not work properly when in the Highlight Documents mode, and these limitations are detailed in the section on Advanced Terms. |
Searching within the Network
Searching the network involves a very different process from searching across All Local Patients or within a Patient List. This is because a Network search involves contacting other EMERSE sites to ask those other systems for approximate counts of patients based on the search terms. The most important thing to note is that the search terms are handled in the same way that they are when searching across All Local Patients. That is, terms with the same color are treated as being separated by OR and those with a different color are considered to be separated by AND. More details can be found in the section on the Network.
Additional Search Strategies
In addition to the two general search strategies described above (Search Strategies with the Find Patients Mode and Search Strategies with the Highlight Documents Mode), there are other tips that are worth noting to ensure that you get the results you’re looking for.
Understand the differences between the two search modes
This is described elsewhere, but it is extremely important to understand the differences between the two search modes, Find Patients and Highlight Documents. The way EMERSE works differs depending on which search mode is being used, and therefore this difference must be understood to ensure effective search results.
Use the synonyms
EMERSE can provide a lot of suggestions for additional terms through the Synoyms feature. Use this to expand your search to cover more possibilities for how something was worded or phrased in the notes. Also be careful because EMERSE is a very literal search engine. If you want to look for antibiotics and that is what you type in, the system will look for the word antibiotics only. If what you really meant was to find any instance of any antibiotic mentioned in the notes, then you will have to include all of the possible terms for these, and there may be hundreds of them (e.g., cephalexin, Keflex, Ancef, Ciprodex, amoxicillin, etc). The Synonyms feature can certainly help expand the breadth of the query terms, but it may not be complete.
While the Synonyms can be very useful and powerful, be careful about what Synonym suggestions you add. EMERSE has the potential to provide a very large list of options, but adding too many terms could slow things down without providing much benefit. And, for ambiguous terms, you might inadvertently include concepts you don’t even want. For example, if you are searching for synonyms of MI because you want to look for terms related to myocardial infarction, EMERSE will also suggest terms like Michigan since that is also a different meaning of MI.
Break up the query
Similar to trying multiple variations, be careful about how specific the query is. For example, if you enter "metastatic breast cancer", then the system will look for that specific phrase. It might be better to look for the phrase metastatic and the phrase "breast cancer" separately, so that you have a greater chance of finding other variations such as:
the
breast cancerwas found to bemetastaticto the lungs
Note, however, that sometimes breaking up the query can lead to false positives if, for example there was text such as:
history of
breast canceras well as melanomametastaticto the brain
Another approach for 'separating' the terms is to use the Proximity Search feature. This will allow you to search for two terms within a specified number of words from each other. For example, suppose you were looking for "sublingual nitroglycerin". A logical alternative phrase would also be "nitroglycerin sublingually". But if the phrase in the clinical note is actually "nitroglycerin was given sublingually" then the simpler, shorter phrase would miss it. Including the terms in a Proximity Search would capture the longer phrase. A Proximity Search within Temporary Terms or Saved Terms will search up to 5 words apart. To search with even more space between words, the Proximity Search can be used with the Advanced Terms. Just remember that the more spacing between two words, the more likely that there is no true connection to them which can result in a false positive result.
Beware of implicit concepts
A concept that you’re looking for may be implicitly described but not explicitly stated. An example of this would be looking for the concept of metastatic as it relates to breast cancer. If the phrase is…
the
breast cancerwas also found in her lungs
…this implies that the cancer was metastatic even though the term metastatic or its variants (metastasized, mets, etc.) was not explicitly mentioned. EMERSE, being a simple tool, is not able to interpret that phrase as being an example of a metastatic breast cancer.
Another example:
He had a raised, red patch on his arm that he didn’t even notice.
This is an example of an asymptomatic rash, even though neither of those two words (neither asymptomatic nor rash) appears in the sentence above. This can happen often, so it is important to be careful of what might be missed when only searching for specific phrases or concepts.
Beware of ambiguous terms
There are hundreds of terms that are used in the clinical notes that are ambiguous—that is, it is hard to know what a term represents without understanding the context in which it appears, and some terms/abbreviations may have been completely made up locally by a single clinician or a small group of clinicians.
For example, diffs might mean differentials, or differences, or difficulties or even be a part of an abbreviation for Clostridium difficiles (C diffs).
Other common ambiguous abbreviations include CA which can mean cancer, calcium, or California, and MG could mean milligrams, myasthenia gravis, or magnesium.
Even terms that one might think are straightforward might not be. For example, imagine you are interested in exploring milk consumption to assess dairy intake, so you search for milk. Be careful because there can be terms like almond milk, carob milk, soy milk, rice milk, and others which are clearly not the right kind of milk. This is why reviewing the results carefully is very important. Also note that you could add those 'false positive' terms as Phrases to Exclude to remove them from the search results (see section on: Phrases to Exclude).
Try multiple variations
You may be tempted to use the most standard, common phrasing for a particular concept, but it is best to consider all of the ways in which something might be phrased. Clinicians will sometimes even make up new terms. For example, scaphotrapeziotrapezoidal may be the official spelling, but clinicians have also used terms such as scaphotrapeziumtrapezoid, scapho-trapezoid-trapezium, and scaphoid-trapezium-trapezoidal. Clinical note creators also add hyphens or spaces (these are equivalent in EMERSE) into words where they might not be expected, as can be seen in the above examples, or even simple words like ham burger or yester-day. The system-suggested Synonyms can help capture some of this variability lot, but they may not be enough to cover all of the possibilities for what is mentioned in the notes.
Beware of word substitutions
Remember that the people who create clinical notes often have a difficult time spelling medical words, or they make errors when they type, or automated transcription systems can "hear" the wrong word, etc. For example, beast mass and prostrate cancer are phrases that contain correctly spelled words, but they are not the right words. In fact, many such word substitutions of correctly spelled (but incorrectly used) words appear. Often these are homonyms, but not always. Think carefully about how someone (or a computer) might hear a word and insert the wrong word. If you’re looking for people with a hoarse voice, be sure to search for horse voice because it’s almost guaranteed that someone will have used the wrong word at least once.
Following is a table containing examples of such word substitutions that have been found int he medical record. It is by no means complete.
Wrong Word (the word that was used in the note) |
Correct Word (what the word was supposed to be) |
beast |
breast |
prostrate |
prostate |
horse |
hoarse |
anther |
another |
mutation |
nutation |
reposited |
repositioned |
unkept |
unkempt |
physiatric |
psychiatric |
crabs |
carbs |
synergist |
Synagis |
callous |
callus |
sliver |
silver |
circumscribed |
circumcised |
calibers |
calipers |
Understand the limitations of EMERSE
This has already been described in the section on Terms, but it is worth pointing out again. EMERSE ignores multiple characters such as ! ? . > < + - #. This means that some searches will not work. For example: BRCA1- will be interpreted by EMERSE as simply BRCA1, which means that although you can still search for BRCA1 you cannot distinguish between BRCA1- and BRCA1+. (If the phrase is "BRCA1 negative", or a similar variation, then EMERSE will be able to find the concept. Similarly, "150 pounds" when written as "150 #" or 150 # will simply be interpreted as 150 and a blood pressure written in the form of 120/90 will be interpreted the same as 120 90, meaning that you cannot use the slash symbol (/) as a way to look for a pattern that appears to be a blood pressure.
Understand the limitations of search in general
A search engine like EMERSE is great for finding concepts quickly, but it does not have any understanding of what it found, or the context in which a term was found. That is why it is important to carefully review the results for accuracy. Even in cases where you might think no error is possible, it just might be possible. The following is a real example of what was found in a clinical note:
A search for
mesenteric polyarterisis nodosashould also include the abbreviation forpolyarterisis nodosawhich isPAN. Thus, an additional search term should bemesenteric PAN. By default EMERSE searches in a case-insensitive manner, so it will identifypolyarteris panas a 'hit'. However, the actual phrase highlighted wasmesenteric panniculitis. which is not the intended concept. In this case, an inadvertent space had been added into the wordpanniculitiis.
Similarly, terms like ular could represent a misspelling of the word ulnar or part of a word that had an inadvertent space such as ventric ular or fib ular.
Another example:
Suppose you are searching for
lupus, so you include the abbreviationSLEwhich is a common abbreviation forsystemic lupus erythematosus. The system will higlight something like:50 YEAR OLD FE,
SLEWITH HISTORY OF….In this case, it looks like there are two common medical abbreviations: [1]
FE(iron), and [2]SLE(systemic lupus erythematosus). However, upon careful inspection, neither of those two abbreviation are correct. In fact, the word should have beenFEMALE, but the person who typed the word accidentally shifted two of the letters to the right on the keyboard (,is directly to the right ofmandsis directly to the right ofaon a keyboard). Thus, what looks like two clinical concepts is really just the termfemale.
As a general rule of thumb, if you have found what you were looking for, and have verified that it is truly the correct concept then consider that to be a success. If you haven’t found what you were looking for, the concept may not be there at all, or it may be that you just haven’t figure out the unusual, or incorrect, way in which a term or concept was phrased.
Consult clinical experts
If possible, talk to someone who has clinical expertise in the area for which you are conducting your searches. They might be able to provide guidance about how certain concepts are likely to be phrased in the clinical notes.
Use the minimum necessary terms, sometimes
Queries that are too long or specific will generally not work well. For example, if you are looking for a positive depression screen based on a PHQ-9 test, do not search for "positive depression screen based on a PHQ-9 test". Instead it might be better to search for PHQ-9 since that alone will help narrow down the results because it is already very specific. This could perhaps be combined with terms such as positive to help narrow down the results.
With more general terms you may need to add more terms to help narrow the results. For example, if you are looking for type 1 diabetes and you just search for the word diabetes you will end up with far too many irrelevant hits because you will most likely be finding diabetes related to type 2 diabetes since it is much more common.
In other words, you will need to come up with a strategy for how to construct your search queries with search terms, and this will usually be very customized to your specific task.
Indeed, there may be times when using longer and more specific phrases can be useful. An example of this might be to look for wording used in a specific note template or report template, which can be useful when trying to identify specific notes needed for data abstraction. In such a situation, the specific text surround a concept of interest may be needed to narrow down the results to the desired one. The example below identifies very specific language used in a test result reported by the Mayo Clinic Medical Laboratories. Searching for this very specific language, which does not appear to vary between reports, helps to identify the actual lab report and not the mention of HIV-1 elsewhere in the notes.
This test was
performed using the Abbott RealTime HIV-1
Qualitative assay
(Abbott Molecular, Inc., Des Plaines, IL). This test was developed and its performance characteristics determined by Mayo Clinic in a manner consistent with CLIA requirements. This test has not been cleared or approved by the U.S. Food and Drug Administration.
Search in stages
Sometimes it may not be an effective strategy to find your patients of interest with a single query. It may require several queries. For example, you may want to first identify your patient population using the Find Patients search mode just by searching for a rare disease. Once you have identified those potential patients, you can move them to a Patient List and then search them for more details (for medications, side effects, etc.) in a subsequent query using the Highlight Documents search mode.
Another example: Imagine you want to find a set of patients who have fibromyalgia and back pain but your query with the Find Patients mode returns almost none. This may be because with Find Patients the system is looking for documents that have the terms fibromyalgia and back pain in the same document. But what if the patients have these terms mentioned in different documents? One solution, among several, would be to first conduct a search for fibromyalgia using Find Patients and then saving the result as a Saved Patient List. Then conduct another, separate search for back pain using Find Patients, and saving this result as a Saved Patient List. Then, use the Compare Patient Lists feature and select the patients that belong to both lists. The resulting set of patients would be ones that contain the terms fibromyalgia and back pain, but not necessarily within the same document. This smaller subset of patients could then be saved as a new list and searched further using the Highlight Documents feature.
Use multiple data resources
EMERSE was designed to work with unstructured, free text data. These clinical documents can be extremely valuable for finding the needed information, much of which might not be present anywhere else in the medical record. However, there are times when using structured data makes sense. For example, if you want to find all patients with a hemoglobin less than 6, you can’t type that into EMERSE and expect to get any sensibile results. It would be better to use a separate system designed for structured data (e.g., DataDirect at the University of Michigan, or the widely used i2b2 Workbench). It may also make sense to use structured data such as ICD-10 billing codes as a first pass attempt to narrow down a patient cohort, and then search that subset of patients within EMERSE to do additional verifications within the clinical notes.
A patient list generated from a different system can be imported into EMERSE, or one can simply copy and paste a column of medical record numbers from an Excel sheet containing a list of patients generated in a different system. EMERSE also provides the technical capabilities for importing a list directly from another software system, but this functionality will depend on how it has been locally installed, configured, and connected to other systems.
It is best to think of EMERSE as being one tool among many in a toolbox of useful software to support your work. It is unlikely that any single tool will enable you to complete your task, but using multiple tools together will help you efficiently get your work done.
Plan your data entry with data extraction/search in mind
While this may not often be possible, if you have any control over how data are initially entered into the electronic health record, you can use strategies to help identify the note or concept later when searching. One example is to use standardized phrases that can be used in search later on that will positively identify only the notes of interest. Also, using more standardized language helps with ensuring that no unusual variations in wording are missed with the search.
Give thought to how you might want to identify and abstract data later on. It may be useful, for example, to include a unique "note identifier" in a note template, so that searching for just that identifier will identify all of the notes of interest. You can use something distinctive like stntv25; it can even be simple phrases like Strep throat note template version 2.5, as long as it is unique to that set of notes.
The Food and Drug Administration (FDA) has enabled just this type of searching with drug biosimilars. These drugs are required to have a generic name appended by a "distinguishing suffix that is devoid of meaning and composed of four lowercase letters" (Reference: Nonproprietary Naming of Biological Products).
Examples include: emicizumab-kxwh, vestronidase alfa-vjbk, filgastrim-vkzt, filgastrim-sndz. Thus, searching for even the 4 letter suffix (kxwh, vjbk, vkzt, sndz) should positively identify the drug in most cases.
|
Be creative
Sometimes it helps to think 'outside the box' when conducting searches. For example, you may be interested in identifying patients based on structured ICD-10 codes. If your clinical notes contain such codes within the text of the document, they can be searched just like searching for any other word or phrase. If you’re interested in finding Ehlers-Danlos syndrome, which has an ICD-10 code of Q79.6, just search for that term and it will find any mention of that code in the notes. Of course, since the dot (.) is ignored, you could simply search for Q79 6 to get the same result). The main thing that you cannot do, as already mentioned above, is search for numeric data using comparitors such as greater than (>), less than (<) or equal to (=).
Network
Network Background
The EMERSE Network is a new feature available since EMERSE version 6.3. If you do not have access to this feature, it may be because you do not have permission from your local EMERSE administrator to use the Network feature, or your site has chosen not to join the network.
The general idea behind the Network is to run searches for patient counts not only at your own site, but at other participating sites across the country as well. If you are looking to plan a clinical trial involving patients that have a rare disease that might only be mentioned in the notes (e.g., no specific ICD-10 code) this could be a very good way to estimate how many patients exist at other sites, and then plan to form a collaboration with investigators at those other sites.
There are many security mechanisms built into the Networking capabilities, but the most important one is that no actual patient data ever travels across the Network. By using the Network you cannot see clinical notes from other EMERSE sites, and other sites cannot see your local notes. Instead, the only information passed across the network are obfuscated counts. Obfuscation means that the real count is not provided. Instead, an approximate count within a reasonable range is provided. This is done to prevent users from trying to identify specific patients by manipulating the search query to change the counts. Another important security mechanism is that sites can set a threshhold below which even counts are not reported. In such a case the site might return a number such as < 10.
To re-iterate, using the network can provide you with approximate counts of how many patients at each participating site have the terms of interest. You cannot see any more details about those patients, and this is intentional.
This Network is conceptually similar to other systems (such as i2b2/ACT) that perform related functions for structured data. That is, for data such as billing codes, medication codes, lab codes, etc. EMERSE differs in that it allows for network search that related to the free text data.
| While we do not thing it would be possible, no one should ever use the Network to try to deduce the identify of an individual. |
Using the Network
Using the network should be straightforward. Simply click on the Network tab in the Patients section. You will be presented with a table showing all of the participating sites. Simply check the boxes next to the sites that you want to include in your search.
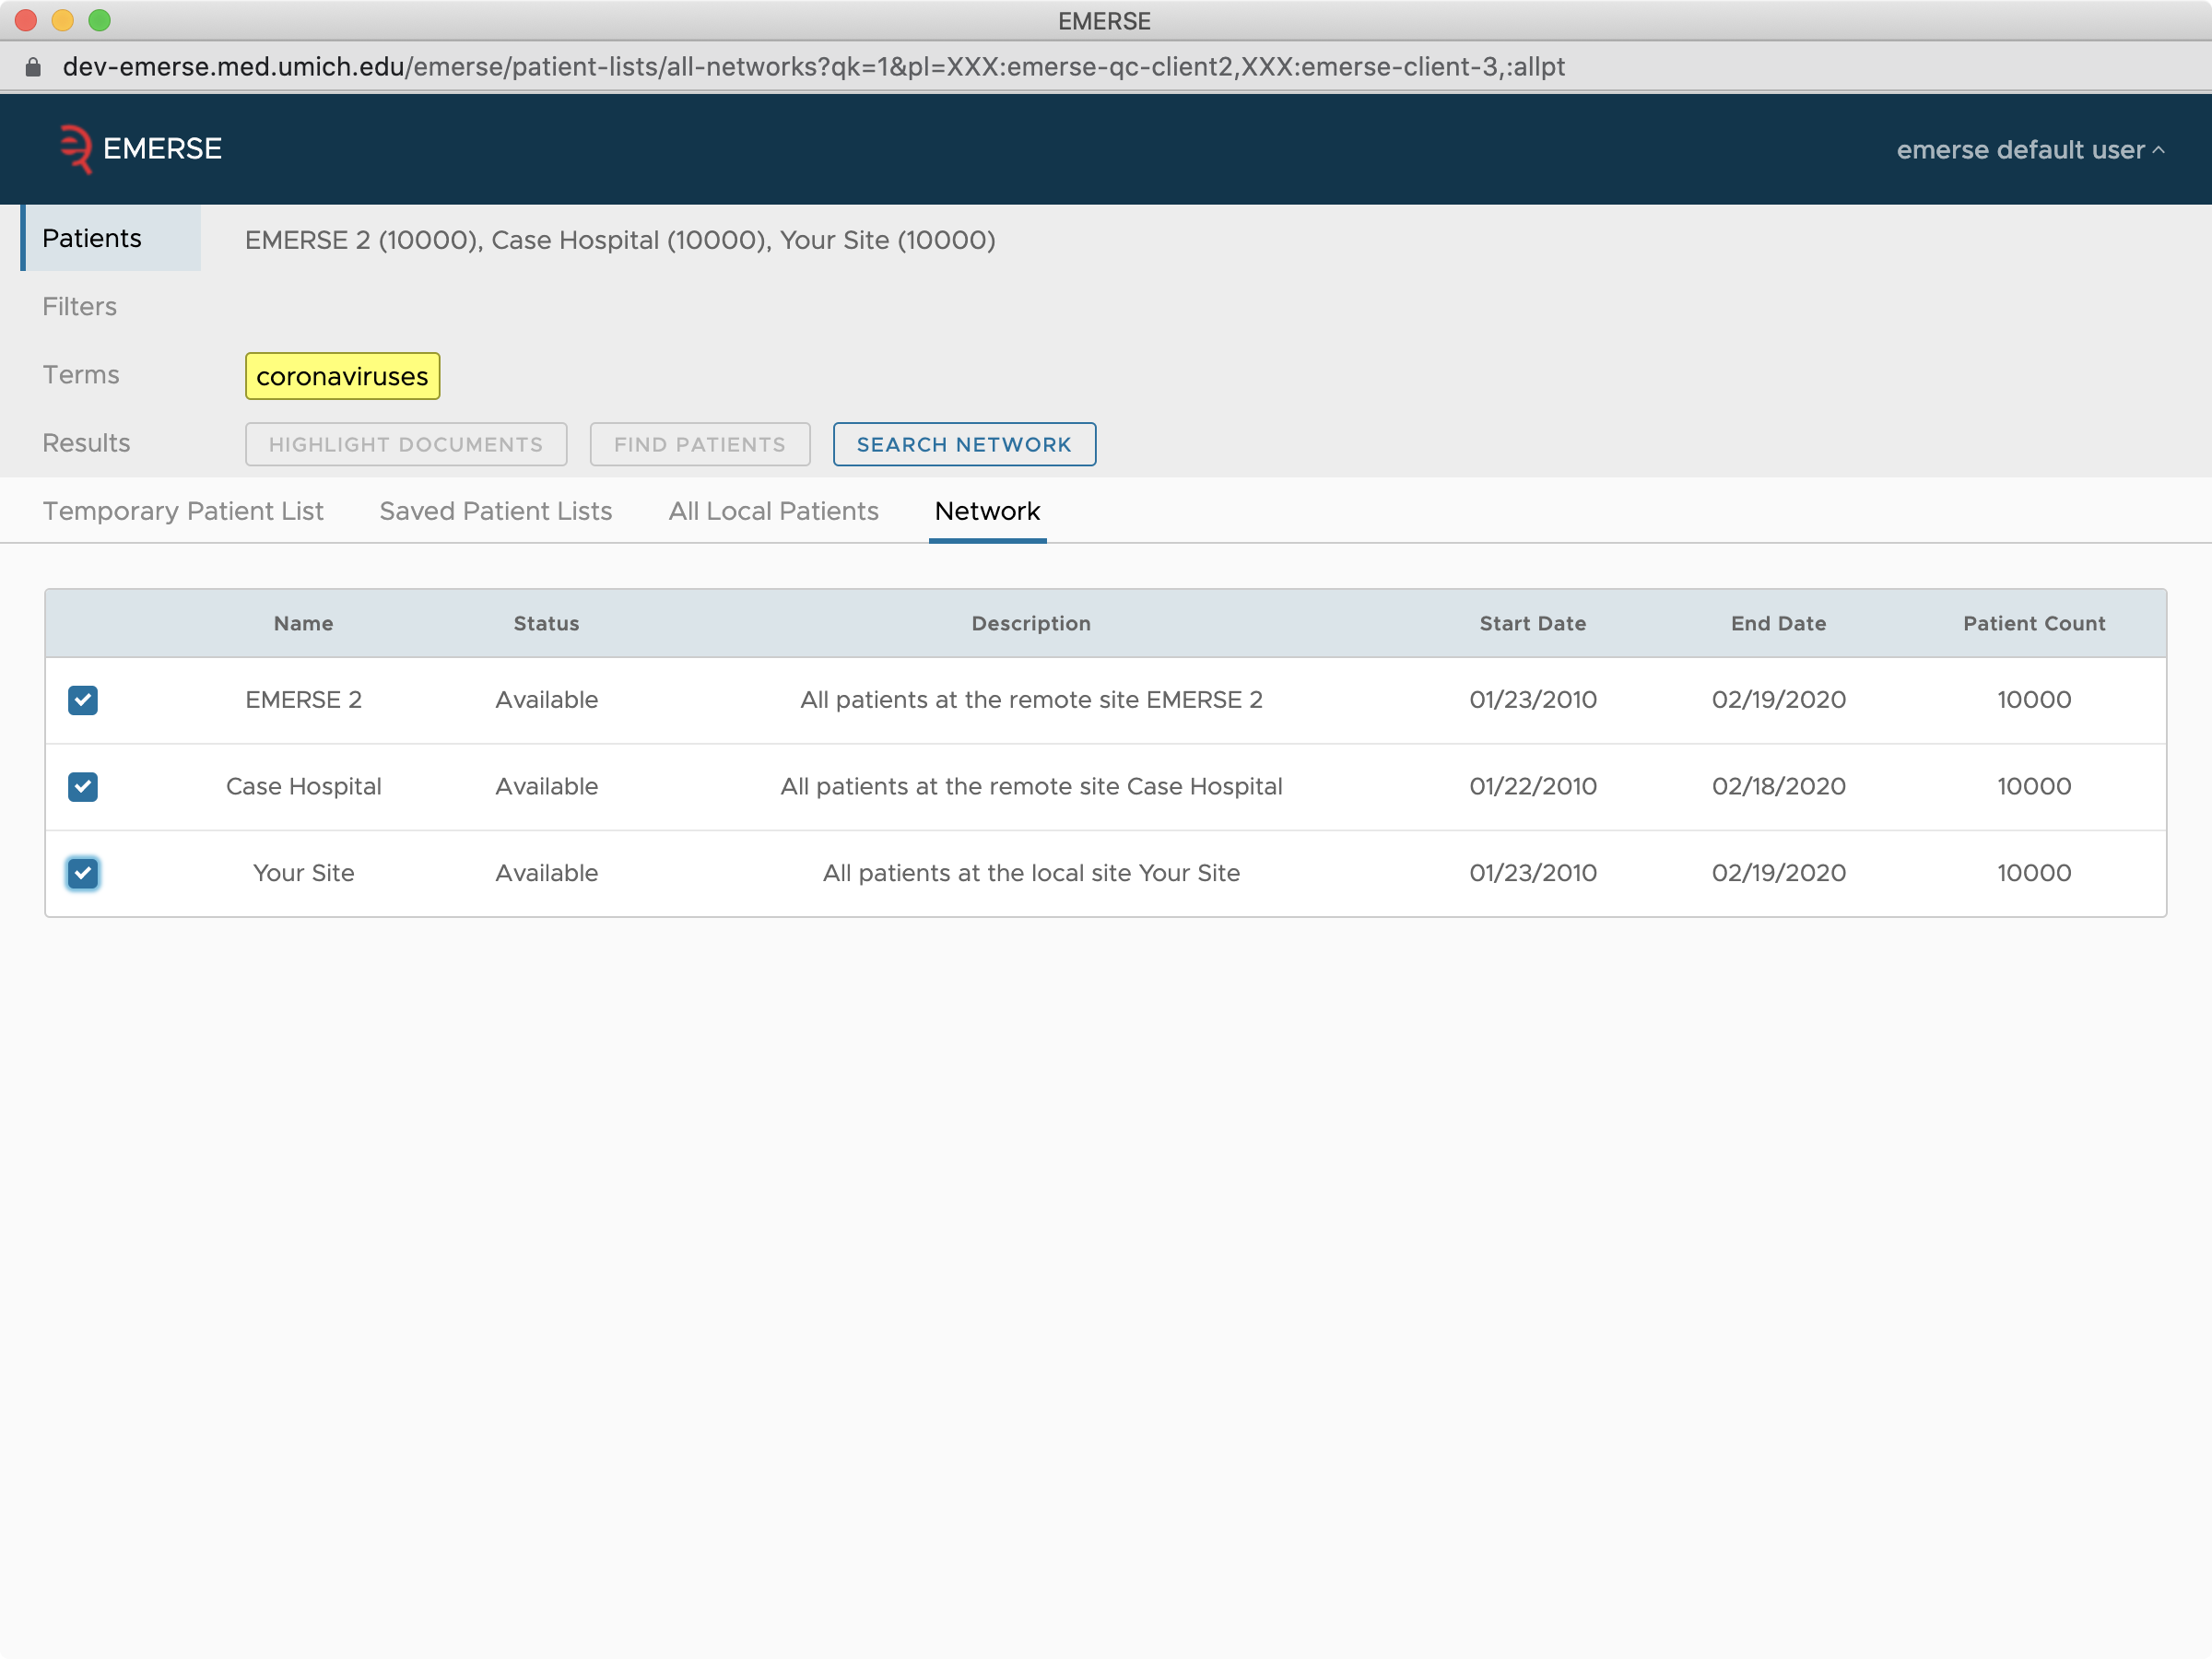
Note that currently the Filters will not work across the Network except for the date filter. In the future this may become more functional. Once the sites are selected, click on the Search Network
Each time a user logs in, the first time that a Network search is attempted, a dialog will appear with the Terms of Use for running a network search. You must agree to these Terms of Use to proceed.
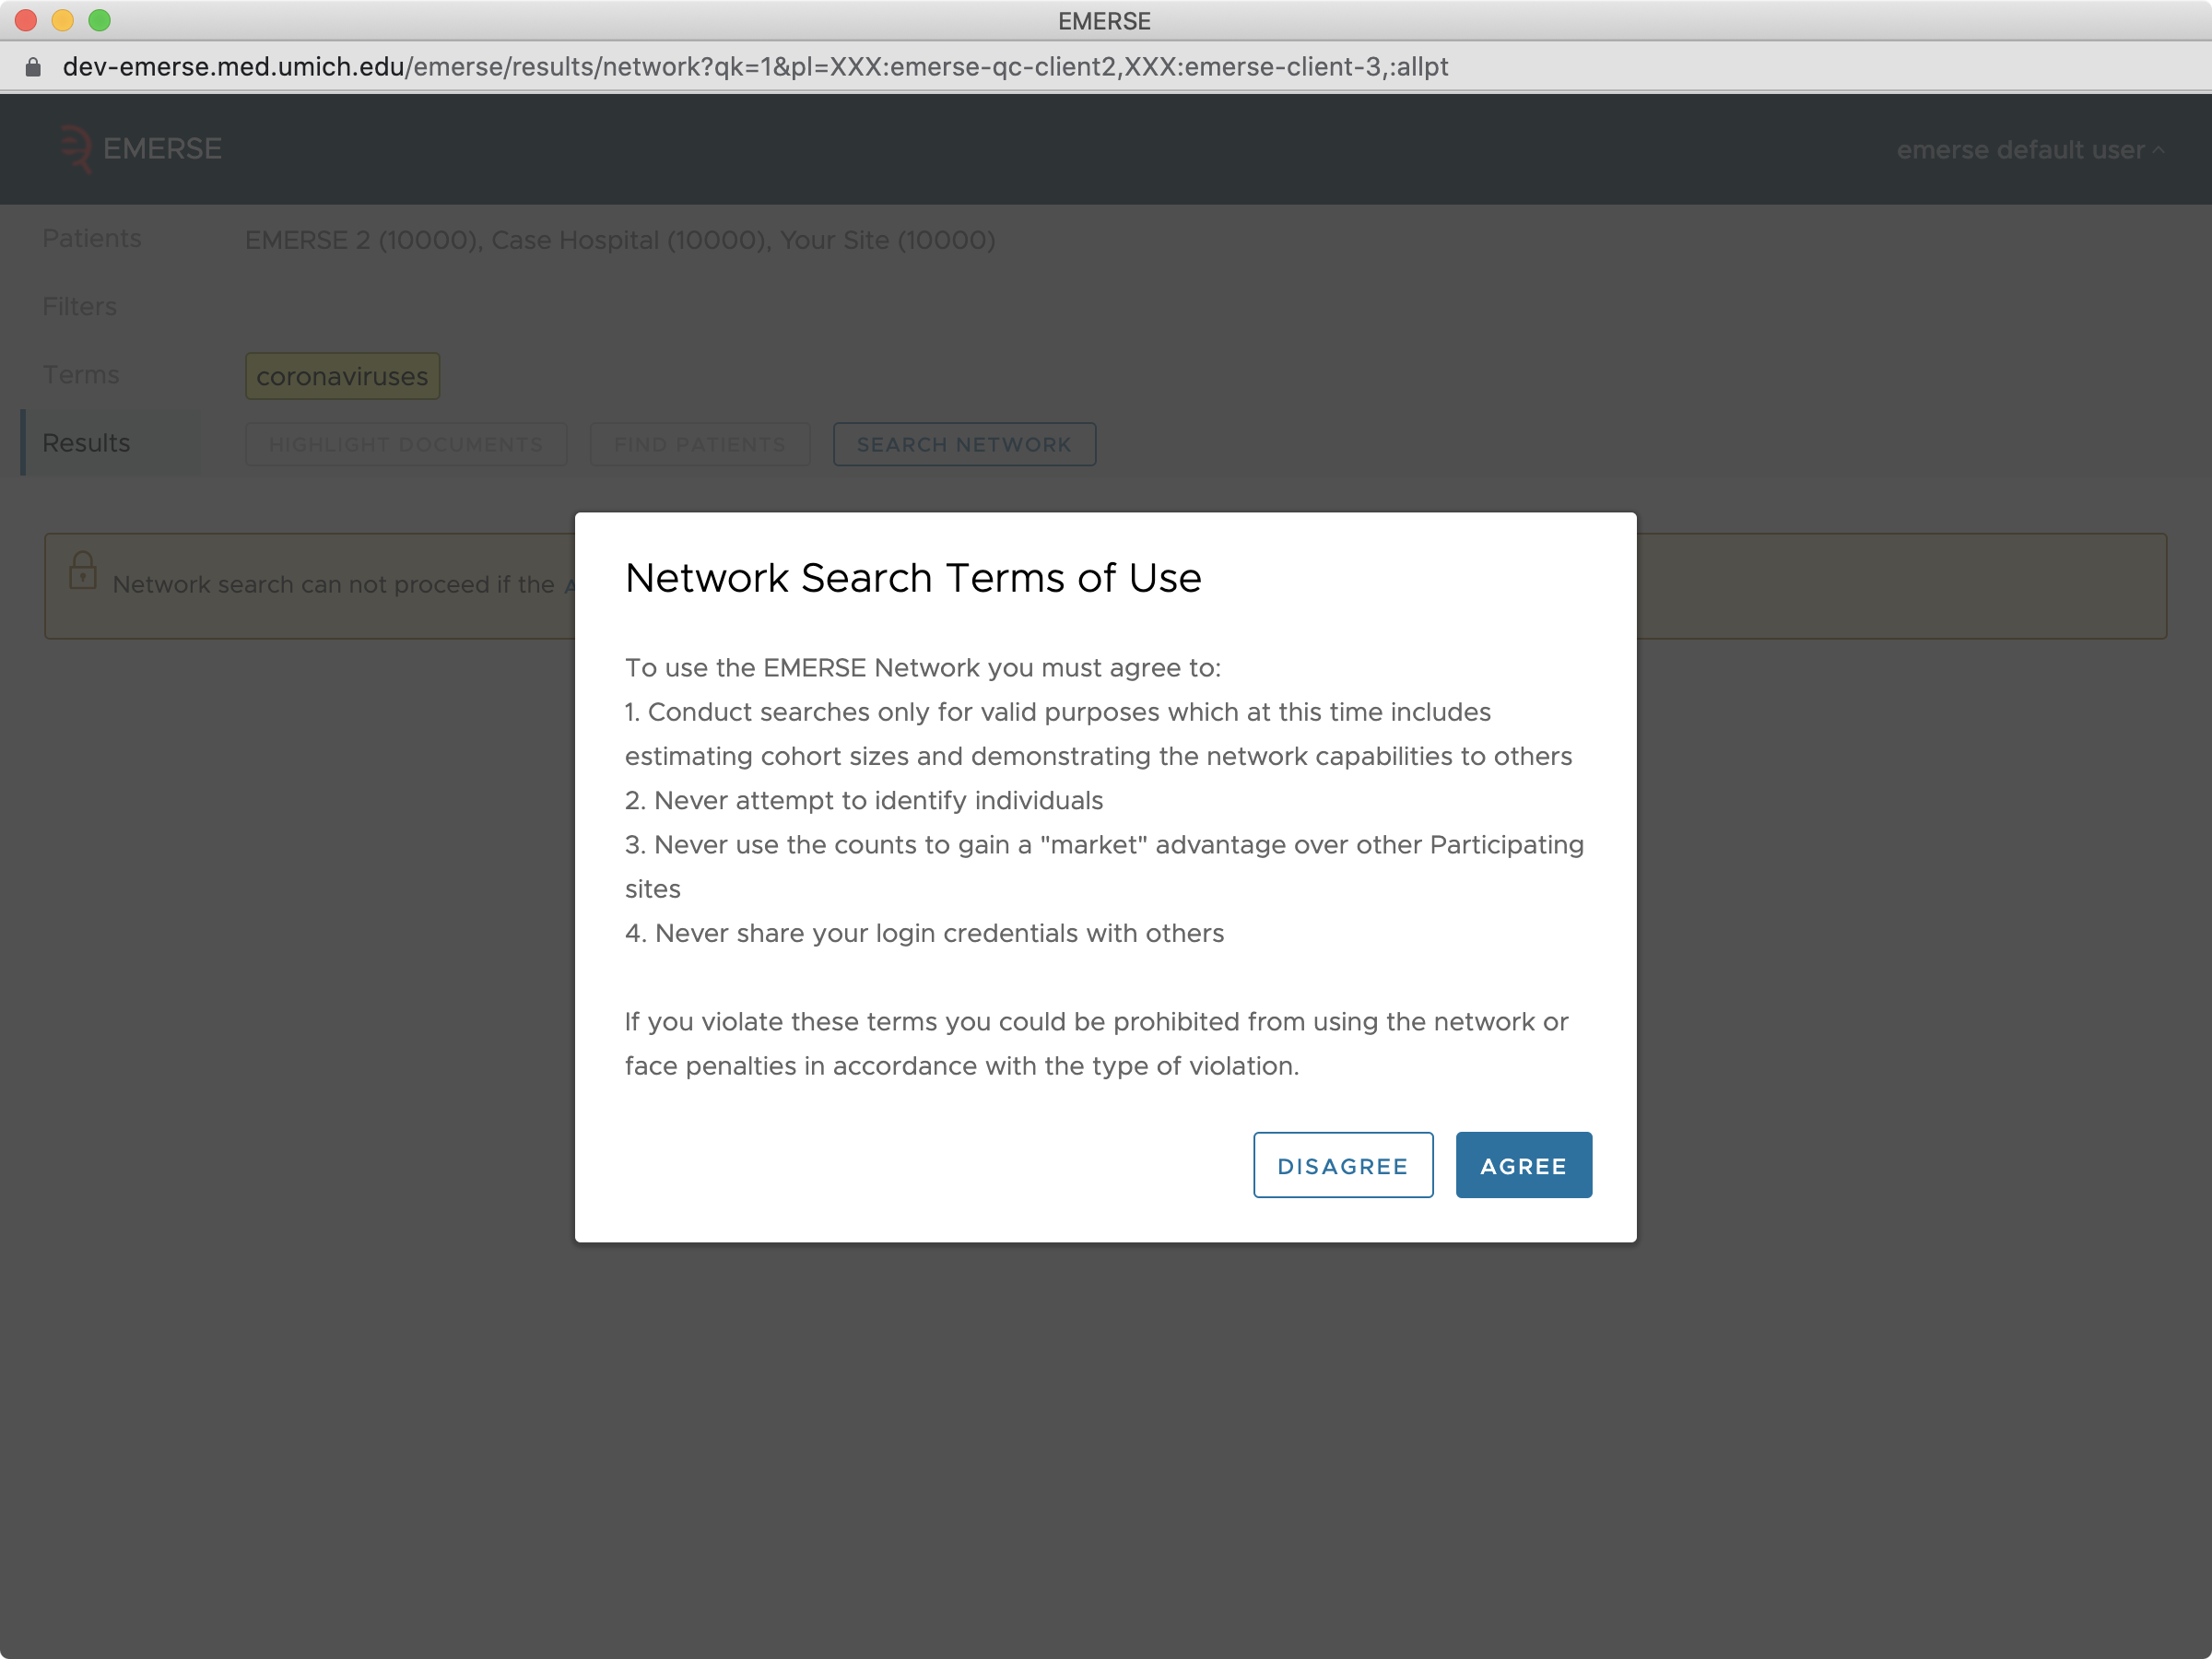
Once you agree to the Terms of Use the query will run. Other sites will be contacted and the results will be displayed on the screen in real-time as they arrive.
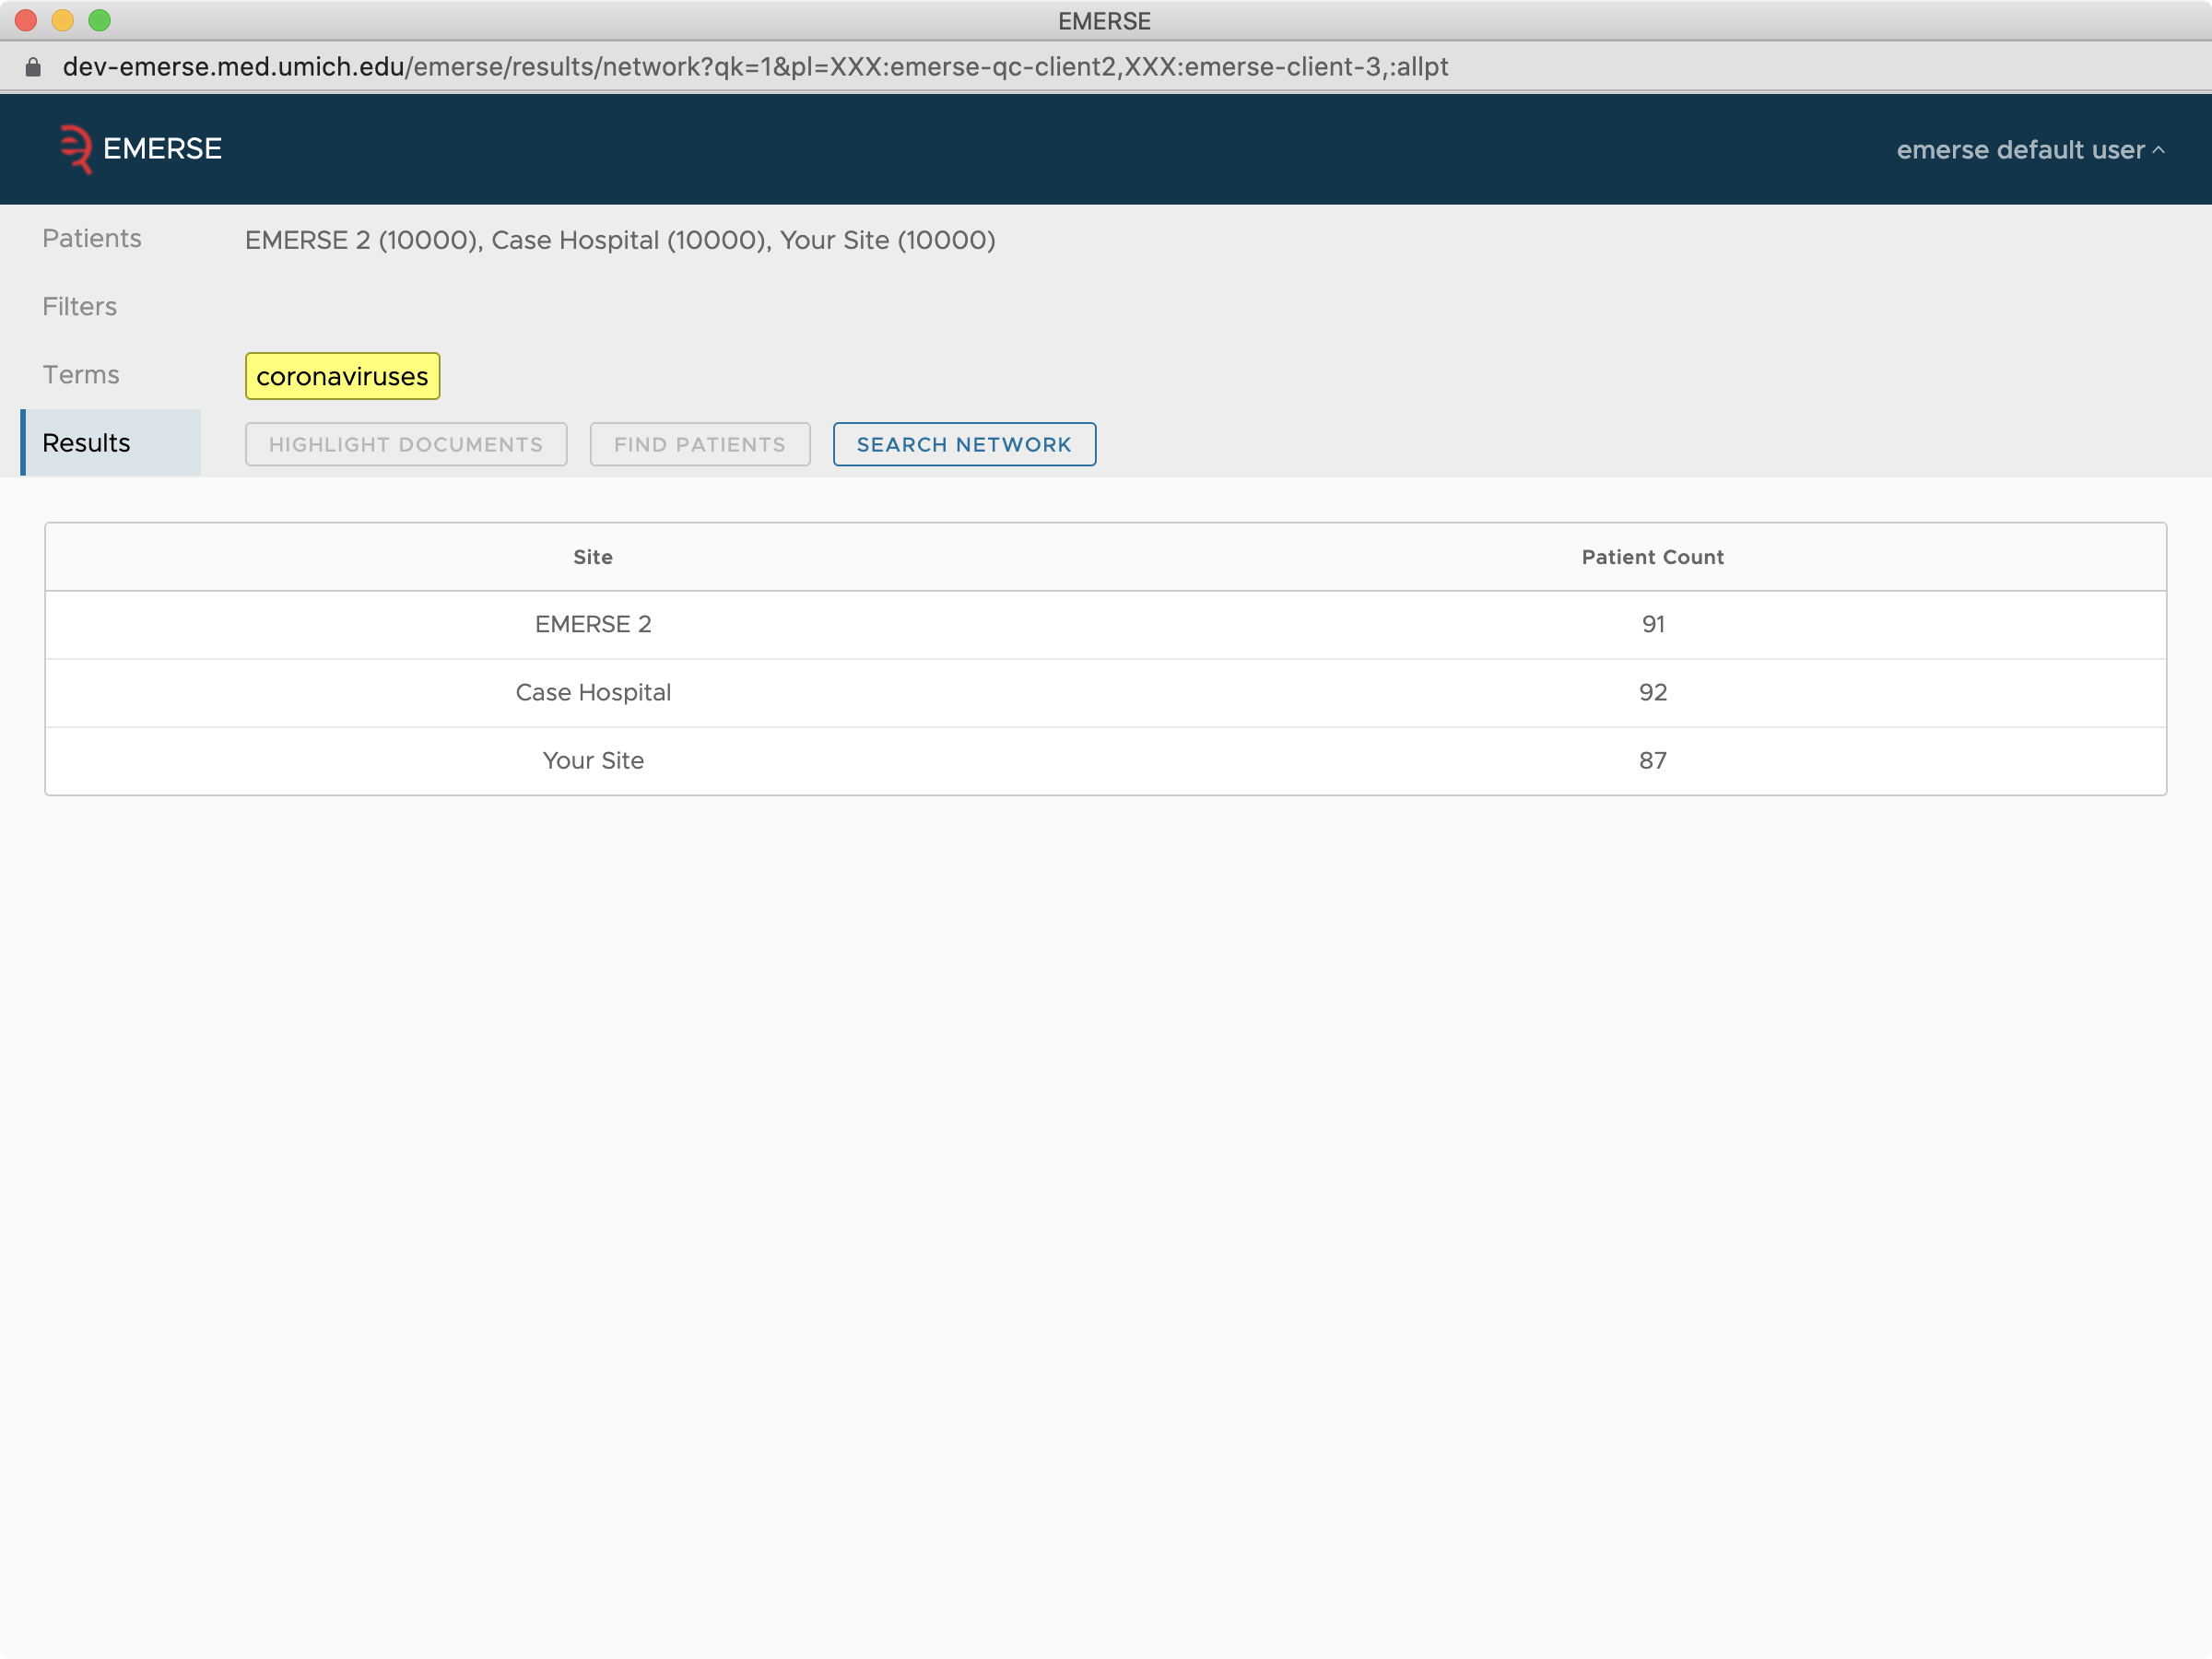
A few other important points to note:
-
If you run too many queries in too short of a time span, you will be blocked from using the network. This is one of the security features built in.
-
All queries sent across the Network are logged (including the specific user and originating site), and all participating sites have their own copy of the logs.
-
We currently do not have a mechanism for contacting other sites if an interesting patient cohort is identified. This is a known challenge with research networks.
Solr API
This section is meant for highly technical groups who have a programmer/developer on the team.
An application programming interface (API) is available to teams needing to access the underlying EMERSE data store. This is based on the underlying Apache Solr infrastructure. This might be useful for groups wanting to utilize the very fast data retrieval mechanisms of Solr, but want to be able to retrieve the documents outside the constraints of the user interface so that additional processing/text mining can be done.
Details about utilizing this API can be found in the Solr documentation section on Client APIs.
The API access point should be locked down and secured by your IT Administrators, and you will need to be provisioned with a username/password for access. Note, however, that the standard Solr API does not maintain audit logs of access or what notes were extracted.
A simple way to leverage the API is to use curl which is a tool available with almost any programming language. Using curl you can form an HTML query, with the results returned in JSON or XML format. Depending on how the query is formed, you can get back the medical record numbers (MRN), document metadata, or even the contents of the document itself. Remember that if the clinical document is in native HTML format, you may need to have a further cleanup process (e.g., strip HTML tags) to make the document usable for your projects.
Note that there is no way to access the EMERSE resources such as Synonym suggestions when using the Solr API.
Frequently Asked Questions
Can I export the data?
No. EMERSE was not designed for data export. It was designed to keep the data centralized and secure, but allow for easy access. If you need to download the data, consider using the Solr API.
You can, however, Export patient lists with the associated Comments and Tags if they were added. Access to the Export feature will depend on your specific privileges within the EMERSE system.
I can’t get into EMERSE, what am I doing wrong?
There are multiple reasons why you may be having trouble getting into the EMERSE application. A few are outlined below.
You haven’t been granted access
Or your access has been revoked. EMERSE contains patient data, so it is not the kind of system you can just log onto without someone providing an account. Talk to your system administrators if you think that is the issue.
You are not on the right network
If you can’t even see the login page (because the page is not found), this may be the reason you’re having trouble. In general, EMERSE will be available on a secured network available only to individuals on that internal, trusted network. There may be ways to get to this network from the outside using virtual private network (VPN) software. This is an issue to bring up to your local IT support teams.
How can I filter an existing patient list to include/exclude only those that mention a certain finding?
There may be times when you have Patient List from another source, and now you want to look through the list, but only retain patients who have a mention of a certain finding (for example, "fibromyalgia"). The easiest way to do that is to use the Find Patients feature and apply it to your existing Saved Patient List. After identifying the patients, simply Tag them and then clear the untagged patients using the Clear/Delete option for the Saved Patient List.