
Overview
| This guide covers an older version of EMERSE (4.10.7). The EMERSE team is determining if distribution using a virtual machine is still a good approach for demonstrating the software for more recent versions. |
EMERSE (Electronic Medical Record Search Engine) is provided on a virtual machine (VM) as a way for potential users to test the system and even load their own data on it for searching. The VM is also provided so that technical teams can try out a fully functional system and take a look “under the hood.” It should be noted at the outset that this virtual machine approach is intended primarily for light use as a demonstration and not for full production-level use in a large research or operational environment.
For large-scale implementations EMERSE should be installed on dedicated servers and be maintained by a professional IT team, and all security and regulatory considerations must be addressed. For such operational use we recommend a full-installation of EMERSE as described in our separate Technical Documentation. The current document (as opposed to the Technical Documentation) focuses primarily on the VM itself and not on a full-scale implementation. We do not recommend simply migrating the current EMERSE VM into a production environment, as we are currently not able to support such an approach. For example, we cannot currently support exporting the current EMERSE VirtualBox VM and importing it into a ESX VMware platform environment. Further, this VM is running on an unsupported version of Red Hat Enterprise Linux (RHEL), with no commercial support.
The following directions were created to help small groups pilot EMERSE on the VirtualBox VM, and the process for loading documents into EMERSE described below are not what we recommend for a full-scale installation of EMERSE. For more detailed technical directions on the full-scale implementation and integration, please see our separate Technical Manual.
This version of the VM comes preloaded with a demonstration dataset, so the system can be used right away for demonstrations and for testing. The dataset contains 1,750 patients (fake) and about 125,000 documents (PubMed abstracts are serving as a replacement for clinical documents here). It also has approximately 10,000 synonyms pre-loaded into the system, which is a small fraction of the full synonym dataset. The full set is available by licensing it from the University of Michigan.
This demo version of EMERSE on the VM uses an Oracle database that is an Express Edition, which means that it is free to distribute but limited in its power. It can use only one CPU and has a maximum allowed size of 4 GB. However, that is more than enough for this demonstration system, and it is also worth noting that the majority of the data used by EMERSE (i.e., the documents) are stored in Solr files and not in the Oracle database.
The VM is currently being distributed via a link that we provide, so please contact us for the link to the VM.
There are 4 basic steps to get started with the EMERSE VM (see overview figure below), and for those wishing to learn more about importing your own data into the VM we are providing some example datasets (using PubMed abstracts in place of clinical documents), as well as instructions for preparing and loading the data.
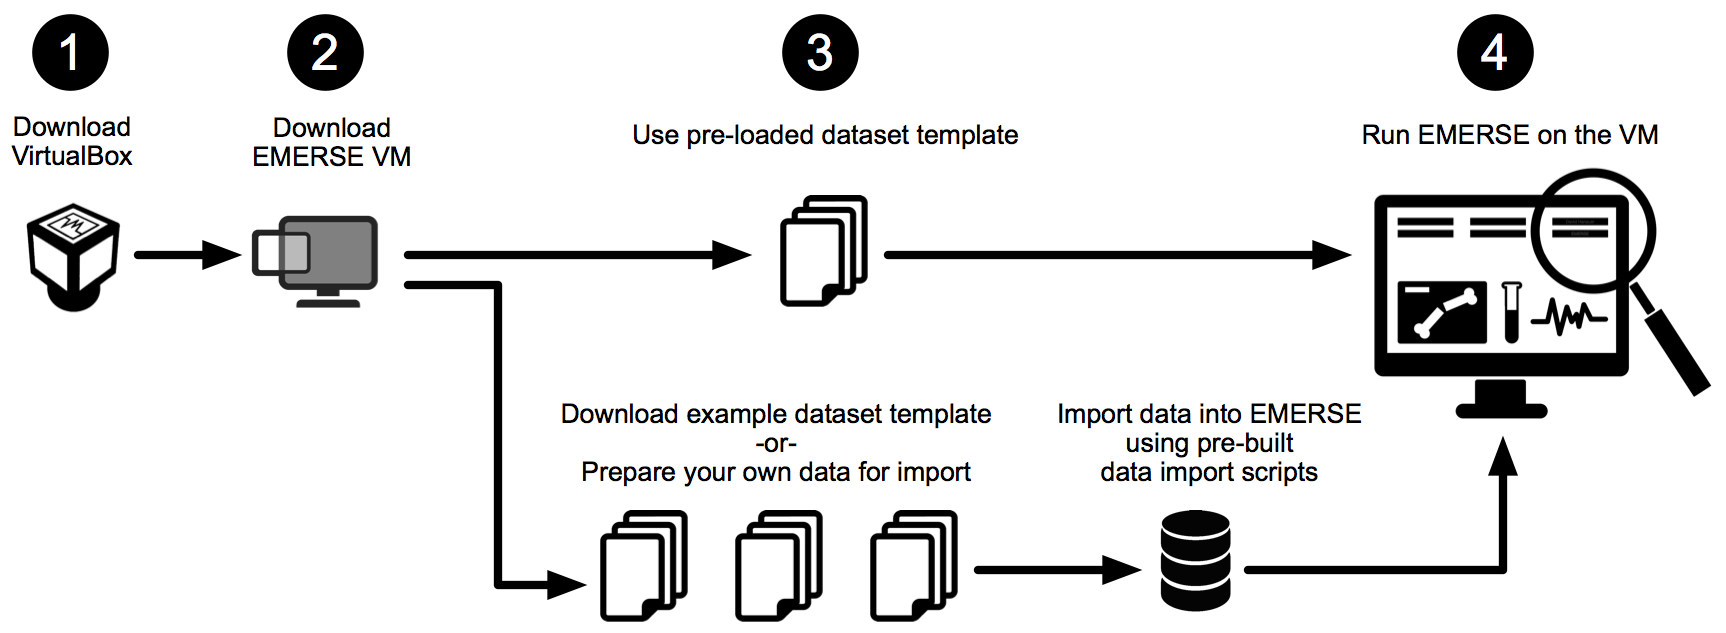
This document covers four main sections, outlined below:
GETTING STARTED: Describes basics for how to download both the Virtual Box application and the EMERSE virtual machine, and how to launch EMERSE, along with other details about exploring the system.
IMPORTING YOUR OWN DATA: Describes the process for importing your own data into the EMERSE VM for further testing or, in some cases, for small studies in which institutional IT support is not possible.
SECURITY CONSIDERATIONS: For those that do choose to import data, some security considerations should be addressed to ensure that the data remain safe.
MAKING EMERSE AVAILABLE ON THE HOST MACHINE: For those who want to run the VM essentially as a background server and want to be able to access the EMERSE application web page from their host Machine (e.g., Mac or Windows) rather than using the Linux interface within the VM.
Getting Started
The directions in this section are provided to allow for basic downloading and launching of the EMERSE virtual machine, and to launch EMERSE itself for testing with the data that are pre-loaded into the system. PubMed abstracts are being used in place of clinical patient documents in this demonstration version.
Downloading and importing the VM
| This only needs to be done once. After it has been imported, you can start the VM over and over again by following the directions in the next section (See Launching the EMERSE VM). |
-
Download and install the VirtualBox application, if not done already. You can find it at: https://www.virtualbox.org
-
Download the EMERSE virtual machine, which is packaged as an
.ovafile. Currently we are distributing this via a link that we will share with you, so feel free to contact us for the latest VM file. Contact David Hanauer at hanauer@umich.edu. -
Double click on the
.ovafile. This will launch the VirtualBox application. -
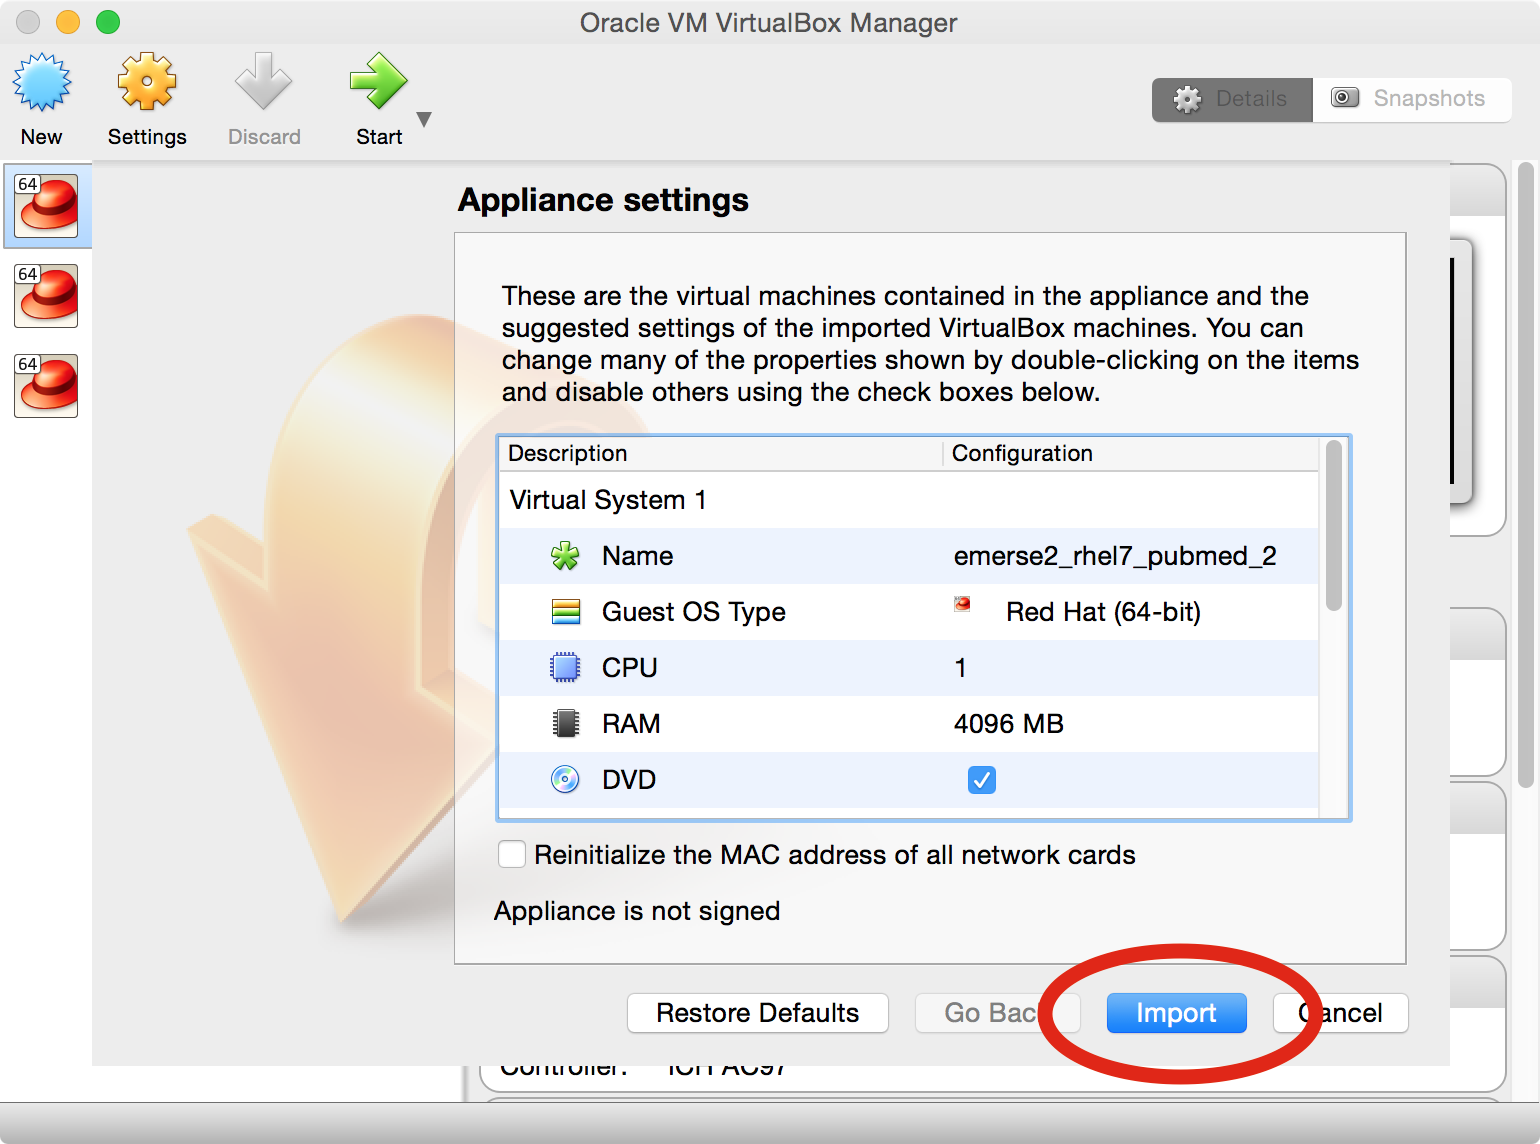
A window will open that is related to
Appliance Settings. We recommend allocating more than 1 CPU to the VM for better performance. Click on theImportbutton.
Launching the EMERSE VM
-
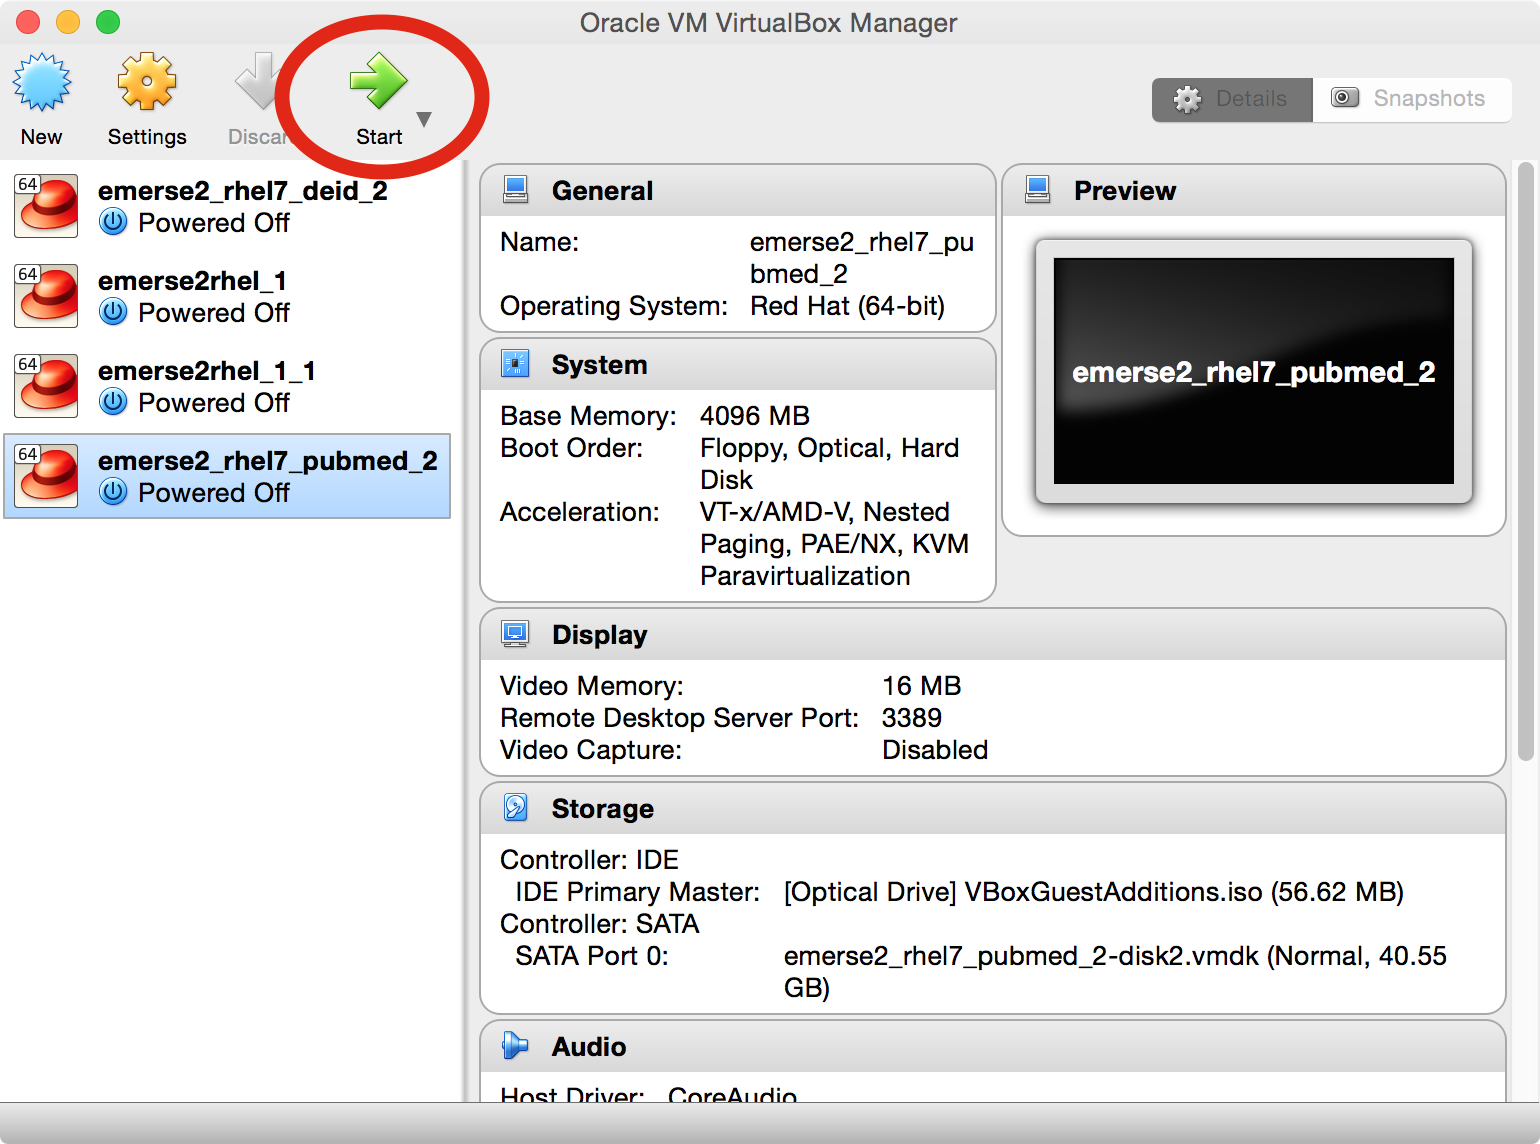
Once the VM is imported, make sure it is selected in the pane on the left in the main Virtual Box window, then press the green start arrow. This will launch the VM (a Linux operating system).
On Windows machines Virtual box VMs sometimes won’t run, or you might get an error (such as "VT-x is disabled in the BIOS for all CPU modes (VERR_VMX_MSR_ALL_VMX_DISABLED)". This is likely because virtualization is not enabled on your computer. There are ways to have it enabled, but you may need to talk to your IT help desk for directions on how to do that.
|
-
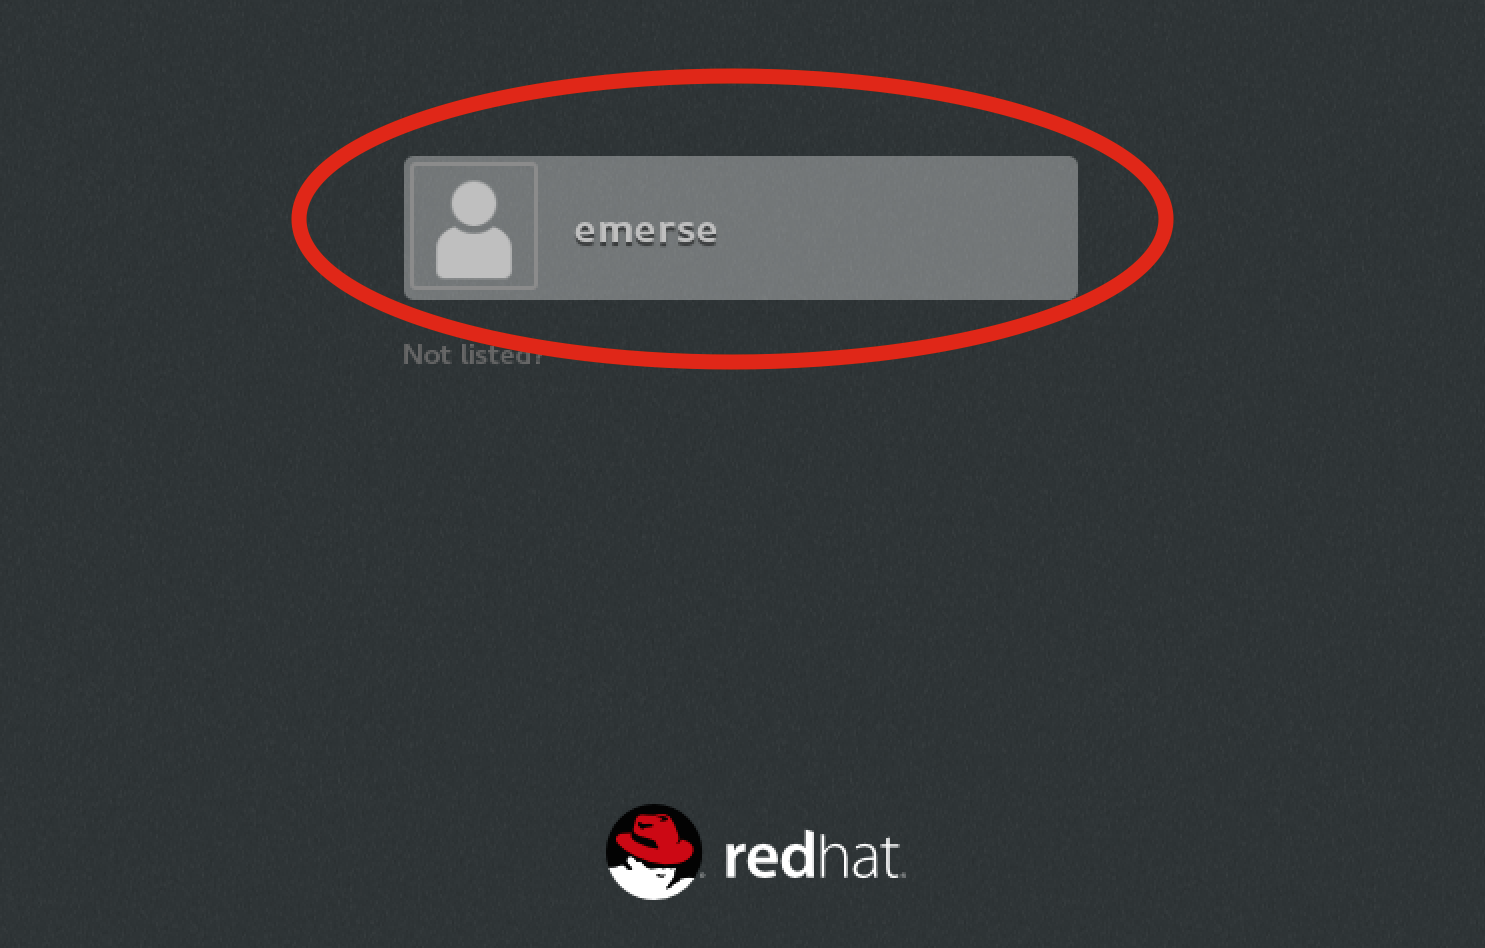
The default username for this Linux OS is
emerseand the password isdemouser. Once the OS loads you will see the login screen that says EMERSE. Click on where it says EMERSE, then enter the password on the next screen. This username and password is also the default for the EMERSE system on the VM (accessible via the web browser on the VM itself).
Launching the EMERSE web application
Once the virtual machine (VM) is up and running, launching EMERSE should be simple. The servers that run EMERSE should already automatically start up, so all you need to do is launch the browser (preferably Chrome). This can be found on the Linux VM under Applications → Internet → Chrome or by double clicking on the Chrome icon on the Desktop. Then, simply go to the URL:
localhost:8090/emerse/login.html
username: emerse
password: demouser
This username and password combination are used throughout the VM, for the Linux OS, for the EMERSE application, for Oracle, etc.
Other useful things to explore on the VM
In addition to the main EMERSE interface that most users will interact with, there are other areas that may be worth exploring.
Administrator page
The EMERSE administrator page (for adding/managing users) can be found at:
localhost:8090/emerse/admin2/
You can also access the page by logging into the EMERSE application and choosing 'Admin' from the EMERSE menu in the upper right corner of the application.
On the Admin page you can add users, change passwords, and upload Synonyms datasets. You can explore the Synonyms feature by downloading one of pre-formatted Synonyms dataset found on the main EMERSE website, and then following the directions in the Administrator Guide.
Solr interface
For those wishing to try out the native Solr interface for submitting a query, visit this URL:
localhost:8983/solr/
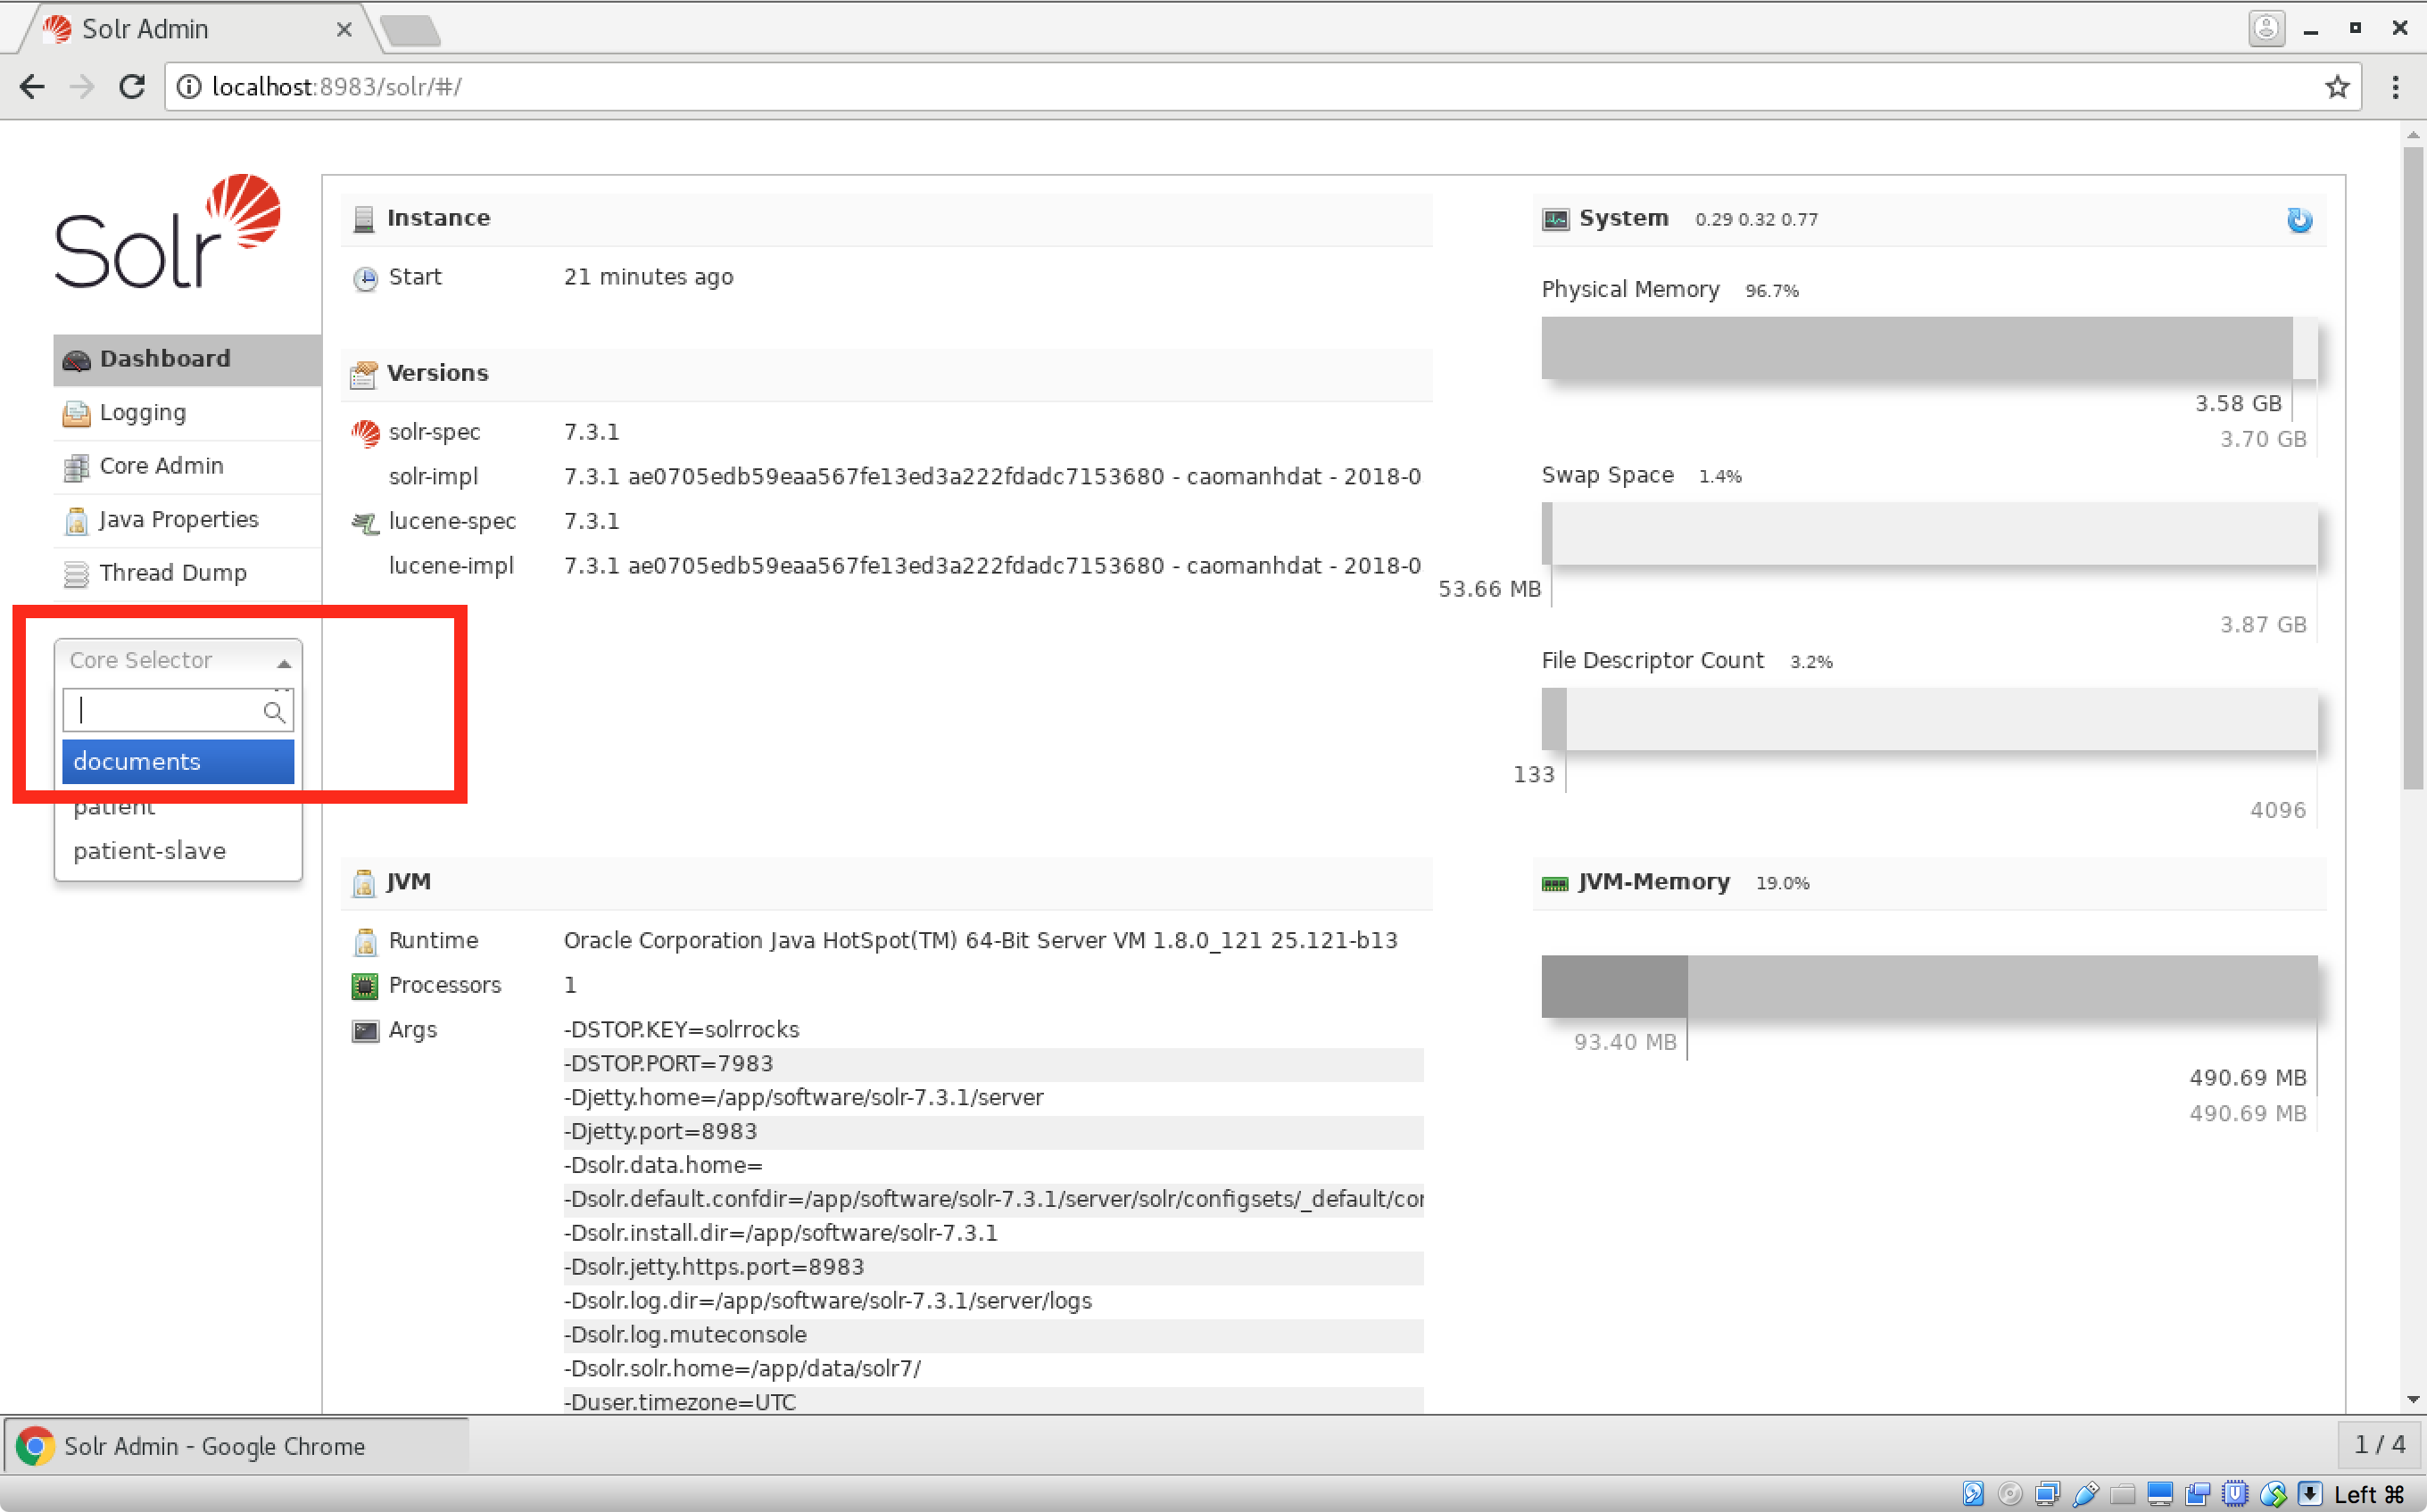
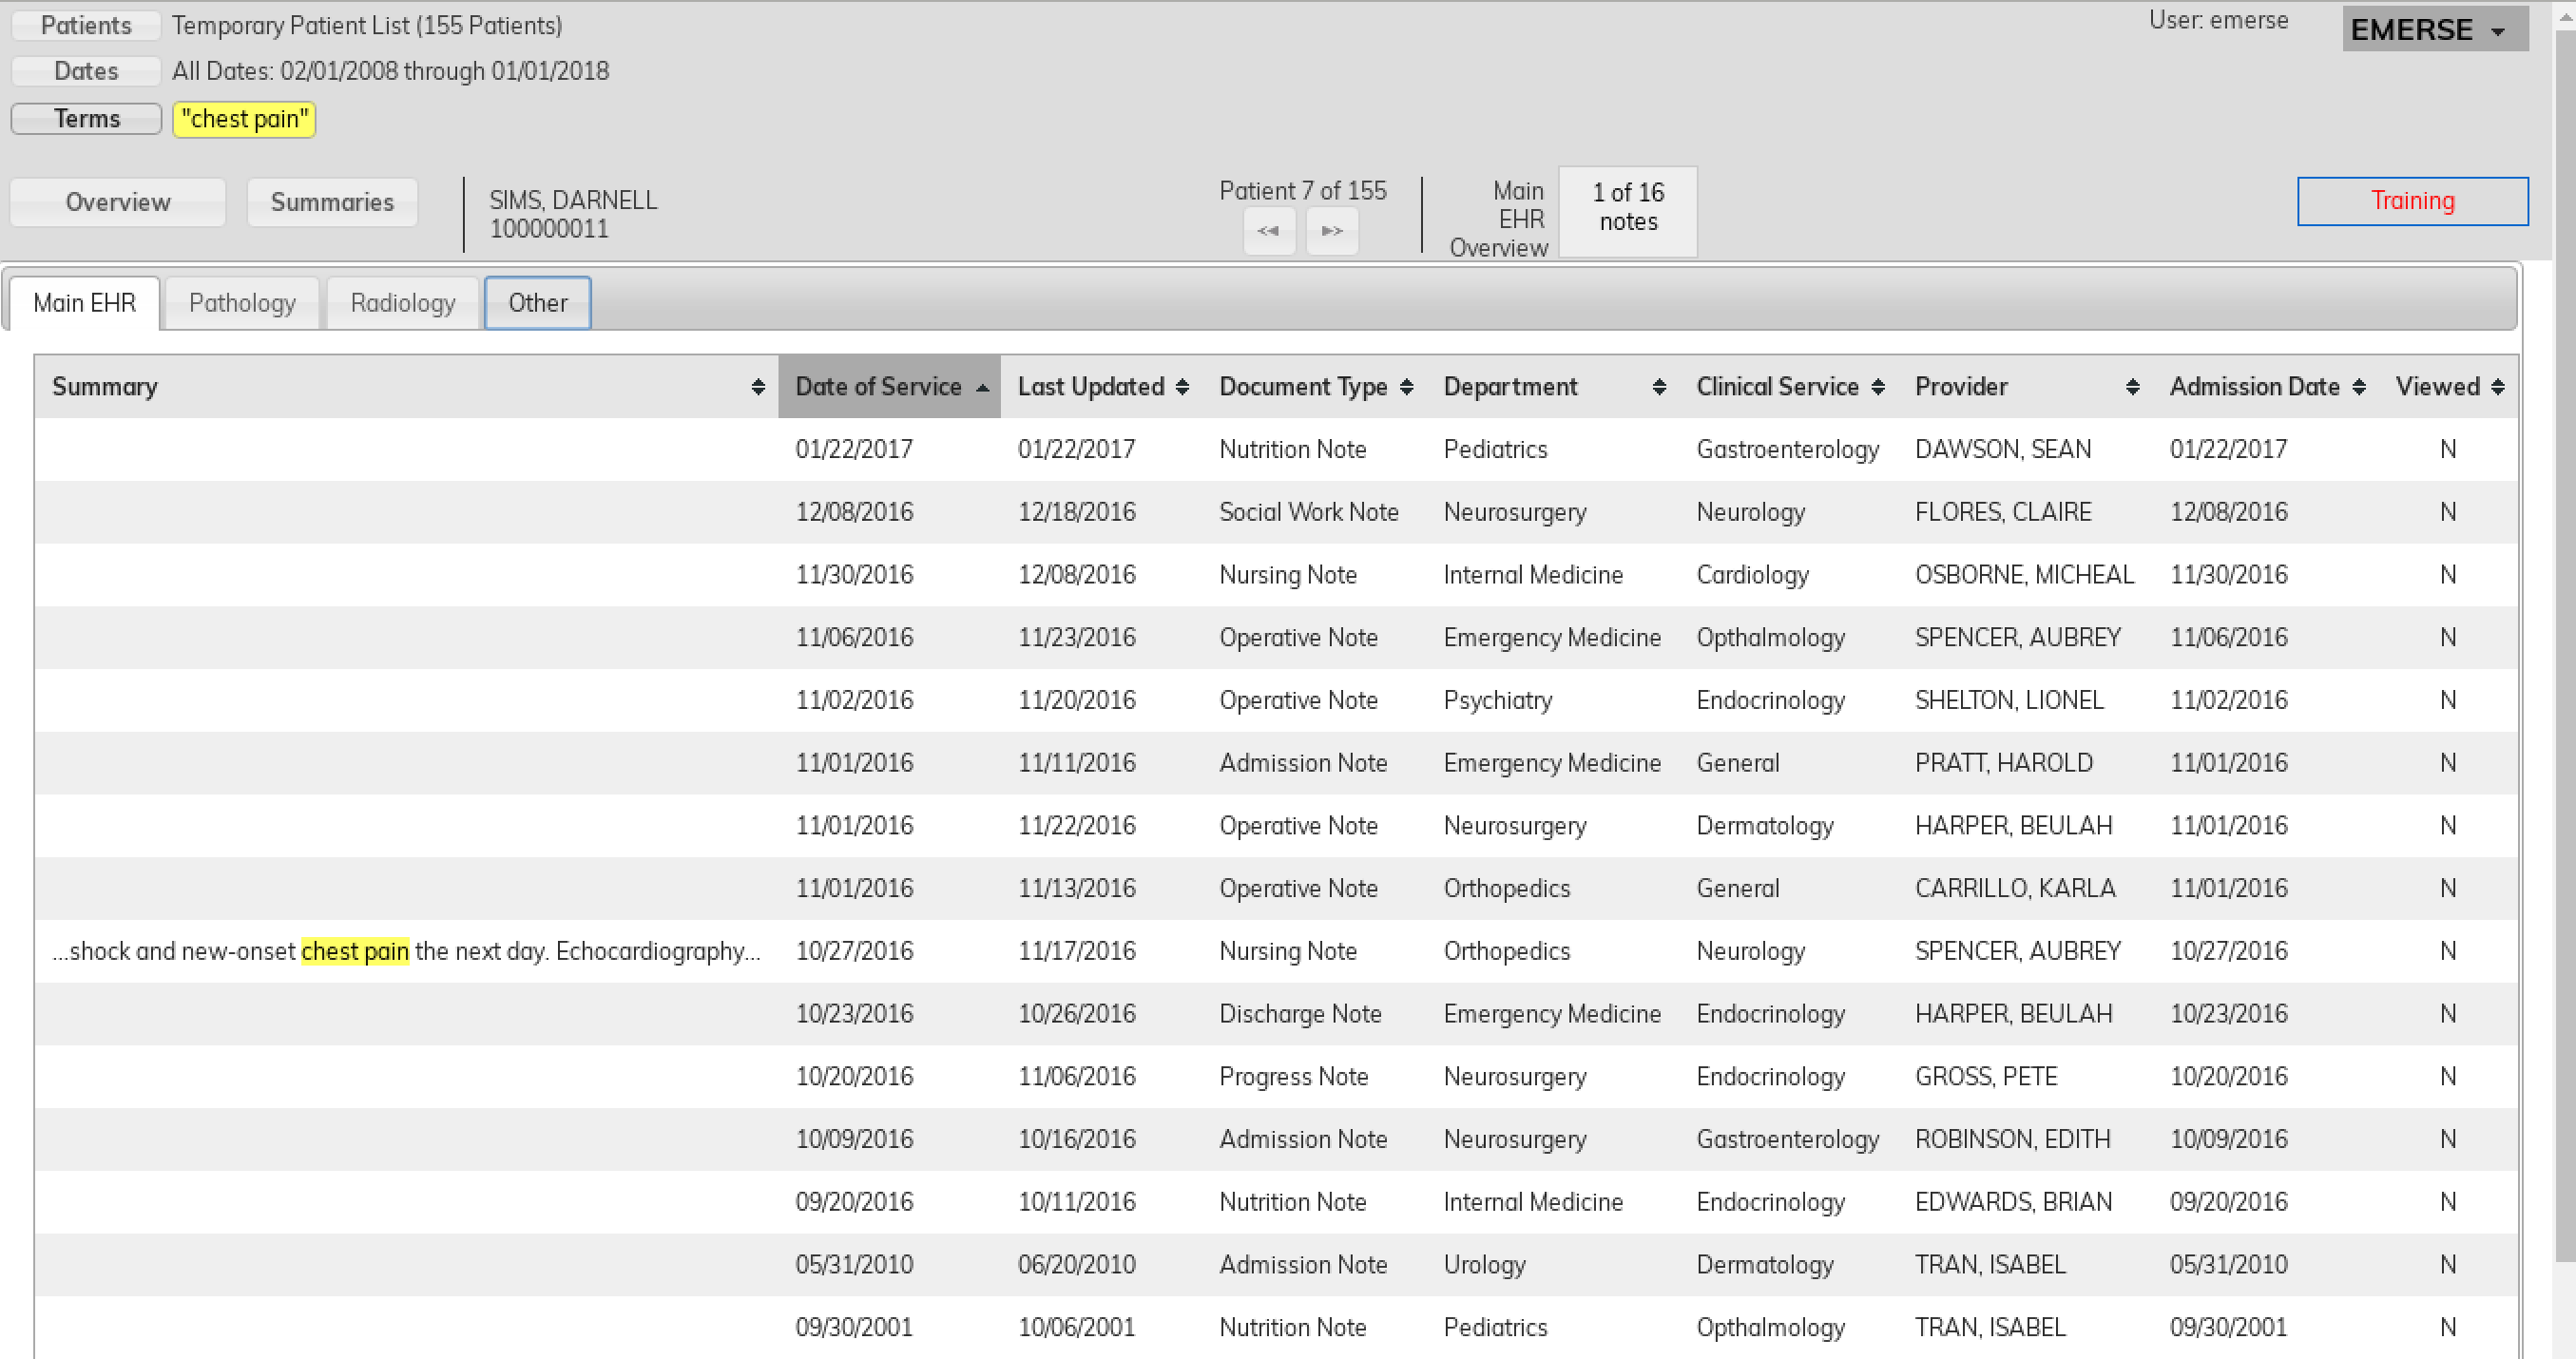
To get to the proper area for running queries from this interface, click on the left pane where it says “Core Selector” and choose “documents”:
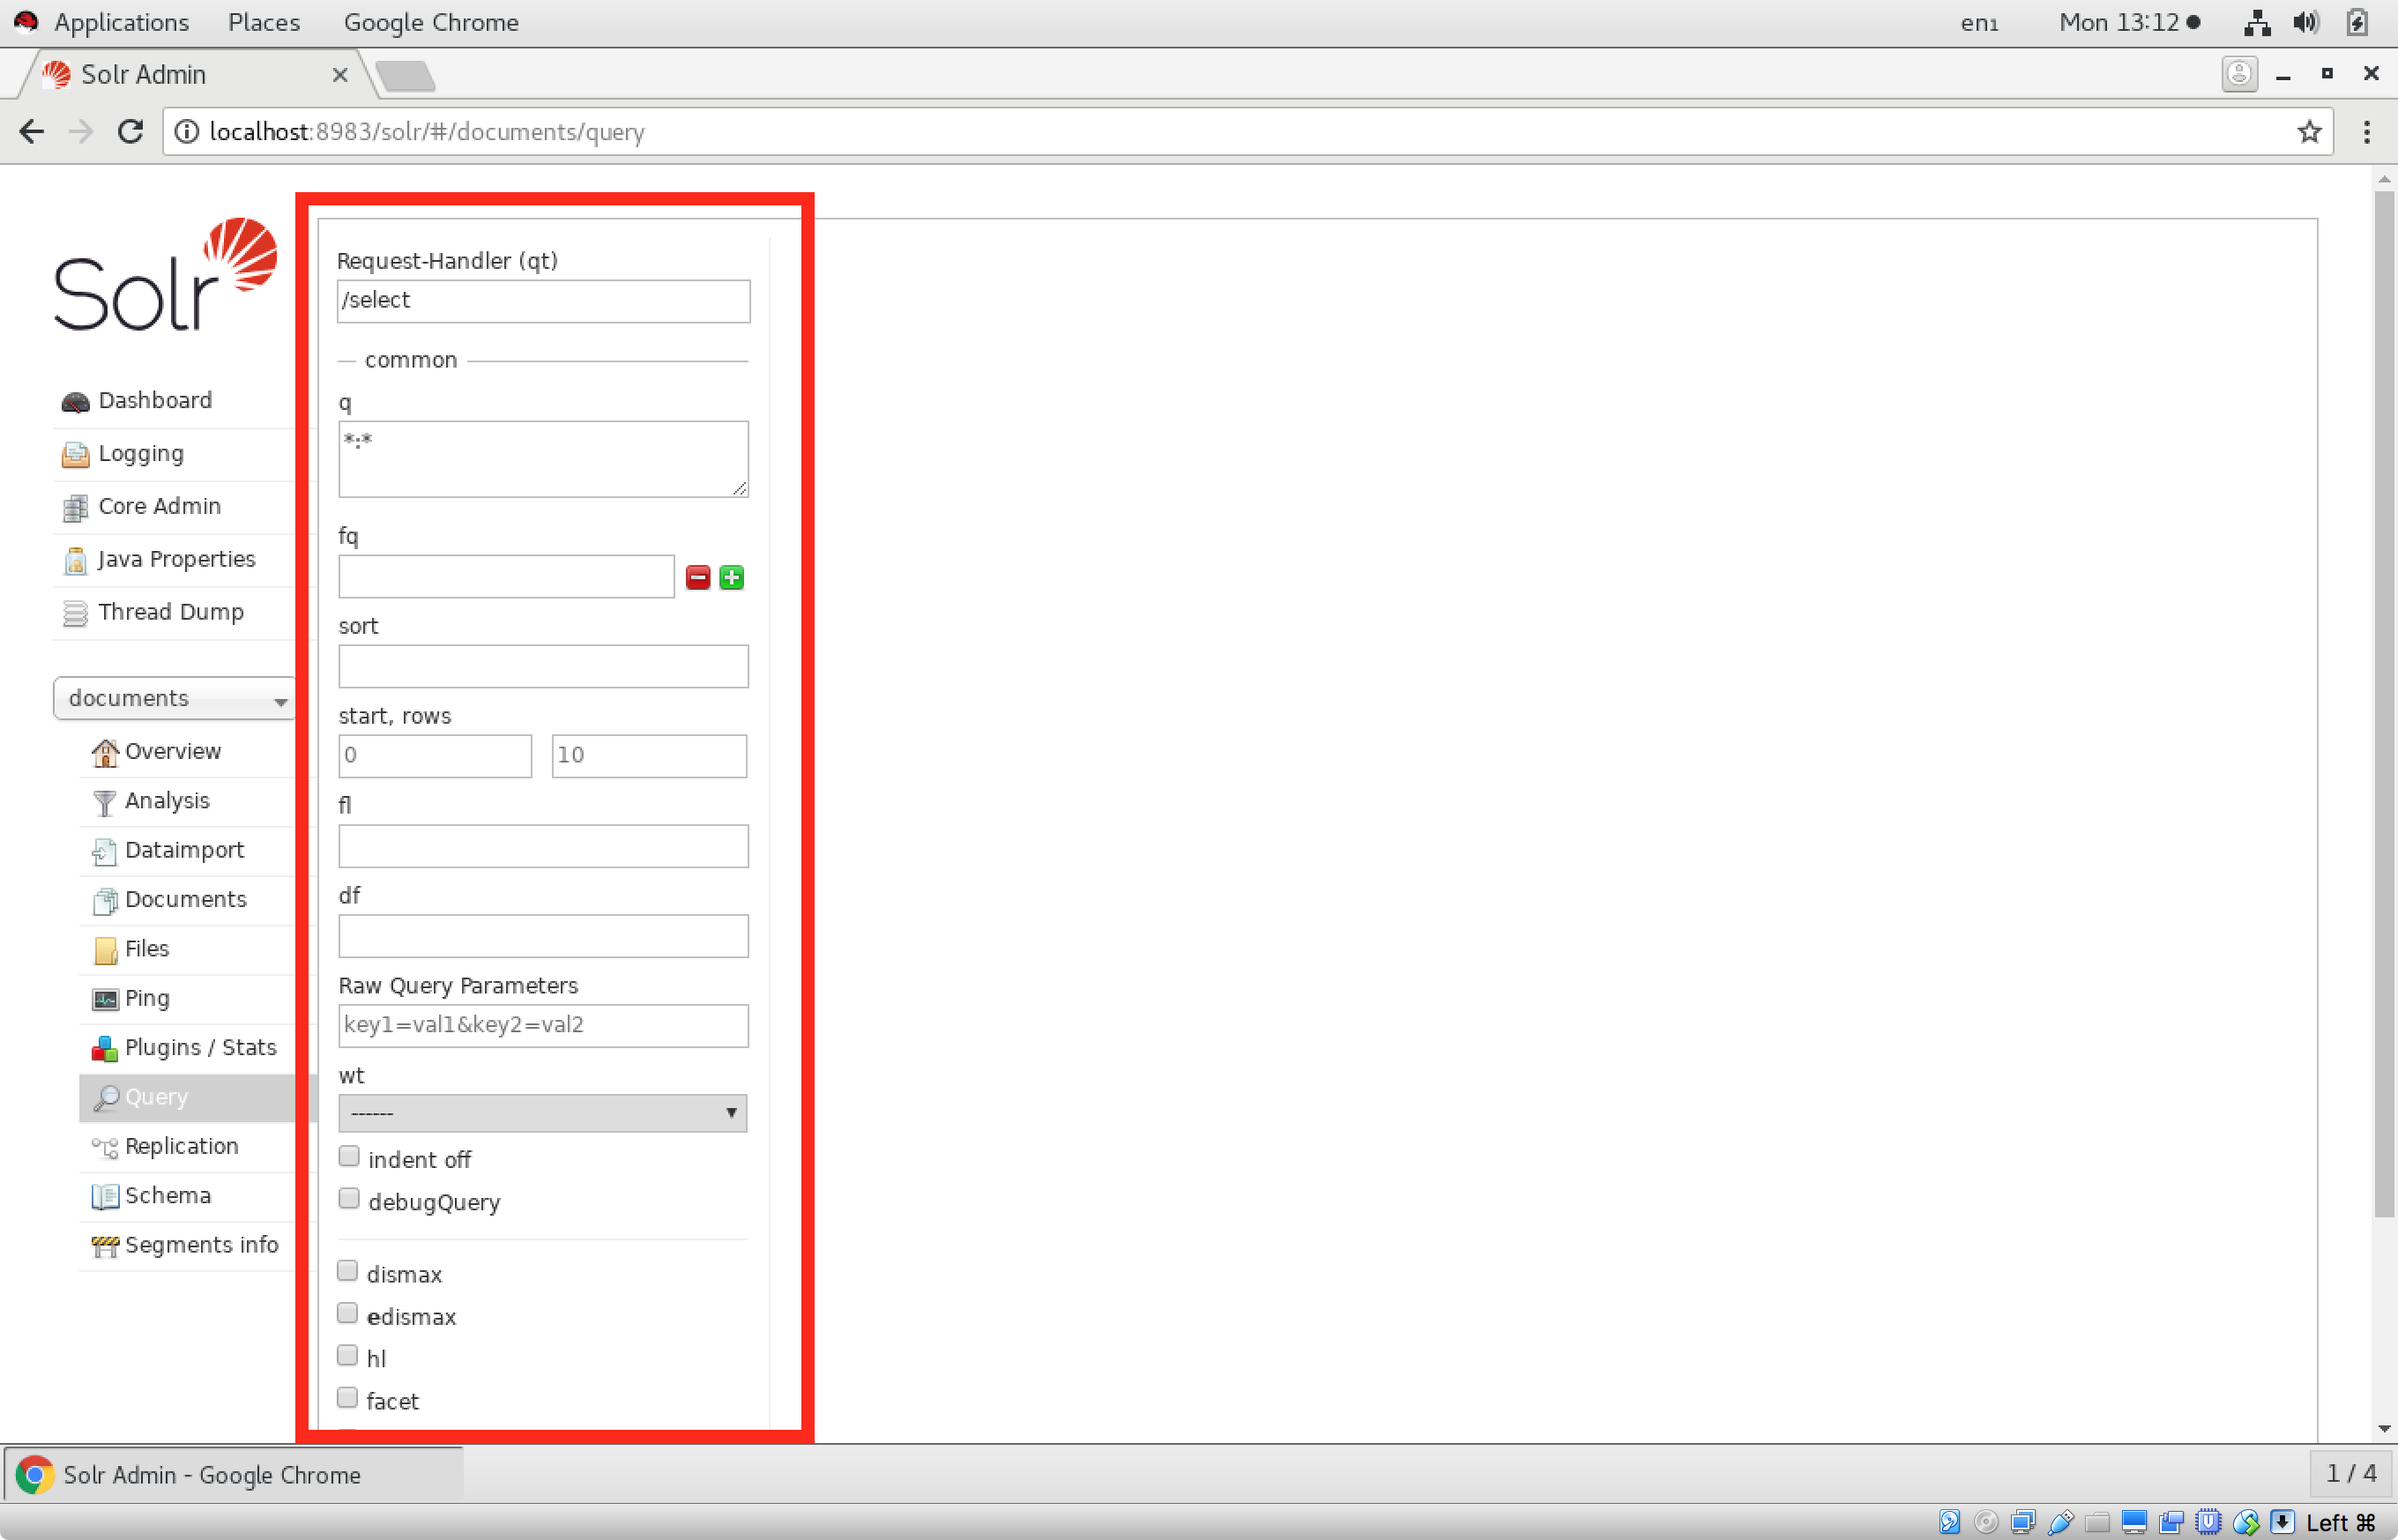
Then, click where it says “Query”:

You will then be at the page where Solr queries can be run, which can be useful for testing and troubleshooting queries:
This is the result from an example query for the word ‘spaghetti’:
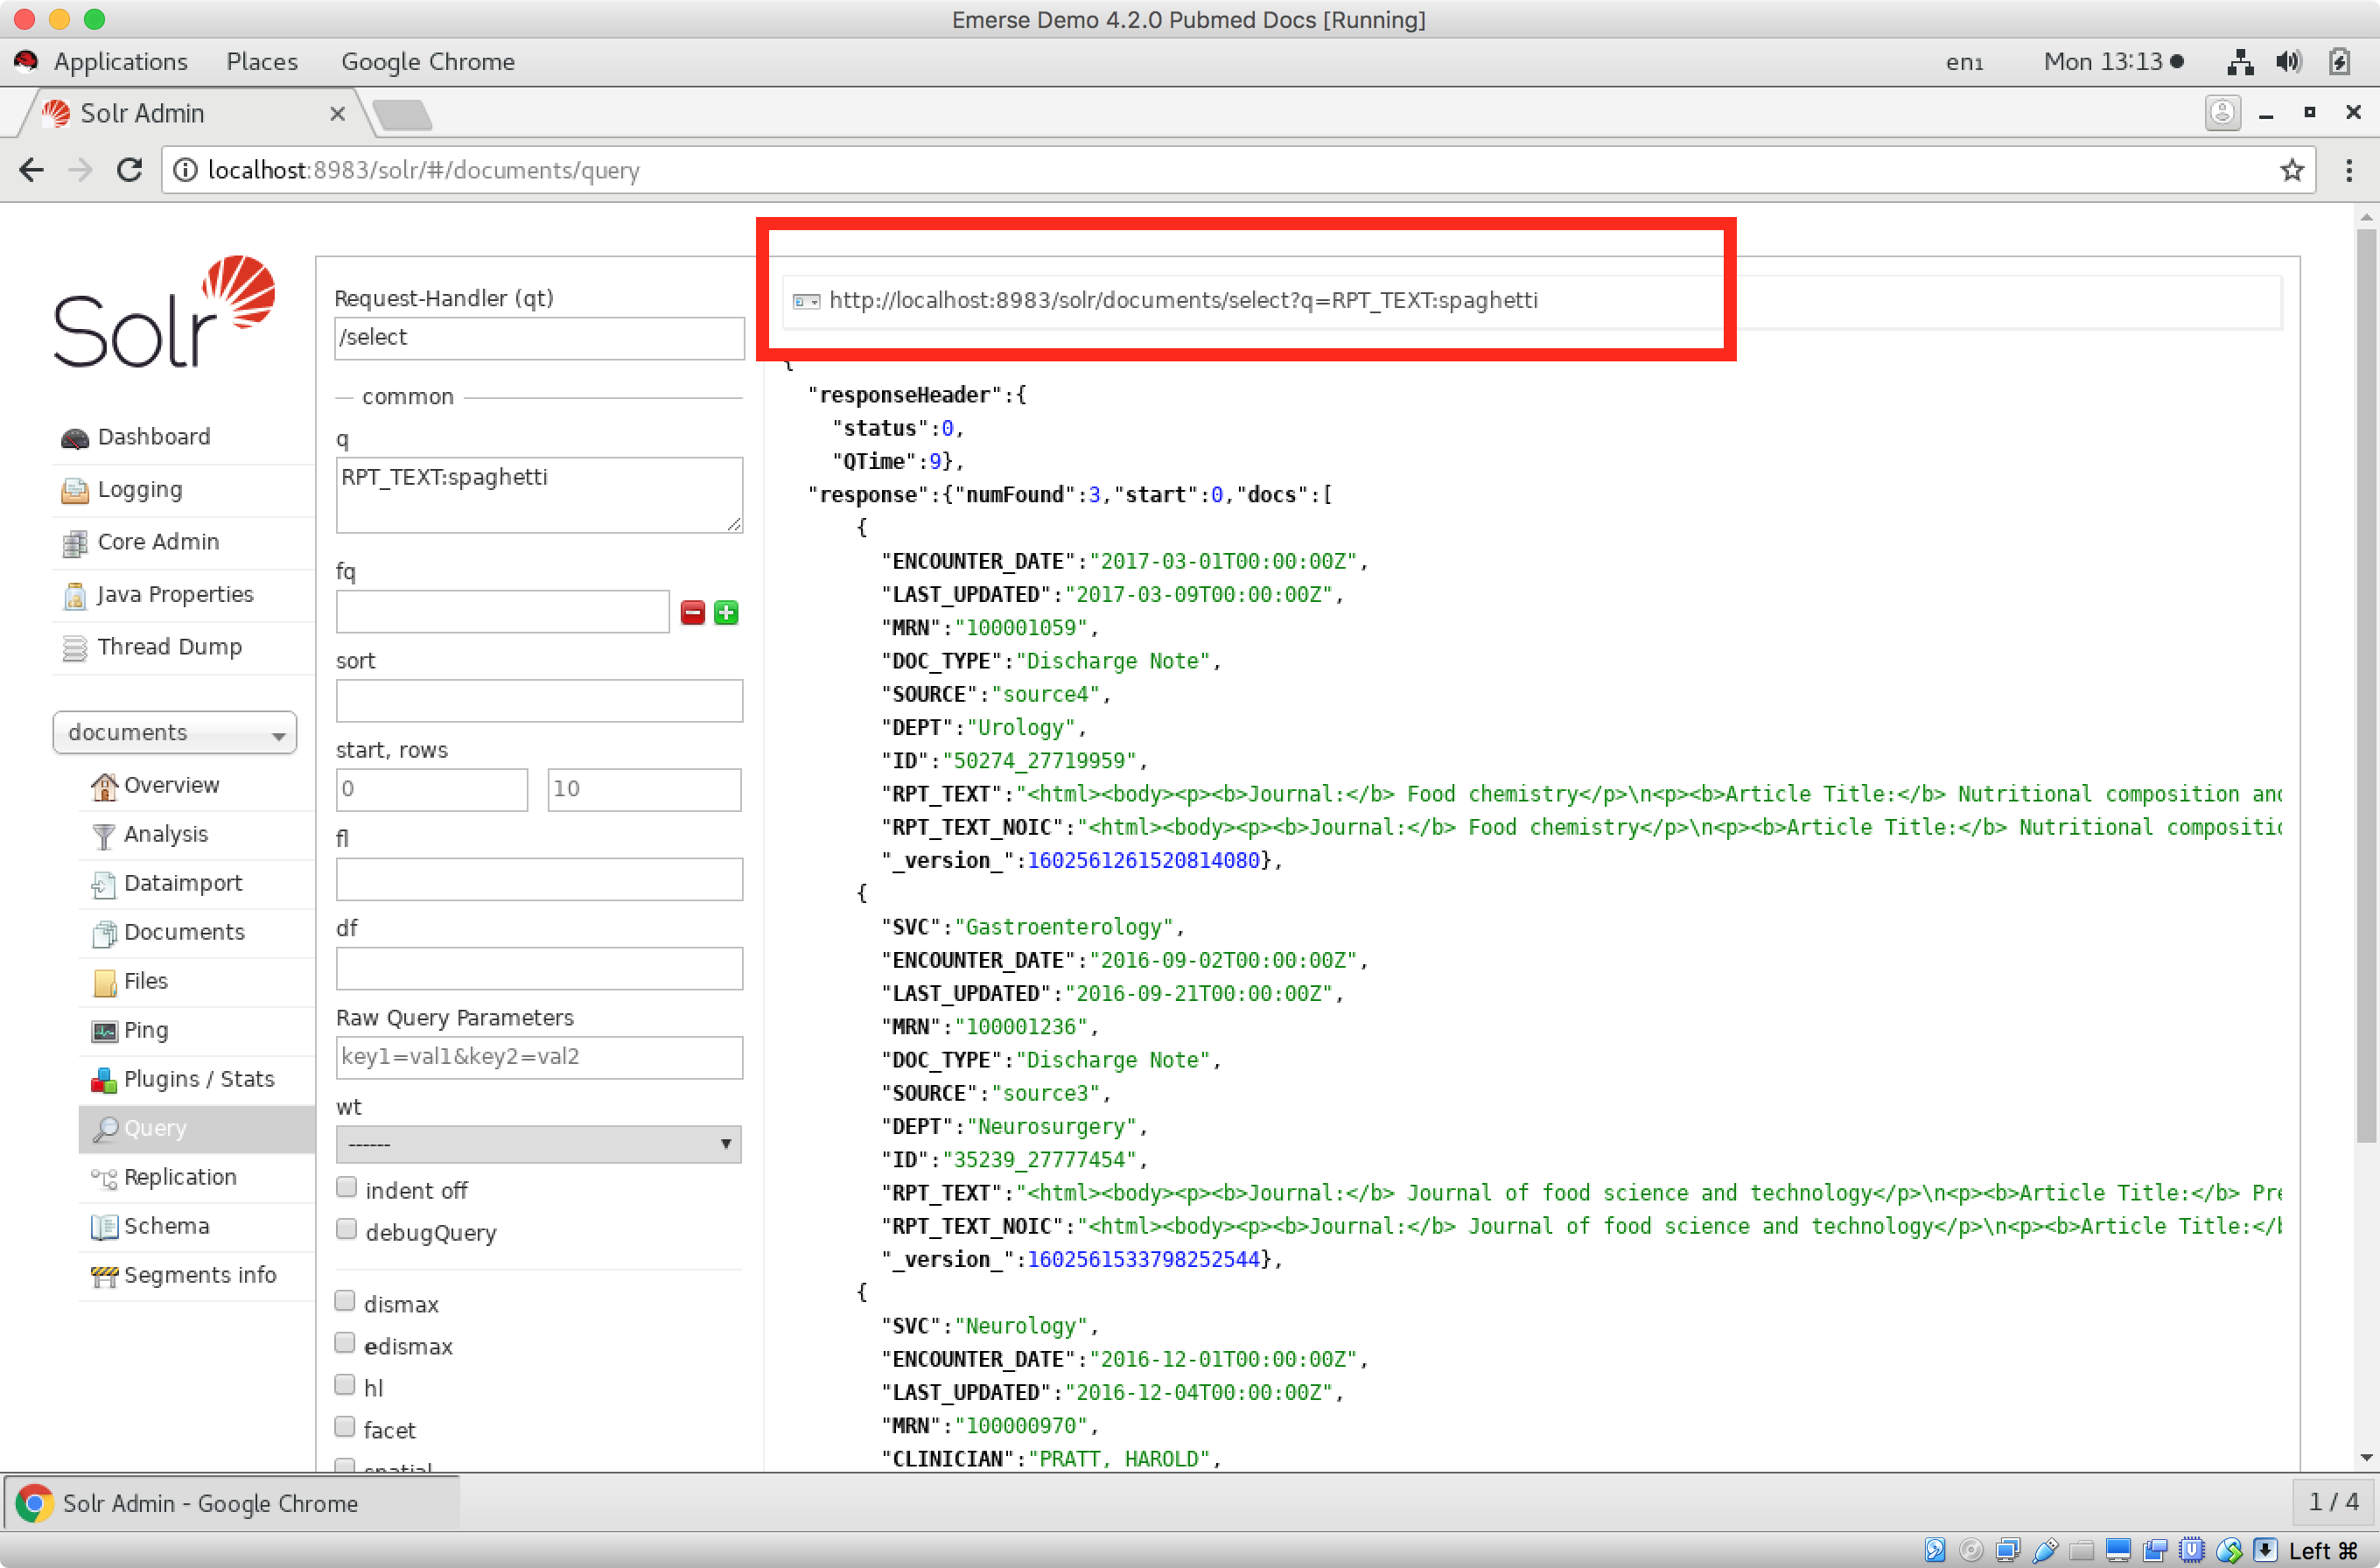
Note that the resulting URL in the red box above is an HTML version of the query that can be used for the Solr API using the curl command line program (described below).
Solr API
The indexed data can also be accessed programmatically using the built-in Solr API via curl. This could be useful for additional processing or to build applications that can access the underlying indexes. Note that in this demonstration version we have not turned on a password for this access but in a production system it should be secured. While curl can be called from various programming languages (e.g., Perl, Python, Java, etc), the example here is for using curl directly from the command line. For an example with Java, see the next section of the document.
Go to Terminal, and enter your query. You can get assistance for building queries by using the Solr interface (described in Solr interface section, above). To query the word ‘spaghetti’ with the results in JSON format, enter:
curl “http://localhost:8983/solr/documents/select?q=RPT_TEXT:spaghetti&wt=json&indent=on”
The results will come back in JSON format in the Terminal:

Many details about formulating queries can be found here:
Accessing the Solr API with programming languages
It is also possible to access the Solr API through various programming languages. Below is a short Java program example showing how to query the system via a URL and get the result back as a String in JSON format. This example code takes a single word passed as an argument through the command line (‘spaghetti’ in the example below) and queries the system for that word, as in:
> java javaEMERSEexample spaghetti
// Simple code example showing how to query Solr using Java

// this was modified from code found at http://www.avajava.com/tutorials/lessons/how-do-i-connect-to-a-url-using-basic-authentication.html

import java.io.IOException;
import java.io.InputStream;
import java.io.InputStreamReader;
import java.net.MalformedURLException;
import java.net.URL;
import java.net.URLConnection;

//import org.apache.commons.codec.binary.Base64; //would be used to convert username and password to base64, if usernames/passwords are turned on for access

	public class javaEMERSEexample {

		public static void main(String[] args) {

			String wordToQuery = args[0]; //take the single word passed to the Java app at the command line as the word for the query
			String	webPage =  "http://localhost:8983/solr/documents/select?q=RPT_TEXT:" + wordToQuery + "&wt=json&indent=on";
			String result = ""; //to hold the result of the Solr query.  In this case in json format.

				/*
				//this is how to deal with authentication if you need to convert the username/password to the base 64 combination
				String name = "emerse";
				String password = "demouser";
				String authString = name + ":" + password;
				System.out.println("auth string: " + authString);
				byte[] authEncBytes = Base64.encodeBase64(authString.getBytes());
				String authStringEnc = new String(authEncBytes);
				System.out.println("Base64 encoded auth string: " + authStringEnc);
				*/

				try {
				URL url = new URL(webPage);
				URLConnection urlConnection = url.openConnection();
				//urlConnection.setRequestProperty("Authorization", "Basic " + authStringEnc);
				InputStream is = urlConnection.getInputStream();
				InputStreamReader isr = new InputStreamReader(is);

				int numCharsRead;
				char[] charArray = new char[1024];
				StringBuffer sb = new StringBuffer();
				while ((numCharsRead = isr.read(charArray)) > 0) {
					sb.append(charArray, 0, numCharsRead);
				}
				 result = sb.toString();
			} catch (MalformedURLException e) {
				e.printStackTrace();
			} catch (IOException e) {
				e.printStackTrace();
			}
		System.out.println(result);
		}
	}
The output of this code looks essentially like the output from the curl command in the prior example.
Importing your own data
The following directions are only needed if there is a desire to load your own data into EMERSE for searching your own documents. It is not required for the basic demonstration version of EMERSE. It is also not recommended as an institutional solution for supporting multiple users. In other words, this approach could be used for individual projects where you are not able to obtain institutional support to install EMERSE centrally. In such a case, it is still important to consider the privacy and security implications of running your own VM to host data if the system were to contain patient data with protected health information. Please consult your local IT support group for advice on the security aspects.
For importing data, we assume that you will have a way to obtain all of your documents that need to be imported into EMERSE, with each document saved as a separate file.
The general steps for importing data into EMERSE are shown in the table below.
| Step | Description | Section(s) describing details in this document |
|---|---|---|
1 |
Convert your documents for importing if they are not already in plain text or HTML formats. |
Preparing documents for import: File Conversion |
2 |
Creating metadata files that will define aspects of how the EMERSE system should display the documents, and define the patients with whom the documents will be associated. |
Metadata files: Overview |
3 |
Creating a shared directory between your host computer and the guest virtual machine to copy the data from the host to the VM. This step, and the following step, is needed only if the data are created on the host machine. If the metadata files are created on the VM then there is no need to copy them. |
Setting up a shared directory for copying data to the VM |
4 |
Copy the files (metadata files and the actual documents for import) to the virtual machine. |
Using the shared folder to copy the data files to the VM |
5 |
Run the data loading scripts. |
Using the scripts to load data into EMERSE |
6 |
Directions for adding new data once existing data have already been loaded (this step is optional) |
Incrementally adding new data |
It is also possible to download an example dataset (containing PubMed abstracts) which can be used for importing into the EMERSE VM. Those datasets, or a set of blank templates, can be found here:
Preparing documents for import: File Conversion (MacOS directions only)
EMERSE uses Apache Solr for indexing documents. Solr can handle several file formats, but not all file formats are supported. If your documents are already plain text (.txt) or HTML (.html or .htm) then no additional conversion is required, and you can skip this section.
Files in other formats should be converted to either plain text or HTML. HTML is ideal for files with formatting (e.g., tables, bold text, etc) since HTML files can generally preserve that formatting whereas plain text files will not.
If file conversion is needed because the documents are not already in plain text (.txt) or HTML (.html or .htm) format, there are various ways to convert files, including several commercial options. The following directions were made for the Mac, using tools already provided with the Mac to perform file conversions. Other file conversions options are available for Windows machines. On Mac OS X there is a file converter built into the operating system. This can convert Microsoft Word documents (.doc or .docx) into HTML files which can then be imported into EMERSE. This file converter can also transform RTF documents into HTML. The following directions describe a simple approach for converting Word documents into HTML. Similar steps would be needed for converting RTF into HTML.
-
Create a directory/folder on the Mac. It can have any name, but in this example you can name it
documentstoconvertand it will be located on theDesktop. -
Copy all of the documents that need converting to this folder (
~/Desktop/documentstoconvert/) -
Open a
Terminalwindow. (Navigate toApplications → Favorites → Terminaland double click theTerminalapplication to open it.) -
At the
Terminalcommand line, navigate to the proper directory, by typing:cd ~/Desktop/documentstoconvert/
-
Next, at the command line, convert the documents by typing:
textutil -convert html *.docx *.doc
-
Note that this will convert all
.docxand.docfiles into HTML format. To also include RTF files, simply add that part of the command, such as:textutil -convert html *.docx *.doc *.rtf
The converted files should all have a .html extension. You can now either delete or remove the original files, or simply copy the new HTML files to a new folder to separate them out. Note that you can sort the folder by Kind to get all of the HTML files together in the list, which makes it easier to just select that file type
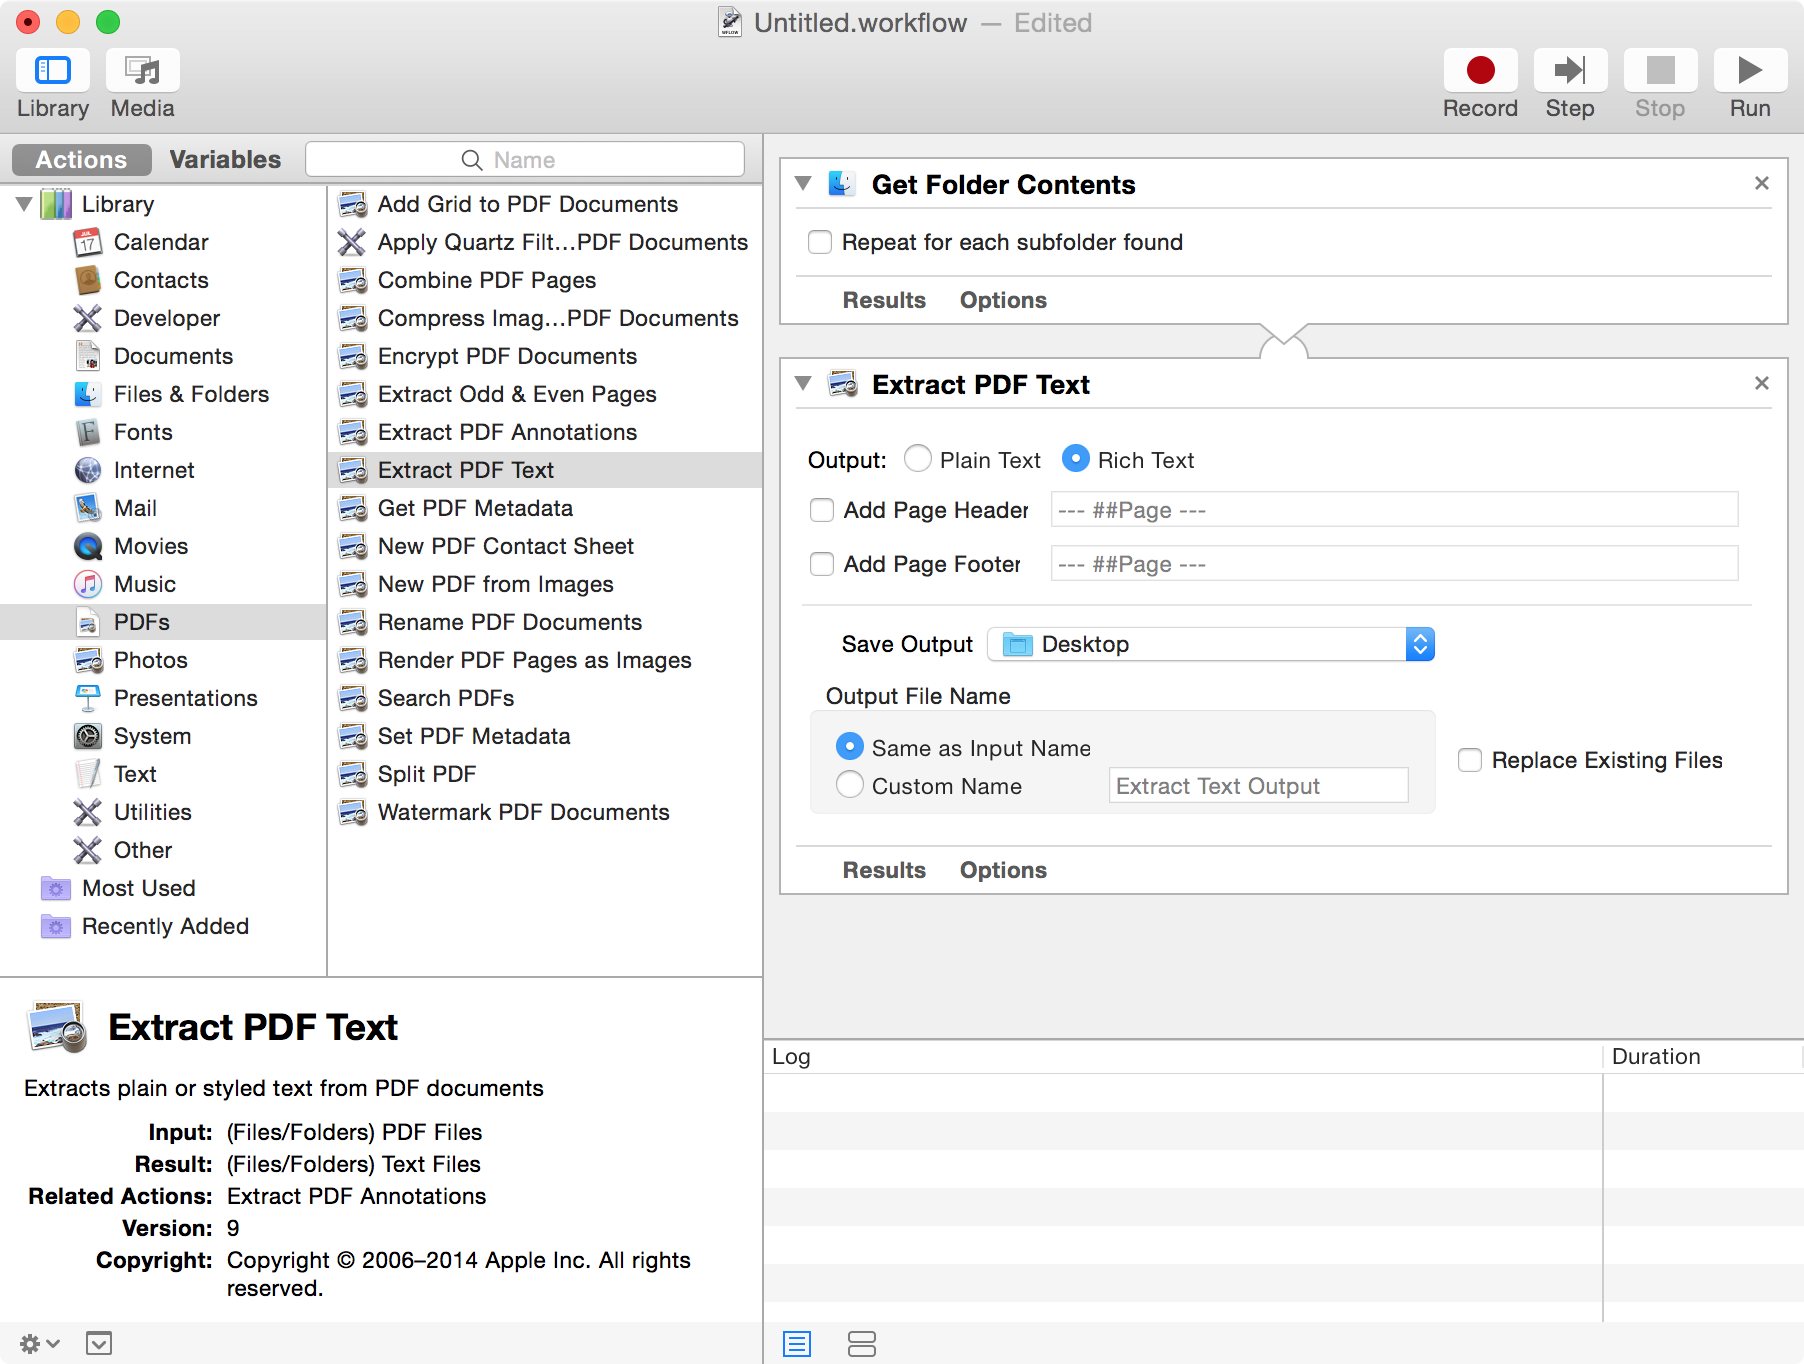
On the Mac it is also possible to convert PDF files, but the process is a bit more involved. This can be done using the Automator app, and developing a workflow. The PDF conversion component in the Automator app can be found under the PDFs → Extract PDF Text workflow. One can use this Automator workflow to save the files in RTF format, and then follow the directions about using the textutil app to convert RTF to HTML.
Metadata files: Overview
EMERSE was designed to incorporate data from electronic health records. As such, it was designed to include documents that are connected to patients via a medical record number (MRN). Documents can have various sources (e.g., Radiology, Pathology, Epic, etc), and each document might have different metadata depending on the source (e.g., date, author, document type, clinical service, authoring clinician, etc). EMERSE also expects to have a list of all patients for which documents are loaded.
While this was the intended use, it is still possible to include documents even if they are not actually tied to a known patient. In such a case, when setting up the data import you will need to essentially create a fake “patient” MRN to connect to the document as well as filler data about the patient name, date of birth, sex, etc. This should not affect the performance of the system.
Following are details about the data files needed to import your own data into the VM, their expected structure, and contents. Four files in Microsoft Excel (.xlsx) are required to define the metadata, and a separate folder (simply called documents) is required to hold the actual documents that will be indexed.
It is probably easiest to create these Excel files on your own (host) computer and then move them to the virtual machine (details for moving the files are provided within this document). However, if there is a desire to open/view Microsoft Excel xlsx files on the Linux virtual machine, this can be done using a free program called OpenOffice, which has been pre-installed on the virtual machine on which EMERSE is distributed.
OpenOffice currently cannot save files in the xlsx format, so you won’t be able to edit the files using that program.
|
There are four components for which you need to provide data: the document source names, the metadata about the document sources, the document metadata, and the patient data. These four files are called:
documentMetadata.xlsx
patientMetadata.xlsx
sourceMetadata.xlsx
documentSources.xlsx
A fifth file is required by the loading scripts, but does not require any editing. It is called solrmap.xlsx and it should already be located on the virtual machine in /app/data/emerse_pdi_job/. In the event that it is missing or deleted, it can simply be re-created by pasting the table below into an Excel spreadsheet and naming it solrmap.xlsx.
The contents of the solrmap.xlsx file:
| Solr field | Excel field |
|---|---|
ID |
documentId |
LAST_UPDATED |
documentLastUpdatedDate |
ENCOUNTER_DATE |
documentServiceDate |
ADMIT_DATE |
admitDate |
DISCHARGE_DATE |
dischargeDate |
CASE_ACCN_NBR |
accessionNumber |
DOC_TYPE |
documentType |
SVC |
service |
CSN |
encounterNumber |
DEPT |
department |
CLINICIAN |
providerName |
STATUS |
status |
DESC |
description |
| Because of the way that the import scripts were written, they will only work if the column headers in the Excel files are not modified in any way. That is, the header names should remain the same and the order of all of the columns should remain the same. Changing the column order will break the import scripts. |
| All dates should ideally be in the MM/DD/YYYY format to ensure there is no ambiguity when importing the dates, especially around any 2-digit year abbreviation. |
Metadata files: Document sources
The first file to define is related to the document sources. In EMERSE, documents are displayed according to source system which helps distinguish where a document came from. In general, a source can be thought of as a source system, such as a radiology system, a pathology system, or the EHR itself. You can include just one source, or you can have multiple sources. These sources are defined in the file called:
documentSources.xlsx
There are 2 columns where the metadata about the document sources should be defined. Each is explained below. The order in which the sources are displayed in the EMERSE “Overview” section (from left to right) are defined by the order in which they are listed in this spreadsheet (from top to bottom).
|
This is used internally to link data between this |
|
This is the name of the source as it will be displayed in EMERSE. This can have spaces in it, and would likely include things such as “Pathology”, “Radiology”, etc. (but without the quotes). |
Example documentSources.xlsx spreadsheet:
| Source Key | Source Display |
|---|---|
source1 |
Main EHR |
source2 |
Pathology |
source3 |
Radiology |
source4 |
Other |

Metadata files: Document Source Metadata
For every document source there are, at a minimum, two required metadata fields (other than the text of the document itself). These are the date in which the clinical encounter occurred (often called the service date or encounter date), and the date when the document was last updated. However, each document source may have additional metadata that could be displayed for the users and can include items such as the clinical department, the clinician’s name who authored the document, or even the document/note type (e.g., progress report, discharge note, etc.). The types of metadata are defined in this Excel spreadsheet which is called:
sourceMetadata.xlsx
This file contains 3 columns, described below. The order in which these elements are listed (top to bottom) are the order in which they will appear in EMERSE (from left to right), with the caveat that the text snippet showing any text found for a note will always appear on the left, and, the order is only considered within each document source.
|
This is the same source that should be listed in the |
|
This provides a linking/map between the |
|
This is the name of the metadata element as it should be displayed in EMERSE. Often these will be names such as “Clinician”, “Department”, “Note Type”, etc., but they can be anything. |
There are two nameFromDocumentSheet elements that are required for each document source, although the display names are customizable. These two required fields are documentServiceDate and documentLastUpdatedDateBy Default EMERSE will sort data based on documentServiceDate.
|
The full list of elements for the nameFromDocumentSheet are defined in the table below. Note that these names are essentially placeholders, so even if a name appears to have a specific intended use, it can be overridden simply by providing a new display name. There are also two data types supported, date and text. Note that the table below is just for information to define what the elements are, it is not meant to be a spreadsheet used for importing data into EMERSE.
| nameFromDocumentSheet | Solr field name* | Required? | Type | Original intended use |
|---|---|---|---|---|
documentServiceDate |
|
Yes |
Date |
The date of the clinical service that the document relates to |
documentLastUpdatedDate |
|
Yes |
Date |
The date the document was last updated |
documentType |
|
No |
Text |
The type of document, such as progress note or admission note |
department |
|
No |
Text |
The clinical department, such as pediatrics, or internal medicine |
encounterNumber |
|
No |
Text |
The encounter number to which the document belongs |
providerName |
|
No |
Text |
The name of the clinician who authored the document |
admitDate |
|
No |
Date |
The admission date for the encounter to which the document belongs |
dischargeDate |
|
No |
Date |
The discharge date for the encounter to which the document belongs |
accessionNumber |
|
No |
Text |
A field for a case accession number, used by the pathology department |
status |
|
No |
Text |
The status of the document, such as Signed, Preliminary, etc. |
service |
|
No |
Text |
The clinical service, such as rheumatology or cardiology |
description |
|
No |
Text |
Any additional information that might be relevant about the ddocuments |
*This is only provided for those wishing to look deeper into the underlying Solr configuration to understand how the fields are being mapped.
| Source Key | nameFromDocumentSheet | displayName |
|---|---|---|
source1 |
documentServiceDate |
Date of Service |
source1 |
documentLastUpdatedDate |
Last Updated |
source1 |
documentType |
Document Type |
source1 |
department |
Department |
source1 |
service |
Clinical Service |
source1 |
providerName |
Provider |
source1 |
admitDate |
Admission Date |
source2 |
documentServiceDate |
Date of Service |
source2 |
documentLastUpdatedDate |
Last Updated |
source2 |
documentType |
Document Type |
source2 |
department |
Department |
source2 |
service |
Clinical Service |
source2 |
providerName |
Provider |
source3 |
documentServiceDate |
Date of Service |
source3 |
documentLastUpdatedDate |
Last Updated |
source3 |
documentType |
Document Type |
source3 |
department |
Department |
source3 |
service |
Clinical Service |
source4 |
documentServiceDate |
Date of Service |
source4 |
documentLastUpdatedDate |
Last Updated |
source4 |
documentType |
Document Type |
source4 |
department |
Department |
documentServiceDate and documentLastUpdatedDate are required fields for each data source. The others are optional.
|
Metadata files: Document Metadata
Every document indexed will have its own metadata which relates to the types defined in the sourceMetadata.xlsx sheet. For example, if service is defined in the sourceMetadata.xlsx sheet, then the specific metadata elements for a document could be ‘cardiology’, ‘pulmonology’, ‘rheumatology’, etc.
The file in which these document-specific metadata are defined is called:
documentMetadata.xlsx
Every row in this spreadsheet represents a single document to be indexed. Every document must have a unique identifier, and must be connected to a patient through a medical record number. The filename of the document to be loaded (from the documents folder) must also be specified here. For the metadata elements related to the documents that will be displayed in EMERSE, each element has its own column in the spreadsheet, regardless of whether or not any metadata for that element actually exists for the documents. The specific cells related to those columns should be left blank if no metadata exists. The following table details the elements present in this spreadsheet.
| Column Header Name | Column Order | Column Required? | Data Required? | Description |
|---|---|---|---|---|
|
A |
Yes |
Yes |
The name of the document, located in the |
|
B |
Yes |
Yes |
The source that the document belongs do, which would be one of the elements listed under |
|
C |
Yes |
Yes |
The patient medical record number, which must match a MRN in |
|
D |
Yes |
Yes |
See definitions in the table describing the metadata in the |
|
E |
Yes |
Yes |
|
|
F |
Yes |
Yes |
A unique identifier for each document. This can be anything, but must be unique for each document |
|
G |
Yes |
No |
See definitions in the table describing the metadata in the |
|
H |
Yes |
No |
|
|
I |
Yes |
No |
|
|
J |
Yes |
No |
|
|
K |
Yes |
No |
|
|
L |
Yes |
No |
|
|
M |
Yes |
No |
|
|
N |
Yes |
No |
|
|
O |
Yes |
No |
|
|
P |
Yes |
No |
fileName |
source |
patientMRN |
documentServiceDate |
documentLastUpdatedDate |
documentID |
documentType |
department |
…* |
description |
abc.txt |
source1 |
1000000056 |
12/26/2016 |
01/08/2017 |
abc12345 |
Nursing Note |
Orthopedics |
||
def.txt |
source3 |
1000000045 |
12/26/2016 |
01/08/2017 |
def43454 |
Discharge Note |
clinical trial subject |
||
ghi.txt |
source1 |
1000000034 |
12/26/2016 |
01/11/2017 |
ddd33433 |
Nutrition Note |
Emergency Medicine |
||
jkl.txt |
source2 |
1000000056 |
09/21/2016 |
10/06/2016 |
12323abc |
Pediatrics |
|||
mno.txt |
source2 |
1000000056 |
10/07/2016 |
10/17/2016 |
231325f3 |
Urology |
|||
pqr.html |
source1 |
1000000045 |
09/21/2016 |
10/08/2016 |
ddsf4543 |
Discharge Note |
Neurosurgery |
||
stu.html |
source3 |
1000000045 |
09/21/2016 |
10/11/2016 |
hhjuy654 |
Nursing Note |
clinical trial subject |
||
vwx.html |
source2 |
1000000023 |
12/12/2016 |
12/13/2016 |
ddfdfdf12 |
Neurosurgery |
*Other columns should appear, as defined elsewhere in the previous table, but are not shown here due to space limitations. In addition, the order of the columns should not change, and all columns must be in this spreadsheet even if no metadata exist for them.
The documents themselves (as defined under the fileName header column) should all be located within a directory called documents. This folder of documents should be in the same directory as the other metadata files when importing them into EMERSE.
|
Metadata files: Patient Metadata
Every document that is imported must be associated with a patient through a medical record number. A patient can have one or (more likely) many associated documents. Patients are defined in a simple Excel spreadsheet called:
patientMetadata.xlsx
In this spreadsheet every patient is listed in a row with some additional metadata about them including date of birth, sex, race, ethnicity, and, most importantly, medical record number (MRN). Ethnicity is not required, but can be added if desired. Race, sex, and ethnicity must be coded according to the EMERSE lookup tables, which can be viewed with the SQL Developer tool. (See section on Oracle database). These lookup tables can also be modified for local needs, but for the purposes of this demonstration you can just map your data to the existing codes. The codes, in additional to an example patient spreadsheet, are described below.
| LastName | FirstName | patientMRN | DOB | sex | race | ethnicity |
|---|---|---|---|---|---|---|
CURRY |
CODY |
100000001 |
02/23/2004 |
M |
B |
Hispanic |
RICE |
CHAD |
100000002 |
12/22/1985 |
M |
U |
Hispanic |
DURAN |
DEVIN |
100000003 |
05/05/2006 |
M |
U |
Pt Refused |
SANCHEZ |
EARNEST |
100000004 |
03/11/1980 |
M |
U |
Hispanic |
COLE |
JONATHON |
100000005 |
12/16/1931 |
M |
W |
Non-Hispanic |
RILEY |
SALLY |
100000006 |
10/01/1977 |
F |
U |
Non-Hispanic |
HENDERSON |
LEONARD |
100000007 |
05/16/1984 |
M |
B |
Non-Hispanic |
ALEXANDER |
LELA |
100000008 |
07/08/1967 |
M |
U |
Non-Hispanic |
FIELDS |
REX |
100000009 |
10/03/2000 |
M |
B |
Non-Hispanic |
HINES |
ROSIE |
100000010 |
01/13/1999 |
F |
B |
Non-Hispanic |
SIMS |
DARNELL |
100000011 |
07/31/1980 |
M |
O |
Hispanic |
Code |
Sex |
F |
Female |
M |
Male |
U |
Unknown |
Code |
Race |
W |
White or Caucasian |
B |
Black or African American |
A |
American Indian and Alaska Native |
O |
Asian |
P |
Native Hawaiian and Other Pacific Islander |
H |
Other |
D |
Patient Refused |
U |
Unknown |
E |
Middle Eastern |
M |
Bi/Multi Racial |
Code |
Ethnicity |
Non-Hispanic |
Non-Hispanic |
Hispanic |
Hispanic |
Unknown |
Unknown |
Pt Refused |
Patient Refused |
Setting up a shared directory for copying data to the VM
The following directions were created for a Mac, but the process should be very similar for Windows. The directions below were based on those found at helpdeskgeek.com:
The virtual machine is essentially another computer (operating system) running on your computer. The VM is often called the guest and the main operating system on your computer is called the host. As such the guest OS has it’s own disk space and can’t “see” the files on your main (host) computer unless you set it up so that they can communicate. Once this is set up you can then copy files from the host OS to the guest VM. In these directions, the term “folder” and “directory” are used essentially interchangeably.
There are several ways to moves files to the VM for data import into EMERSE, and the directions below describe only one such approach. Depending on your setup, the default VM environment may not able to connect to the outside Internet, so using services connected to the internet for moving files may not be possible. There are ways to configure the VM to allow for internet connections, but this is not described here. Further, if the data destined for import contains sensitive patient information, it might not be ideal to move them via the internet anyway.
-
In the Virtual Box Application (not the Linux VM), go to the menu bar at the top of the screen and choose
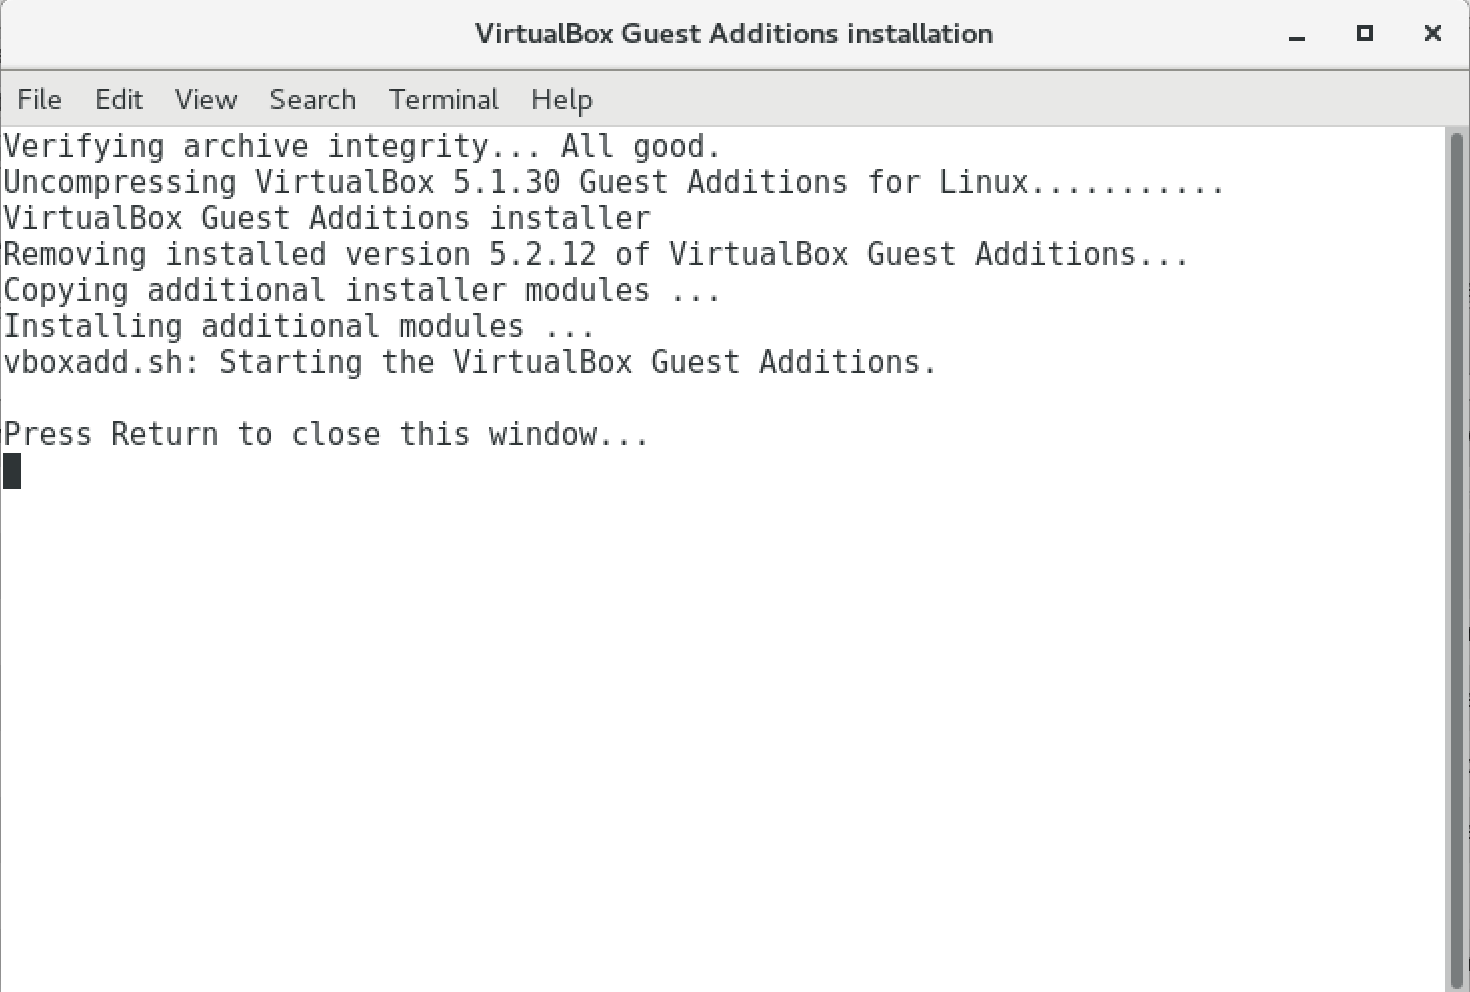
Devices → Insert Guest Additions CD image…Then chooseRunat the prompt. Enter the passworddemouser. You will see a window with text about the installation. After it is complete it will show a messagePress Return to close this window…, so pressReturn.
| Installing Guest Additions may not be needed since it should already have been added the Virtual Machine distributed with EMERSE. |
-
On the Mac Desktop create a folder where you will put all of the files that should be moved over to the VM. You can give it any name, but in this case call it:
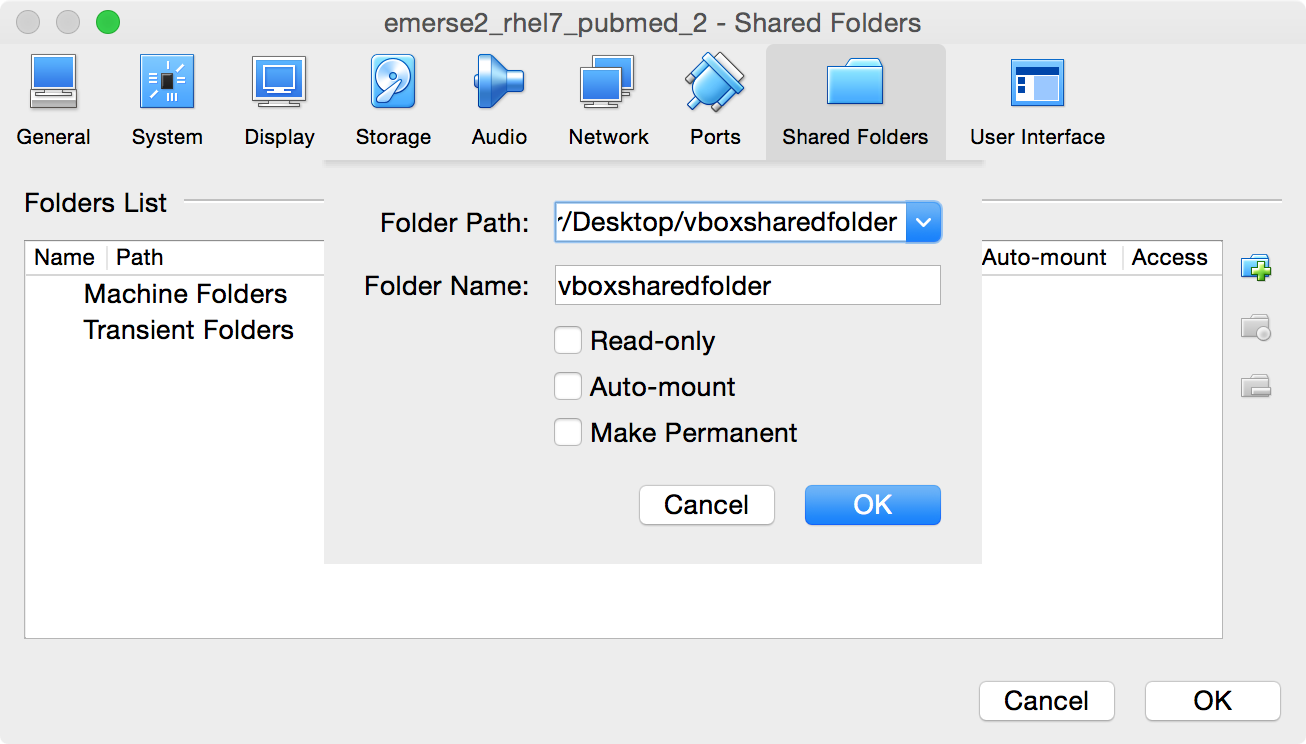
vboxsharedfolder -
Go back to the VirtualBox Mac App and in the menu bar across the top of the screen choose
Devices → Shared Folders → Shared Folders Settings… -
A window will open up, and then click on the folder icon with a plus sign
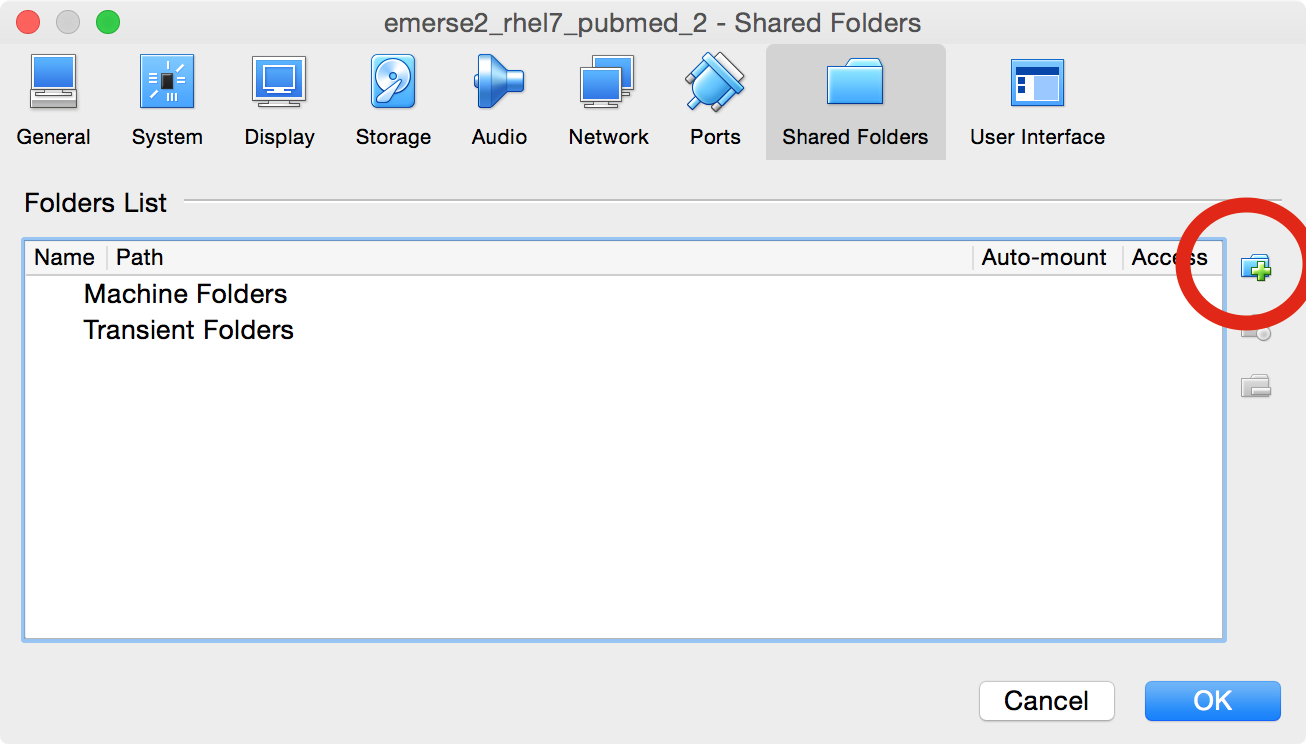
-
Under
Folder Pathclick on the down arrow and selectOther…
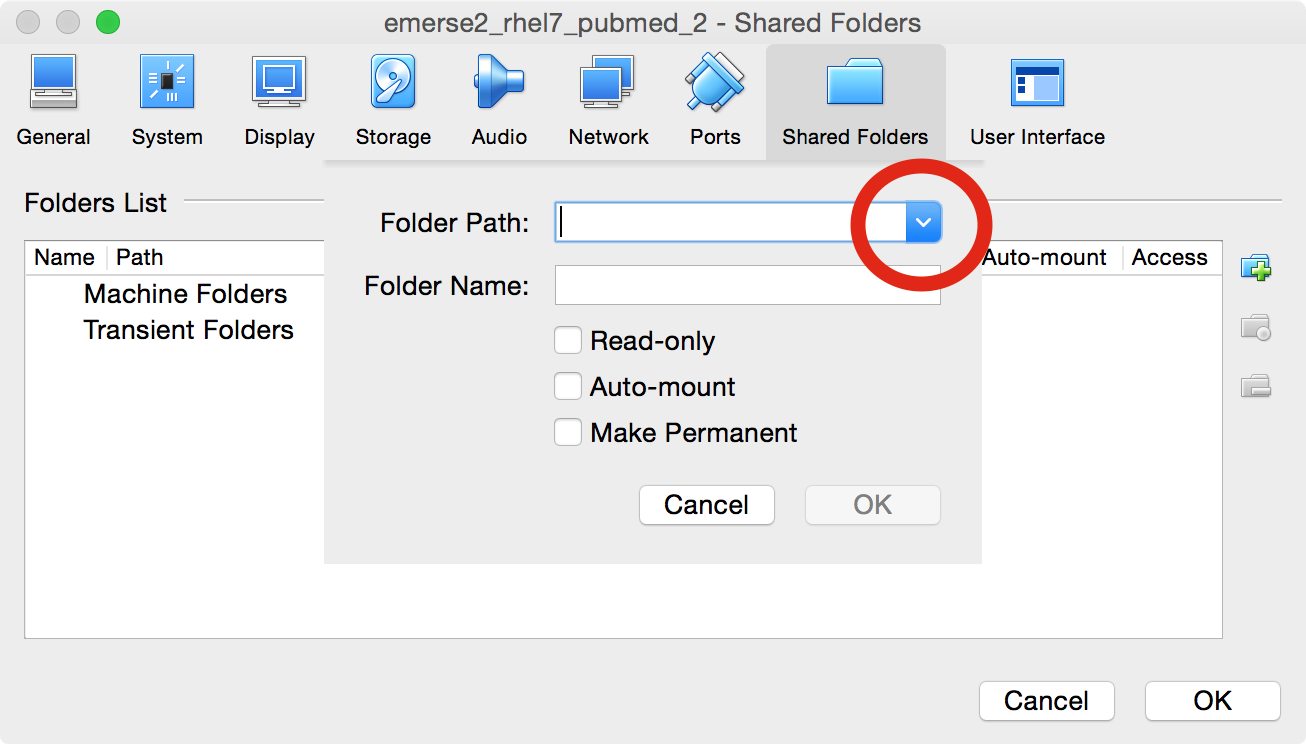
-
Navigate to the correct folder (the one named
vboxsharedfolder) on the Mac Desktop, click on the folder once to select it, then click on theOpenbutton. It should fill in the name of the folder where it saysFolder Name. Then clickOKto close that section and leave the other settings unchecked (e.g., Read-only, Auto-Mount, Make Permanent).
-
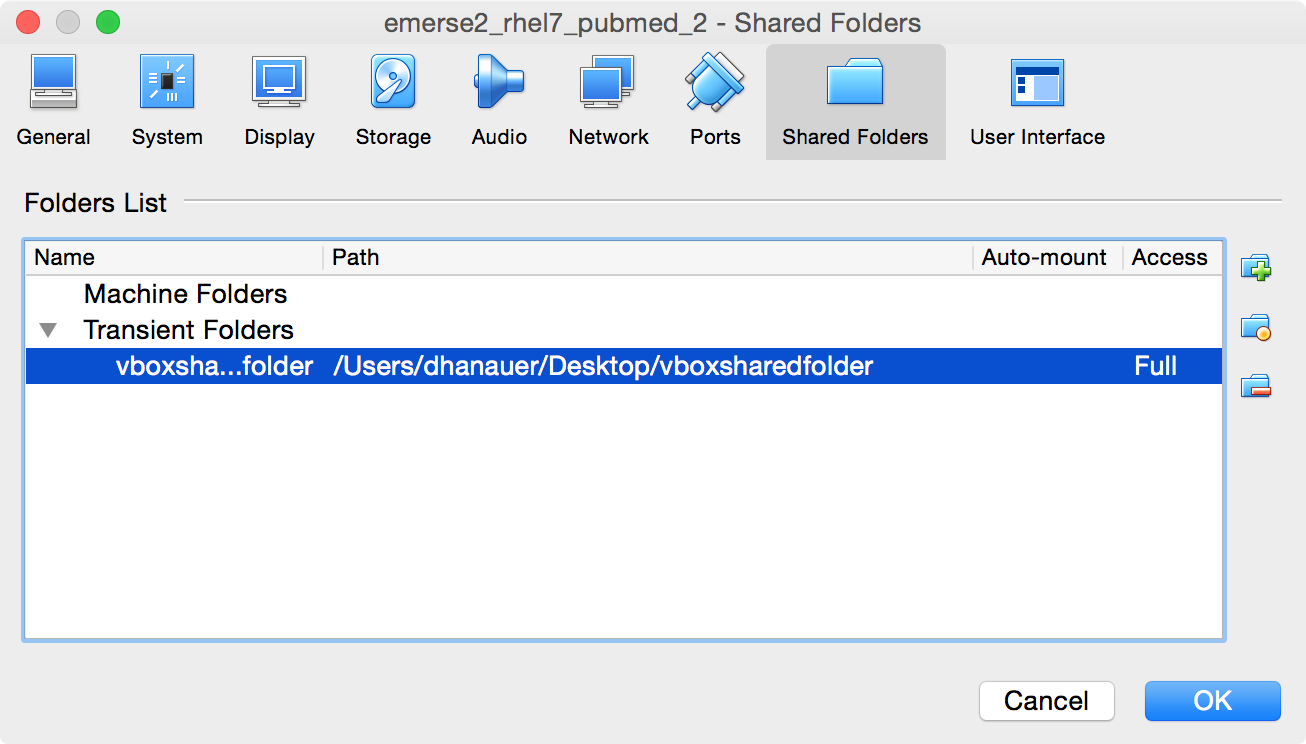
The folder will then show up in the table under the
Transient Folder`s heading. Then click `OK.
-
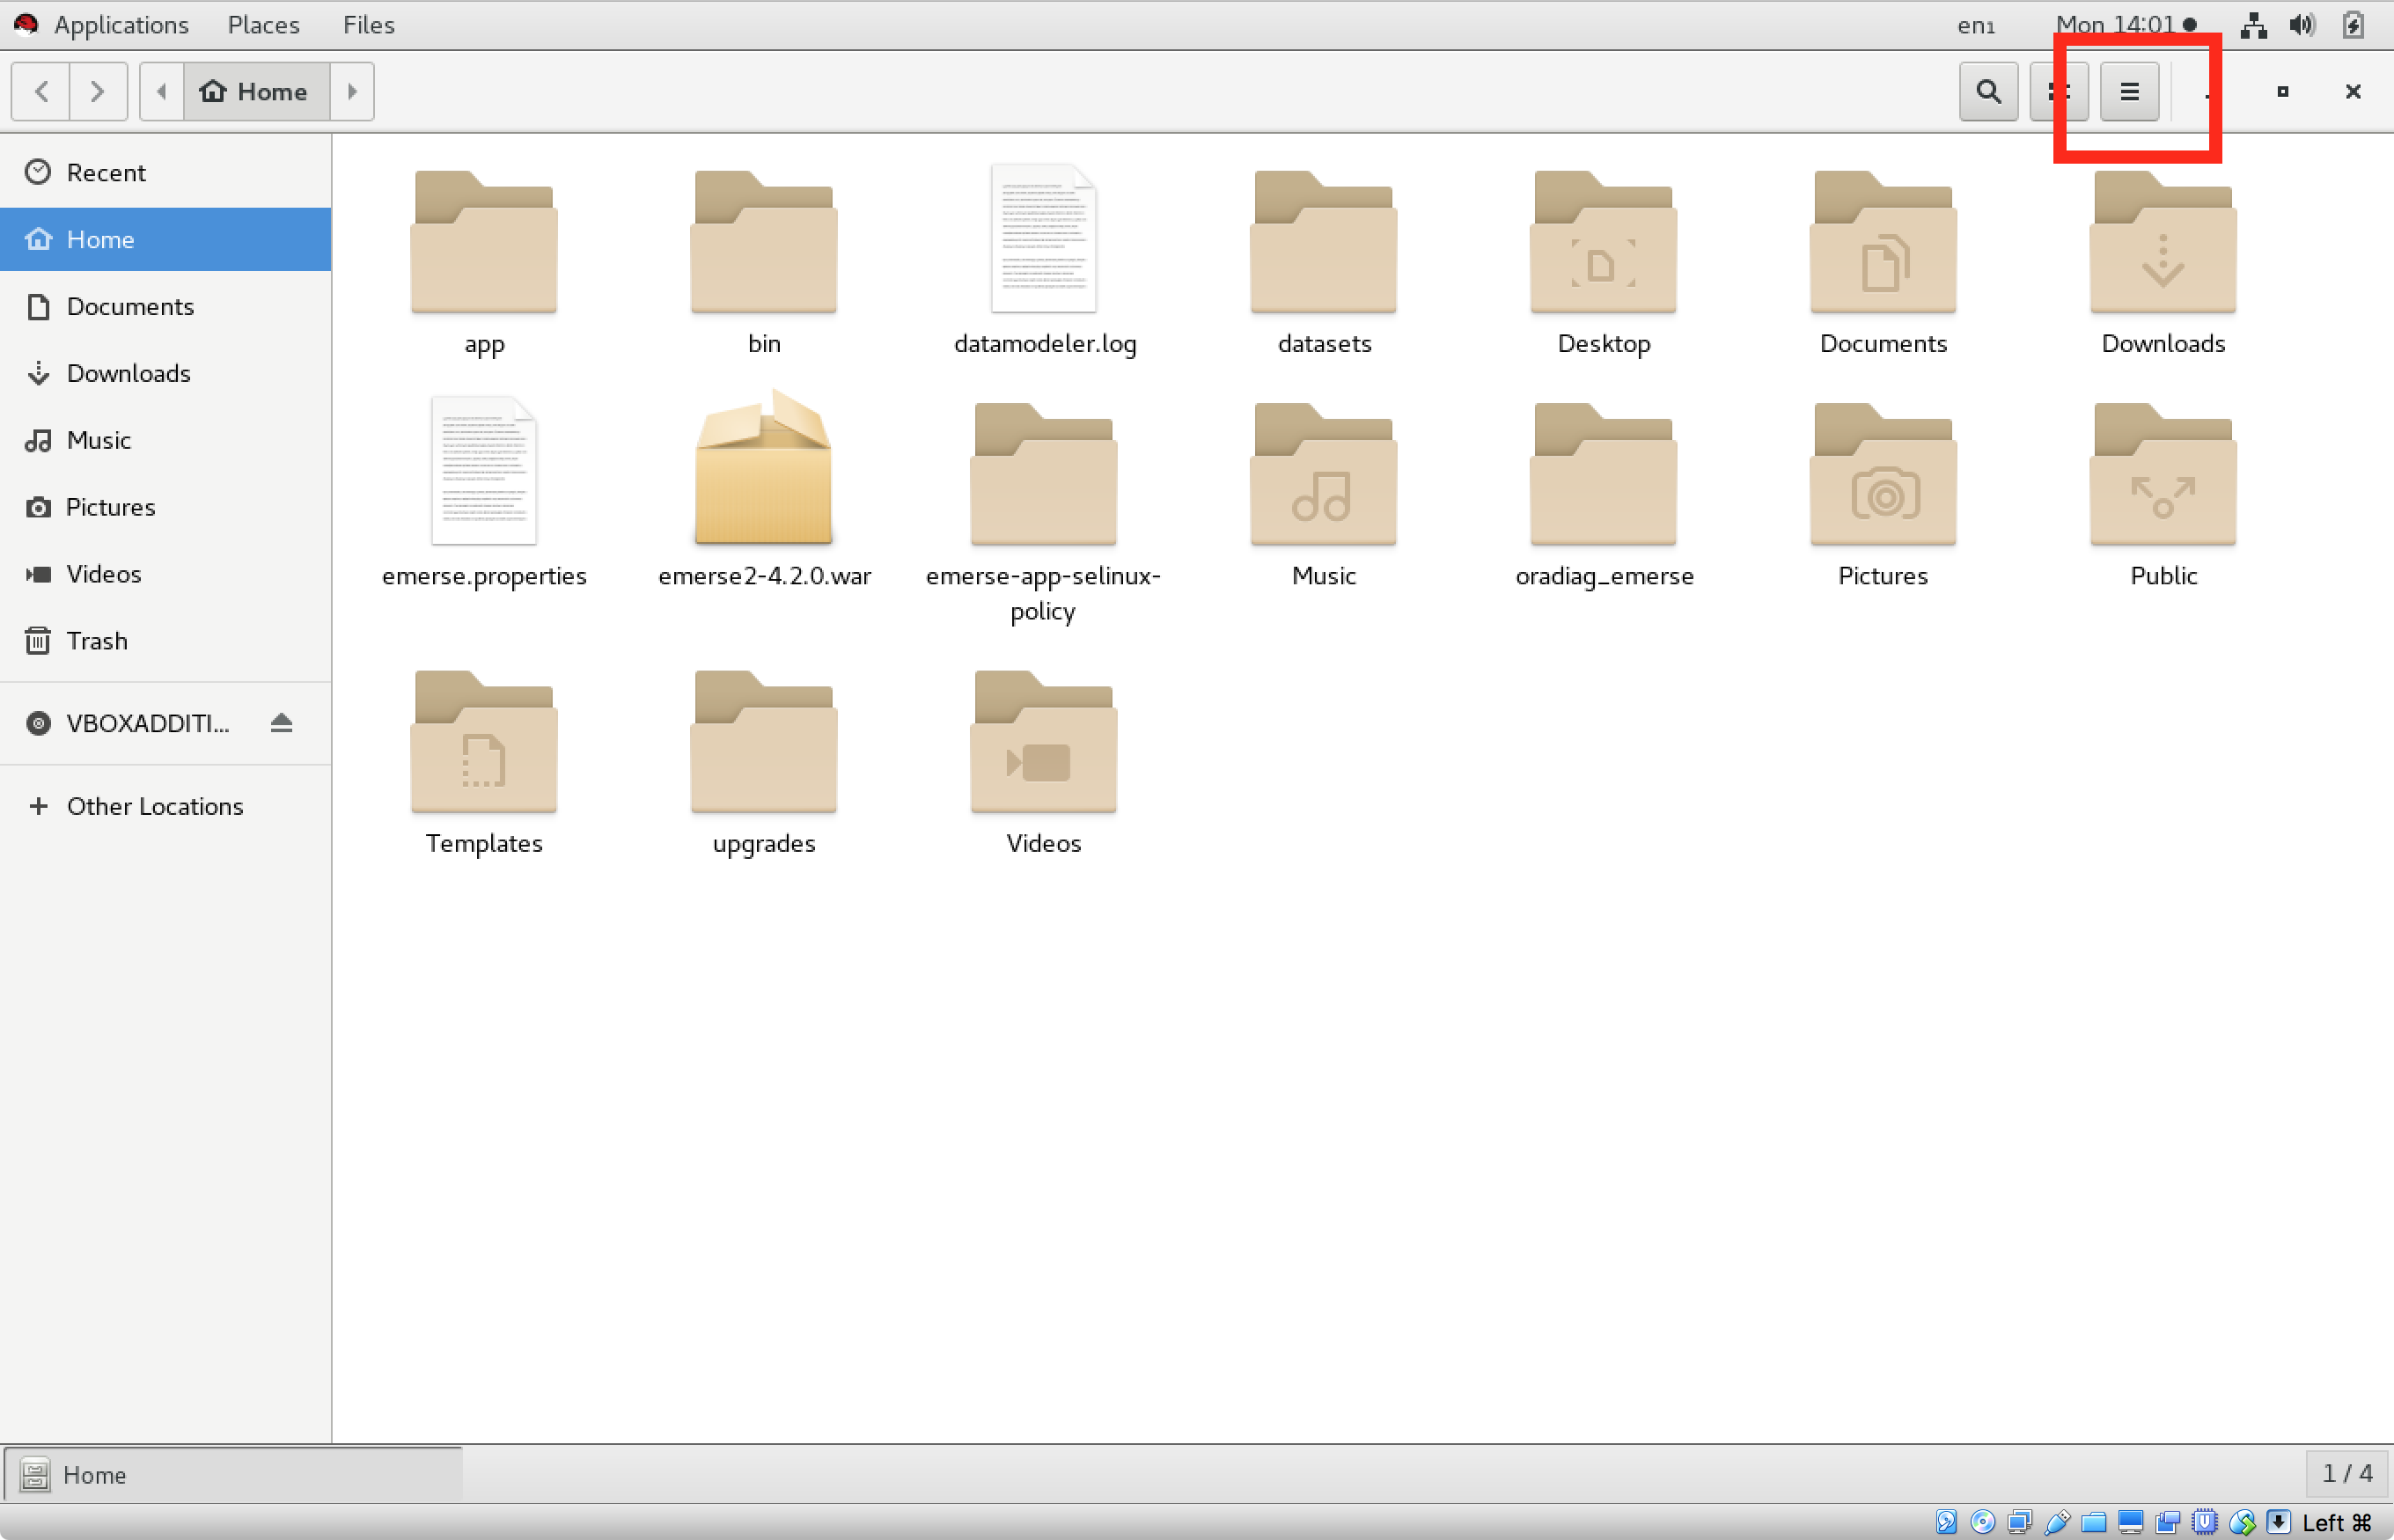
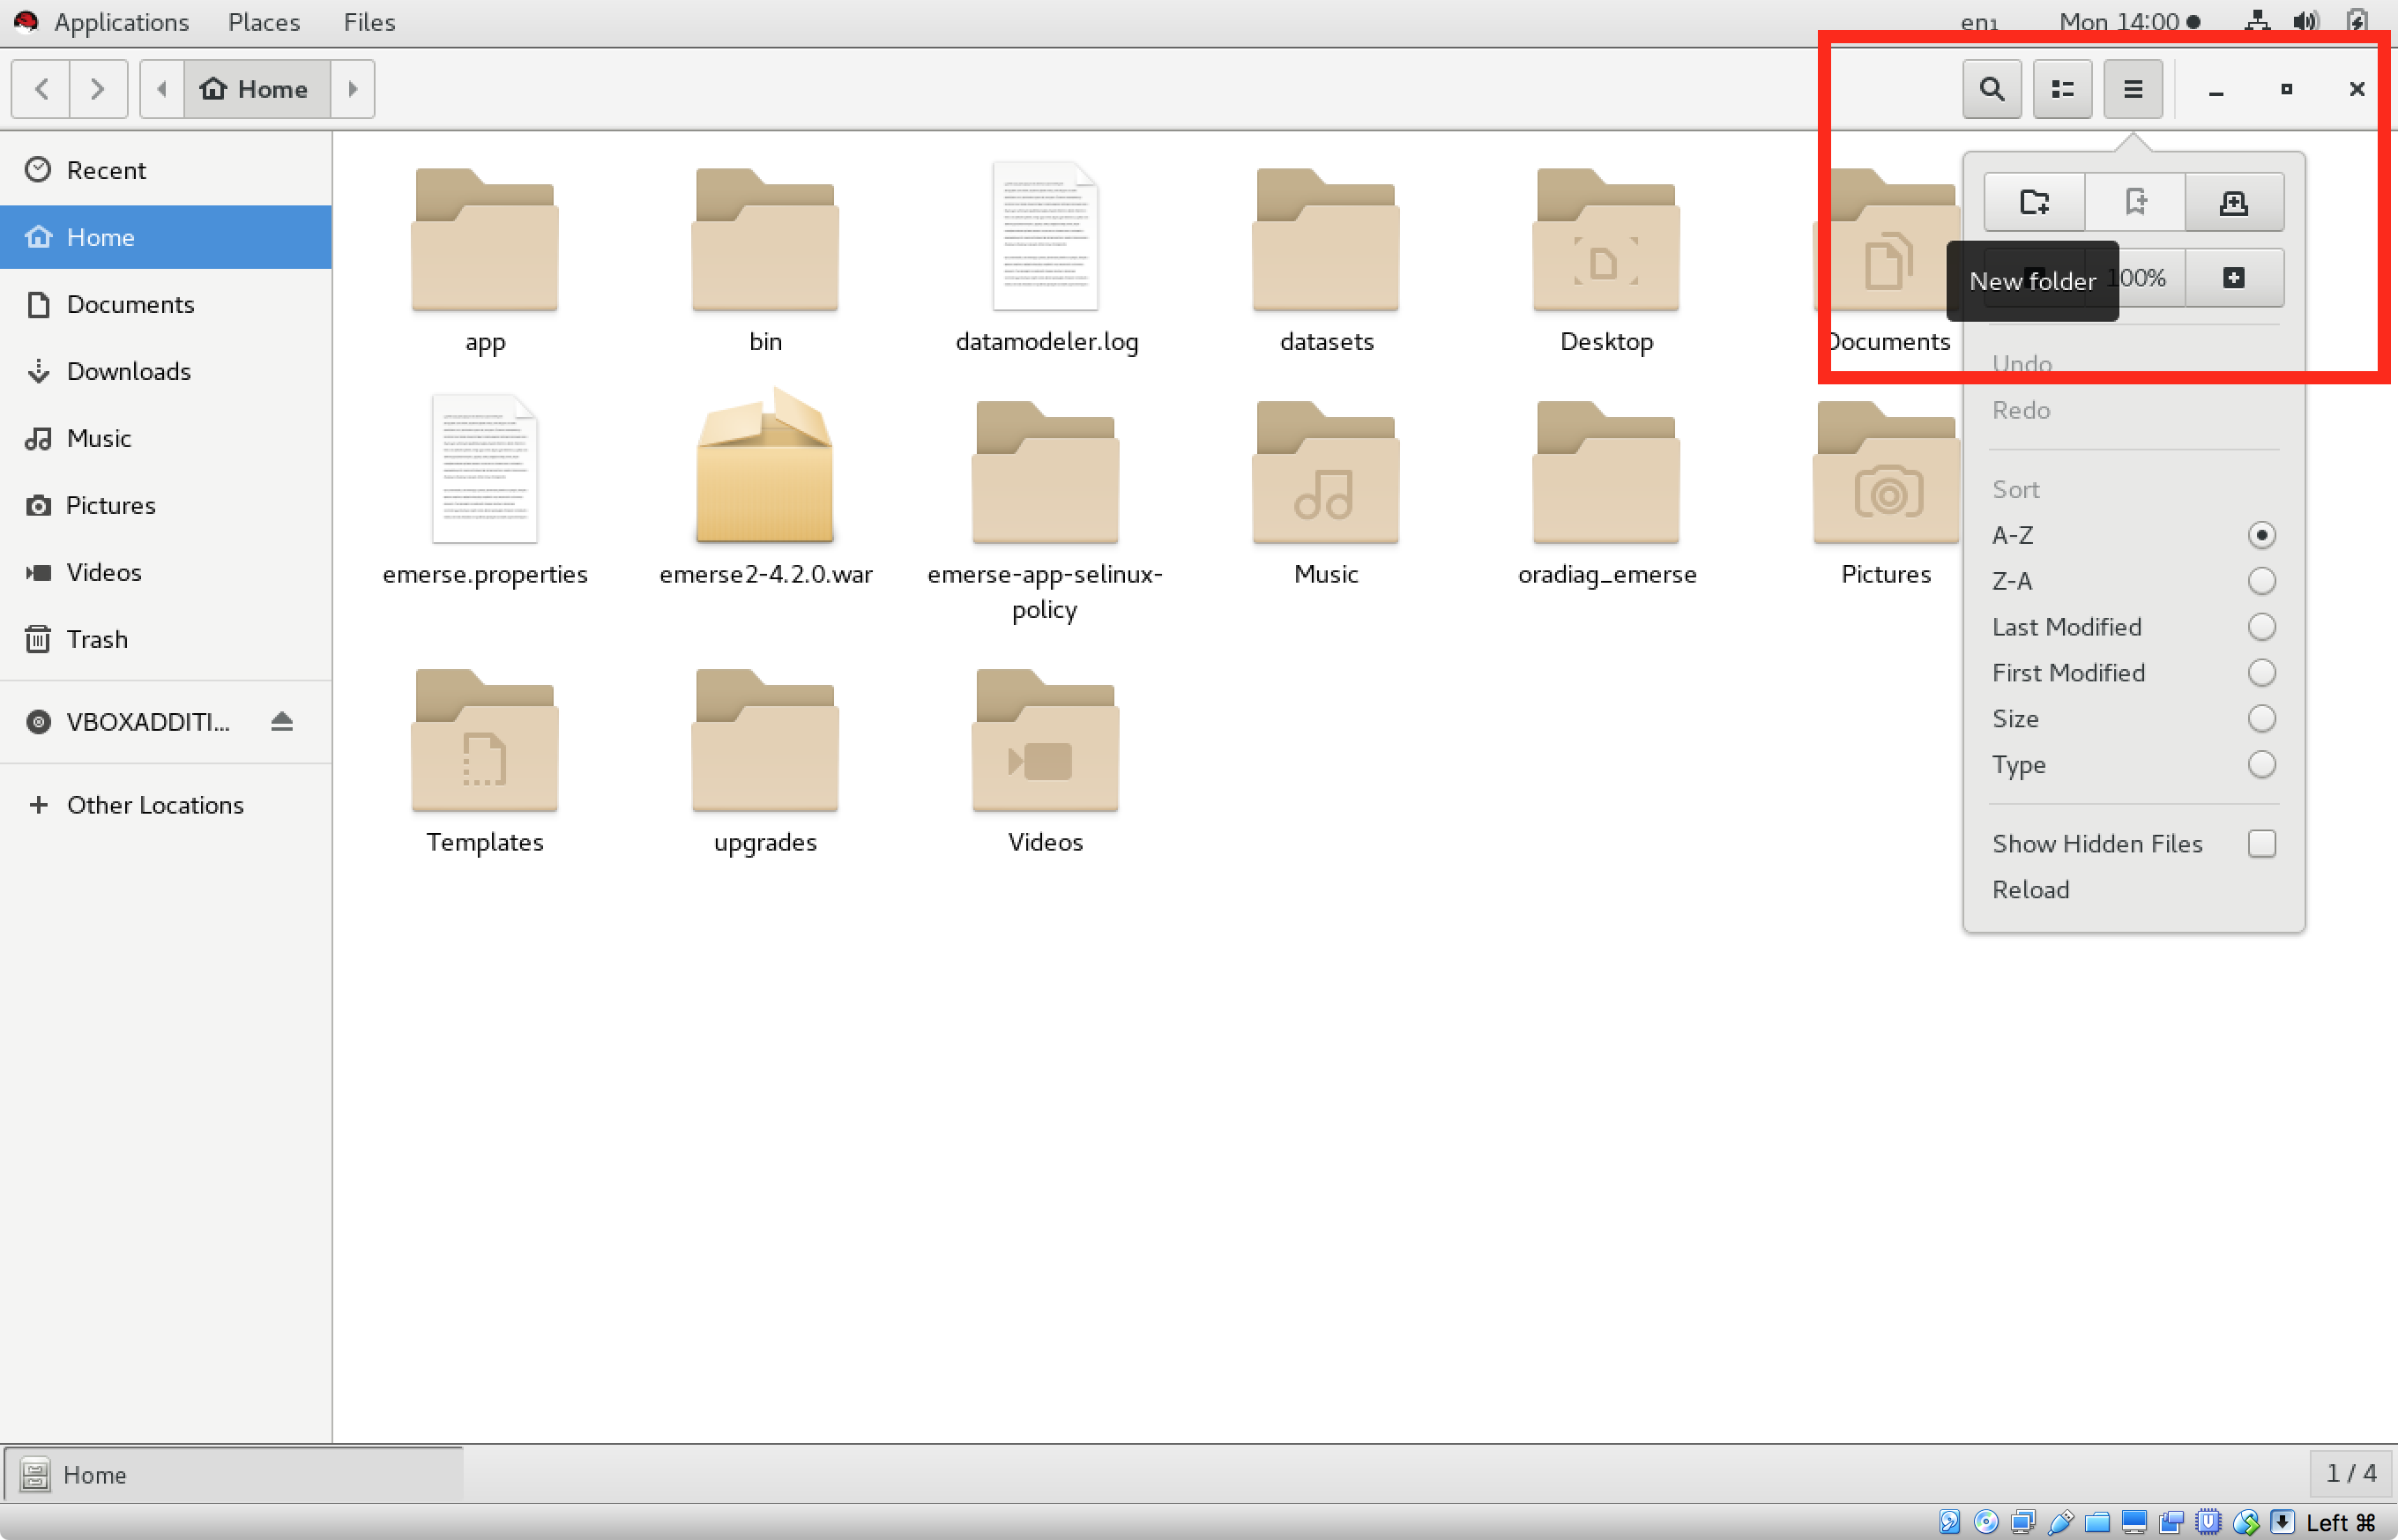
Switch to the guest OS (Linux) and navigate to the
Home Directoryby double-clicking on the Home folder on the Linux Desktop or choosingPlaces → Homefrom the menu bar. In the window that opens click on the icon with the horizontal lines in the upper right corner of the window and then chooseNew Folder.
-
Give it the same name as the one given for the folder on the Mac:
vboxsharedfolder -
In the Linux OS go to the menu bar and choose
Applications → Favorites → Terminal

-
At the Terminal prompt type in:
sudo mount -t vboxsf vboxsharedfolder /home/emerse/vboxsharedfolder/
Then enter the password: demouser
Close the Terminal window.
At this point if you open the vboxsharedfolder on the Linux OS you should be able to see any files that are in the equivalent folder on the Mac Desktop.
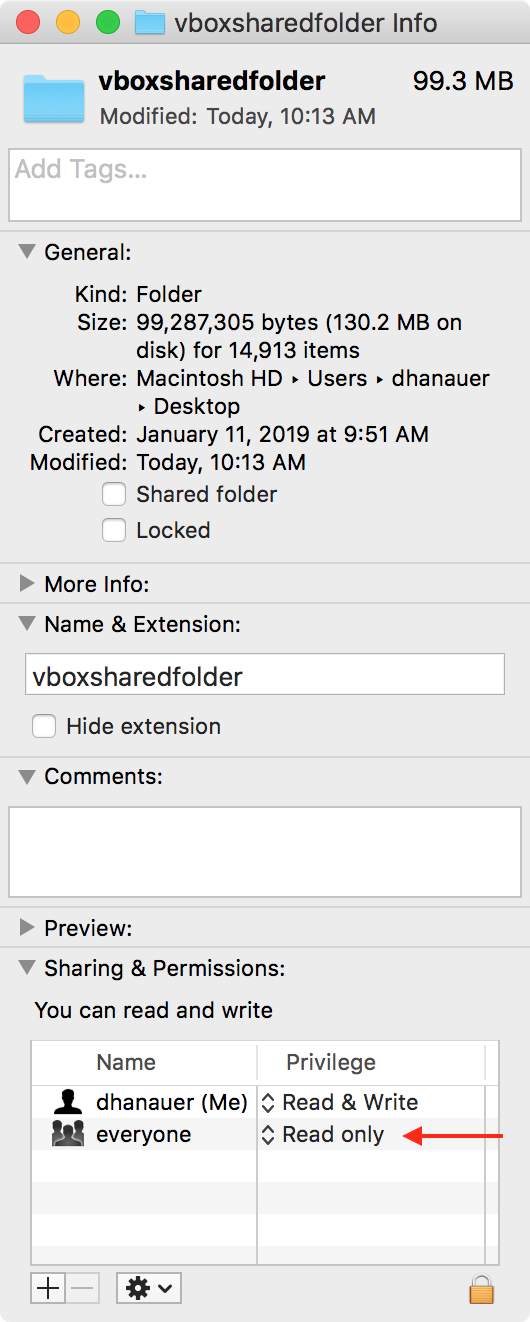
If it is still not possible to access the vboxsharedfolder on the Mac from the Linux OS, it may be necessary to verify that the privileges on the folder on the Mac side are set correctly. To check, click once on the folder (on the Mac side) to select it, then press command-I for Get Info. Look at the bottom of the small info window where it shows Sharing & Permissions and make sure that for "everyone" it displays Read only or Read & Write. See screen shot below for an example.
Using the shared folder to copy the data files to the VM
Once the shared folder has been created, and the correct ‘permissions’ have been granted for access (see the prior section, “Setting up a shared directory for copying data to the VM”), you can then copy the data files to the VM. The directions for this are below.
-
Make sure the proper files have been moved to the
vboxsharedfolderdirectory on the Mac, and then open the equivalent folder on the Linux virtual machine. The files that are on the host OS should now be visible in the folder on the guest OS (the Linux VM). Keep that folder open for now. -
The next step is to then move those files to the right place on the Linux machine for importing. Go to the Linux menu bar and choose
Places → Computer. Navigate (by double-clicking the folders to open then) toapp → data → emerse_pdi_job -
Drag the files from the Linux folder
vboxsharedfolderto theemerse_pdi_job folder. These would include the files called:
documentMetadata.xlsx
patientMetadata.xlsx
sourceMetadata.xlsx
documentSources.xlsx
documents/ folder
If other files or folders with the same name are already there, replace them with the ones you are moving (or delete the older ones before copying over the new ones).
| Occasionally it has been noticed that files don’t always copy over properly from the host machine to the VM. One way to check if the file has been copied successfully is to open the file in the OpenOffice application that is pre-installed on the VM. If the file does not properly load up (e.g., OpenOffice can’t recognize the document type) then it probably won’t load properly using the PDI scripts and should be copied again. |
| Additionally, sometimes even when a file is updated on the host machine and then copied again through the shared directory, it ends up being the older (un-updated) file that gets copied over. This issue can generally be solved by renaming the file on the host, copying it over to the VM, and then renaming the copied version back to the original name. |
Make sure that the solrmap.xlsx file remains in the emerse_pdi_job folder. This file does not need to be edited but must be there for proper data import to occur. If it is not there, copy it there. Details about the file, and how to create a new one if necessary, are provided elsewhere in this document.
Using the scripts to load data into EMERSE
The directions in this section are based on the assumption that you have already created your metadata files for import and have the documents located in the documents folder as described in the previous sections of this manual. The following scripts will clear out the existing data in the system, load in the new data, and then index the documents so that they are ready to be searched. For this to work, you will need to first make sure that you have copied the updated metadata files into the emerse_pdi_job folder, and in that same emerse_pdi_job directory you have all of the documents that need to be indexed, located within a directory called documents. This includes:
documentMetadata.xlsx
patientMetadata.xlsx
sourceMetadata.xlsx
documentSources.xlsx
documents/ folder
-
Go to
Applications → Favorites → Terminal. Navigate to the proper directory. To do this, at the command prompt type:cd /app/software/PDI/jobs
-
Type the following command to remove the old data and add the new data. It may take several minutes to run.
./reload.sh
-
The
reload.shscript is actually running, in order, the following 5 PDI scripts:./runClearAll.sh ./runStagingTablesJob.sh ./runDocFields.sh ./runPatientLoadJob.sh ./runDocsToSolr.sh
The runPatientLoadJob.sh script loads the patient data into a database table. The patient data must then get copied from that database table into a Solr index called patient (used to show demographic charts). This copying will normally occur on a scheduled basis by EMERSE itself but to force the copying immediately (so that the changes can be seen immediately), follow the directions regarding Rebuilding Patient Indexes. For the standard setup on the virtual machine, use the following credentials to login:
username: emerse
password: demouser
You can check to see if the index has been updated by looking at the Solr admin page, by looking at the Last Modified time under Statistics. It won’t say 'complete', but it should report a very recent time frame, such as within the last few minutes. If not, wait until it is complete. Refresh the page from time to time to see if the Last Modified status has changed. Note, however, that erasing the prior data before loading the new data (which occurs when running the reload.sh script) will also result in a recent time frame for the Last Modified time. Therefore, also check that the Num Docs for the patient index matches the total number of patients added to the system.
The scripts used on the VM to load data were built using the Pentaho Data Integration (PDI) tool, which is installed on the VM. PDI provides a graphical way to set up workflows and data transformations that can be useful for loading data. To explore this on the VM, use the Terminal application to go to /app/software/PDF/data-integration/ and type ./spoon.sh. This will bring up the user interface for the tool. You can open one of the scripts (such as load-docfields.ktr) to see the contents, and then explore the components in more detail.
|
Once this is complete, it is time to stop and then start Tomcat and Solr (password demouser will be required for each command) from the Terminal:
systemctl stop tomcat
systemctl stop solr
systemctl start tomcat
systemctl start solr
It may be necessary to wait a few minutes minutes until everything fully starts up again before trying EMERSE.
The Synchronize function should also have updated the patient counts as shown in the EMERSE UI. However, if for some reason it does not show up you may have to wait about 30 minutes for the Spring Scheduler within the app itself to auto-update these stats periodically. This also may require logging out of and then logging back into EMERSE for the change to be displayed in the application.
The virtual machine currently has the date range for the documents “hard-coded”, meaning that they will not change even if the actual imported documents have a different date range. This is a configuration option and can be changed. This won’t matter unless a search was done for a specific date range, otherwise EMERSE will always search across all documents regardless of dates. Nevertheless, it is possible to change this so that the system will dynamically change the date range to accurately reflect the dates of the documents. The following directions detail how this can be done:
-
In the menu bar of the Linux VM, choose
Places → Computer -
Then navigate to the folder:
app → software → emerse → apache-tomcat-x.x.xx → webapps → emerse → WEB-INF → classes
| The x.x.xx is a placeholder for the installed version of Tomcat, which will change as the system is updated. |
-
Find the file called
project.propertiesand double click it to open it in a text editor. Then find the two lines:
-
batch.updateIndexMinDateFromSOLRIndex=false -
batch.updateIndexMaxDateFromSOLRIndex=false
-
The first line represents the command to automatically update the minimum date range of the documents, and the second line represents the command to automatically update the maximum range of the documents. Set both of them to true, as in:
-
batch.updateIndexMinDateFromSOLRIndex=true -
batch.updateIndexMaxDateFromSOLRIndex=true
-
Then, save the file.
-
Restart the Tomcat webserver by going to the Terminal application and typing:
systemctl stop tomcat
systemctl start tomcat
-
The password
demouserwill be required after issuing the stop and start commands.
The code that reads this properties file and updates the dates is embedded in the Java Virtual Machine (JVM) so it can’t be run automatically. However, it should update on its own about every 30-60 minutes once the properties file has been edited and saved, and Tomcat has been restarted.
Incrementally adding new data
New data (patients and documents) can be added after an initial loading of data. To do this, clear out the prior two spreadsheets (documentMetadata.xlsx and
patientMetadata.xlsx) that were used to load the previous data. Also clear out the documents folder that contained the previous documents that needed to be loaded. Then add in just the new data to be loaded (new patients, new documents, and new document metadata) into the two spreadsheets, and add the documents to the documents folder. Then, simply go back to the directions in the section: “Using the scripts to load data into EMERSE” but run just these two scripts:
./runPatientLoadJob.sh
./runDocsToSolr.sh
And finally, stop and start the servers:
systemctl stop solr
systemctl stop tomcat
systemctl start solr
stystemctl start tomcat
Incorporating PDFs into the VM
For demonstration purposes it may be useful to include documents that are in PDF format since clinical documents are sometimes stored in that format. The directions below do not cover all aspects of handling PDFs, since it can be a complex task, but some basic instructions are provided. Also note that, as described elsewhere in this manual, this VM is provided primarily for demonstration purposes so if you plan to include any documents that contain real protected health information it is best to check with your local compliance and IT groups for guidance.
The following figure provides a high-level overview of the process for incorporating PDFs into the EMERSE VM, with more details described below.
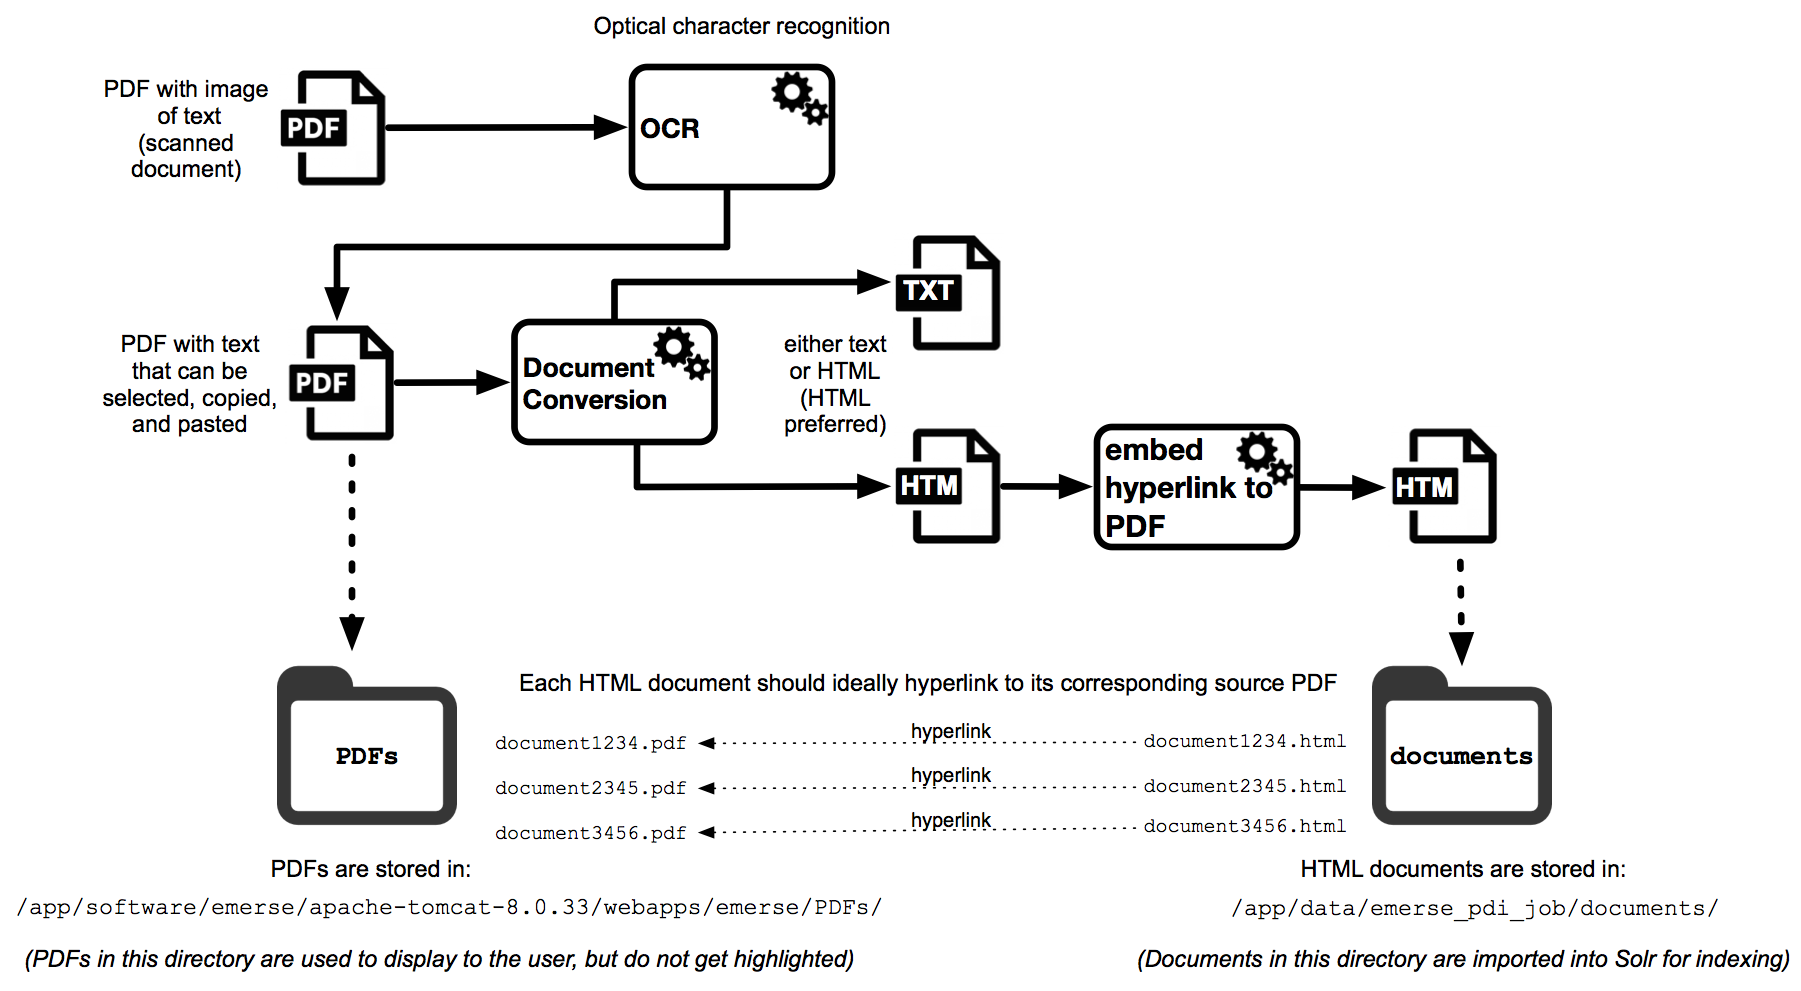
Note that the location of the PDF directory in the example diagram above is not necessarily where that directory must be located. This is just for demonstration purposes. EMERSE has no built-in expectation of where PDFs should be located, but including them within the Tomcat webapps directory is a simple way to make them accessible to the web application.
The first step for incorporating a PDF into EMERSE is to determine if the PDF contains actual ‘text or just an image (a scan/photograph) of text. PDFs created from software such as Microsoft Word should already have the text incorporated inside the PDF, but if a document was scanned then it will likely contain only an image of the text. One way to tell the difference is to try to select, highlight, and copy the text inside the PDF and paste it into a word processor. If you can select, copy and paste it, then the text is already incorporated. If the text can’t be selected, copied, and pasted, then it is likely only an image. If the text is an image then you may need to use optical character recognition (OCR) software to turn the pictures of the text into actual computer text that can be copied or, in the case of EMERSE, extracted and indexed. There are various options for OCR, including one built into Adobe Acrobat, and there is also the open source Tesseract software that was developed by Google. OCR is not built into EMERSE.
If the text is already incorporated into the PDF then the next step is to extract the text and convert it to a document that Solr can handle natively, which would be either HTML or TXT. Details for how this can be done on a Mac are described in the section “Preparing documents for import: File Conversion.” One possible approach is to convert PDF to RTF and then RTF to HTML (to preserve any formatting), or to even simply convert PDF to TXT and just use the plain text file for importing into Solr. Note that Apache also provides a tool for extracting text from PDF (called “Tika”) that can work with Solr, but it is not an automated process—in other words, you can’t just push a PDF document to Solr like you could a plain text or HTML document.
For the following example of how these PDFs can be incorporated into EMERSE, assume that the PDF text has been extracted and converted to a similarly named HTML document. Each PDF document should ideally have a name with no spaces (so it can easily be displayed within a web browser).
Store all of the PDF documents in a directory called PDFs (it can be any name, but for this example that is the name used). Then, in the corresponding HTML document with the extracted text, add a link to the original PDF from the HTML document. For example ssume that the original PDF is called document_12345.pdf and the corresponding HTML document with the extracted PDF text is called document_12345.html. The PDF document will be stored in a directory called PDFs (location of the directory is defined below), and the corresponding HTML document will be in the documents directory, which is the one used for importing the documents into Solr.
Inside the HTML document, within the body of the text, add a link to the PDF, for example:
<html>
...
<body>
<a href="PDFs/document_12345.pdf" target="_blank">Link to original PDF</a>
...
</body>
Note that adding this link/URL could be done automatically with some simple coding such as identifying the <body> tag and appending the URL immediately after that.
At this point, the documents and metadata can be loaded into EMERSE using the directions provided elsewhere in this manual. The only other thing that needs to be done is to move the directory of PDFs (called PDFs) over the to virtual machine. That directory should be copied to:
/app/software/emerse/apache-tomcat-x.x.xx/webapps/emerse/
| The x.x.xx is a placeholder for the installed version of Tomcat, which will change as the system is updated. |
Currently, EMERSE can highlight the extracted text in the HTML document that EMERSE indexed, but EMERSE cannot highlight the corresponding text within the PDF itself. However, linking to the original PDF file containing the text should still be useful for users, and a user could still use the “Find” command (control-F on Windows, command-F on Mac) within the web browser or the PDF viewer to look for the text within the PDF. This can still be a timesaver.
Security Considerations
The virtual machine that EMERSE runs on or may or may not be able to access the Internet depending on how it, and the host Virtual Box application, is configured. If real patient data were to be loaded into the VM, it will be important to understand this configuration to make sure the security settings are in compliance with your institution’s policies. It may be important to contact your local IT department to obtain guidance about how the VM is configured to ensure that the data are kept secure.
If the networking on the VM is set to NAT mode, then it is basically “sandboxed” and invisible to the outside world, with any exceptions defined in the NAT port forwarding table. However, if the VM is in bridged mode then the VM would be completely visible to the outside world since it essentially would have its own IP address on the network. If the VM (and host computer) is running behind an institutional firewall, additional protections may be in place because of where it is running, but that protection would not be available if the host machine were running outside of that firewall. Again, consult with your local IT group on advice about the best way to configure the VM to ensure security.
Of course, one way to reduce exposure to the outside world is to disconnect your host machine (the computer running the VM) from the Internet entirely (unplug it from Ethernet, turn off wireless, etc). When accessing EMERSE from the VM, a connection to the Internet is not necessary since everything runs locally.
Also, note that the VM ships with a standard username and password for all aspects of the system (Linux, EMERSE login, Oracle database, etc). These should be changed if real patient data were loaded into the system. Additionally, the Solr API in this demonstration system has no password set at all, which means it can be accessed without any authentication. This is useful for testing and demonstrations, but in a production system that API should be protected.
Some of the default passwords required by the application are located in the project.properties file which is itself located in:
/app/software/emerse/apache-tomcat-x.x.xx/webapps/emerse/WEB-INF/classes/
| The x.x.xx is a placeholder for the installed version of Tomcat, which will change as the system is updated. |
Making EMERSE available on the host machine
There may be cases in which you want to let EMERSE run on the virtual machine (the guest operating system) but would prefer to access EMERSE via the browser on your primary machine (the host operating system). This is possible to do, but requires some configuration. Further, this may make the system more accessible to the outside world, so it is important to consider any security implications about changing how the system might be accessed from outside the VM itself.
For those wishing to proceed, here are the directions, assume Virtual Box is already installed:
-
Launch Virtual Box
-
Install the VM VirtualBox Extension Pack. This can be found here:
https://www.virtualbox.org/wiki/Downloads
-
Download the file, which has a
.vboxextension, and then double-click on it to install it.
-
In the VirtualBox app itself (not the virtual machine), go to
VirtualBox → Preferences -
Go to the
NetworkTab,-
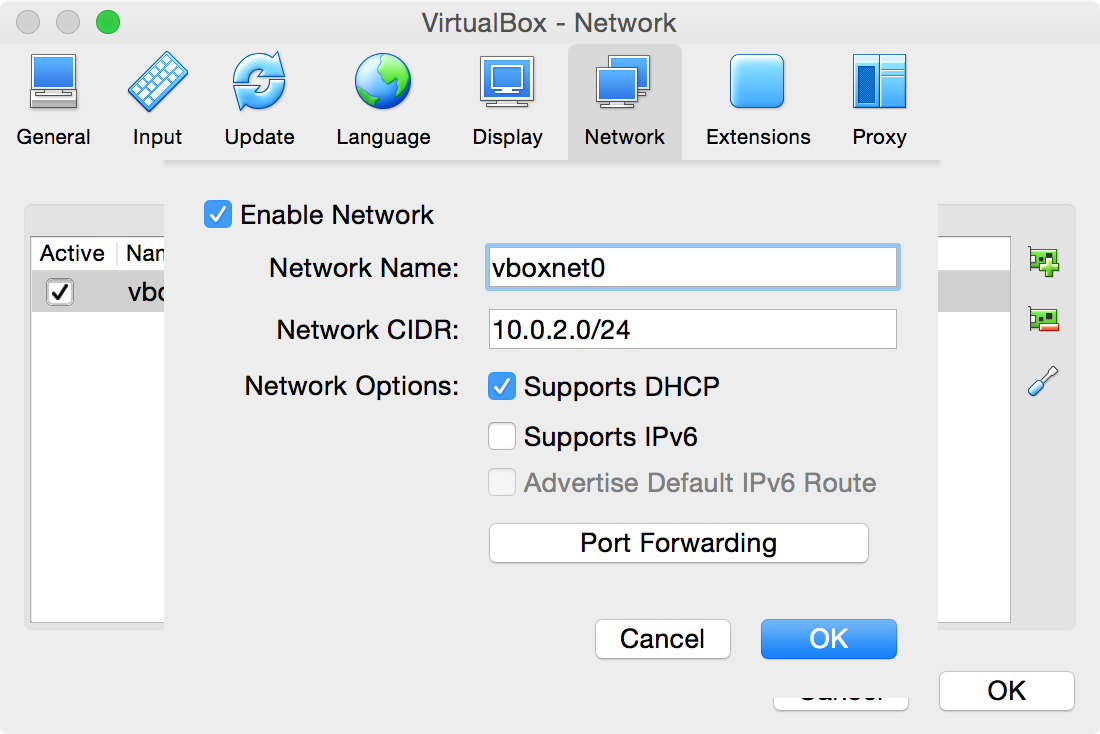
Right click in the table, or click on the Plus icon to
Add new NAT network -
Can give it any name, but here we use
vboxnet0 -
Can leave the other settings the same for now (will ignore Port Forwarding for now)
-
Click
OK
-
-
In the main VirtualBox application, click once on the correct virtual machine in the list to select it, and the click on
Settings.
-
In the Settings section,
-
Make sure
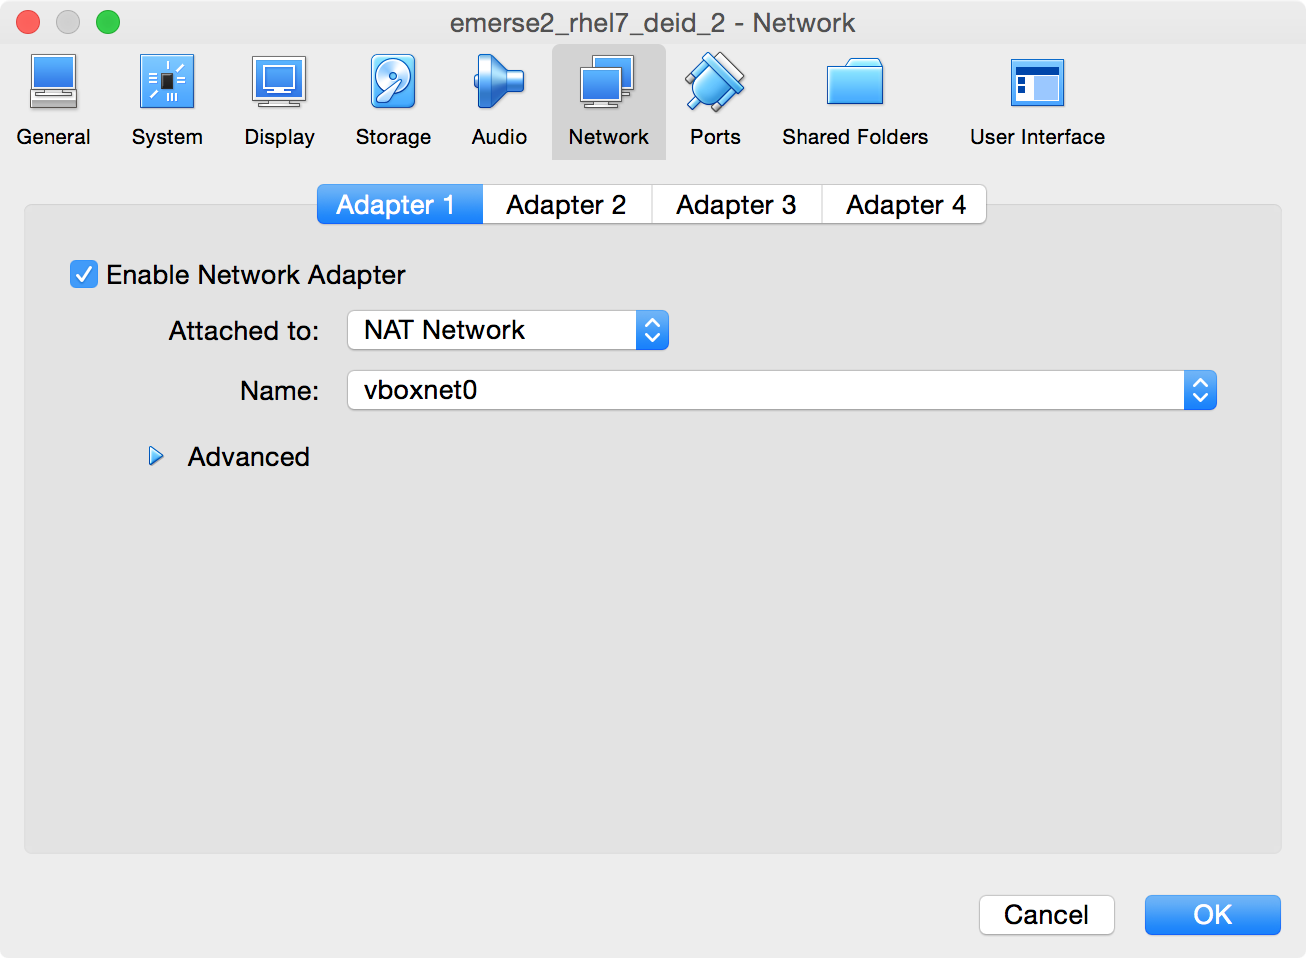
Enable Network Adapteris checked -
Set it to
Attached to: NAT Network -
Under
Name, select the name given to the Network Name above, in this casevboxnet0 -
Can leave
Advancedunchanged. -
Click
OK
-
-
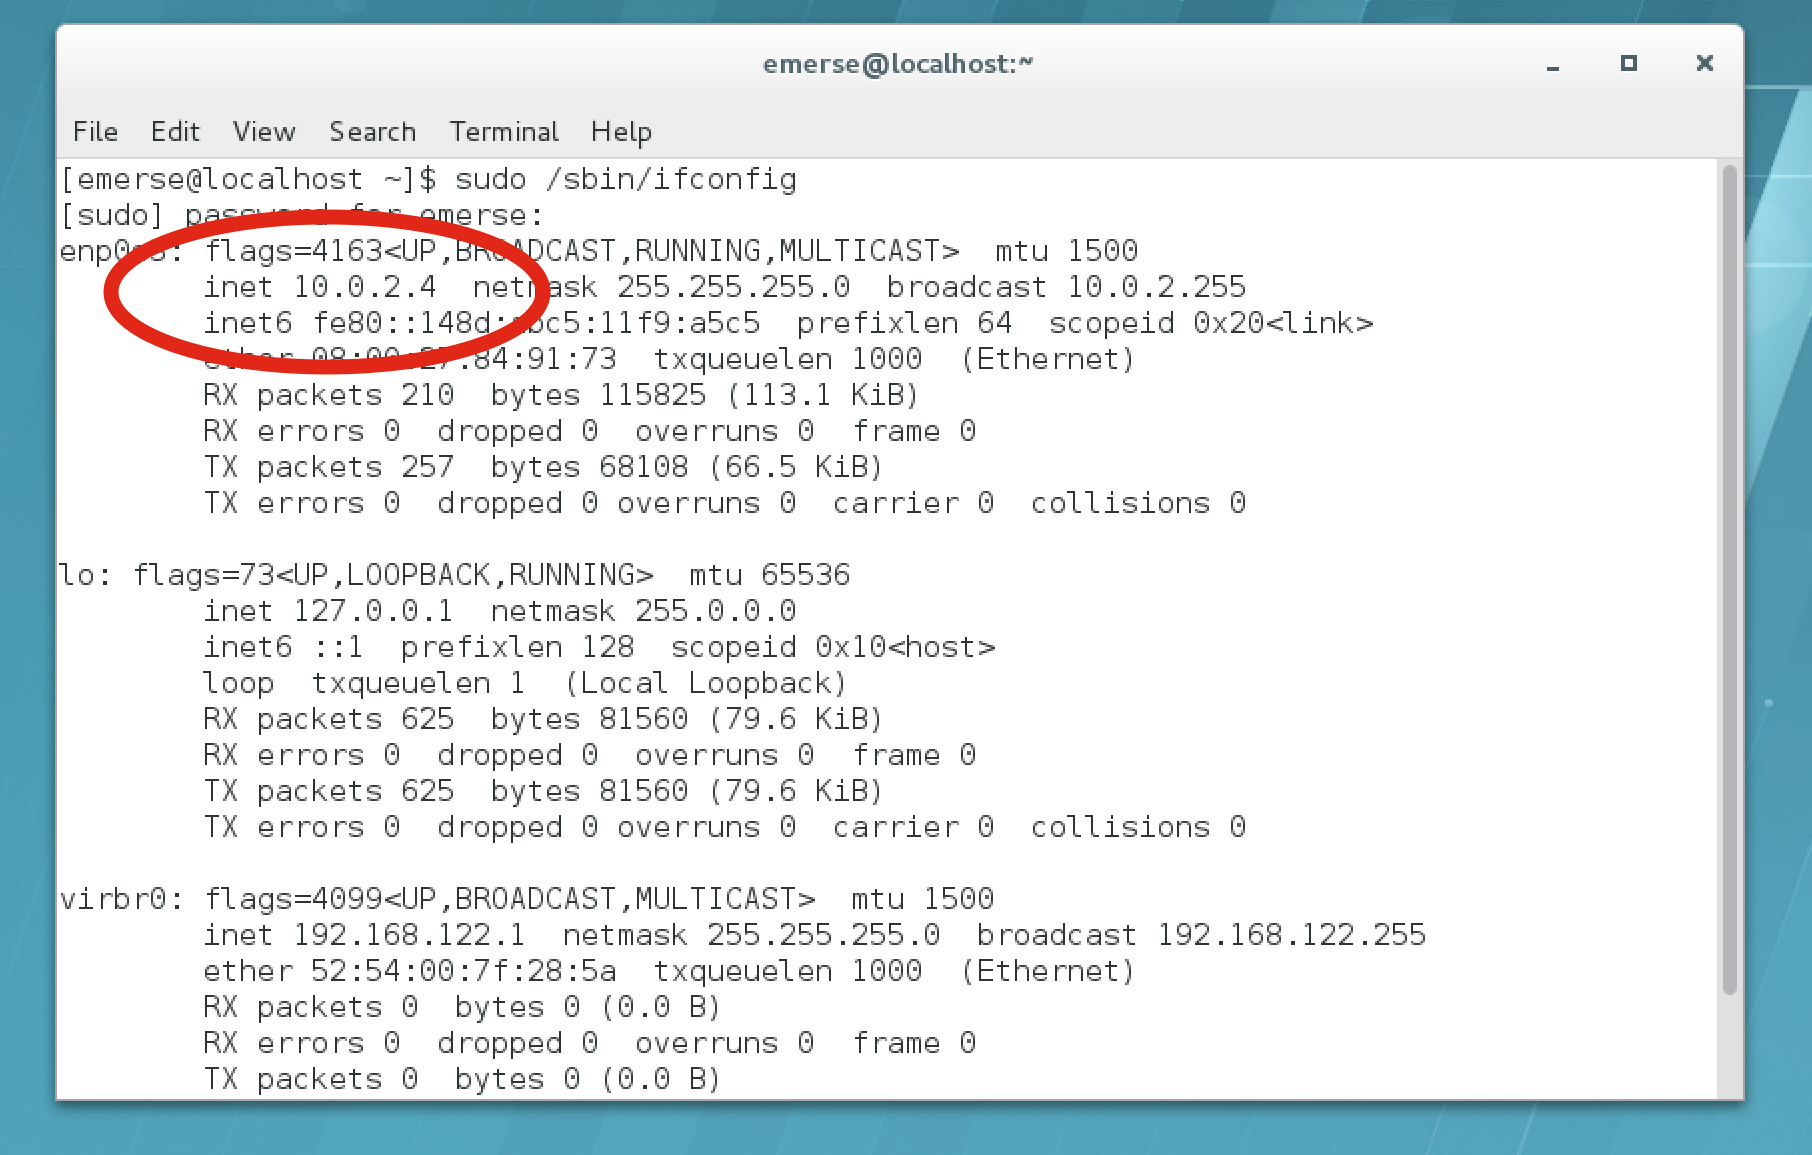
Start the VM by selecting it in the VirtualBox app, and the clicking the green
Startarrow. -
Login to the VM (username:
emerse, password:demouser) -
Go to
Utilities → Terminal, then type:sudo /sbin/ifconfig
-
Write down the IP address shown near the
enps03. In the example screen shot below it saysinet 10.0.2.4
-
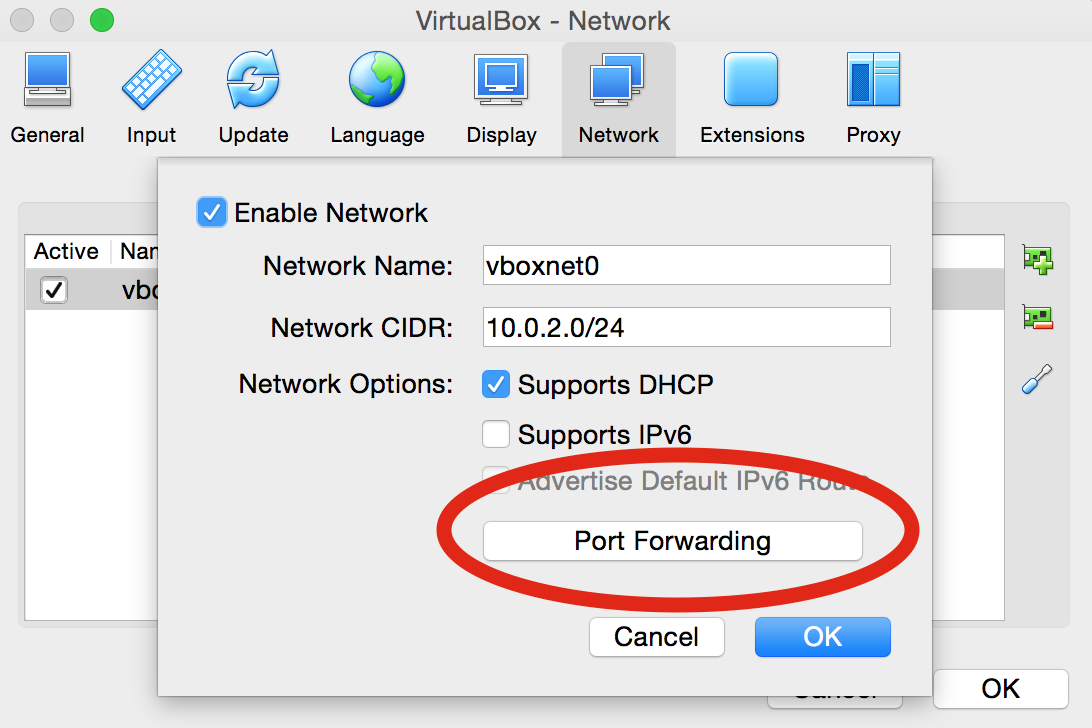
Go back to the VirtualBox VM application (not the VM itself) and choose
Preferences…and got to theNetworktab, and in that table go to theNAT Networkssection -
Go to the Edit section for the NAT Network
vboxnet0by right-clicking toEdit NAT Network, or by clicking on the small screwdriver icon:
-
Click on the
Port ForwardingButton:
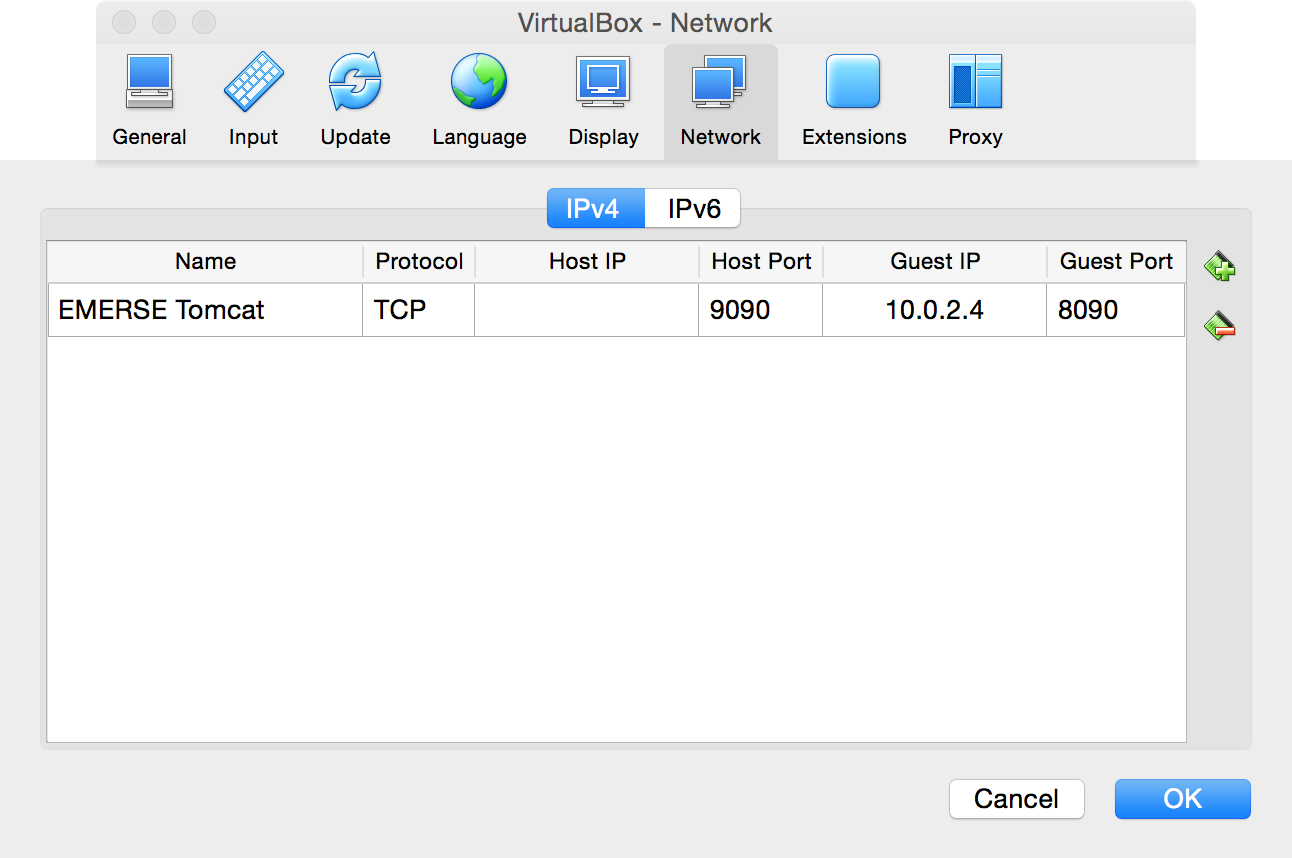
-
Make sure the
IPv4pane is selected, then,-
For
Name, can enter anything, such asEMERSE Tomcat -
Set
ProtocoltoTCP -
For
Host IP, leave it blank -
For
Host Portenter9090 -
For
Guest IPenter in the prior IP address that was written down (in this example it is10.0.2.4, but that may not always be the case, and it may even change from time to time but hopefully not). -
For
Guest Portenter8090
-
-
If the actual EMERSE VM is running, it may be necessary to turn the network settings off and then on again to have them change:
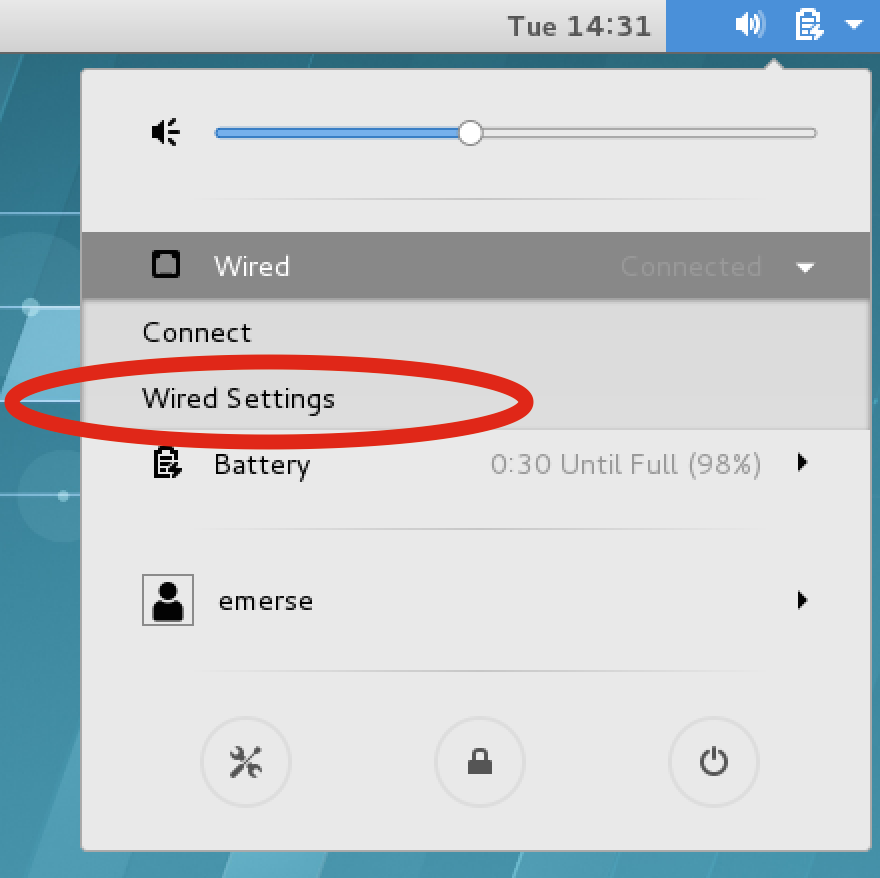
In the upper right of the VM screen click on the icons, then Wired → Wired Settings, then turn the connection OFF, then ON again.

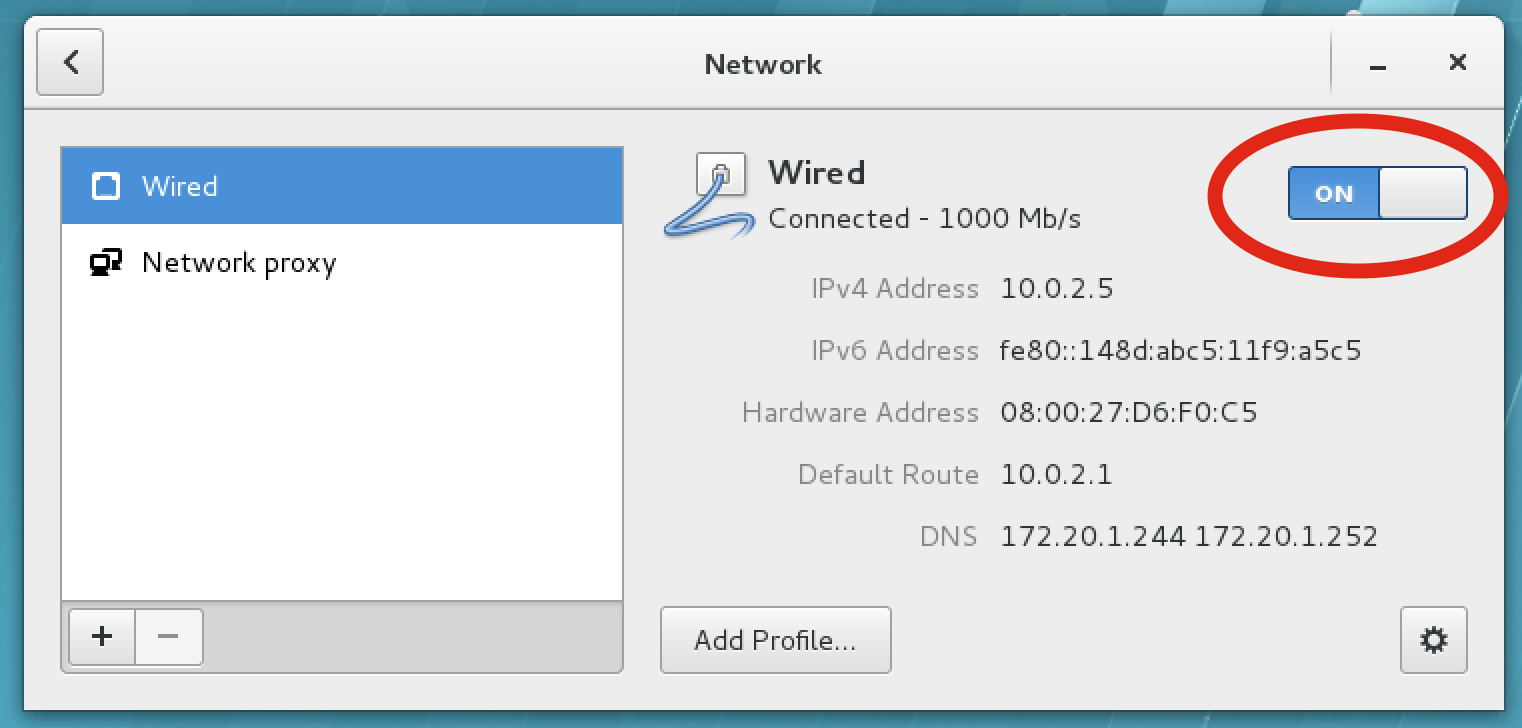
At this point should it should now be possible to go to the browser on the host machine (not the VM) and enter the URL:
localhost:9090/emerse/